第1步:你需要什么。
《从技术上讲,大多数基础产品教程通常以“Hello World!”开头。例如,甚至是一个“Blink”示例,由于您在某些时候使用过Arduino或Raspberry Pi,因此您可能已经非常熟悉它。但是我不想从头开始,因为每个人都在做同样的事情,这使得它真的有点无聊。
相反,我想从一个实际的项目想法开始。如果你愿意的话,它既简单又可扩展到更复杂的项目构想。
以下是我们需要的项目(参考Instructable本节提供的照片):
CC03 - Arm Cortex M0 + Core
SW02 - VOC和气象传感器(使用BOSCH的BME680传感器)
xBUS连接器 - 启用不同xChip之间的I2C通信(x2)
xPDI连接器 - 启用编程和调试(x1)
步骤2:连接件
要将所有部分连接在一起,我们将首先从1个xBUS连接器和xPDI连接器开始。
按照我提供的图像,注意xChip的方向和连接器的位置。
在IP02和&之间。 CC03 xChips,很容易识别连接点。
对于CC03,它将是南侧。对于IP02,它将是xChip的北侧。
一旦完成,我们将在CC03 xChip的西侧添加另一个xBUS连接器。
完成?
现在,只需将SW02 xChip连接到CC03的西侧。
在我们将IP02插入笔记本电脑之前,请确保为这两个开关选择以下选项:
B (左侧开关)
选择 DCE (右侧开关)
最后,我们现在准备将IP02插入笔记本电脑并开始设置Arduino IDE。
步骤3:设置Arduino IDE
同样,在这个教程中,我假设你已经熟悉了Arduino IDE环境以及如何在开发环境中管理库。
为了这个项目的目的,我们需要两个主要的库:
arduino-CORE
SW02库
将两个库下载到桌面上的某个位置。
接下来,启动Arduino IDE 。
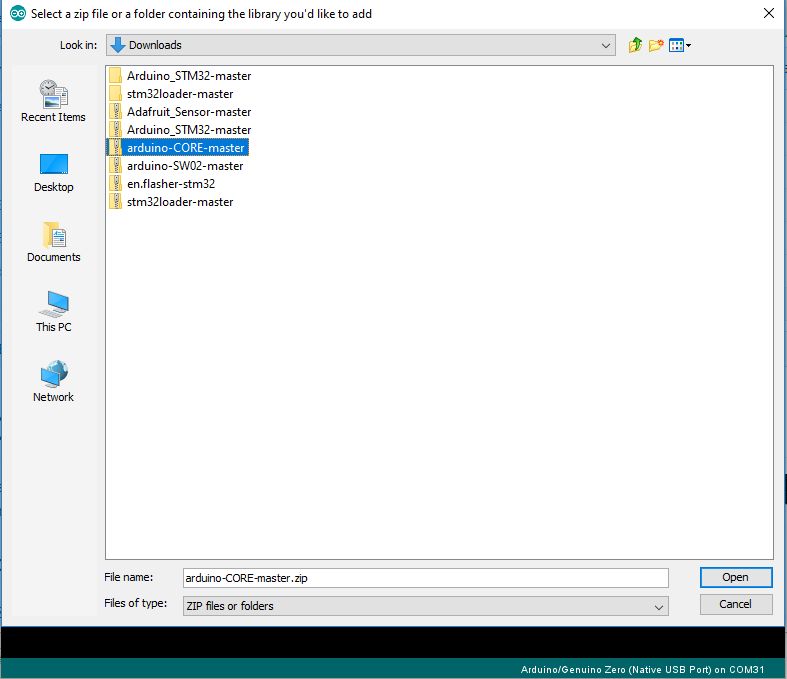
从主菜单中选择“草图”》“包含库”》“添加.ZIP库。..”
重复相同的过程两个库文件。
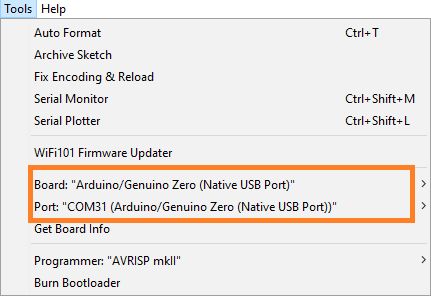
接下来,我们需要选择相关的“Board”以及“Port”。 (请注意,我还使用橙色框突出显示了必要的选项。
Board:“Arduino/Genuino Zero(原生USB端口)”
端口:“COMXX”(这应该是根据您机器上反映的COM端口。我的是使用COM31)
好吧!我知道你一直渴望进入编码,所以在下一步,这就是我们将关注的重点。
第4步:代码时间
在本节中,我将首先从已完成的项目代码中共享代码片段。最后,我将发布完整的源代码,使您可以轻松地将代码复制并粘贴到Arduino IDE源文件中。
标题文件:
#include /* This is the library for the main XinaBox Core Functions. */
#include /* This is the library for the VOC & Weather Sensor xChip. */
#define redLedPin A4
#define greenLedPin 8
#define blueLedPin 9
接下来,我们需要声明一个函数原型来传递RGB值。
void setRGBColor(int redValue, int greenValue, int blueValue);
声明SW02对象:
xSW02 SW02;
setup()方法:
void setup() {
// Start the I2C Communication
Wire.begin();
// Start the SW02 Sensor
SW02.begin();
// Delay for sensor to normalise
delay(5000);
}
现在主循环():
void loop() {
float tempC;
}
接下来,我们需要使用我们之前在程序中创建的SW02对象进行轮询,以开始与传感器芯片的通信:
// Read and calculate data from SW02 sensor
SW02.poll();
现在,我们正在读取传感器的温度读数。
tempC = SW02.getTempC();
一旦我们读完了,我们要做的最后一件事是使用一系列if 。.. else 。..控制语句来确定温度范围,然后调用setRGBColor()函数。
// You can adjust the temperature range according to your climate. For me, I live in Singapore,
// which is tropical all year round, and the temperature range can be quite narrow here.
if (tempC 》= 20 && tempC 《 25) {
setRGBColor(0, 0, 255);
} else if (tempC 》= 25 && tempC 《 30) {
setRGBColor(0, 255, 0);
} else if (tempC 》= 30 && tempC 《 32) {
setRGBColor(255, 190, 9);
} else if (tempC 》= 32 && tempC 《 35) {
setRGBColor(243, 122, 0);
} else if (tempC 》= 35) {
setRGBColor(255, 0, 0);
}
注意:如果您有兴趣知道特定颜色的相关RGB值是什么,我会记录推荐你做谷歌搜索“RGB颜色值”。有很多站点可以使用颜色选择器来选择你想要的颜色。
// If you like to, and it is optional, you can also add a delay in between polling for the sensor‘s readings.
delay(DELAY_TIME);
你可以在开始时声明DELAY_TIME常量对于程序,这样,您只需要修改它的值一次,而不是在整个程序中的多个位置。最后,我们需要控制RGB LED的功能:
void setRGBColor(int redValue, int greenValue, int blueValue) {
analogWrite(redLedPin, redValue);
analogWrite(greenLedPin, greenValue);
analogWrite(blueLedPin, blueValue);
}
最终程序
#include
#include
#define redLedPin A4
#define greenLedPin 8
#define blueLedPin 9
void setRGBColor(int redValue, int greenValue, int blueValue);
const int DELAY_TIME = 1000;
xSW02 SW02;
void setup() {
// Start the I2C Communication
Wire.begin();
// Start the SW02 Sensor
SW02.begin();
// Delay for sensor to normalise
delay(5000);
}
void loop() {
// Create a variable to store the data read from SW02
float tempC;
tempC = 0;
// Read and calculate data from SW02 sensor
SW02.poll();
// Request SW02 to get the temperature measurement and store in the
// temperatue variable
tempC = SW02.getTempC();
if (tempC 》= 20 && tempC 《 25) {
setRGBColor(0, 0, 255);
} else if (tempC 》= 25 && tempC 《 30) {
setRGBColor(0, 255, 0);
} else if (tempC 》= 30 && tempC 《 32) {
setRGBColor(255, 190, 9);
} else if (tempC 》= 32 && tempC 《 35) {
setRGBColor(243, 122, 0);
} else if (tempC 》= 35) {
setRGBColor(255, 0, 0);
}
// Small delay between sensor reads
delay(DELAY_TIME);
}
void setRGBColor(int redValue, int greenValue, int blueValue) {
analogWrite(redLedPin, redValue);
analogWrite(greenLedPin, greenValue);
analogWrite(blueLedPin, blueValue);
}
现在我们的程序准备好了,让我们来吧编程xChip!上传过程与将程序上传到Arduino板的过程完全相同。
完成后,为什么不拔掉电源插头并将其带出来进行试运行。
查看我自己在室外测试项目时创建的短暂时间视频。我还使用了PB04(双AA智能电池)xChip,当它没有连接到笔记本电脑时为项目供电,使其紧凑和移动。
我还在下一步附加了Arduino项目文件。随意下载并运行它! :)
-
指示器
+关注
关注
0文章
251浏览量
38428
发布评论请先 登录
相关推荐
一摇、二遥型配网自动化终端原理和功能介绍
浅谈架空暂态特征型远传故障指示器
线路故障指示器为什么变成红色
线路故障指示器如何复位
线路故障指示器工作原理是什么
线路故障指示器怎么判断故障点
L60系列0.230英寸(5.9毫米)防水面板安装指示器
利用Arduino的数字水位指示器电路设计
VL53L8CX TOF开发(4)----运动指示器
内置超级电容模块的故障指示器有哪些特性?


 RGB温度指示器的制作


评论