步骤1:部件
对于这个instructables你需要几个部分。
一个arduino
一个Android智能手机或平板电脑(我正在使用android 5.0.1)
以太网屏蔽
3 Led的
3 220欧姆电阻
一些跳线
a breadboard
安装了android studio的计算机
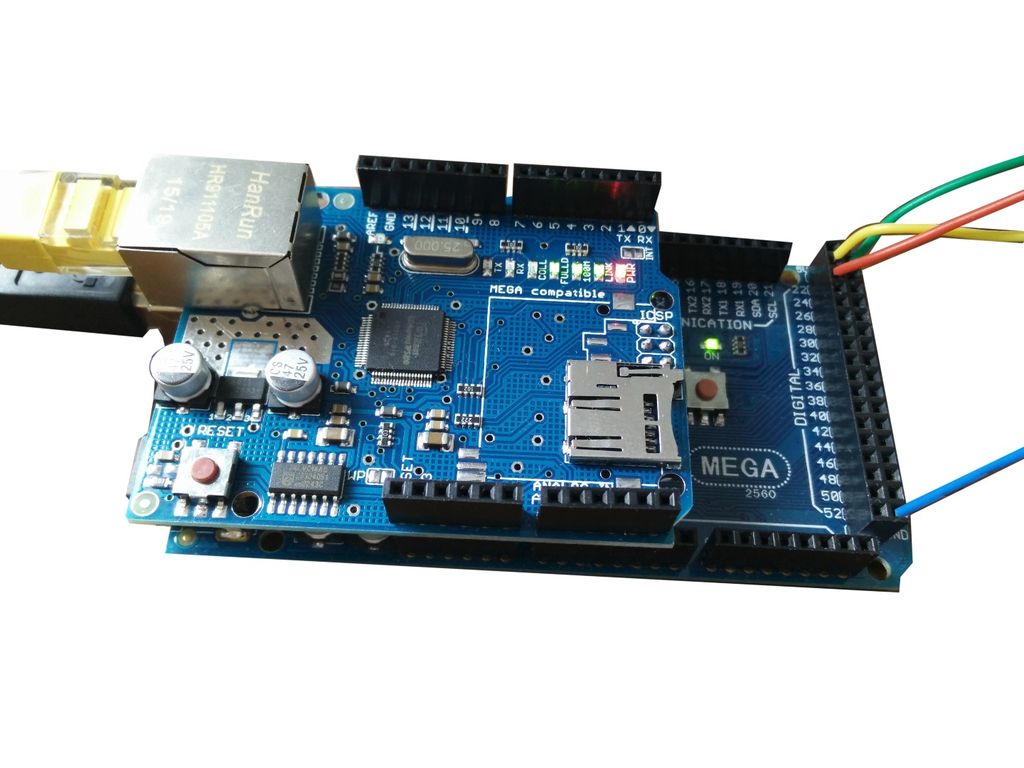
步骤2:以太网盾
我从gearbest.com获得了这个以太网屏蔽。
它立即在我的arduino mega(也来自gearbest.com)上工作
在屏蔽上你有2个SPI设备。 SD卡读卡器和用于以太网的W5100 IC。
在这个instructables中,我们只使用以太网部件。
步骤3:架构

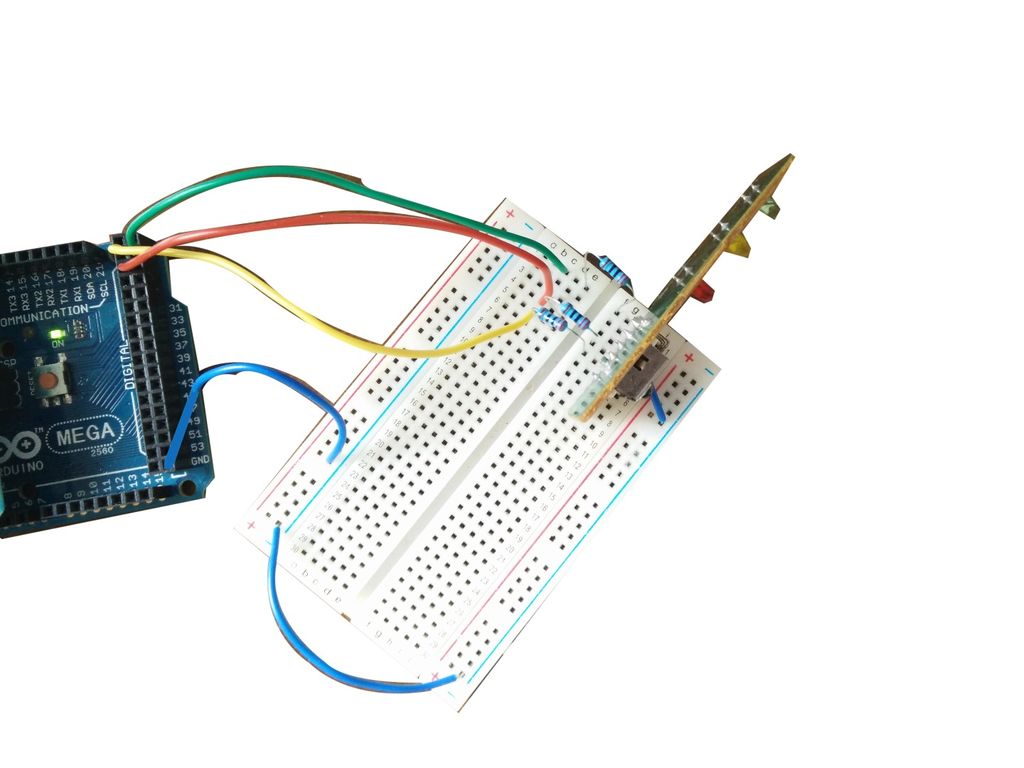
我们需要将3个led连接到arduino。您可以使用除引脚0,1,10到13和50到53之外的每个引脚。
我使用的是引脚22,引脚23和引脚24.
您还需要将arduino连接到你的本地网络。不需要互联网。
第4步:Arduino草图
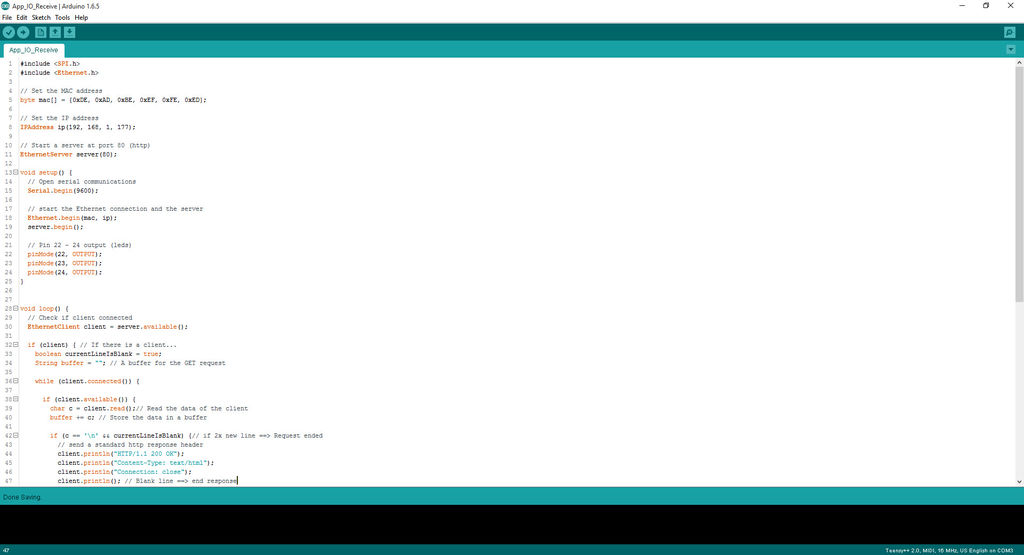
对于arduino草图,我从示例网络服务器草图开始。
我尝试记录每一件事,但如果你有问题可以随意提问!
#include
#include
// Set the MAC address
byte mac[] = {0xDE, 0xAD, 0xBE, 0xEF, 0xFE, 0xED};
// Set the IP address
IPAddress ip(192, 168, 1, 177);
// Start a server at port 80 (http)
EthernetServer server(80);
void setup() {
// Open serial communications
Serial.begin(9600);
// start the Ethernet connection and the server
Ethernet.begin(mac, ip);
server.begin();
// Pin 22 - 24 output (leds)
pinMode(22, OUTPUT);
pinMode(23, OUTPUT);
pinMode(24, OUTPUT);
}
void loop() {
// Check if client connected
EthernetClient client = server.available();
if (client) { // If there is a client.。.
boolean currentLineIsBlank = true;
String buffer = “”; // A buffer for the GET request
while (client.connected()) {
if (client.available()) {
char c = client.read();// Read the data of the client
buffer += c; // Store the data in a buffer
if (c == ‘ ’ && currentLineIsBlank) {// if 2x new line ==》 Request ended
// send a standard http response header
client.println(“HTTP/1.1 200 OK”);
client.println(“Content-Type: text/html”);
client.println(“Connection: close”);
client.println(); // Blank line ==》 end response
break;
}
if (c == ‘ ’) { // if New line
currentLineIsBlank = true;
buffer = “”; // Clear buffer
} else if (c == ‘ ’) { // If cariage return.。.
//Read in the buffer if there was send “GET /?。..”
if(buffer.indexOf(“GET /?led1=1”)》=0) { // If led1 = 1
digitalWrite(24, HIGH); // led 1 》 on
}
if(buffer.indexOf(“GET /?led1=0”)》=0) { // If led1 = 0
digitalWrite(24, LOW); // led 1 》 off
}
if(buffer.indexOf(“GET /?led2=1”)》=0) { // If led2 = 1
digitalWrite(22, HIGH); // led 2 》 on
}
if(buffer.indexOf(“GET /?led2=0”)》=0) { // If led2 = 0
digitalWrite(22, LOW); // led 2 》 off
}
if(buffer.indexOf(“GET /?led3=1”)》=0) { // If led3 = 1
digitalWrite(23, HIGH); // led 3 》 on
}
if(buffer.indexOf(“GET /?led3=0”)》=0) { // If led3 = 0
digitalWrite(23, LOW); // led 3 》 off
}
} else {
currentLineIsBlank = false;
}
}
}
delay(1);
client.stop();
}
}
那是arduino上的代码。
很简单,对吧?让我们去看看应用程序吧!
第5步:应用程序布局
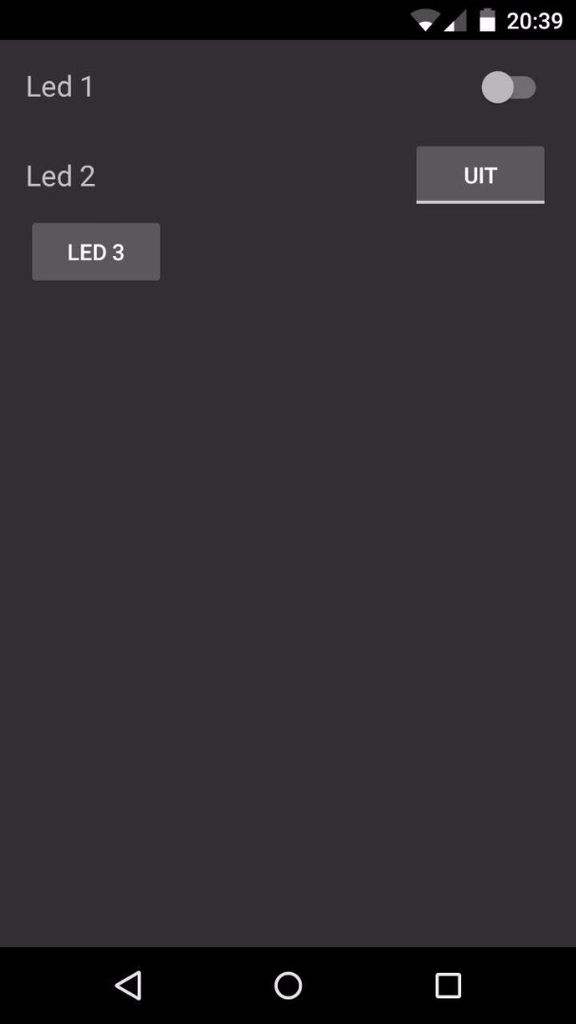
为了创建一个android工作室项目我会在这里重定向你。开头是相同的,选择一个名称并创建主要活动,但在删除“hello world” textview后,您需要添加任意类型的3个按钮。我正在使用开关,切换按钮和普通按钮,但您可以选择最喜欢的。
注意:
如果出现渲染错误,请在窗口顶部将 Apptheme 更改为 Appcompat.NoActionBar
!注意!
正常按钮只会在按下时点亮它的LED。释放按钮后led将熄灭。
在 res/values/styles.xml 中,您需要将父级更改为:“Theme.Appcompat.NoActionBar”
好的,现在我们可以开始编写应用程序了!
第6步:应用程序编码
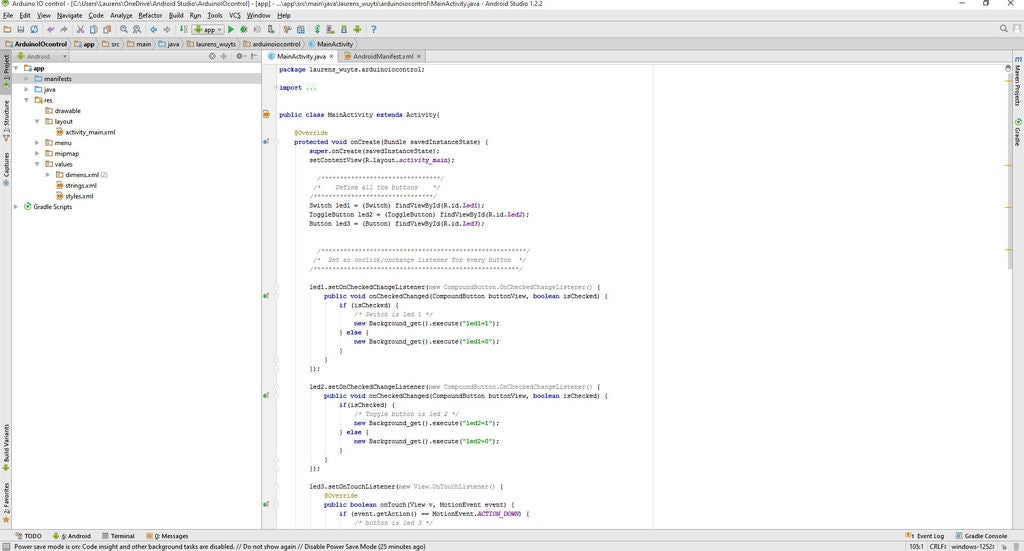
为了对应用进行编码,我让您更轻松。您需要将此代码复制到 MainActivity.java ,并将包 laurens_wuyts.arduinoiocontrol 更改为 company.appname 。
package laurens_wuyts.arduinoiocontrol;
import android.app.Activity;
import android.os.AsyncTask;
import android.support.v7.app.ActionBarActivity;
import android.os.Bundle;
import android.view.Menu;
import android.view.MenuItem;
import android.view.MotionEvent;
import android.view.View;
import android.widget.Button;
import android.widget.CompoundButton;
import android.widget.Switch;
import android.widget.ToggleButton;
import java.io.BufferedReader;
import java.io.IOException;
import java.io.InputStreamReader;
import java.net.HttpURLConnection;
import java.net.URL;
public class MainActivity extends Activity{
@Override
protected void onCreate(Bundle savedInstanceState) {
super.onCreate(savedInstanceState);
setContentView(R.layout.activity_main);
}
@Override
public boolean onCreateOptionsMenu(Menu menu) {
// Inflate the menu; this adds items to the action bar if it is present.
getMenuInflater().inflate(R.menu.menu_main, menu);
return true;
}
@Override
public boolean onOptionsItemSelected(MenuItem item) {
// Handle action bar item clicks here. The action bar will
// automatically handle clicks on the Home/Up button, so long
// as you specify a parent activity in AndroidManifest.xml.
int id = item.getItemId();
//noinspection SimplifiableIfStatement
if (id == R.id.action_settings) {
return true;
}
return super.onOptionsItemSelected(item);
}
/*****************************************************/
/* This is a background process for connecting */
/* to the arduino server and sending */
/* the GET request withe the added data */
/*****************************************************/
private class Background_get extends AsyncTask {
@Override
protected String doInBackground(String.。. params) {
try {
/*********************************************************/
/* Change the IP to the IP you set in the arduino sketch */
/*********************************************************/
URL url = new URL(“http://192.168.1.177/?” + params[0]);
HttpURLConnection connection = (HttpURLConnection) url.openConnection();
BufferedReader in = new BufferedReader(new InputStreamReader(connection.getInputStream()));
StringBuilder result = new StringBuilder();
String inputLine;
while ((inputLine = in.readLine()) != null)
result.append(inputLine).append(“ ”);
in.close();
connection.disconnect();
return result.toString();
} catch (IOException e) {
e.printStackTrace();
}
return null;
}
}
}
在此代码中,您只需要将IP更改为arduino的IP。
要检查按钮,您需要做两件事:
定义按钮
为每个按钮添加onclick/onchange监听器。
定义按钮:
/* For a switch */
Switch led1 = (Switch) findViewById(R.id.Led1);
/* For a toggle button */
ToggleButton led2 = (ToggleButton) findViewById(R.id.Led2);
/* For a normal button */
Button led3 = (Button) findViewById(R.id.Led3);
添加onclick/onchange:
将onclick/onchange侦听器放在onCreate函数中。
/* For a switch you‘ll need an “OnCheckedChangeListener” like this */
led1.setOnCheckedChangeListener(new CompoundButton.OnCheckedChangeListener() {
public void onCheckedChanged(CompoundButton buttonView, boolean isChecked) {
if (isChecked) {
/* Switch is led 1 */
new Background_get().execute(“led1=1”);
} else {
new Background_get().execute(“led1=0”);
}
}
});
/* For a toggle button you also need a “OnCheckedChangeListener” */
led2.setOnCheckedChangeListener(new CompoundButton.OnCheckedChangeListener() {
public void onCheckedChanged(CompoundButton buttonView, boolean isChecked) {
if(isChecked) {
/* Toggle button is led 2 */
new Background_get().execute(“led2=1”);
} else {
new Background_get().execute(“led2=0”);
}
}
});
/* For a button you’ll need a “OnTouchListener” */
led3.setOnTouchListener(new View.OnTouchListener() {
@Override
public boolean onTouch(View v, MotionEvent event) {
if (event.getAction() == MotionEvent.ACTION_DOWN) {
/* button is led 3 */
new Background_get().execute(“led3=1”);
} else if (event.getAction() == MotionEvent.ACTION_UP) {
new Background_get().execute(“led3=0”);
}
return true;
}
});
这就是所有编码这需要做!现在我们需要为您的应用添加权限。
步骤7:向您的应用添加权限
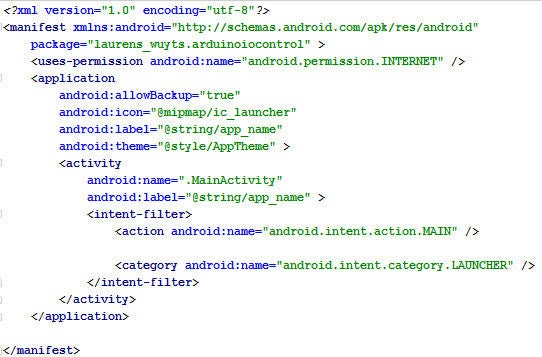
让您的应用运行你需要赋予它权限。我们只需要1个权限:上网。要获得此权限,您需要打开清单文件并添加:
在
步骤8:恢复

在这个教程中,我向您展示了如何通过网络从Android手机控制arduino IO引脚。
我还为想要使用它的人提供了完整的应用程序目录。
责任编辑:wv
-
Android
+关注
关注
12文章
3937浏览量
127503 -
Arduino
+关注
关注
188文章
6471浏览量
187249
发布评论请先 登录
相关推荐
android手机上emulate应用程序的方法
AWTK-WEB 快速入门(1) - C 语言应用程序


 如何使用Android应用程序控制arduino IO引脚



评论