第1步:工具和组件
这就是您需要的-
Attiny84或85
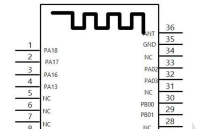
蓝牙模块
面包板
跳线
步骤2:电路
如下设置ATiny和蓝牙之间的连接-
蓝牙模块Rx-》 ATiny85引脚1
蓝牙模块Tx-》 ATiny85引脚2
蓝牙模块接地-》 ATiny85引脚4
蓝牙模块VCC-》 ATiny85引脚8
步骤3:代码
在这里是可以运行的测试草图,连接6点的led并上传代码。从串行终端发送1将打开LED指示灯,发送0将关闭它。
#include //Software Serial Port
#define RxD 1
#define TxD 2
#define DEBUG_ENABLED 1
SoftwareSerial blueToothSerial(RxD,TxD);
int led = 4;
void setup()
{
pinMode(RxD, INPUT);
pinMode(TxD, OUTPUT);
setupBlueToothConnection();
pinMode(led,OUTPUT);
digitalWrite(led,HIGH);
}
void loop()
{
char recvChar;
while(1){
//check if there‘s any data sent from the remote bluetooth shield
if(blueToothSerial.available()){
recvChar = blueToothSerial.read();
if(recvChar == ’1‘)
digitalWrite(led,HIGH);
else
digitalWrite(led,LOW);
}
}
}
void setupBlueToothConnection()
{
blueToothSerial.begin(9600); //Set BluetoothBee BaudRate to default baud rate 38400
blueToothSerial.print(“ +STWMOD=0 ”); //set the bluetooth work in slave mode
blueToothSerial.print(“ +STNA=HC-05 ”); //set the bluetooth name as “HC-05”
blueToothSerial.print(“ +STOAUT=1 ”); // Permit Paired device to connect me
blueToothSerial.print(“ +STAUTO=0 ”); // Auto-connection should be forbidden here
delay(2000); // This delay is required.
//blueToothSerial.print(“ +INQ=1 ”); //make the slave bluetooth inquirable
blueToothSerial.print(“bluetooth connected! ”);
delay(2000); // This delay is required.
blueToothSerial.flush();
}
责任编辑:wv
-
蓝牙
+关注
关注
114文章
5833浏览量
170566 -
串行通信
+关注
关注
4文章
576浏览量
35446
发布评论请先 登录
相关推荐
RS232与蓝牙无线通信的对比 RS232串口设备的故障排查
了解蓝牙模块串口通讯基础知识


 如何通过蓝牙网络与ATiny85进行串行通信


评论