步骤1:启动。..
以下是您需要的项目列表:
1。 Arduino开发板
2。电线结果3。 5v继电器
6。所有焊接组件
步骤2:
1。组件如上图所示。
2。现在,将电缆放在螺钉端子中。
-》另一端的一对(红色和黑色)连接到电源或电池。在我的情况下,我已连接到6v 4.7ah电池。
-》而另一对(绿色和白色)已连接至照明灯。
-》您可以添加AC/DC电源根据灯的配置而定。我已经连接了10个1w LED。
3。我还连接了母排针端子,以便可以轻松地从arduino插入跳线电缆。
步骤3:电路。..

继电器的作用就像电子电路中的状况一样。在线圈上施加5v时,舌片连接到p1,否则连接到p2。
连接所有点,如上图所示。
步骤4 :Arduino程序
int incomingByte = 0;//用于输入串行数据
void setup()
{
Serial.begin(9600);//打开串行端口,将数据速率设置为9600 bps
pinMode(12,OUTPUT);
}
void loop()
{
////仅在接收数据时才发送数据:
if(Serial.available()》 0)
{//读取传入的字节:
entrying Byte = Serial.read();
//说说您得到了什么:
Serial.print(“我收到了:”);
Serial.println(incomingByte,DEC);
}
如果(incomingByte == 100)
digitalWrite(12,HIGH);
否则,如果(incomingByte == 97)
digitalWrite(12,LOW);
}
步骤5:工作原理
步骤6:C#代码。..
// c# program to switch on the lights
using System;
using System.Collections.Generic;
using System.Linq;
using System.Text;
using System.IO.Ports;
using System.IO;
namespace ConsoleApplication1
{
class Program
{
static void Main(string[] args)
{
SerialPort sp= new SerialPort();
sp.PortName = “com4” // write your com port connected to arduino
sp.BaudRate=9600;
sp.Open();
sp.Write(“d”);
sp.Close();
}
}
}
关闭灯。
// c# program to switch off the lights
using System;
using System.Collections.Generic;
using System.Linq;
using System.Text;
using System.IO.Ports;
using System.IO;
namespace ConsoleApplication1
{
class Program
{
static void Main(string[] args)
{
SerialPort sp= new SerialPort();
sp.PortName = “com4” // write your com port connected to arduino
sp.BaudRate=9600;
sp.Open();
sp.Write(“a”);
sp.Close();
}
}
}
Type both the projects separately
Type =》 Build =》 take the .exe file
you can get the .exe file from
Documents/Visual Studio/Projects///bin/Debug/.exe
for both the off and on, bring two exe files and place them somewhere u are comfortable.
第7步:上电时间。..
=》将红色和黑色电线分别连接到电源的+ ve和-ve端子。
在我的情况下,我使用的是10个1W LED。因此,我连接了6v 4.7Ah电池为它们供电。如果要连接到交流电源,则可以继续使用。
接线。..。 !!!请勿将LED直接连接到交流电中,而应使用交流设备。
=》将白色(gnd)和绿色(+ ve)连接到设备或LED的两个端子上。
我还已将DPDT开关连接到电池,以便直接打开LED。热情洋溢。您可以跳过该步骤。
步骤8:将它们放在一起
步骤9:配置JARVIS。

您可以下载JARVIS:
从此处下载Jarvis软件
完成安装后,打开程序,选择您喜欢的语言。
然后单击右下角的+按钮以添加自定义命令。..
然后添加命令,
添加响应及其各自的文件位置。
最后说“ 更新命令”以保存并激活这些命令。
尝试说这些命令并查看结果
步骤10:可能的错误
如果jarvis程序没有使用识别您的声音,然后您应该训练系统。
要执行此操作,请转到控制面板》语音重组
完成训练过程,然后尝试一下。
如果问题仍然存在,请随时与我联系或发表评论低。
在www.facebook.com/bisudw
与我联系:给我发邮件:mails2bisu@gmail.com
步骤11:任何设备可以通过语音控制

只需对代码进行一些修改,然后通过从语音控制到arduino板上添加更多的继电器开关即可。 p》
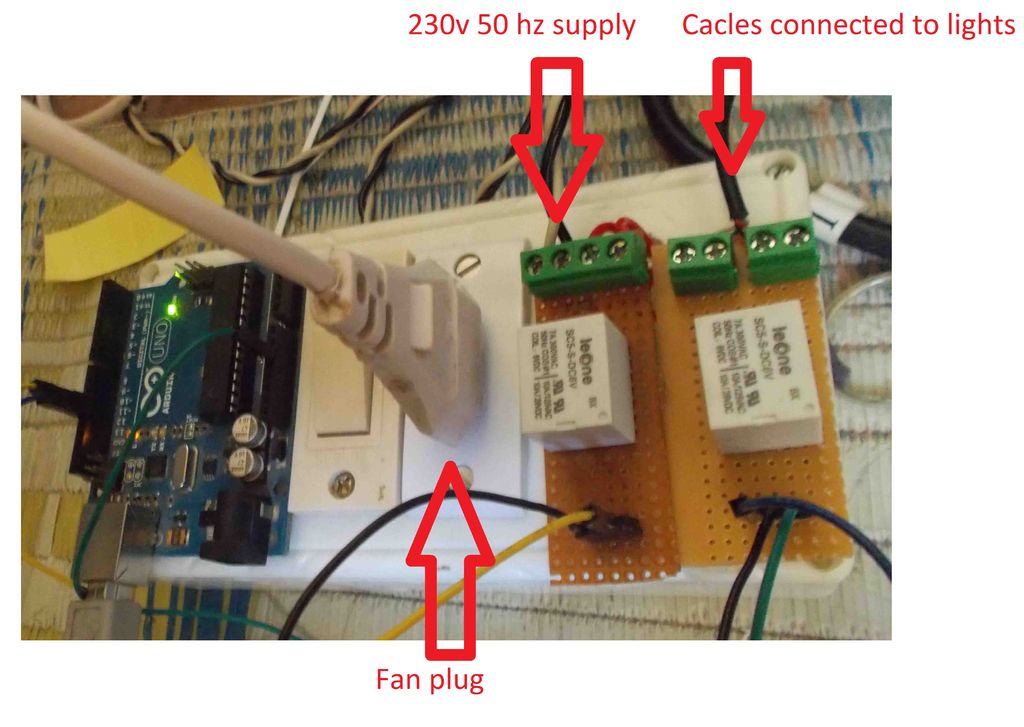
这是我的修改。我添加了一个带有230v 50hz AC电源的开关来控制风扇。
然后更新了JARVIS控制台上的命令。..全部都设置为可用。
而不是Fan插件您想要并开始使用的任何设备。
-
开关
+关注
关注
19文章
3163浏览量
94076 -
语音控制
+关注
关注
5文章
485浏览量
28357 -
Arduino
+关注
关注
188文章
6478浏览量
188396
发布评论请先 登录
相关推荐
网络语音控制器的原理与应用
网络语音控制器是什么设备
开源项目!基于 Arduino 的 MIDI 架子鼓
智能语音开关:离线控制,守护隐私的新选择

语音开关控制器方案,全屋开关变“声控”

离线语音控制技术特点

语音控制模块_雷龙发展
开源项目!可编程的磁悬浮桌面氛围灯(Arduino+WS2812)


 带有Arduino的语音控制开关的制作


评论