 温控风扇的制作
第1步:您需要的零件
我用来执行此操作的零件
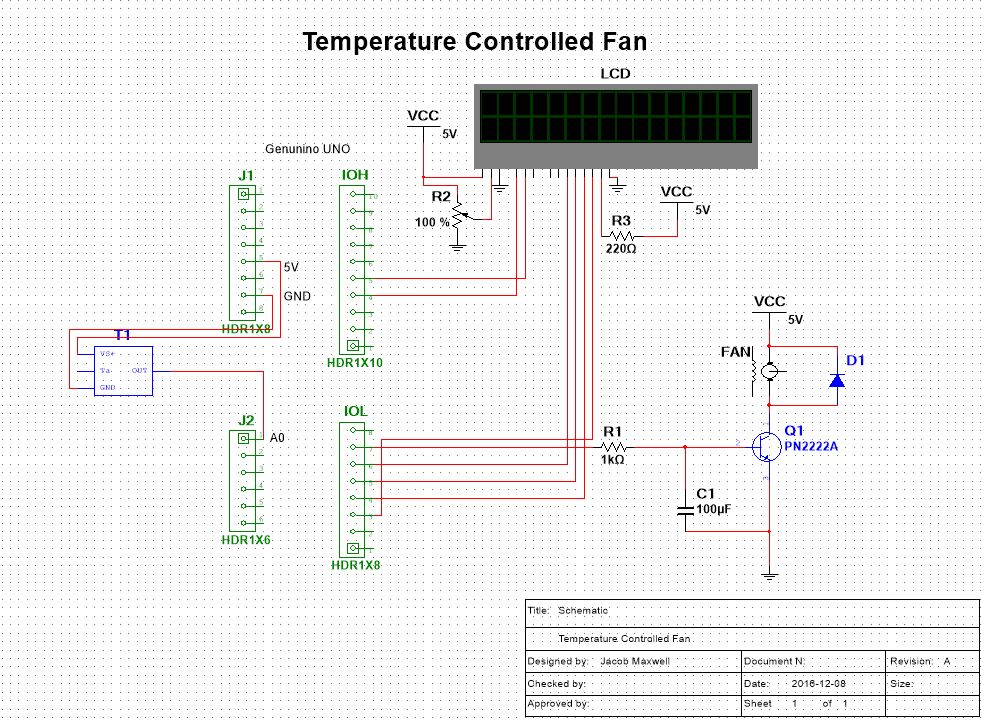
·Genuino UNO
·温度传感器–关键部件
·1KΩ电阻器
·100µF/16V电容器
·PN2222A NPN晶体管–打开风扇的关键部分
·12V DC无刷风扇–关键部分
·1N4007二极管
·AC – DC插入适配器120VAC至12VDC
·液晶显示器
·额外面包板
步骤2:示意图
步骤3:源代码//注释
#include
// library for LCD LiquidCrystal lcd(12, 11, 5, 4, 3, 2);
float temp; // set temp as a whole number
int tempPin = A0; //arduino pin used for temperature sensor
int tempMin = 23; // the temperature to start the buzzer
int tempMax = 26; // temperature full speed
int fan = 6; // the pin where fan is connected
int fanSpeed = 0; // fan speed variable void setup() {
pinMode(fan, OUTPUT); // declaring fan pin 6 as output
pinMode(tempPin, INPUT); // declaring tempPin A0 as input
lcd.begin(16, 2); // LCD intialize
lcd.clear(); // clears lcd
lcd.print(“Fan Speed:”); // prints “Fan Speed” 50-255 PWM
lcd.setCursor(0,1); // Sets cursor for next line
lcd.print(“Temperature:”); // Prints “Temperature” below “Fan Speed”
Serial.begin(9600); // begins the serial monitor
} void loop() {
float voltage = (temp/1024)*5.0;
float temperature = (voltage - 0.5) * 100; // formula for degrees celcius
Serial.println(temperature); // prints temp in serial monitor
lcd.setCursor(12,1); // 12 character to the right on the first column
lcd.print(temperature); // prints the number on the 12 character
delay(1000); // delay in between reads for stability
if(temp 《 tempMin) { // if temp is lower than minimum temp
fanSpeed = 0; // fan is not spinning
digitalWrite(fan, LOW); // pin 6 output is low
}
if((temperature 》= tempMin) && (temperature 《= tempMax)) //if temperature is higher than the minimmum range
{
fanSpeed = map(temperature, tempMin, tempMax, 50, 255); // the actual speed of fan
analogWrite(fan, fanSpeed); // spin the fan at the fanSpeed speed
Serial.println(fanSpeed); // prints fan speed in serial monitor
lcd.setCursor(12,0); // sets cursor
lcd.print(fanSpeed); // prints
lcd.print(“ ”); // fixes an error of random number display
}
}
责任编辑:wv
-
温控
+关注
关注
0文章
69浏览量
18897 -
风扇
+关注
关注
4文章
416浏览量
37566
发布评论请先 登录
相关推荐
把常用的小黄鸭风扇升级为语音控制的智能风扇~

Wi-Fi温控器与传统温控器比较
温控器常见故障及解决办法
远程控制温控器的应用
温控器的工作原理解析 智能温控器对节能的影响
风扇驱动怎么安装
无叶风扇灯的优缺点有哪些
基于STM32的智能风扇系统设计

基于STM32单片机的智能温控风扇系统设计
温控探头传感器型号k和e是什么意思
使用Arduino的温控风扇电路分享

调速风扇的原理?
OpenHarmony南向开发案例:【智能风扇】


 工商网监
工商网监
评论