今天,我将尝试教您一些有关移位寄存器的知识。这些是Arduino编程中相当重要的部分,基本上是因为它们扩展了您可以使用的输出数量,以换取3个控制引脚。您还可以将菊花链移位寄存器在一起以获取更多的输出。
这与以前的教程相比有很大的困难,我强烈建议您对以前的材料有个很好的了解。 (本文末尾的链接),以及了解我上次编写的二进制的基本知识。
什么是移位寄存器?
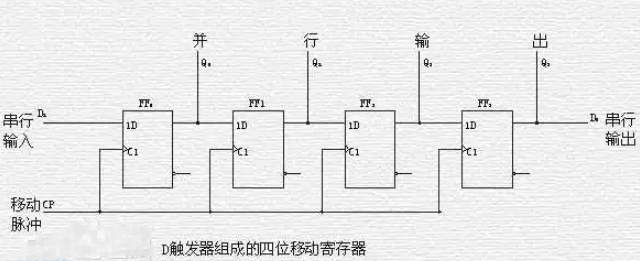
技术上是输出移位寄存器换句话说,串行接收数据并并行输出。实际上,这意味着我们可以快速向芯片发送一堆输出命令,告诉它激活,然后将输出发送到相关的引脚。无需遍历每个引脚,我们只需一次将所需的输出作为单个字节或更多信息发送到所有引脚。
如果可以帮助您理解,您可以考虑一下移位寄存器作为数字输出的“数组”,但是我们可以跳过常规的digitalWrite命令,而只需发送一系列位以将其打开或关闭即可。
它如何工作?
我们将使用的移位寄存器-Oomlout入门套件中包含的74HC595N-仅需要3个控制引脚。第一个是时钟-您无需担心太多,因为Arduino串行库对其进行了控制-但时钟基本上只是一个开/关电脉冲,用于设置数据信号的速度。
锁存器引脚用于告知移位寄存器何时应根据我们刚发送的位打开或关闭输出,即将它们锁存到位。
最后,数据引脚位于此处我们用位发送了实际的串行数据,以确定移位寄存器输出的开/关状态。
整个过程可以用4个步骤来描述:
设置移位寄存器上第一个输出引脚的数据引脚为高电平或低电平。
脉冲时钟以将数据“移位”到寄存器。
继续设置数据并向脉冲输出脉冲。时钟,直到为所有输出引脚设置了所需的状态为止。
对闩锁引脚进行脉冲以激活输出序列。
实现
您需要此产品的以下组件oject:
7HC595N移位寄存器芯片
通常的面包板,连接器和基本的Arduino
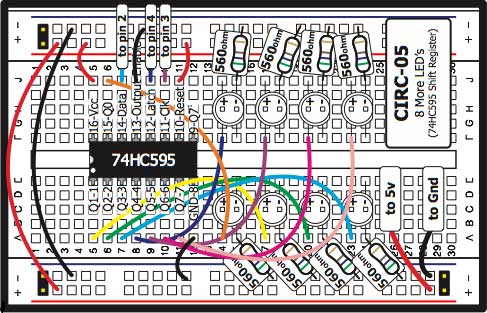
如果您有Oomlout入门套件,则可以从此处下载面包板布局。
电路板布局:

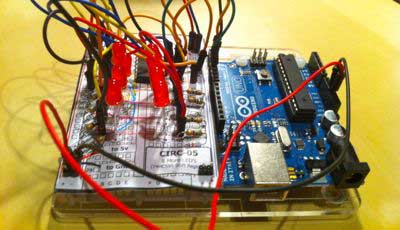
和我的组装版本:

I已修改了Ooolmout提供的原始代码,但如果您想尝试使用该代码,则可以在此处完整下载。包括了代码的说明,因此,请从下面复制或粘贴整个内容,或使用pastebin读取代码的说明。
/* ---------------------------------------------------------
* | Shift Register Tutorial, based on |
* | Arduino Experimentation Kit CIRC-05 |
* | 。: 8 More LEDs :。 (74HC595 Shift Register) |
* ---------------------------------------------------------
* | Modified by James @ MakeUseOf.com |
* ---------------------------------------------------------
*/
// 7HC595N has three pins
int data = 2; // where we send the bits to control outputs
int clock = 3; // keeps the data in sync
int latch = 4; // tells the shift register when to activate the output sequence
void setup()
{
// set the three control pins to output
pinMode(data, OUTPUT);
pinMode(clock, OUTPUT);
pinMode(latch, OUTPUT);
Serial.begin(9600); // so we can send debug messages to serial monitor
}
void loop(){
outputBytes(); // our basic output which writes 8-bits to show how a shift register works.
//outputIntegers(); // sends an integer value as data instead of bytes, effectively counting in binary.
}
void outputIntegers(){
for (int i=0;i《256;i++){
digitalWrite(latch, LOW);
Serial.println(i); // Debug, sending output to the serial monitor
shiftOut(data, clock, MSBFIRST, i);
digitalWrite(latch, HIGH);
delay(100);
}
}
void outputBytes(){
/* Bytes, or 8-bits, are represented by a B followed by 8 0 or 1s.
In this instance, consider this to be like an array that we‘ll use to control
the 8 LEDs. Here I’ve started the byte value as 00000001
*/
byte dataValues = B00000001; // change this to adjust the starting pattern
/* In the for loop, we begin by pulling the latch low,
using the shiftOut Arduino function to talk to the shift register,
sending it our byte of dataValues representing the state of the LEDs
then pull the latch high to lock those into place.
Finally, we shift the bits one place to the left, meaning the next iteration
will turn on the next LED in the series.
To see the exact binary value being sent, check the serial monitor.
*/
for (int i=0;i《8;i++){
digitalWrite(latch, LOW);
Serial.println(dataValues, BIN); // Debug, sending output to the serial monitor
shiftOut(data, clock, MSBFIRST, dataValues);
digitalWrite(latch, HIGH);
dataValues = dataValues 《《 1; // Shift the bits one place to the left - change to 》》 to adjust direction
delay(100);
}
}
位移位(OutputBytes函数)
在第一个循环示例– outputBytes()–代码使用8位序列(一个字节),然后在for循环的每次迭代中向左移。重要的是要注意,如果您进行的移位超出了可能,则只会丢失该位。
使用《《或》》加上要移位的位数来完成移位。/p》
查看以下示例,并确保您了解发生了什么:
byte val = B00011010
val = val 《《 3 // B11010000
val = val 《《 2 // B01000000, we lost those other bits!
val = val 》》 5 // B00000010
发送整数而不是(OutputIntegers函数)
数字到移位寄存器而不是字节,它将简单地将数字转换为二进制字节序列。在此函数中(取消注释并上载以查看效果),我们有一个for循环,其计数范围是0-255(可以用一个字节表示的最大整数),然后发送该循环。它基本上是二进制的,因此除非您的LED排成一排,否则该序列似乎有点随机。
例如,如果您阅读二进制的说明文章,就会知道数字44将表示为00101100,因此LED 3、5、6将在序列中的该点点亮。

菊花链超过一个移位寄存器
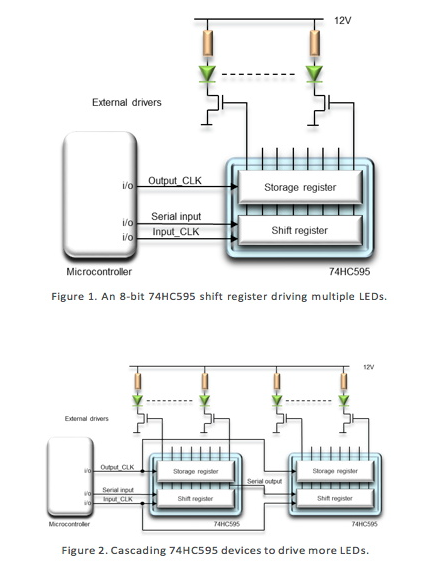
移位寄存器的显着之处在于,如果它们获得的信息多于8位(或者其注册表很大),它们将再次移出其他位。这意味着您可以将它们中的一系列连接在一起,推入一个较长的位链,然后将其分别分配到每个寄存器,而无需您进行额外的编码。
尽管我们不会在这里详细说明过程或原理图,如果您有多个移位寄存器,则可以从此处的Arduino官方网站尝试该项目。
该系列中的其他文章:
什么是Arduino?您可以使用它做什么?
什么是Arduino入门工具包?它包含什么?
您可以通过入门工具包购买更多更酷的组件
》
开始使用Arduino入门套件?安装驱动程序并设置电路板和端口
Fritzing,这是一个免费的电路图绘制工具
仔细查看Arduino应用程序和示例闪烁程序的结构
》
Arduino Xmas树灯项目(又是关于数组的学习)
什么是Binary?
到目前为止,我们将使用移位寄存器,我认为我们涵盖了很多。一如既往,我鼓励您使用和调整代码,并随时询问您在注释中可能遇到的任何问题,甚至共享指向基于出色移位寄存器的项目的链接。
责任编辑:wv
-
移位寄存器
+关注
关注
3文章
258浏览量
22273
发布评论请先 登录
相关推荐
移位寄存器的工作原理、类型及应用
移位寄存器中使用的储存单元是什么
移位寄存器中Dsr有什么用
移位寄存器右移是怎么移位的
PLC移位寄存器指令的工作过程
8位移位寄存器工作原理是什么?
移位寄存器的工作原理与作用
双向移位寄存器的工作原理、特点及应用
移位寄存器的功能是什么 移位寄存器的工作原理
线性反馈移位寄存器输出序列怎么算
移位寄存器可降低LED设计的尺寸和成本


 如何使用移位寄存器


评论