前言
缺陷检测是工业上非常重要的一个应用,由于缺陷多种多样,传统的机器视觉算法很难做到对缺陷特征完整的建模和迁移,复用性不大,要求区分工况,这会浪费大量的人力成本。深度学习在特征提取和定位上取得了非常好的效果,越来越多的学者和工程人员开始将深度学习算法引入到缺陷检测领域中。
导师一直鼓励小编做一些小项目,将学习与动手相结合。于是最近小编找来了某个大数据竞赛中的一道缺陷检测题目,在开源目标检测框架的基础上实现了一个用于布匹瑕疵检测的模型。现将过程稍作总结,供各位同学参考。
问题简介
01
1
实际背景
布匹的疵点检测是纺织工业中的一个十分重要的环节。当前,在纺织工业的布匹缺陷检测领域,人工检测仍然是主要的质量检测方式。而近年来由于人力成本的提升,以及人工检测存在的检测速度慢、漏检率高、一致性差、人员流动率高等问题,越来越多的工厂开始利用机器来代替人工进行质检,以提高生产效率,节省人力成本。
2
题目内容
开发出高效准确的深度学习算法,检验布匹表面是否存在缺陷,如果存在缺陷,请标注出缺陷的类型和位置。
3
数据分析
• 题目数据集提供了9576张图片用于训练,其中有瑕疵图片5913张,无瑕疵图片3663张。
• 瑕疵共分为15个类别。分别为:沾污、错花、水卬、花毛、缝头、缝头印、虫粘、破洞、褶子、织疵、漏印、蜡斑、色差、网折、其它
• 尺寸:4096 * 1696
算法分享
02
本文算法基于开源框架YOLOv5,原框架代码请前往https://github.com/ultralytics/yolov5查看,针对这次问题做出的修改和调整部分代码请继续向下阅读。
1.框架选择
比较流行的算法可以分为两类,一类是基于Region Proposal的R-CNN系算法(R-CNN,Fast R-CNN, Faster R-CNN等),它们是two-stage的,需要先算法产生目标候选框,也就是目标位置,然后再对候选框做分类与回归。而另一类是Yolo,SSD这类one-stage算法,其仅仅使用一个卷积神经网络CNN直接预测不同目标的类别与位置。
第一类方法是准确度高一些,但是速度慢,但是第二类算法是速度快,但是准确性要低一些。考虑本次任务时间限制和小编电脑性能,本次小编采用了单阶段YOLOV5的方案。
YOLO直接在输出层回归bounding box的位置和bounding box所属类别,从而实现one-stage。通过这种方式,Yolo可实现45帧每秒的运算速度,完全能满足实时性要求(达到24帧每秒,人眼就认为是连续的)。
2.环境配置(参考自 YOLOv5 requirements)
Cython numpy==1.17 opencv-python torch》=1.4 matplotlib pillow tensorboard PyYAML》=5.3torchvisionscipytqdmgit+https://github.com/cocodataset/cocoapi.git#subdirectory=PythonAPI
3.数据预处理
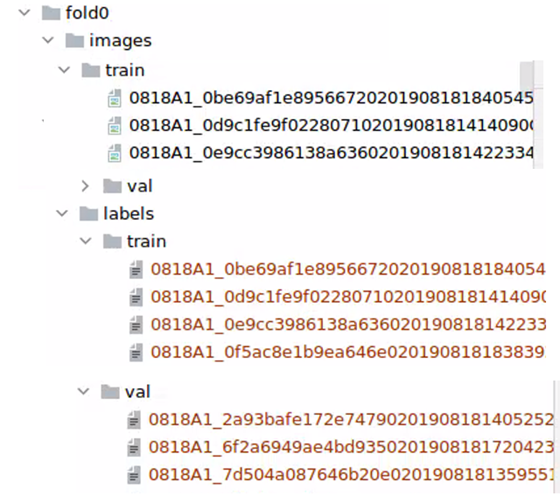
· 数据集文件结构
· 标注格式说明
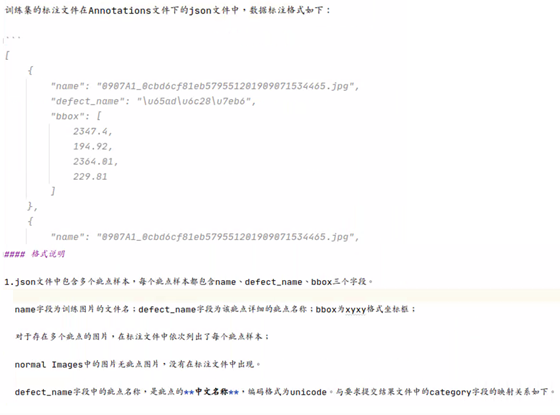

· YOLO要求训练数据文件结构:
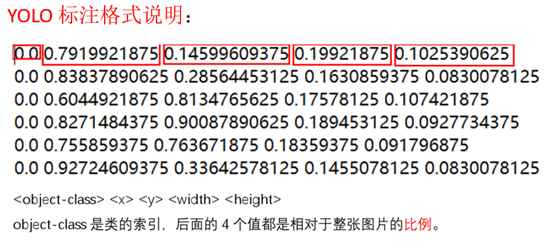
· 比赛数据格式 -》 YOLO数据格式:
(针对本问题原创代码)
for fold in [0]: val_index = index[len(index) * fold // 5:len(index) * (fold + 1) // 5] print(len(val_index)) for num, name in enumerate(name_list): print(c_list[num], x_center_list[num], y_center_list[num], w_list[num], h_list[num]) row = [c_list[num], x_center_list[num], y_center_list[num], w_list[num], h_list[num]] if name in val_index: path2save = ‘val/’ else: path2save = ‘train/’ if not os.path.exists(‘convertor/fold{}/labels/’.format(fold) + path2save): os.makedirs(‘convertor/fold{}/labels/’.format(fold) + path2save) with open(‘convertor/fold{}/labels/’.format(fold) + path2save + name.split(‘。’)[0] + “.txt”, ‘a+’) as f: for data in row: f.write(‘{} ’.format(data)) f.write(‘
’) if not os.path.exists(‘convertor/fold{}/images/{}’.format(fold, path2save)): os.makedirs(‘convertor/fold{}/images/{}’.format(fold, path2save)) sh.copy(os.path.join(image_path, name.split(‘。’)[0], name), ‘convertor/fold{}/images/{}/{}’.format(fold, path2save, name))
4.超参数设置(针对本问题原创代码)
# Hyperparameters hyp = {‘lr0’: 0.01, # initial learning rate (SGD=1E-2, Adam=1E-3) ‘momentum’: 0.937, # SGD momentum ‘weight_decay’: 5e-4, # optimizer weight decay ‘giou’: 0.05, # giou loss gain ‘cls’: 0.58, # cls loss gain ‘cls_pw’: 1.0, # cls BCELoss positive_weight ‘obj’: 1.0, # obj loss gain (*=img_size/320 if img_size != 320) ‘obj_pw’: 1.0, # obj BCELoss positive_weight ‘iou_t’: 0.20, # iou training threshold ‘anchor_t’: 4.0, # anchor-multiple threshold ‘fl_gamma’: 0.0, # focal loss gamma (efficientDet default is gamma=1.5) ‘hsv_h’: 0.014, # image HSV-Hue augmentation (fraction) ‘hsv_s’: 0.68, # image HSV-Saturation augmentation (fraction) ‘hsv_v’: 0.36, # image HSV-Value augmentation (fraction) ‘degrees’: 0.0, # image rotation (+/- deg) ‘translate’: 0.0, # image translation (+/- fraction) ‘scale’: 0.5, # image scale (+/- gain) ‘shear’: 0.0} # image shear (+/- deg)}
5.模型核心代码(针对本问题原创代码)
import argparse from models.experimental import * class Detect(nn.Module): def __init__(self, nc=80, anchors=()): # detection layer super(Detect, self).__init__() self.stride = None # strides computed during build self.nc = nc # number of classes self.no = nc + 5 # number of outputs per anchor self.nl = len(anchors) # number of detection layers self.na = len(anchors[0]) // 2 # number of anchors self.grid = [torch.zeros(1)] * self.nl # init grid a = torch.tensor(anchors).float().view(self.nl, -1, 2) self.register_buffer(‘anchors’, a) # shape(nl,na,2) self.register_buffer(‘anchor_grid’, a.clone().view(self.nl, 1, -1, 1, 1, 2)) # shape(nl,1,na,1,1,2) self.export = False # onnx export def forward(self, x): # x = x.copy() # for profiling z = [] # inference output self.training |= self.export for i in range(self.nl): bs, _, ny, nx = x[i].shape # x(bs,255,20,20) to x(bs,3,20,20,85) x[i] = x[i].view(bs, self.na, self.no, ny, nx).permute(0, 1, 3, 4, 2).contiguous() if not self.training: # inference if self.grid[i].shape[2:4] != x[i].shape[2:4]: self.grid[i] = self._make_grid(nx, ny).to(x[i].device) y = x[i].sigmoid() y[。。., 0:2] = (y[。。., 0:2] * 2. - 0.5 + self.grid[i].to(x[i].device)) * self.stride[i] # xy y[。。., 2:4] = (y[。。., 2:4] * 2) ** 2 * self.anchor_grid[i] # wh z.append(y.view(bs, -1, self.no)) return x if self.training else (torch.cat(z, 1), x) @staticmethod def _make_grid(nx=20, ny=20): yv, xv = torch.meshgrid([torch.arange(ny), torch.arange(nx)]) return torch.stack((xv, yv), 2).view((1, 1, ny, nx, 2)).float() class Model(nn.Module): def __init__(self, model_cfg=‘yolov5s.yaml’, ch=3, nc=None): # model, input channels, number of classes super(Model, self).__init__() if type(model_cfg) is dict: self.md = model_cfg # model dict else: # is *.yaml import yaml # for torch hub with open(model_cfg) as f: self.md = yaml.load(f, Loader=yaml.FullLoader) # model dict # Define model if nc and nc != self.md[‘nc’]: print(‘Overriding %s nc=%g with nc=%g’ % (model_cfg, self.md[‘nc’], nc)) self.md[‘nc’] = nc # override yaml value self.model, self.save = parse_model(self.md, ch=[ch]) # model, savelist, ch_out # print([x.shape for x in self.forward(torch.zeros(1, ch, 64, 64))]) # Build strides, anchors m = self.model[-1] # Detect() if isinstance(m, Detect): s = 128 # 2x min stride m.stride = torch.tensor([s / x.shape[-2] for x in self.forward(torch.zeros(1, ch, s, s))]) # forward m.anchors /= m.stride.view(-1, 1, 1) check_anchor_order(m) self.stride = m.stride self._initialize_biases() # only run once # print(‘Strides: %s’ % m.stride.tolist()) # Init weights, biases torch_utils.initialize_weights(self) self._initialize_biases() # only run once torch_utils.model_info(self) print(‘’) def forward(self, x, augment=False, profile=False): if augment: img_size = x.shape[-2:] # height, width s = [0.83, 0.67] # scales #1.2 0.83 y = [] for i, xi in enumerate((x, torch_utils.scale_img(x.flip(3), s[0]), # flip-lr and scale torch_utils.scale_img(x, s[1]), # scale )): # cv2.imwrite(‘img%g.jpg’ % i, 255 * xi[0].numpy().transpose((1, 2, 0))[:, :, ::-1]) y.append(self.forward_once(xi)[0]) y[1][。。., :4] /= s[0] # scale y[1][。。., 0] = img_size[1] - y[1][。。., 0] # flip lr y[2][。。., :4] /= s[1] # scale return torch.cat(y, 1), None # augmented inference, train else: return self.forward_once(x, profile) # single-scale inference, train def forward_once(self, x, profile=False): y, dt = [], [] # outputs for m in self.model: if m.f != -1: # if not from previous layer x = y[m.f] if isinstance(m.f, int) else [x if j == -1 else y[j] for j in m.f] # from earlier layers
if profile: try: import thop o = thop.profile(m, inputs=(x,), verbose=False)[0] / 1E9 * 2 # FLOPS except: o = 0 t = torch_utils.time_synchronized() for _ in range(10): _ = m(x) dt.append((torch_utils.time_synchronized() - t) * 100) print(‘%10.1f%10.0f%10.1fms %-40s’ % (o, m.np, dt[-1], m.type)) x = m(x) # run y.append(x if m.i in self.save else None) # save output
if profile: print(‘%.1fms total’ % sum(dt)) return x
def _initialize_biases(self, cf=None): # initialize biases into Detect(), cf is class frequency # cf = torch.bincount(torch.tensor(np.concatenate(dataset.labels, 0)[:, 0]).long(), minlength=nc) + 1. m = self.model[-1] # Detect() module for f, s in zip(m.f, m.stride): # from mi = self.model[f % m.i] b = mi.bias.view(m.na, -1) # conv.bias(255) to (3,85) b[:, 4] += math.log(8 / (640 / s) ** 2) # obj (8 objects per 640 image) b[:, 5:] += math.log(0.6 / (m.nc - 0.99)) if cf is None else torch.log(cf / cf.sum()) # cls mi.bias = torch.nn.Parameter(b.view(-1), requires_grad=True)
def _print_biases(self): m = self.model[-1] # Detect() module for f in sorted([x % m.i for x in m.f]): # from b = self.model[f].bias.detach().view(m.na, -1).T # conv.bias(255) to (3,85) print((‘%g Conv2d.bias:’ + ‘%10.3g’ * 6) % (f, *b[:5].mean(1).tolist(), b[5:].mean()))
# def _print_weights(self): # for m in self.model.modules(): # if type(m) is Bottleneck: # print(‘%10.3g’ % (m.w.detach().sigmoid() * 2)) # shortcut weights
def fuse(self): # fuse model Conv2d() + BatchNorm2d() layers print(‘Fusing layers.。。 ’, end=‘’) for m in self.model.modules(): if type(m) is Conv: m.conv = torch_utils.fuse_conv_and_bn(m.conv, m.bn) # update conv m.bn = None # remove batchnorm m.forward = m.fuseforward # update forward torch_utils.model_info(self) return self
def parse_model(md, ch): # model_dict, input_channels(3) print(‘
%3s%18s%3s%10s %-40s%-30s’ % (‘’, ‘from’, ‘n’, ‘params’, ‘module’, ‘arguments’)) anchors, nc, gd, gw = md[‘anchors’], md[‘nc’], md[‘depth_multiple’], md[‘width_multiple’] na = (len(anchors[0]) // 2) # number of anchors no = na * (nc + 5) # number of outputs = anchors * (classes + 5)
layers, save, c2 = [], [], ch[-1] # layers, savelist, ch out for i, (f, n, m, args) in enumerate(md[‘backbone’] + md[‘head’]): # from, number, module, args m = eval(m) if isinstance(m, str) else m # eval strings for j, a in enumerate(args): try: args[j] = eval(a) if isinstance(a, str) else a # eval strings except: pass
n = max(round(n * gd), 1) if n 》 1 else n # depth gain if m in [nn.Conv2d, Conv, PW_Conv,Bottleneck, SPP, DWConv, MixConv2d, Focus, CrossConv, BottleneckCSP, C3, BottleneckMOB]: c1, c2 = ch[f], args[0]
# Normal # if i 》 0 and args[0] != no: # channel expansion factor # ex = 1.75 # exponential (default 2.0) # e = math.log(c2 / ch[1]) / math.log(2) # c2 = int(ch[1] * ex ** e) # if m != Focus: c2 = make_divisible(c2 * gw, 8) if c2 != no else c2
# Experimental # if i 》 0 and args[0] != no: # channel expansion factor # ex = 1 + gw # exponential (default 2.0) # ch1 = 32 # ch[1] # e = math.log(c2 / ch1) / math.log(2) # level 1-n # c2 = int(ch1 * ex ** e) # if m != Focus: # c2 = make_divisible(c2, 8) if c2 != no else c2
args = [c1, c2, *args[1:]] if m in [BottleneckCSP, C3]: args.insert(2, n) n = 1 elif m is nn.BatchNorm2d: args = [ch[f]] elif m is Concat: c2 = sum([ch[-1 if x == -1 else x + 1] for x in f]) elif m is Detect: f = f or list(reversed([(-1 if j == i else j - 1) for j, x in enumerate(ch) if x == no])) else: c2 = ch[f]
m_ = nn.Sequential(*[m(*args) for _ in range(n)]) if n 》 1 else m(*args) # module t = str(m)[8:-2].replace(‘__main__.’, ‘’) # module type np = sum([x.numel() for x in m_.parameters()]) # number params m_.i, m_.f, m_.type, m_.np = i, f, t, np # attach index, ‘from’ index, type, number params print(‘%3s%18s%3s%10.0f %-40s%-30s’ % (i, f, n, np, t, args)) # print save.extend(x % i for x in ([f] if isinstance(f, int) else f) if x != -1) # append to savelist layers.append(m_) ch.append(c2) return nn.Sequential(*layers), sorted(save)
if __name__ == ‘__main__’: parser = argparse.ArgumentParser() parser.add_argument(‘--cfg’, type=str, default=‘yolov5s.yaml’, help=‘model.yaml’) parser.add_argument(‘--device’, default=‘’, help=‘cuda device, i.e. 0 or 0,1,2,3 or cpu’) opt = parser.parse_args() opt.cfg = check_file(opt.cfg) # check file device = torch_utils.select_device(opt.device)
# Create model model = Model(opt.cfg).to(device) model.train()
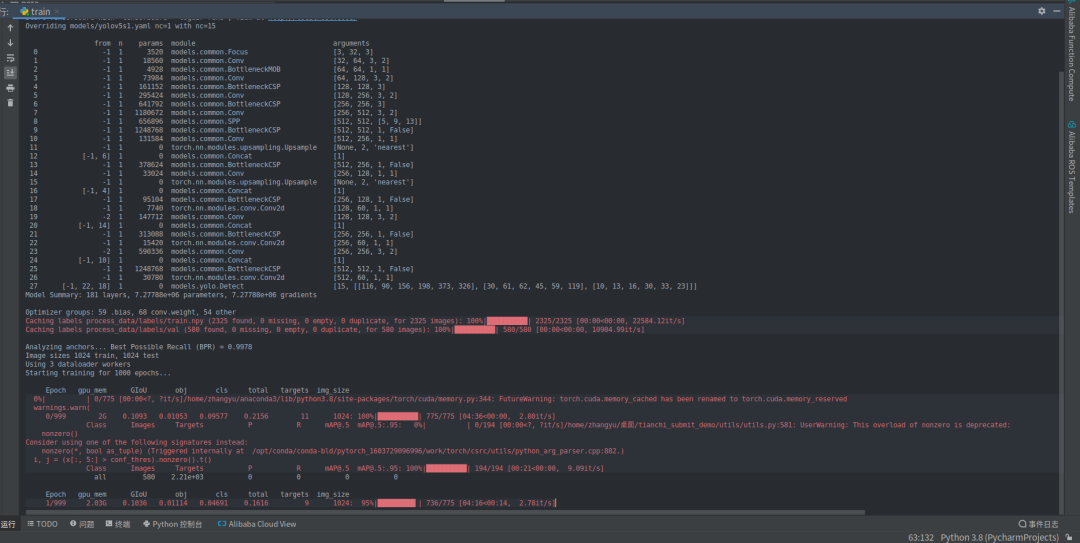
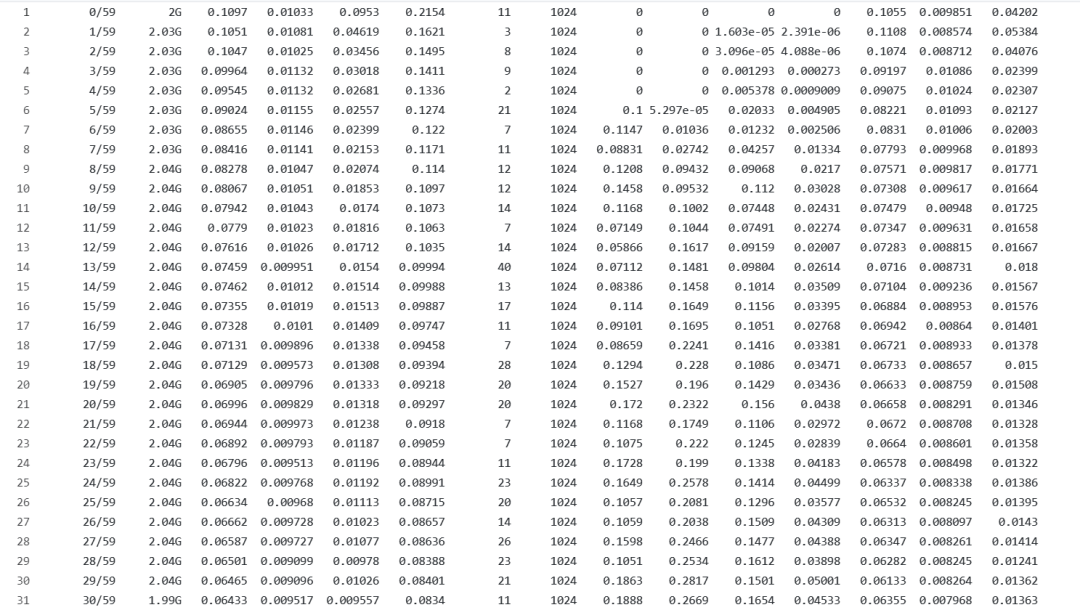
训练截图
6.测试模型并生成结果(针对本问题原创代码)
for *xyxy, conf, cls in det: if save_txt: # Write to file xywh = (xyxy2xywh(torch.tensor(xyxy).view(1, 4)) / gn).view(-1).tolist() # normalized xywh with open(txt_path + ‘.txt’, ‘a’) as f: f.write((‘%g ’ * 5 + ‘
’) % (cls, *xywh)) # label format # write to json if save_json: name = os.path.split(txt_path)[-1] print(name)
x1, y1, x2, y2 = float(xyxy[0]), float(xyxy[1]), float( xyxy[2]), float(xyxy[3]) bbox = [x1, y1, x2, y2] img_name = name conf = float(conf)
#add solution remove other result.append({ ‘name’: img_name + ‘.jpg’, ‘category’: int(cls + 1), ‘bbox’: bbox, ‘score’: conf })
7.结果展示
后记
03
针对布匹瑕疵检测问题,我们首先分析了题目要求,确定了我们的任务是检测到布匹中可能存在的瑕疵,对其进行分类并将其在图片中标注出来。接下来针对问题要求我们选择了合适的目标检测框架YOLOv5,并按照YOLOv5的格式要求对数据集和标注进行了转换。然后我们根据问题规模设置了合适的超参数,采用迁移学习的思想,基于官方的预训练模型进行训练以加快收敛速度。模型训练好以后,即可在验证集上验证我们模型的性能和准确性。
回顾整个过程我们可以发现,在越来越多的优秀目标检测框架被提出并开源之后,目标检测模型的实现门槛越来越低,我们可以很轻松的借用这些框架搭建模型来解决现实生活中的缺陷检测问题,深度学习的应用并没有我们想象的那么复杂。
当然,若想得到针对某个具体问题表现更加优秀的模型,还需要我们根据具体问题的具体特点对模型进行修正调优。例如针对本次布匹缺陷检测数据集中部分缺陷种类样本数量少、缺陷目标较小的问题,我们可以通过过采样种类较少的样本、数据增广、增加anchor的数量等方法来进一步提高模型的准确率。如果有同学对该问题感兴趣,想要进一步了解或在代码理解、环境配置等各方面存在疑问的话,欢迎通过文末邮箱联系小编,小编在这里期待与您交流。
文案:张宇(华中科技大学管理学院本科二年级)指导老师:曹菁菁(武汉理工大学物流工程学院)排版:程欣悦(荆楚理工学院本科三年级)审稿:张宇(华中科技大学管理学院本科二年级)。
—版权声明—
来源:数据魔术师 作者:张宇
仅用于学术分享,版权属于原作者。
若有侵权,请联系微信号:删除或修改!
编辑:jq
-
机器视觉
+关注
关注
162文章
4369浏览量
120294 -
数据集
+关注
关注
4文章
1208浏览量
24691 -
深度学习
+关注
关注
73文章
5500浏览量
121118
原文标题:深度学习实战之布匹缺陷检测
文章出处:【微信号:vision263com,微信公众号:新机器视觉】欢迎添加关注!文章转载请注明出处。
发布评论请先 登录
相关推荐
在树莓派上部署YOLOv5进行动物目标检测的完整流程
在目标检测中大物体的重要性

目标检测与识别技术有哪些
目标检测与识别技术的关系是什么
目标检测识别主要应用于哪些方面
人脸检测模型有哪些
AI驱动的雷达目标检测:前沿技术与实现策略


 基于目标检测框架上实现用于布匹瑕疵检测的模型





评论