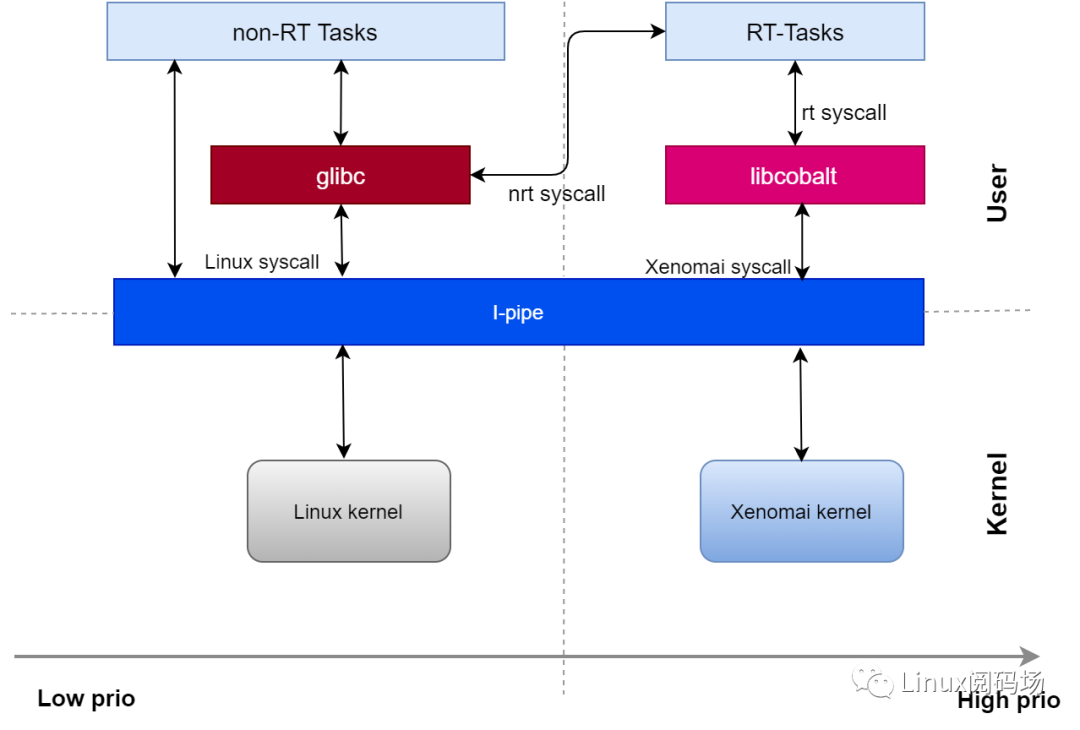
一、如何区分xenomai、linux系统调用/服务
1. 引出问题
上一篇文章xenomai内核解析--双核系统调用(一)以X86处理器为例,分析了xenomai内核系统调用的流程,读了以后可能会觉得缺了点什么,你可能会有以下疑问:
-
系统中的两个内核都是POSIX接口实现系统调用,那么我们用POSIX接口写了一个应用程序,怎样知道它调用的内核,或者如何区分这个应用是cobalt内核的应用,而不是普通linux应用?
-
对于同一个POSIX接口应用程序,可能既需要xenomai内核提供服务(xenomai 系统调用),又需要调用linux内核提供服务(linux内核系统调用),或者既有libcobalt,又有glibc库,他们是如何实现和区分的?

2. 编译链接
对于问题1,答案是:由编译的链接过程决定,链接的库不同当然执行的也就不同,如果普通编译,则该应用编译后是一个普通linux运用。如果要编译为xenomai应用,则需要链接到xenomai库。但是我们应用程序调用的代码函数symbol完全一样,我们会有疑惑xenomai是如何狸猫换太子的?首先链接是通过符号表(symbol)来链接的,当然也就要从代码符号(symbol)入手,首先来看一个常用的编译xenomai 应用的makefile:
XENO_CONFIG := /usr/xenomai/bin/xeno-configPROJPATH = .CFLAGS := $(shell $(XENO_CONFIG) --posix --alchemy --cflags)LDFLAGS := $(shell $(XENO_CONFIG) --posix --alchemy --ldflags)INCFLAGS= -I$(PROJPATH)/include/EXECUTABLE := rt-appsrc = $(wildcard ./*.c)obj = $(patsubst %.c, %.o, $(src))all: $(EXECUTABLE)$(EXECUTABLE): $(obj)$(CC) -g -o $@ $^ $(INCFLAGS) $(CFLAGS) $(LDFLAGS)%.o:%.c$(CC) -g -o $@ -c $< $(INCFLAGS) $(CFLAGS) $(LDFLAGS)clean:rm -f $(EXECUTABLE) $(obj)
其中最重要的就是编译时需要 xeno-config来生成gcc参数。xeno-config在我们编译安装xenomai库后,默认放在 /usr/bin/xeno-config。
$ /usr/bin/xeno-config --helpxeno-config --verbose--core=cobalt--version="3.1"--cc="gcc"--ccld="/usr/bin/wrap-link.sh gcc"--arch="x86"--prefix="/usr"--library-dir="/usr/lib"Usage xeno-config OPTIONSOptions :--help--v,--verbose--version--cc--ccld--arch--prefix--[skin=]posix|vxworks|psos|alchemy|rtdm|smokey|cobalt--auto-init|auto-init-solib|no-auto-init--mode-check|no-mode-check--cflags--ldflags--lib*-dir|libdir|user-libdir--core--info--compat
例如编译一个POSIX接口的实时应用,参数 --cflags表示编译,指定接口(skin) --posix,就能得到编译该程序的gcc参数了,看着没什么特别的:
$ /usr/bin/xeno-config --posix --cflags-I/usr/include/xenomai/cobalt-I/usr/include/xenomai-D_GNU_SOURCE-D_REENTRANT-fasynchronous-unwind-tables-D__COBALT__-D__COBALT_WRAP__
再看链接, --ldflags表示链接,如下得到链接参数:
$ /usr/bin/xeno-config --ldflags --posix-Wl,--no-as-needed-Wl,@/usr/lib/cobalt.wrappers-Wl,@/usr/lib/modechk.wrappers/usr/lib/xenomai/bootstrap.o-Wl,--wrap=main-Wl,--dynamic-list=/usr/lib/dynlist.ld-L/usr/lib-lcobalt-lmodechk-lpthread-lrt
这一看就多出不少东西,重点就在这 cobalt.wrappers、 modechk.wrappers,两个文件的内容如下:
...--wrap open--wrap open64--wrap socket--wrap close--wrap ioctl--wrap read....--wrap recv--wrap send--wrap getsockopt--wrap setsockop...
里面是一些posix系统调用,前面的 --wrap是什么作用?这是执行链接过程的程序 ld的一个参数,通过 man ld可以找到该参数的说明:
--wrap symbolUse a wrapper function for symbol. Any undefined reference to symbol will be resolved to "__wrap_symbol". Any undefined reference to "__real_symbol" will be resolved to symbol.This can be used to provide a wrapper for a system function. The wrapper function should be called "__wrap_symbol". If it wishes to call the system function, it should call "__real_symbol".Here is a trivial example:void *__wrap_malloc (size_t c){printf ("malloc called with %zu ", c);return __real_malloc (c);}If you link other code with this file using --wrap malloc, then all calls to "malloc" will call the function "__wrap_malloc" instead. The call to "__real_malloc" in "__wrap_malloc" will call the real "malloc"function.You may wish to provide a "__real_malloc" function as well, so that links without the --wrap option will succeed. If you do this, you should not put the definition of "__real_malloc" in the same file as"__wrap_malloc"; if you do, the assembler may resolve the call before the linker has a chance to wrap it to "malloc".
简单来说就是:任何 对 symbol未定义 的 引用 (undefined reference) 将 解析为 __wrap_symbol. 任何 对 __real_symbol未定义 的 引用 将 解析为 symbol。意思就是我们代码里使用到且是参数 --wrap指定的符号 symbol(即文件里的内容),链接的时候就认为它是 __wrap_symbol,比如我们代码用到了 open()在链接的时候是与库中的 __wrap_open()链接的, __wrap_open就是在xenomai 实时库libcobalt中实现,现在我们明白我们的posix函数如何和xenomai对接上了。
对于
xeno-config的其他更多参数可通过xenomai Manual Page了解。
这样就将POSIX接口源码编译成一个xenomai可执行程序了。
我们还有另一个问题,既然链接到了libcobalt,但我们是要Linux来提供服务,又是怎么让Linux来提供服务的呢?看libcobalt具体实现可以知道答案。
3. libcobalt中的实现
下面来看问题2,既然我们已将一个接口链接到实时内核库libcobalt,当然由实时内核库libcobalt来区分该发起linux内核调用还是xenomai内核系统。与上一篇文章一样,以一个POSIX接口 pthread_cretate()来解析libcobalt中的实现。
xenomai线程的创建流程比较复杂,需要先让linux创建普通线程,然后再由xenomai创建该线程的shadow 线程,即xenomai调度的实时线程,很符合我们上面的提出的问题2。说到这先简答介绍一下xenomai实时线程的创建,详细的创建流程后面会写专门写一篇文章解析,敬请期待。
pthread_cretate()不是一个系统调用,由NPTL(Native POSIX Threads Library)实现(NPTL是Linux 线程实现的现代版,由UlrichDrepper 和Ingo Molnar 开发,以取代LinuxThreads),NPTL负责一个用户线程的用户空间栈创建、内存分配、初始化等工作,与linux内核配合完成线程的创建。每一线程映射一个单独的内核调度实体(KSE,Kernel Scheduling Entity)。内核分别对每个线程做调度处理。线程同步操作通过内核系统调用实现。
xenomai coblat作为实时任务的调度器,每个实时线程需要对应到 coblat调度实体,如果要创建实时线程就需要像linux那样NPTL与linux 内核深度结合,那么coblat与libcoblat实现将会变得很复杂。在这里,xenomai使用了一种方式,由NPTL方式去完成实时线程实体的创建(linux部分),在普通线程的基础上附加一些属性,对应到xenomai cobalt内核实体时能被实时内核cobalt调度。
所以libcoblat库中的实时线程创建函数 pthread_cretate最后还是需要使用 glibc的 pthread_cretate函数,xenomai只是去扩展glibc pthread_cretate创建的线程,使这个线程可以在实时内核cobalt调度。
pthread_cretate()在libcobalt中pthread.h文件中定义如下:
COBALT_DECL(int, pthread_create(pthread_t *ptid_r,const pthread_attr_t *attr,void *(*start) (void *),void *arg));
COBALT_DECL宏在 wrappers.h中如下,展开上面宏,会为 pthread_create()生成三个类型函数:
__typeof__(T) __RT(P);__typeof__(T) __STD(P);__typeof__(T) __WRAP(P)int __cobalt_pthread_create(pthread_t *ptid_r,const pthread_attr_t *attr,void *(*start) (void *),void *arg);int __wrap_pthread_create(pthread_t *ptid_r,const pthread_attr_t *attr,void *(*start) (void *),void *arg);int __real_pthread_create(pthread_t *ptid_r,const pthread_attr_t *attr,void *(*start) (void *),void *arg);
声明 pthread_create()函数的这三个宏意思为:
__RT(P):__cobalt_pthread_create明确表示Cobalt实现的POSIX函数
__COBALT(P):与__RT()等效。
__STD(P):__real_pthread_create表示这是原始的POSIX函数(Linux glibc实现),cobalt库内部通过它来表示调用原始的POSIX函数(glibc NPTL).
__WRAP(P):__wrap_pthread_create是__cobalt_pthread_create的弱别名,如果编译器编译时知道有该函数其它的实现,该函数就会被覆盖。
主要关注前面两个,对于最后一个宏,如果外部库想覆盖已有的函数,应提供其自己的 __wrap_pthread_create()实现,来覆盖Cobalt实现的 pthread_create()版本。原始的Cobalt实现仍可以引用为 __COBALT(pthread_create)。由宏COBALT_IMPL来定义:
#define COBALT_IMPL(T, I, A) \__typeof__(T) __wrap_ ## I A __attribute__((alias("__cobalt_" __stringify(I)), weak)); \__typeof__(T) __cobalt_ ## I A
最后cobalt库函数 pthread_create实现主体为
COBALT_IMPL(int, pthread_create, (pthread_t *ptid_r,const pthread_attr_t *attr,void *(*start) (void *), void *arg)){pthread_attr_ex_t attr_ex;......return pthread_create_ex(ptid_r, &attr_ex, start, arg);}
COBALT_IMPL定义了 __cobalt_pthread_create函数及该函数的一个弱别名 __wrap_pthread_create,调用这两个函数执行的是同一个函数体。
对于 NPTL函数 pthread_create,在Cobalt库里使用 __STD()修饰,展开后即 __real_pthread_create(),其实只是NPTL pthread_create()的封装, __real_pthread_create()会直接调用 NPTL pthread_create,在libcobaltwrappers.c实现如下:
/* pthread */__weakint __real_pthread_create(pthread_t *ptid_r,const pthread_attr_t * attr,void *(*start) (void *), void *arg){return pthread_create(ptid_r, attr, start, arg);}
它调用的就是glibc中的 pthread_create函数.同样我们接着 __cobalt_pthread_create()看哪里调用的.
int pthread_create_ex(pthread_t *ptid_r,const pthread_attr_ex_t *attr_ex,void *(*start) (void *), void *arg){......__STD(sem_init(&iargs.sync, 0, 0));ret = __STD(pthread_create(&lptid, &attr, cobalt_thread_trampoline, &iargs));/*__STD 调用标准库的函数*/if (ret) {__STD(sem_destroy(&iargs.sync));return ret;}__STD(clock_gettime(CLOCK_REALTIME, &timeout));.....}
下面再看另一个例子,实时任务在代码中使用了linux的网络套接字(xenomai任务也是一个linux任务,也可以使用linux来提供服务,只不过会影响实时性),有以下代码,:
....int sockfd,ret;struct sockaddr_in addr;sockfd = socket(PF_INET, SOCK_STREAM, 0);.....bind(sockfd, (struct sockaddr *)&my_addr,sizeof(struct sockaddr_in));....
该代码编译时链接到了libcobalt,socket()函数即libcobalt中的 __cobalt_socket(),其定义在xenomai- 3.x.xlibcobalt tdm.c,如下:
COBALT_IMPL(int, socket, (int protocol_family, int socket_type, int protocol)){int s;s = XENOMAI_SYSCALL3(sc_cobalt_socket, protocol_family,socket_type, protocol);if (s < 0) {s = __STD(socket(protocol_family, socket_type, protocol));}return s;}
可以看到,libcobalt中的函数会先尝试调用实时内核cobalt的系统调用, 当cobalt系统调用不成功的时候才继续尝试通过 __STD()宏来调用linux系统调用(cobalt内核根据socket协议类型参数 PF_INET, SOCK_STREAM判断),这样就有效的分清了是linux系统调用还是xenomai系统调用,这也是所有libcobalt实现的posix都链接到libobalt库的原因。
一般情况下,可以直接在代码中使用 __STD()宏指明我们调用的linux内核的服务,修改如下:
....int sockfd,ret;struct sockaddr_in addr;sockfd = __STD(socket(PF_INET, SOCK_STREAM, 0));.....__STD(bind(sockfd, (struct sockaddr *)&my_addr,sizeof(struct sockaddr_in)));....
现在一切都明了了,一个函数编译时通过参数链接到xenomai库后,通过 __STD()宏来表示使用linux接口。
4. 总结
-
在实时程序或实时库libcobalt中,通过
__STD()宏来表示使用linux接口。 -
对于一个未指明的接口,libcobalt会先尝试发起xenomai系统调用,不成功会接着尝试linux内核系统调用或者调用glibc函数。
-
如果我们向libcobalt库中新添加一个libcobalt库中没有的自定义POSIX函数/系统调用时,一定要在内部先尝试发起xenomai系统调用,不成功时接着尝试linux内核系统调用,此外还必须将该接口添加到文件
xenomailibcobaltcobalt.wrappers中,这样才能正确链接,否则编译后的应用还是原来的。
二、 如何为xenomai添加一个系统调用
1. 添加系统调用
有的时候我们需要给系统添加一个特殊功能的系统调用,比如我们在对xenomai做benchmark测试的时候,需要测试每个系统服务操作系统需要消耗多长时间,比如测量获取信号量操作系统的耗时。我们知道中断优先级最高,会强占前台的操作系统和应用,为了更准确的测量获取信号量时操作系统的耗时,这里需要将这种情况下的结果丢弃,我们就需要一个获取xenomai中断次数的系统调用。
假设该系统没有任何实时驱动运行,且设置了xenomai.supportedcpus和linux irqaffinity,supportedcpus启用tickless,下面给xenomai添加一个系统调用 get_timer_hits(),用于获取应用程序运行CPU的定时器中断产生的次数(类似于VxWorks里的tickGet(),VxWorks是采用周期tick的方式来驱动系统运作,tickGet()获取的也就是tick定时器中断的次数)。以该系统调用来举例如何为xenomai添加一个实时系统调用。
在前两篇文中说到,xenomai每个系统的系统系统调用号在 cobaltuapisyscall.h中:
......
在此添加 sc_cobalt_get_timer_hits的系统,为了避免与xenomai系统调用冲突(xenomai官方添加的系统调用号从小到大),那我们就从最后一个系统调用添加,即127号系统调用,如下。
....../*Powerof2*/
先确定一下我们这个函数的API形式,由于是一个非标准的形式,这里表示如下:
int get_timer_hits(unsigned long *u_tick);
参数为保存hits的变量地址;
返回值:成功0;出错 <0;
系统调用的头文件,然后添加一个系统调用的声明,觉得它和clock相关,那就放在 kernelxenomaiposixclock.h中吧。
COBALT_SYSCALL_DECL(get_timer_hits,(unsignedlong__user*u_tick));
然后是该函数的内核实现,放在 /kernelxenomaiposixclock.c,如下:
COBALT_SYSCALL(get_timer_hits,primary,(unsignedlong__user*u_tick)){structxnthread*thread;unsignedlongtick;intcpu;intret=0;unsignedintirq;thread=xnthread_current();if(thread==NULL)return-EPERM;/*得到当前任务CPU号*/cpu=xnsched_cpu(thread->sched);irq=per_cpu(ipipe_percpu.hrtimer_irq,cpu);/*读取该CPU中断计数*/tick=__ipipe_cpudata_irq_hits(&xnsched_realtime_domain,cpu,irq);if(cobalt_copy_to_user(u_tick,&tick,sizeof(tick)))return-EFAULT;returnret;}
需要注意的是该系统调用的权限,这里使用 primary,表示只有cobalt上下文(实时线程)才能调用。
修改完成后重新编译内核并安装。
2.Cobalt库添加接口
在前两篇文中说到,xenomai系统调用由libcobalt发起,所以修改应用库来添加该函数接口,添加声明 includecobalt ime.h:
COBALT_DECL(int,get_timer_hits(unsignedlongtick));
xenomai3.x.xlibcobaltclock.c添加该接口定义:
COBALT_IMPL(int,get_timer_hits,(unsignedlong*tick)){intret;ret=-XENOMAI_SYSCALL1(sc_cobalt_get_tick,tick);returnret;}
因为该系统调用和posix接口没有符号重名,不需要修改wrappers文件,完成上述步骤后重新编译并安装xenomai库。
3. 应用使用
由于我们添加 get_timer_hits()系统调用时,指定了系统调用的权限为primary,这里创建一个实时任务,使用宏 __RT()指定链接到libcobalt库。
void test(void *cookie){unsigned long tick;int ret;ret = __RT(get_timer_hits(&tick));if (ret){fprintf(stderr,"%s: failed to get_tick,%s ",__func__,strerror(-ret));return ret;}fprintf(stdout,"timer_hits:%ld ",tick);/*....*/return 0;}int main(int argc, char *const *argv){struct sigaction sa __attribute__((unused));int sig, cpu = 0;char sem_name[16];sigset_t mask;RT_TASK task;int ret;sigemptyset(&mask);sigaddset(&mask, SIGINT);sigaddset(&mask, SIGTERM);sigaddset(&mask, SIGHUP);sigaddset(&mask, SIGALRM);pthread_sigmask(SIG_BLOCK, &mask, NULL);setlinebuf(stdout);ret = rt_task_spawn(&task, "test_task", 0, PRIO,T_JOINABLE, test, NULL);if (ret){fprintf(stderr,"%s: failed to create task,%s ",__func__,strerror(-ret));return ret;}__STD(sigwait(&mask, &sig));rt_task_join(&task);rt_task_delete(&task);return 0;}
编译Makefile:
XENO_CONFIG := /usr/xenomai/bin/xeno-configPROJPATH = .CFLAGS := $(shell $(XENO_CONFIG) --posix --alchemy --cflags)LDFLAGS := $(shell $(XENO_CONFIG) --posix --alchemy --ldflags)INCFLAGS= -I$(PROJPATH)/include/EXECUTABLE := get-timer-hitssrc = $(wildcard ./*.c)obj = $(patsubst %.c, %.o, $(src))all: $(EXECUTABLE)$(EXECUTABLE): $(obj)$(CC) -g -o $@ $^ $(INCFLAGS) $(CFLAGS) $(LDFLAGS)%.o:%.c$(CC) -g -o $@ -c $< $(INCFLAGS) $(CFLAGS) $(LDFLAGS)clean:rm -f $(EXECUTABLE) $(obj)
运行结果:
$./get-timer-hitstimer_hits:3
可以看到,虽然系统已经启动十几分钟了,但一直没有运行xenomai应用,xenomai tick相关中断才产生了3次,这就是tickless,后面会出xenomai调度及时间子系统和xenomai benchmark相关文章,敬请关注。
审核编辑 :李倩-
Linux
+关注
关注
87文章
11310浏览量
209592 -
Xenomai
+关注
关注
0文章
10浏览量
7988
原文标题:xenomai内核解析--双核系统调用(二)--应用如何区分xenomai/linux系统调用或服务
文章出处:【微信号:LinuxDev,微信公众号:Linux阅码场】欢迎添加关注!文章转载请注明出处。
发布评论请先 登录
相关推荐


 如何区分xenomai、linux系统调用/服务


评论