 TensorFlow Lite实现移植到ART-Pi Smart

TensorFlow Lite 官方仓库:
https://github.com/iysheng/tflite-micro
我的ART-Pi-smart仓库:
https://gitee.com/iysheng/ART-Pi-smart


经过了多天的摸索学习,今天将 TensorFlow Lite 的框架移植到了ART-Pi Smart上,但是还是存在一点问题,主要是 C++ 和 C 语言混合编译的问题,根据目前我的总结,具体体现在:
-
TensorFlow Lite 在函数中定义的静态对象无法正常构造,必须放在全局变量的位置
-
全局变量定义的对象只能使用默认的构造函数,无发使用带有参数的构造函数初始对象
 1diff--gita/kernel/bsp/imx6ull-artpi-smart/applications/tflm_tree/examples/hello_world/main_functions.ccb/kernel/bsp/imx6ull-artpi-smart/applications/tflm_tree/examples/hello_world/main_functions.cc
 2indexa585ba7..a318c32100644
 3---a/kernel/bsp/imx6ull-artpi-smart/applications/tflm_tree/examples/hello_world/main_functions.cc
 4+++b/kernel/bsp/imx6ull-artpi-smart/applications/tflm_tree/examples/hello_world/main_functions.cc
 5@@-37,18+37,30@@constexprintkTensorArenaSize=2000;
 6uint8_ttensor_arena[kTensorArenaSize];
 7}//namespace
 8
 9+statictflite::MicroErrorReportermicro_error_reporter;
10+//Thispullsinalltheoperationimplementationsweneed.
11+//NOLINTNEXTLINE(runtime-global-variables)
12+statictflite::AllOpsResolverresolver;
13+statictflite::MicroInterpreter*static_interpreter;
14+
15//ThenameofthisfunctionisimportantforArduinocompatibility.
16voidsetup(){
17+
18+DebugLog("setupbegin.
");
19tflite::InitializeTarget();
20
21+DebugLog("initialok.
");
22+
23//Setuplogging.Googlestyleistoavoidglobalsorstaticsbecauseof
24//lifetimeuncertainty,butsincethishasatrivialdestructorit'sokay.
25//NOLINTNEXTLINE(runtime-global-variables)
26-statictflite::MicroErrorReportermicro_error_reporter;
27+/*这个地方有问题*/
28error_reporter=µ_error_reporter;
29
30//Mapthemodelintoausabledatastructure.Thisdoesn'tinvolveany
31//copyingorparsing,it'saverylightweightoperation.
32+//printf("value:%x%u
",g_hello_world_model_data[0],g_hello_world_model_data_size);
33+
34model=tflite::GetModel(g_hello_world_model_data);
35if(model->version()!=TFLITE_SCHEMA_VERSION){
36TF_LITE_REPORT_ERROR(error_reporter,
37@@-57,15+69,10@@voidsetup(){
38model->version(),TFLITE_SCHEMA_VERSION);
39return;
40}
41-
42-//Thispullsinalltheoperationimplementationsweneed.
43-//NOLINTNEXTLINE(runtime-global-variables)
44-statictflite::AllOpsResolverresolver;
45-
46//Buildaninterpretertorunthemodelwith.
47-statictflite::MicroInterpreterstatic_interpreter(
48+static_interpreter=newtflite::MicroInterpreter(
49model,resolver,tensor_arena,kTensorArenaSize,error_reporter);
50-interpreter=&static_interpreter;
51+interpreter=static_interpreter;
52
53//Allocatememoryfromthetensor_arenaforthemodel'stensors.
54TfLiteStatusallocate_status=interpreter->AllocateTensors();
55@@-102,6+109,7@@intloop(){
56if(invoke_status!=kTfLiteOk){
57TF_LITE_REPORT_ERROR(error_reporter,"Invokefailedonx:%f
",
58static_cast<double>(x));
59+printf("invokestatus:%x
",invoke_status);
60return-1;
61}
参考的资料主要有:
1、tinyML基TensorFlow Lite在Arduino
2、https://github.com/iysheng/tflite-micro/blob/main/tensorflow/lite/micro/docs/new_platform_support.md
特别关键的一点是提取基础框架的文件:python3 tensorflow/lite/micro/tools/project_generation/create_tflm_tree.py -e hello_world /tmp/tflm-tree根据官方的文档,上述命令就可以将 hello_world 工程相关的文件提取到指定的 /tmp/tflm-tree 目录,下一步做的就是将这部分内容添加到 RT-Thread Smart 工程中,编译出来。相关的代码,我都上传到了我的ART-Pi Smart的仓库。如果有问题欢迎和我讨论。展示下,运行起来的效果,为了展示需要,删除了部分空行打印:
  1U-Boot2017.03-g002b758ac9-dirty(Jul082021-10:45:12+0000)
  2CPU:Freescalei.MX6ULLrev1.1696MHz(runningat396MHz)
  3CPU:Industrialtemperaturegrade(-40Cto105C)at44C
  4Resetcause:POR
  5Model:Freescalei.MX6ULL14x14EVKBoard
  6Board:MX6ULL14x14EVK
  7DRAM:512MiB
  8MMC:FSL_SDHC:0,FSL_SDHC:1
  9Display:TFT7016(1024x600)
 10Video:1024x600x24
 11In:serial
 12Out:serial
 13Err:serial
 14switchtopartitions#0,OK
 15mmc1(part0)iscurrentdevice
 16Net:eth0:ethernet@02188000[PRIME]
 17NormalBoot
 18Hitanykeytostopautoboot:3210
 19ethernet@02188000WaitingforPHYautonegotiationtocomplete....done
 20Usingethernet@02188000device
 21TFTPfromserver10.20.52.39;ourIPaddressis10.20.52.89
 22Filename'rtthread.bin'.
 23Loadaddress:0x80001000
 24Loading:*#################################################################
 25###############################################################
 26159.2KiB/s
 27done
 28Bytestransferred=1866656(1c7ba0hex)
 29##Startingapplicationat0x80001000...
 30|/
 31-RT-ThreadSmartOperatingSystem
 32/|5.0.0buildApr302022
 332006-2020Copyrightbyrt-threadteam
 34docomponentsinitialization.
 35initializerti_board_end:0done
 36initializedfs_init:0done
 37initializert_mmcsd_core_init:0done
 38initializert_usbd_winusb_class_register:0done
 39initializefutex_system_init:0done
 40initializepmutex_system_init:0done
 41initializelwip_system_initlwIP-2.1.2initialized!
 42:0done
 43initializeulog_console_backend_init:0done
 44initializeulog_init:0done
 45initializert_hw_adc_init:0done
 46initializert_hw_csi_init:0done
 47initializert_hw_dbg_mm_init:0done
 48initializeimx6ul_eth_initredfirstva=f00here0000
 49here1111mmu_l2=c107c000
 50[31m[63]E/drv.enet:emacdeviceinitsuccess
 51[0m:0done
 52initializert_hw_i2c_init[32m[70]I/I2C:I2Cbus[i2c1]registered
 53[0m[32m[75]I/I2C:I2Cbus[i2c3]registered
 54[0m[32m[79]I/I2C:I2Cbus[i2c4]registered
 55[0m:0done
 56initializert_hw_elcd_init[86]D/drv.lcd:fbaddress=>0x811c0000
 57:0done
 58initializert_hw_pwm_init:0done
 59initializert_hw_rtc_init:0done
 60initializeimxrt_mci_init:0done
 61initializert_hw_spi_init:0done
 62initializegt911_init[31m[158]E/drv.enet:PHYLinkdown,pleasecheckthecableconnectionandlinkpartnersetting.
 63[0m[32m[192]I/SDIO:emmccardcapacity3817472KB.
 64[0mfoundpart[0],begin:2098176,size:500.0MB
 65foundpart[1],begin:526386176,size:1.0GB
 66foundpart[2],begin:1600128000,size:10.0MB
 67foundpart[3],begin:1610613760,size:200.0MB
 68[32m[328]I/touch:rt_touchinitsuccess
 69[0m[32m[332]I/gt911:touchdevicegt911initsuccess
 70[0m:0done
 71initializert_usbd_init:0done
 72initializert_hw_wdt_init:0done
 73initializenull_device_init:0done
 74initializerandom_device_init:0done
 75initializeurandom_device_init:0done
 76initializezero_device_init:0done
 77initializert_work_sys_workqueue_init:0done
 78initializeptmx_register:0done
 79initializecritical_init:0done
 80initializert_hw_ov5640_init:0done
 81initializecplusplus_system_init:0done
 82initializeelm_init:0done
 83initializedfs_romfs_init:0done
 84initializert_i2c_core_init:0done
 85initializelibc_system_init:0done
 86initializeclock_time_system_init:0done
 87initializesal_init[32m[390]I/sal.skt:SocketAbstractionLayerinitializesuccess.
 88[0m:0done
 89initializemnt_initemmcfilesysteminitializationdone!
 90:0done
 91initializeTF_lite_init[5309]D/drv.enet:enet1linkup
 92:0done
 93initializeem_initopenemfailed!
 94:-1done
 95initializeset_adc_init:0done
 96initializeset_pwm_default:0done
 97initializert_sysinfo_init:0done
 98initializefinsh_system_init:0done
 99Redsay:hellort-smart.
100openlcdokwatchdogstarting.....
101testtf.
102setupbegin.
103gohere
104initialok.
105getmodebegin.
106gethere?
107gethere000?
108constructtheclass.
109initok.
110x_value:1.0*2^-127,y_value:1.0297613*2^-7
111x_value:1.0053092*2^-5,y_value:1.8020826*2^-5
112x_value:1.0053092*2^-4,y_value:1.1584818*2^-4
113x_value:1.507964*2^-4,y_value:1.9308027*2^-4
114x_value:1.0053092*2^-3,y_value:1.0941217*2^-3
115x_value:1.2566366*2^-3,y_value:1.4802819*2^-3
116x_value:1.507964*2^-3,y_value:1.6733624*2^-3
117x_value:1.7592913*2^-3,y_value:1.8664425*2^-3
118x_value:1.0053092*2^-2,y_value:1.0619412*2^-2
119x_value:1.130973*2^-2,y_value:1.1584818*2^-2
特别地:
 1x_value:1.0*2^-127,y_value:1.0297613*2^-7
 2x_value:1.0053092*2^-5,y_value:1.8020826*2^-5
 3x_value:1.0053092*2^-4,y_value:1.1584818*2^-4
 4x_value:1.507964*2^-4,y_value:1.9308027*2^-4
 5x_value:1.0053092*2^-3,y_value:1.0941217*2^-3
 6x_value:1.2566366*2^-3,y_value:1.4802819*2^-3
 7x_value:1.507964*2^-3,y_value:1.6733624*2^-3
 8x_value:1.7592913*2^-3,y_value:1.8664425*2^-3
 9x_value:1.0053092*2^-2,y_value:1.0619412*2^-2
10x_value:1.130973*2^-2,y_value:1.1584818*2^-2
11...
上述部分是模型估算的正弦函数的数据,我绘制成图表的效果如下: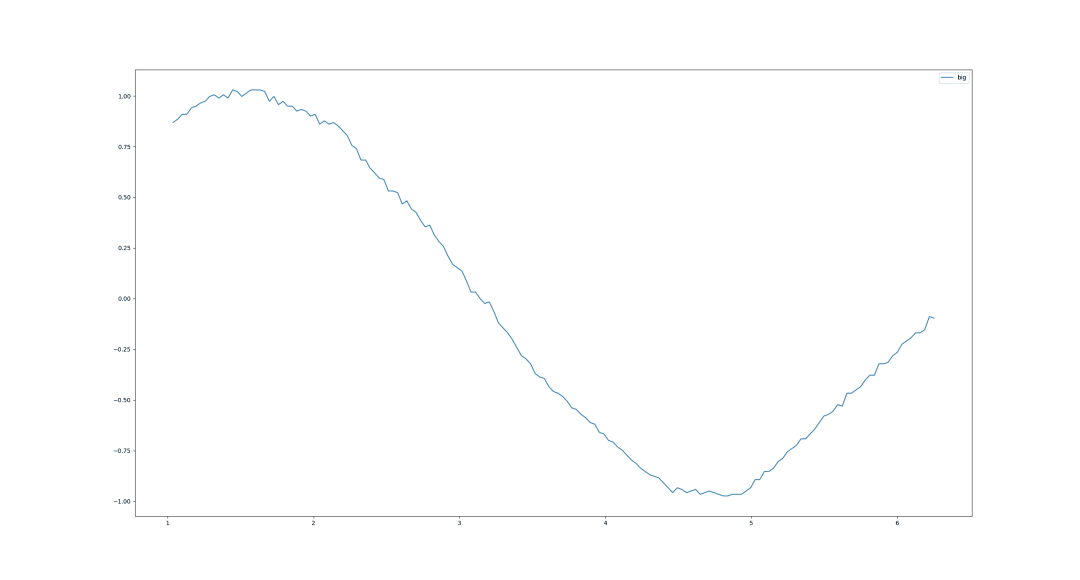 效果还是不错的,这使用的是官方例程 16 * 16 * 1 的三层模型。
审核编辑:汤梓红
声明:本文内容及配图由入驻作者撰写或者入驻合作网站授权转载。文章观点仅代表作者本人,不代表电子发烧友网立场。文章及其配图仅供工程师学习之用,如有内容侵权或者其他违规问题,请联系本站处理。
举报投诉
-
移植
+关注
关注
1文章
379浏览量
28150 -
SMART
+关注
关注
3文章
225浏览量
44721 -
tensorflow
+关注
关注
13文章
329浏览量
60545 -
TensorFlow Lite
+关注
关注
0文章
26浏览量
643
原文标题:在 ART-Pi Smart 上运行 TensorFlow Lite
文章出处:【微信号:RTThread,微信公众号:RTThread物联网操作系统】欢迎添加关注!文章转载请注明出处。
发布评论请先 登录
相关推荐
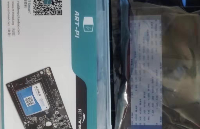
ART-Pi Smart开发板开箱体验
拿到开发板,首先考虑的是如何接线,先看了一遍sdk包里面 ART-Pi-smart-masterdocuments目录下的操作文档,然后拿了一根TypeC的usb线连接开发板并开始体验ART-Pi开发板,如下图所示。
发表于 07-07 11:15
•1177次阅读
ART Pi Smart基于RT-Thread Smart系统的LVGL移植
ART-Pi Smart开发板为RT-Thread联合百问科技出品,使用的是 NXP 公司的 i.MX6ULL 处理器,具备单核 ARM Cortex-A7,最高运行频率可以达到 800MHz。
ART-PI重力感应无线智能小车设计实现
实现无线重力感应遥控小车。终极目标:发射板采用MPU6050采集陀螺仪数据,通过wifi+MQTT协议发布主题至Onenet服务器,控制板通过wifi+MQTT订阅主题,实现无线遥控小车的目标;所有资料开源,PCB可直接打板,小飞哥已经测试,大家放心使用。
发表于 02-10 06:39
怎样在ART-Pi H750上移植TouchGFX呢
QSPI-FLASH烧录算法在ART-Pi H750上移植TouchGFX(三)——移植TouchGFX到RT-Thread系统在ART-Pi
发表于 02-22 06:01
配置ART-Pi Smart开发板的启动方式资料推荐
BOOT_MODE 寄存器、eFUSEs、配置管脚等状态来决定启动模式以及启动设备。故在启动前,用户可根据自己需要配置 ART-Pi Smart 开发板的启动方式。目前,ART-Pi Sma
发表于 05-05 17:30
分享一种在ART-Pi Smart上进行车标识别的设计方案
1、在ART-Pi Smart上对摄像头采集的数据进行车辆识别本来计划使用 ART-Pi Smart 进行车标识别的,但是现在实际测试发现摄像头采集的数据显示有大概率抖动的现象发生,所
发表于 06-02 15:11
ART-PI嵌入式人形检测设计资料实现
1、ART-PI嵌入式人形检测设计实现硬件平台 ART-Pi, 50M FLOPS。我的模型(删减后的模型)最终部署在板子上是推理时间是56ms,不包括数据处理时间。$ pip
发表于 08-25 15:33
ART-PI smart PWM的问题是如何修复的
art-pi smart PWM问题修复记录PWM功能是我需要使用的一个重要功能,art-pi smart板子本身就做好了PWM功能。实际一测试,傻眼了:频率不是1000Hz,只有66
发表于 09-13 16:46
RT-Thread联合百问科技出品ART-Pi Smart开发板
ART-Pi Smart 开发板是RT-Thread联合百问科技出品,用于学习和评估RT-Thread Smart微内核操作系统。 硬件配置 i.MX6ULL,单核 ARM Cortex-A7,最高
【STM32H750】玩转ART-Pi(一)——使用STM32CUBMX生成TouchGFX工程
QSPI-FLASH烧录算法在ART-Pi H750上移植TouchGFX(三)——移植TouchGFX到RT-Thread系统在ART-Pi
发表于 12-28 19:20
•10次下载

ART-PI Smart开发板介绍与开发环境的建立
art-pi smart 是rt-thread公司推出的一款基于NXP公司imx6ull处理器的开发板,主要用来测试评估RT公司去年新发布的混合微内核操作系统RT-Smart。
在ART-Pi Smart上对摄像头采集的数据进行车标识别
本来计划使用 ART-Pi Smart 进行车标识别的,但是现在实际测试发现摄像头采集的数据显示有大概率抖动的现象发生,所以实现了将摄像头采集的数据以 bmp 图片格式存储,然后发送到电脑端使用 tflite 格式的模型数据进行
发表于 07-06 16:53
•942次阅读


 工商网监
工商网监
评论