欧拉数定义
二值图像分析中欧拉数重要的拓扑特征之一,在图像分析与几何对象识别中有着十分重要的作用,二值图像的欧拉数计算公式表示如下:
E = N – H 其中
E表示计算得到欧拉数
N表示联通组件的数目
H表示在联通组件内部的洞的数目
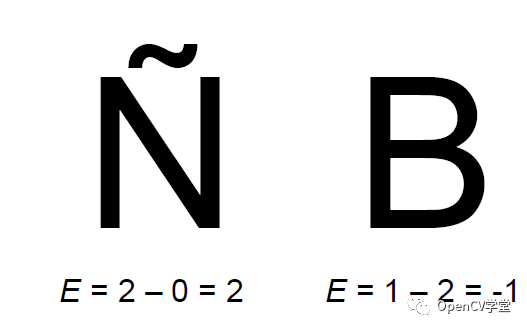
下图是二值图像,白色背景,两个对象、分析计算得到欧拉数的例子:

可以看到通过简单的欧拉数属性就可以对它们进行区分。左侧对象中有两个联通区域,所以N=2,没有洞孔区域,所以H=0, 计算得到欧拉数目为 2 – 0 = 。右侧是大写字母B,它只有一个联通区域所以N = 1, 内部有两个洞孔区域所以H = 2,最终计算得到欧拉数为 2 – 1 = -1。对于任意一个几何形状来说,如果我们要求得它的欧拉数,就首先要分析它的轮廓结构,然后根据轮廓层次结构计算得到N与H值。
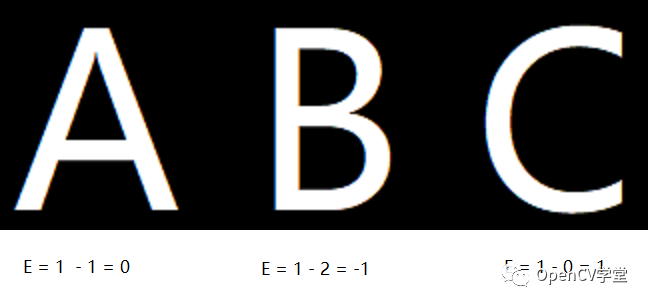
欧拉数是图像几何识别中重要的属性,举例如下图中三个英文字母
 对字母A来说它的内部有一个黑色孔洞,所以它的H=1,其本身是一个联通组件所以N =1,最终计算得到欧拉数为 E = 1 -1 = 0,同样可以计算B与C它们的欧拉数分布为-1与1,可见通过欧拉数属性可以轻而易举的区分ABC三个英文字母。
二:轮廓层次信息获取
在OpenCV对二值图像进行轮廓分析输出的层次结构会保存在一个Vec4i的结构体中,这里有必要首先看一下轮廓发现API及其相关参数的解释:
voidcv::findContours(
InputOutputArrayimage,
OutputArrayOfArrayscontours,
OutputArrayhierarchy,
intmode,
intmethod,
Pointoffset=Point()
)
image参数表示输入的二值图像
contours表示所有的轮廓信息,每个轮廓是一系列的点集合
hierarchy表示对应的每个轮廓的层次信息,我们就是要用它实现对最大轮廓欧拉数的分析
mode表示寻找轮廓拓扑的方法,如果要寻找完整的层次信息,要选择参数RETR_TREE
method表示轮廓的编码方式,一般选择简单链式编码,参数CHAIN_APPROX_SIMPLE
offset表示是否有位移,一般默认是0
上面的参数中最重要的是hierarchy信息,它的输出是vector

上面的索引如果是负数就表示没有相关层次信息,如果是非负数就表示有相关的层次关系信息。此外轮廓发现函数对输入image图像的要求必须满足
-
背景是黑色 ,0表示
-
对象或者前景是白色,1表示
三:欧拉数计算方法
有了轮廓的层次信息与每个轮廓的信息之后,尝试遍历每个轮廓,首先通过调用findContours就可以获取二值图像的轮廓层次信息,然后遍历每个轮廓,进行层次遍历,获得每层子轮廓的总数,最终根据轮廓层级不同分为孔洞与连接轮廓的计数,二者想减得到每个独立外层轮廓的欧拉数。
二值化与轮廓发现的代码如下:
Matgray,binary;
cvtColor(src,gray,COLOR_BGR2GRAY);
threshold(gray,binary,0,255,THRESH_BINARY|THRESH_OTSU);
vectorhireachy;
vector<vector>contours;
findContours(binary,contours,hireachy,RETR_TREE,CHAIN_APPROX_SIMPLE,Point());
获取同层轮廓的代码如下:
vector<int>current_layer_holes(vector<Vec4i>layers,intindex){
intnext=layers[index][0];
vector<int>indexes;
indexes.push_back(index);
while(next>=0){
indexes.push_back(next);
next=layers[next][0];
}
returnindexes;
}
使用队列迭代寻找遍历每层的代码如下:
while(!nodes.empty()){
//当前层总数目
if(index%2==0){//联通组件对象
n_total+=nodes.size();
}
else{//孔洞对象
h_total+=nodes.size();
}
index++;
//计算下一层所有孩子节点
intcurr_ndoes=nodes.size();
for(intn=0;n< curr_ndoes; n++) {
        intvalue=nodes.front();
nodes.pop();
//获取下一层节点第一个孩子
intchild=hireachy[value][2];
if(child>=0){
nodes.push(child);
}
}
}
四:运行与测试结果
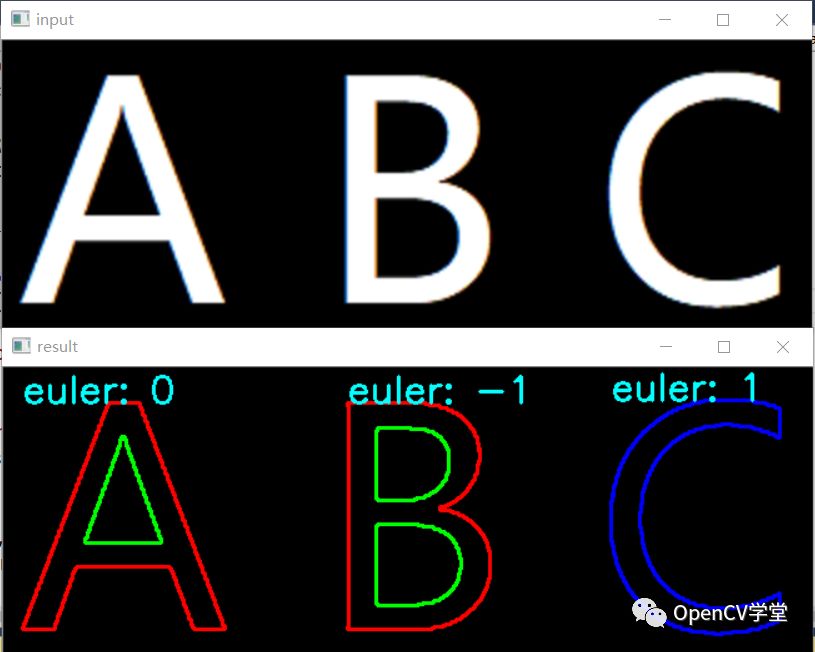
测试图一(ABC)与运行结果:

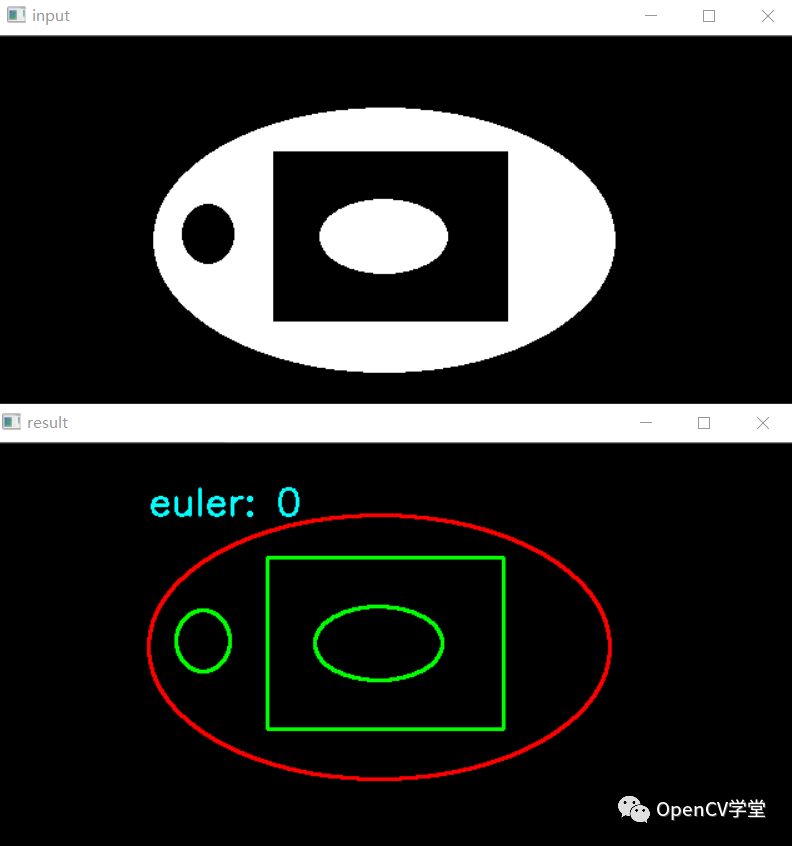
测试图二与运行结果

五:完整源代码
#includelayers,intindex);
intmain(intargc,char**argv){
Matsrc=imread("D:/holes.png");
if(src.empty()){
printf("couldnotloadimage...
");
return-1;
}
namedWindow("input",CV_WINDOW_AUTOSIZE);
imshow("input",src);
Matgray,binary;
cvtColor(src,gray,COLOR_BGR2GRAY);
threshold(gray,binary,0,255,THRESH_BINARY|THRESH_OTSU);
vectorhireachy;
vector<vector>contours;
findContours(binary,contours,hireachy,RETR_TREE,CHAIN_APPROX_SIMPLE,Point());
Matresult=Mat::zeros(src.size(),src.type());
for(size_tt=0;t< contours.size(); t++) {
intnext=hireachy[t][0];//nextatthesamehierarchicallevel
intprev=hireachy[t][1];//prevatthesamehierarchicallevel
intchild=hireachy[t][2];//firstchild
intparent=hireachy[t][3];//parent
printf("next%d,previous%d,children:%d,parent:%d
",next,prev,child,parent);
drawContours(result,contours,t,Scalar(0,255,0),2,8);
//startcalculateeulernumber
inth_total=0;
intn_total=1;
intindex=1;
vector<int>all_children;
if(child>=0&&parent< 0){
//计算当前层
queue<int>nodes;
vector<int>indexes=current_layer_holes(hireachy,child);
for(inti=0;i< indexes.size(); i++) {
nodes.push(indexes[i]);
}
while(!nodes.empty()){
//当前层总数目
if(index%2==0){//联通组件对象
n_total+=nodes.size();
}
else{//孔洞对象
h_total+=nodes.size();
}
index++;
//计算下一层所有孩子节点
intcurr_ndoes=nodes.size();
for(intn=0;n< curr_ndoes; n++) {
intvalue=nodes.front();
nodes.pop();
//获取下一层节点第一个孩子
intchild=hireachy[value][2];
if(child>=0){
nodes.push(child);
}
}
}
printf("holenumber:%d
",h_total);
printf("connectionnumber:%d
",n_total);
//计算欧拉数
inteuler_num=n_total-h_total;
printf("numberofeuler:%d
",euler_num);
drawContours(result,contours,t,Scalar(0,0,255),2,8);
//显示欧拉数
Rectrect=boundingRect(contours[t]);
putText(result,format("euler:%d",euler_num),rect.tl(),FONT_HERSHEY_SIMPLEX,1.0,Scalar(255,255,0),2,8);
}
if(child< 0&&parent< 0){
printf("holenumber:%d
",h_total);
printf("connectionnumber:%d
",n_total);
inteuler_num=n_total-h_total;
printf("numberofeuler:%d
",euler_num);
drawContours(result,contours,t,Scalar(255,0,0),2,8);
Rectrect=boundingRect(contours[t]);
putText(result,format("euler:%d",euler_num),rect.tl(),FONT_HERSHEY_SIMPLEX,1.0,Scalar(255,255,0),2,8);
}
}
imshow("result",result);
waitKey(0);
return0;
}
vector<int>current_layer_holes(vectorlayers,intindex){
intnext=layers[index][0];
vector<int>indexes;
indexes.push_back(index);
while(next>=0){
indexes.push_back(next);
next=layers[next][0];
}
returnindexes;
}
PS:代码未经更多严格测试,仅供参考!
审核编辑 :李倩
-
二值图像
+关注
关注
0文章
14浏览量
8737 -
OpenCV
+关注
关注
31文章
635浏览量
41363 -
欧拉
+关注
关注
1文章
13浏览量
1831
原文标题:OpenCV轮廓层次分析实现欧拉数计算
文章出处:【微信号:CVSCHOOL,微信公众号:OpenCV学堂】欢迎添加关注!文章转载请注明出处。
发布评论请先 登录
相关推荐


 二值图像的欧拉数计算公式


评论