前言
我们都知道,Spring的功能非常强大,但也有些弊端。比如:我们需要手动去配置大量的参数,没有默认值,需要我们管理大量的jar包和它们的依赖。
为了提升Spring项目的开发效率,简化一些配置,Spring官方引入了SpringBoot。
当然,引入SpringBoot还有其他原因,在这里就不过多描述了。
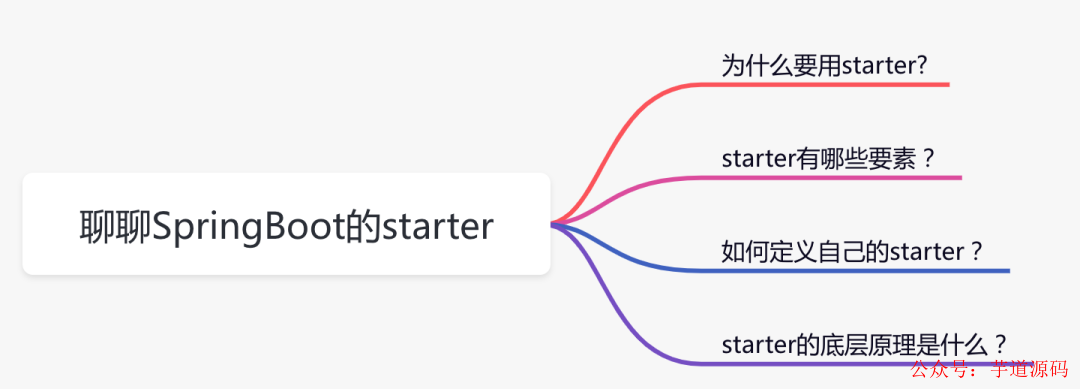
本文重点跟大家一起聊聊SpringBoot的starter机制,因为它太重要了。
基于 Spring Boot + MyBatis Plus + Vue & Element 实现的后台管理系统 + 用户小程序,支持 RBAC 动态权限、多租户、数据权限、工作流、三方登录、支付、短信、商城等功能
- 项目地址:https://github.com/YunaiV/ruoyi-vue-pro
- 视频教程:https://doc.iocoder.cn/video/
1 为什么要用starter?
在SpringBoot还没有出来之前,我们使用Spring开发项目。如果程序需要连接数据库,我们一般会使用Hibernate或Mybatis等ORM框架,这里我以Mybatis为例,具体的操作步骤如下:
- 到maven仓库去找需要引入的mybatis jar包,选取合适的版本。
- 到maven仓库去找mybatis-spring整合的jar包,选取合适的版本。
- 在spring的applicationContext.xml文件中配置dataSource和mybatis相关信息。
当然有些朋友可能会指正,不是还需要引入数据库驱动包吗?
确实需要引入,但数据库驱动有很多,比如:mysql、oracle、sqlserver,这不属于mybatis的范畴,使用者可以根据项目的实际情况单独引入。
如果程序只是需要连接数据库这一个功能还好,按上面的步骤做基本可以满足需求。但是,连接数据库可能只是庞大的项目体系中一个环节,实际项目中往往更复杂,需要引入更多的功能,比如:连接redis、连接mongodb、使用rocketmq、使用excel功能等等。
引入这些功能的话,需要再把上面的步骤再重复一次,工作量无形当中增加了不少,而且有很多重复的工作。
另外,还是有个问题,每次到要到maven中找合适的版本,如果哪次找的mybatis.jar包 和 mybatis-spring.jar包版本不兼容,程序不是会出现问题?
SpringBoot为了解决以上两个问题引入了starter机制。
基于 Spring Cloud Alibaba + Gateway + Nacos + RocketMQ + Vue & Element 实现的后台管理系统 + 用户小程序,支持 RBAC 动态权限、多租户、数据权限、工作流、三方登录、支付、短信、商城等功能
2 starter有哪些要素?
我们首先一起看看mybatis-spring-boot-starter.jar是如何定义的。

可以看到它的META-INF目录下只包含了:
- pom.protperties 配置maven所需的项目version、groupId和artifactId。
- pom.xml 配置所依赖的jar包。
- MANIFEST.MF 这个文件描述了该Jar文件的很多信息。
- spring.provides 配置所依赖的artifactId,给IDE使用的,没有其他的作用。
注意一下,没有一行代码。
我们重点看一下pom.xml,因为这个jar包里面除了这个没有啥重要的信息
<projectxmlns="http://maven.apache.org/POM/4.0.0"xmlns:xsi="http://www.w3.org/2001/XMLSchema-instance"xsi:schemaLocation="http://maven.apache.org/POM/4.0.0http://maven.apache.org/xsd/maven-4.0.0.xsd">
<modelVersion>4.0.0modelVersion>
<parent>
<groupId>org.mybatis.spring.bootgroupId>
<artifactId>mybatis-spring-bootartifactId>
<version>1.3.1version>
parent>
<artifactId>mybatis-spring-boot-starterartifactId>
<name>mybatis-spring-boot-startername>
<dependencies>
<dependency>
<groupId>org.springframework.bootgroupId>
<artifactId>spring-boot-starterartifactId>
dependency>
<dependency>
<groupId>org.springframework.bootgroupId>
<artifactId>spring-boot-starter-jdbcartifactId>
dependency>
<dependency>
<groupId>org.mybatis.spring.bootgroupId>
<artifactId>mybatis-spring-boot-autoconfigureartifactId>
dependency>
<dependency>
<groupId>org.mybatisgroupId>
<artifactId>mybatisartifactId>
dependency>
<dependency>
<groupId>org.mybatisgroupId>
<artifactId>mybatis-springartifactId>
dependency>
dependencies>
project>
从上面可以看出,pom.xml文件中会引入一些jar包,其中除了引入spring-boot-starter,之外重点看一下:mybatis-spring-boot-autoconfigure。
我们找到mybatis-spring-boot-autoconfigure.jar文件,打开这个文件。
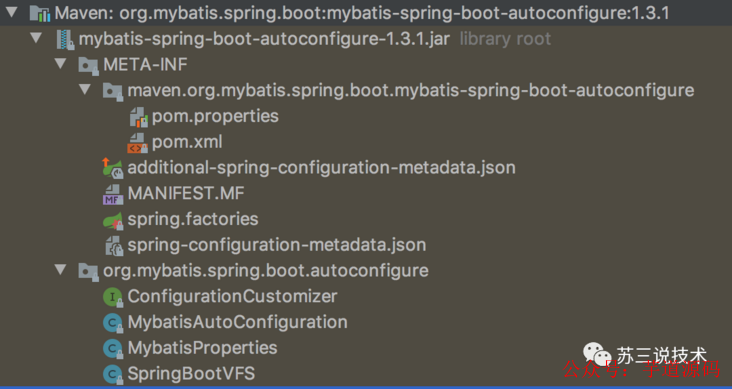
里面包含如下文件:
- pom.properties 配置maven所需的项目version、groupId和artifactId
- pom.xml 配置所依赖的jar包
- additional-spring-configuration-metadata.json 手动添加IDE提示功能
- MANIFEST.MF 这个文件描述了该Jar文件的很多信息
- spring.factories SPI会读取的文件
- spring-configuration-metadata.json 系统自动生成的IDE提示功能
- ConfigurationCustomizer 自定义Configuration回调接口
- MybatisAutoConfiguration mybatis配置类
- MybatisProperties mybatis属性类
- SpringBootVFS 扫描嵌套的jar包中的类
spring-configuration-metadata.json和additional-spring-configuration-metadata.json的功能差不多,我们在applicationContext.properties文件中输入spring时,会自动出现下面的配置信息可供选择,就是这个功能了。
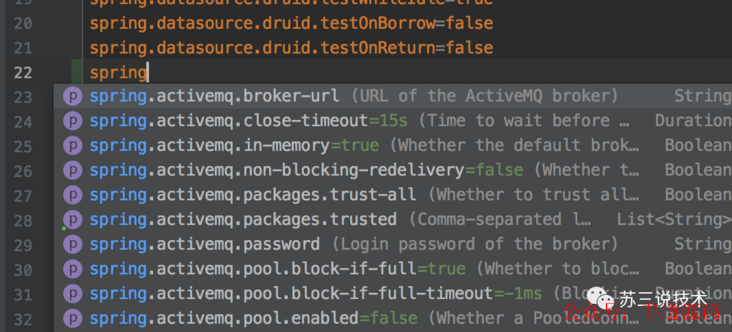
来自灵魂的一问:这两个文件有什么区别?
答:如果pom.xml中引入了spring-boot-configuration-processor包,则会自动生成spring-configuration-metadata.json。
如果需要手动修改里面的元数据,则可以在additional-spring-configuration-metadata.json中编辑,最终两个文件中的元数据会合并到一起。
MybatisProperties类是属性实体类:
@ConfigurationProperties(prefix=MybatisProperties.MYBATIS_PREFIX)
publicclassMybatisProperties{

publicstaticfinalStringMYBATIS_PREFIX="mybatis";
privateStringconfigLocation;
privateString[]mapperLocations;
privateStringtypeAliasesPackage;
privateStringtypeHandlersPackage;
privatebooleancheckConfigLocation=false;
privateExecutorTypeexecutorType;
privatePropertiesconfigurationProperties;
@NestedConfigurationProperty
privateConfigurationconfiguration;

publicStringgetConfigLocation(){
returnthis.configLocation;
}

publicvoidsetConfigLocation(StringconfigLocation){
this.configLocation=configLocation;
}

@Deprecated
publicStringgetConfig(){
returnthis.configLocation;
}

@Deprecated
publicvoidsetConfig(Stringconfig){
this.configLocation=config;
}

publicString[]getMapperLocations(){
returnthis.mapperLocations;
}

publicvoidsetMapperLocations(String[]mapperLocations){
this.mapperLocations=mapperLocations;
}

publicStringgetTypeHandlersPackage(){
returnthis.typeHandlersPackage;
}

publicvoidsetTypeHandlersPackage(StringtypeHandlersPackage){
this.typeHandlersPackage=typeHandlersPackage;
}

publicStringgetTypeAliasesPackage(){
returnthis.typeAliasesPackage;
}

publicvoidsetTypeAliasesPackage(StringtypeAliasesPackage){
this.typeAliasesPackage=typeAliasesPackage;
}

publicbooleanisCheckConfigLocation(){
returnthis.checkConfigLocation;
}

publicvoidsetCheckConfigLocation(booleancheckConfigLocation){
this.checkConfigLocation=checkConfigLocation;
}

publicExecutorTypegetExecutorType(){
returnthis.executorType;
}

publicvoidsetExecutorType(ExecutorTypeexecutorType){
this.executorType=executorType;
}

publicPropertiesgetConfigurationProperties(){
returnconfigurationProperties;
}

publicvoidsetConfigurationProperties(PropertiesconfigurationProperties){
this.configurationProperties=configurationProperties;
}

publicConfigurationgetConfiguration(){
returnconfiguration;
}

publicvoidsetConfiguration(Configurationconfiguration){
this.configuration=configuration;
}

publicResource[]resolveMapperLocations(){
ResourcePatternResolverresourceResolver=newPathMatchingResourcePatternResolver();
Listresources=newArrayList();
if(this.mapperLocations!=null){
for(StringmapperLocation:this.mapperLocations){
try{
Resource[]mappers=resourceResolver.getResources(mapperLocation);
resources.addAll(Arrays.asList(mappers));
}catch(IOExceptione){
//ignore
}
}
}
returnresources.toArray(newResource[resources.size()]);
}
}
可以看到Mybatis初始化所需要的很多属性都在这里,相当于一个JavaBean。
下面重点看一下MybatisAutoConfiguration的代码:
@org.springframework.context.annotation.Configuration
@ConditionalOnClass({SqlSessionFactory.class,SqlSessionFactoryBean.class})
@ConditionalOnBean(DataSource.class)
@EnableConfigurationProperties(MybatisProperties.class)
@AutoConfigureAfter(DataSourceAutoConfiguration.class)
publicclassMybatisAutoConfiguration{
privatestaticfinalLoggerlogger=LoggerFactory.getLogger(MybatisAutoConfiguration.class);
privatefinalMybatisPropertiesproperties;
privatefinalInterceptor[]interceptors;
privatefinalResourceLoaderresourceLoader;
privatefinalDatabaseIdProviderdatabaseIdProvider;
privatefinalListconfigurationCustomizers;
publicMybatisAutoConfiguration(MybatisPropertiesproperties,
ObjectProviderinterceptorsProvider,
ResourceLoaderresourceLoader,
ObjectProviderdatabaseIdProvider,
ObjectProvider>configurationCustomizersProvider) {
this.properties=properties;
this.interceptors=interceptorsProvider.getIfAvailable();
this.resourceLoader=resourceLoader;
this.databaseIdProvider=databaseIdProvider.getIfAvailable();
this.configurationCustomizers=configurationCustomizersProvider.getIfAvailable();
}
@PostConstruct
publicvoidcheckConfigFileExists(){
if(this.properties.isCheckConfigLocation()&&StringUtils.hasText(this.properties.getConfigLocation())){
Resourceresource=this.resourceLoader.getResource(this.properties.getConfigLocation());
Assert.state(resource.exists(),"Cannotfindconfiglocation:"+resource
+"(pleaseaddconfigfileorcheckyourMybatisconfiguration)");
}
}
@Bean
@ConditionalOnMissingBean
publicSqlSessionFactorysqlSessionFactory(DataSourcedataSource)throwsException{
SqlSessionFactoryBeanfactory=newSqlSessionFactoryBean();
factory.setDataSource(dataSource);
factory.setVfs(SpringBootVFS.class);
if(StringUtils.hasText(this.properties.getConfigLocation())){
factory.setConfigLocation(this.resourceLoader.getResource(this.properties.getConfigLocation()));
}
Configurationconfiguration=this.properties.getConfiguration();
if(configuration==null&&!StringUtils.hasText(this.properties.getConfigLocation())){
configuration=newConfiguration();
}
if(configuration!=null&&!CollectionUtils.isEmpty(this.configurationCustomizers)){
for(ConfigurationCustomizercustomizer:this.configurationCustomizers){
customizer.customize(configuration);
}
}
factory.setConfiguration(configuration);
if(this.properties.getConfigurationProperties()!=null){
factory.setConfigurationProperties(this.properties.getConfigurationProperties());
}
if(!ObjectUtils.isEmpty(this.interceptors)){
factory.setPlugins(this.interceptors);
}
if(this.databaseIdProvider!=null){
factory.setDatabaseIdProvider(this.databaseIdProvider);
}
if(StringUtils.hasLength(this.properties.getTypeAliasesPackage())){
factory.setTypeAliasesPackage(this.properties.getTypeAliasesPackage());
}
if(StringUtils.hasLength(this.properties.getTypeHandlersPackage())){
factory.setTypeHandlersPackage(this.properties.getTypeHandlersPackage());
}
if(!ObjectUtils.isEmpty(this.properties.resolveMapperLocations())){
factory.setMapperLocations(this.properties.resolveMapperLocations());
}
returnfactory.getObject();
}
@Bean
@ConditionalOnMissingBean
publicSqlSessionTemplatesqlSessionTemplate(SqlSessionFactorysqlSessionFactory){
ExecutorTypeexecutorType=this.properties.getExecutorType();
if(executorType!=null){
returnnewSqlSessionTemplate(sqlSessionFactory,executorType);
}else{
returnnewSqlSessionTemplate(sqlSessionFactory);
}
}
publicstaticclassAutoConfiguredMapperScannerRegistrar
implementsBeanFactoryAware,ImportBeanDefinitionRegistrar,ResourceLoaderAware{
privateBeanFactorybeanFactory;
privateResourceLoaderresourceLoader;
@Override
publicvoidregisterBeanDefinitions(AnnotationMetadataimportingClassMetadata,BeanDefinitionRegistryregistry){
ClassPathMapperScannerscanner=newClassPathMapperScanner(registry);
try{
if(this.resourceLoader!=null){
scanner.setResourceLoader(this.resourceLoader);
}
Listpackages=AutoConfigurationPackages.get(this.beanFactory);
if(logger.isDebugEnabled()){
for(Stringpkg:packages){
logger.debug("Usingauto-configurationbasepackage'{}'",pkg);
}
}
scanner.setAnnotationClass(Mapper.class);
scanner.registerFilters();
scanner.doScan(StringUtils.toStringArray(packages));
}catch(IllegalStateExceptionex){
logger.debug("Couldnotdetermineauto-configurationpackage,automaticmapperscanningdisabled.",ex);
}
}
@Override
publicvoidsetBeanFactory(BeanFactorybeanFactory)throwsBeansException{
this.beanFactory=beanFactory;
}
@Override
publicvoidsetResourceLoader(ResourceLoaderresourceLoader){
this.resourceLoader=resourceLoader;
}
}
@org.springframework.context.annotation.Configuration
@Import({AutoConfiguredMapperScannerRegistrar.class})
@ConditionalOnMissingBean(MapperFactoryBean.class)
publicstaticclassMapperScannerRegistrarNotFoundConfiguration{
@PostConstruct
publicvoidafterPropertiesSet(){
logger.debug("No{}found.",MapperFactoryBean.class.getName());
}
}
}
这个类就是一个Configuration(配置类),它里面定义很多bean,其中最重要的就是SqlSessionFactory的bean实例,该实例是Mybatis的核心功能,用它创建SqlSession,对数据库进行CRUD操作。
除此之外,MybatisAutoConfiguration类还包含了:
- @ConditionalOnClass 配置了只有包含SqlSessionFactory.class和SqlSessionFactoryBean.class,该配置类才生效。
- @ConditionalOnBean 配置了只有包含dataSource实例时,该配置类才生效。
- @EnableConfigurationProperties 该注解会自动填充MybatisProperties实例中的属性。
- AutoConfigureAfter 配置了该配置类在DataSourceAutoConfiguration类之后自动配置。
这些注解都是一些辅助功能,决定Configuration是否生效,当然这些注解不是必须的。
接下来,重点看看spring.factories文件有啥内容:
org.springframework.boot.autoconfigure.EnableAutoConfiguration=
org.mybatis.spring.boot.autoconfigure.MybatisAutoConfiguration
里面只有一行配置,即key为EnableAutoConfiguration,value为MybatisAutoConfiguration。
好了,介绍了这么多东西,现在我们来总结一下,
starter几个要素如下图所示:
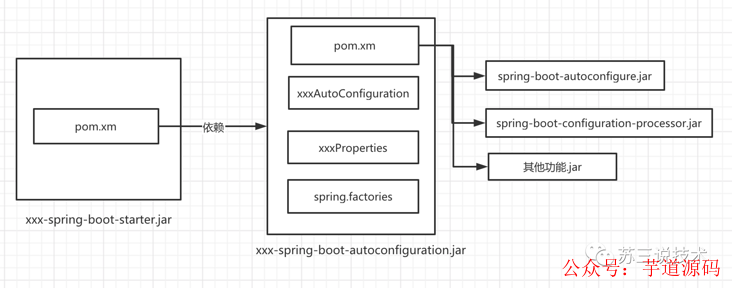
那么,编写starter需要哪些步骤?
- 1.需要定义一个名称为xxx-spring-boot-starter的空项目,里面不包含任何代码,可以有pom.xml和pom.properties文件。
- 2.pom.xml文件中包含了名称为xxx-spring-boot-autoconfigure的项目。
- 3.xxx-spring-boot-autoconfigure项目中包含了名称为xxxAutoConfiguration的类,该类可以定义一些bean实例。当然,Configuration类上可以打一些如:ConditionalOnClass、ConditionalOnBean、EnableConfigurationProperties等注解。
- 4.需要在spring.factories文件中增加key为EnableAutoConfiguration,value为xxxAutoConfiguration。
我们试着按照这四步,自己编写一个starter看看能否成功,验证一下总结的内容是否正确。
3 如何定义自己的starter?
3.1 先创建一个空项目
该项目名称为id-generate-starter,注意为了方便我把项目重命名了,原本应该是叫id-generate-spring-boot-starter的,如下图所示:
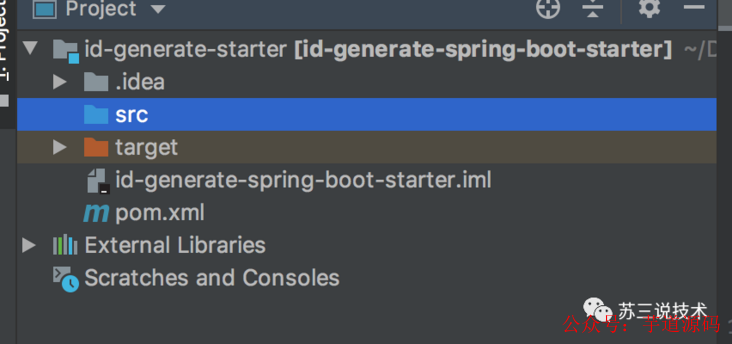
pom.xml文件定义如下:
<projectxmlns="http://maven.apache.org/POM/4.0.0"xmlns:xsi="http://www.w3.org/2001/XMLSchema-instance"xsi:schemaLocation="http://maven.apache.org/POM/4.0.0http://maven.apache.org/xsd/maven-4.0.0.xsd">
<modelVersion>4.0.0modelVersion>
<version>1.3.1version>
<groupId>com.suegroupId>
<artifactId>id-generate-spring-boot-starterartifactId>
<name>id-generate-spring-boot-startername>
<dependencies>
<dependency>
<groupId>com.suegroupId>
<artifactId>id-generate-spring-boot-autoconfigureartifactId>
<version>1.3.1version>
dependency>
dependencies>
project>
我们看到,它只引入了id-generate-spring-boot-autoconfigure。当然如果有需要这里还可以引入多个autoconfigure或者多个其他jar包或者。
3.2 创建id-generate-autoconfigure
同样为了方便我把项目重命名了,原本是叫id-generate-spring-boot-autoconfigure,如下图所示:
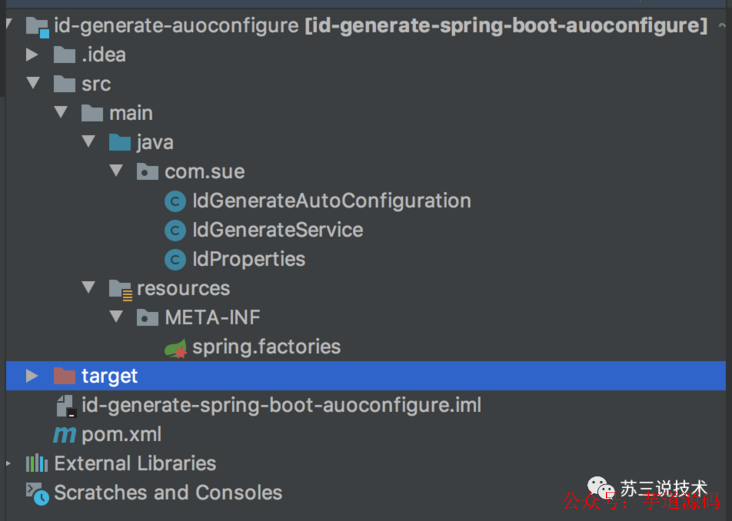
该项目当中包含:pom.xml、spring.factories、IdGenerateAutoConfiguration、IdGenerateService 和 IdProperties 这5个关键文件,下面我们逐一看看。
先从pom.xml
<projectxmlns="http://maven.apache.org/POM/4.0.0"xmlns:xsi="http://www.w3.org/2001/XMLSchema-instance"xsi:schemaLocation="http://maven.apache.org/POM/4.0.0http://maven.apache.org/xsd/maven-4.0.0.xsd">
<parent>
<groupId>org.springframework.bootgroupId>
<artifactId>spring-boot-starter-parentartifactId>
<version>2.0.4.RELEASEversion>
parent>
<modelVersion>4.0.0modelVersion>
<version>1.3.1version>
<groupId>com.suegroupId>
<artifactId>id-generate-spring-boot-autoconfigureartifactId>
<name>id-generate-spring-boot-autoconfigurename>

<dependencies>
<dependency>
<groupId>org.springframework.bootgroupId>
<artifactId>spring-boot-starterartifactId>
dependency>
<dependency>
<groupId>org.springframework.bootgroupId>
<artifactId>spring-boot-autoconfigureartifactId>
dependency>
<dependency>
<groupId>org.springframework.bootgroupId>
<artifactId>spring-boot-configuration-processorartifactId>
<optional>trueoptional>
dependency>
dependencies>

<build>
<plugins>
<plugin>
<groupId>org.apache.maven.pluginsgroupId>
<artifactId>maven-compiler-pluginartifactId>
<configuration>
<source>1.8source>
<target>1.8target>
configuration>
plugin>
plugins>
build>
project>
我们可以看到,这个文件比较简单就引入了:
- spring-boot-starter:springboot的相关jar包。
- spring-boot-autoconfigure:springboot自动配置相关jar包。
- spring-boot-configuration-processor:springboot生成IDE提示功能相关jar包。
重点看看spring.factories文件:
org.springframework.boot.autoconfigure.EnableAutoConfiguration=com.sue.IdGenerateAutoConfiguration
它里面只包含一行配置,其中key是EnableAutoConfiguration,value是IdGenerateAutoConfiguration。
再重点看一下IdGenerateAutoConfiguration
@ConditionalOnClass(IdProperties.class)
@EnableConfigurationProperties(IdProperties.class)
@Configuration
publicclassIdGenerateAutoConfiguration{
@Autowired
privateIdPropertiesproperties;
@Bean
publicIdGenerateServiceidGenerateService(){
returnnewIdGenerateService(properties.getWorkId());
}
}
该类是一个使用了@Configuration注解标记为了配置类,生效的条件是@ConditionalOnClass注解中检测到包含IdProperties.class。并且使用@EnableConfigurationProperties注解会自动注入IdProperties的实例。
此外,最关键的点是该类里面创建了idGenerateService的bean实例,这是自动配置的精髓。
再看看IdGenerateService
publicclassIdGenerateService{
privateLongworkId;
publicIdGenerateService(LongworkId){
this.workId=workId;
}

publicLonggenerate(){
returnnewRandom().nextInt(100)+this.workId;
}
}
我们可以看到它是一个普通的类,甚至都没有使用@Service注解,里面有个generate方法,根据workId的值和随机数动态生成id。
最后看看IdProperties
@ConfigurationProperties(prefix=IdProperties.PREFIX)
publicclassIdProperties{
publicstaticfinalStringPREFIX="sue";
privateLongworkId;
publicLonggetWorkId(){
returnworkId;
}
publicvoidsetWorkId(LongworkId){
this.workId=workId;
}
}
它是一个配置实体类,里面包含了相关的配置文件。使用@ConfigurationProperties注解,会自动把application.properties文件中以sue开通的,参数名称跟IdProperties中一样的参数值,自动注入到IdProperties对象中。
3.3 创建id-generate-test
这个项目主要用于测试。
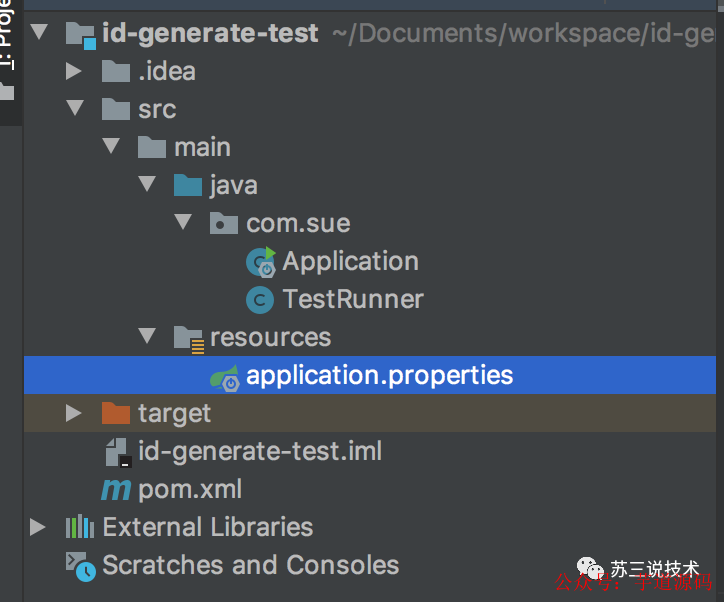
该项目里面包含:pom.xml、application.properties、Application 和 TestRunner 文件。
先看看pom.xml文件
<projectxmlns="http://maven.apache.org/POM/4.0.0"xmlns:xsi="http://www.w3.org/2001/XMLSchema-instance"xsi:schemaLocation="http://maven.apache.org/POM/4.0.0http://maven.apache.org/xsd/maven-4.0.0.xsd">

<modelVersion>4.0.0modelVersion>
<version>1.3.1version>
<groupId>com.suegroupId>
<artifactId>spring-boot-id-generate-testartifactId>
<name>spring-boot-id-generate-testname>
<dependencies>
<dependency>
<groupId>com.suegroupId>
<artifactId>id-generate-spring-boot-starterartifactId>
<version>1.3.1version>
dependency>
dependencies>
project>
由于只测试刚刚定义的id生成功能,所以只引入的id-generate-spring-boot-starter jar包。
application.properties配置资源文件
sue.workId=123
只有一行配置,因为我们的IdProperties中目前只需要这一个参数。
Application是测试程序启动类
@SpringBootApplication
publicclassApplication{
publicstaticvoidmain(String[]args){
SpringApplication.run(Application.class,args);
}
}
很简单,就是一个普通的springboot启动类
TestRunner是我们的测试类
@Component
publicclassTestRunnerimplementsApplicationRunner{
@Autowired
privateIdGenerateServiceidGenerateService;
publicvoidrun(ApplicationArgumentsargs)throwsException{
LongsysNo=idGenerateService.generate();
System.out.println(sysNo);
}
}
它实现了ApplicationRunner接口,所以在springboot启动的时候会调用该类的run方法。
好了,所有自定义starter的代码和测试代码都已经就绪。接下,运行一下Application类的main方法。
运行结果:
176
完美,验证成功了。
接下来,我们分析一下starter的底层实现原理。
4 starter的底层原理是什么?
通过上面编写自己的starter的例子,相信大家对starter的认识更进一步了,现在跟大家一起看看starter的底层是如何实现的。
id-generate-starter.jar其实是一个空项目,依赖于id-generate-autoconfiguration.jar。
id-generate-starter.jar是一个入口,我们给他取一个更优雅的名字:门面模式,其他业务系统想引入相应的功能,必须要通过这个门面。
我们重点分析一下 id-generate-autoconfiguration.jar
该jar包核心内容是:IdGenerateConfiguration,这个配置类中创建了IdGenerateService对象,IdGenerateService是我们所需要自动配置的具体功能。
接下来一个最重要的问题:IdGenerateConfiguration为什么会自动加载的呢?
还记得我们定义的spring.factories文件不?
org.springframework.boot.autoconfigure.EnableAutoConfiguration=com.sue.IdGenerateAutoConfiguration
它里面只包含一行配置,其中key是EnableAutoConfiguration,value是IdGenerateAutoConfiguration。
要搞明白这个过程,要从Application类的@SpringBootApplication注解开始:
@Target(ElementType.TYPE)
@Retention(RetentionPolicy.RUNTIME)
@Documented
@Inherited
@SpringBootConfiguration
@EnableAutoConfiguration
@ComponentScan(excludeFilters={
@Filter(type=FilterType.CUSTOM,classes=TypeExcludeFilter.class),
@Filter(type=FilterType.CUSTOM,classes=AutoConfigurationExcludeFilter.class)})
public@interfaceSpringBootApplication{

@AliasFor(annotation=EnableAutoConfiguration.class)
Class[]exclude()default{};

@AliasFor(annotation=EnableAutoConfiguration.class)
String[]excludeName()default{};

@AliasFor(annotation=ComponentScan.class,attribute="basePackages")
String[]scanBasePackages()default{};

@AliasFor(annotation=ComponentScan.class,attribute="basePackageClasses")
Class[]scanBasePackageClasses()default{};
}
从上面可以看出该注解里面包含了@EnableAutoConfiguration注解。
@Target(ElementType.TYPE)
@Retention(RetentionPolicy.RUNTIME)
@Documented
@Inherited
@AutoConfigurationPackage
@Import(AutoConfigurationImportSelector.class)
public@interfaceEnableAutoConfiguration{
StringENABLED_OVERRIDE_PROPERTY="spring.boot.enableautoconfiguration";

Class[]exclude()default{};
String[]excludeName()default{};
}
@EnableAutoConfiguration注解会引入AutoConfigurationImportSelector类。
该类的selectImports方法一个关键方法:
@Override
publicString[]selectImports(AnnotationMetadataannotationMetadata){
//配置有没有配置spring.boot.enableautoconfiguration开关,默认为true
//如果为false,则不执行自动配置的功能,直接返回
if(!isEnabled(annotationMetadata)){
returnNO_IMPORTS;
}
//找spring-autoconfigure-metadata.properties中的元素
AutoConfigurationMetadataautoConfigurationMetadata=AutoConfigurationMetadataLoader
.loadMetadata(this.beanClassLoader);
//获取EnableAutoConfiguration注解中的属性
AnnotationAttributesattributes=getAttributes(annotationMetadata);
//获取工程下所有配置key为EnableAutoConfiguration的值,即IdGenerateConfiguration等类。
Listconfigurations=getCandidateConfigurations(annotationMetadata,
attributes);
//删除重复的值
configurations=removeDuplicates(configurations);
//获取需要排除的规则列表
Setexclusions=getExclusions(annotationMetadata,attributes);
//检查
checkExcludedClasses(configurations,exclusions);
//删除需要排除的值
configurations.removeAll(exclusions);
//根据配置文件中配置的开关,过滤一部分不满足条件的值
configurations=filter(configurations,autoConfigurationMetadata);
fireAutoConfigurationImportEvents(configurations,exclusions);
returnStringUtils.toStringArray(configurations);
}
这里就是starter能够自动配置的秘密。
此外,有些朋友看其他人定义的springboot starter可能会有疑惑。
先看看druid-spring-boot-starter
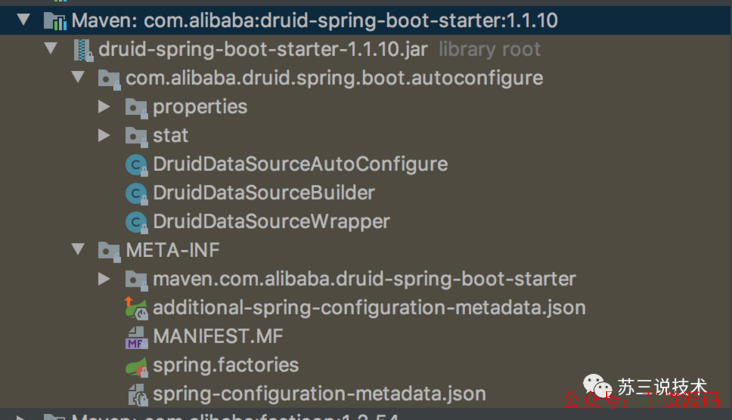
alibaba定义的druid-spring-boot-starter只有xxx-spring-boot-starter.jar文件,而没有xxx-spring-boot-autoconfigure.jar文件。
再看看spring-boot-starter-jdbc:

更神奇的是这个文件中连pom.xml都没有,一脸懵逼。。。。。。。
是不是我讲错了?
答:其实没有。
SpringBoot的原则是约定优于配置。
从spring-boot-starter-jdbc内部空实现来看,它的约定是要把xxx-spring-boot-starter.jar和xxx-spring-boot-autoconfigure.jar区分开的。个人认为,alibaba定义得并不好,没有遵照springboot的约定,虽然功能不受影响。(这个地方欢迎一起探讨一下)
而springboot自己定义的spring-boot-starter-jdbc为什么连pom.xml文件也没有呢?
它不需要依赖xxx-spring-boot-autoconfigure.jar文件吗?
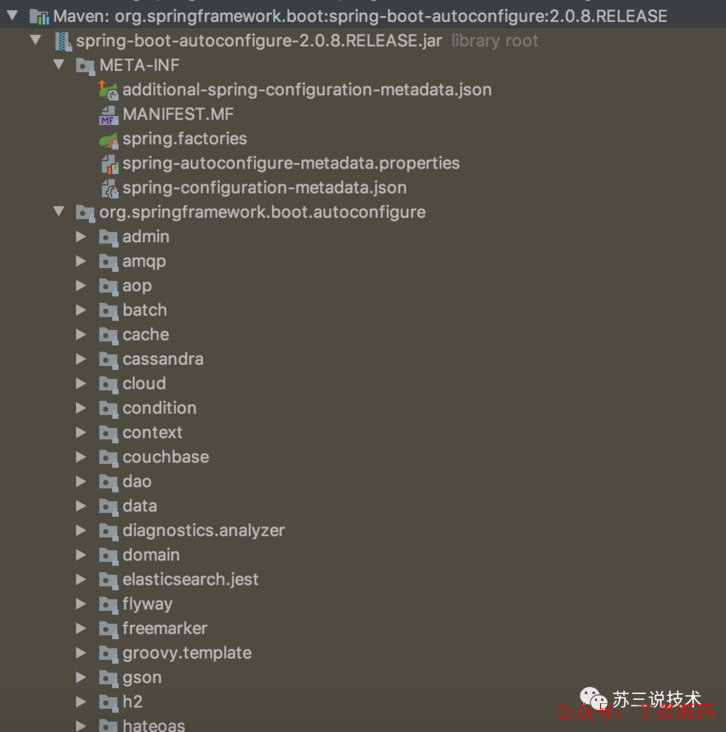
因为springboot把所有的自动配置的类都统一放到spring-boot-autoconfigure.jar下面了:
spring.factories文件内容如下:
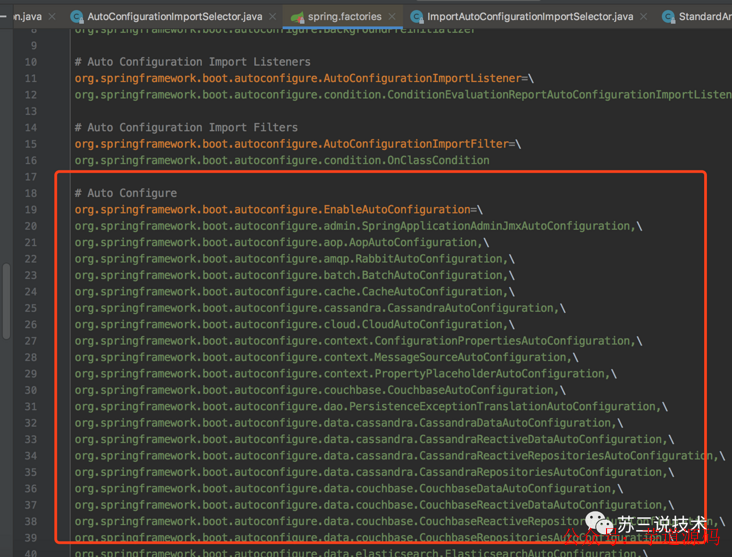
SpringBoot这样集中管理自动配置,而不需要从各个子包中遍历,我个人认为是为了查找效率。
我们最后再看看spring-cloud-starter-openfegin

明显看到,它是遵循了我们说的原则的。
除此之外,还有一个原则一顺便提一下。
SpringBoot和SpringCloud系列定义jar包的名称是:
- spring-boot-starter-xxx.jar
- spring-cloud-starter-xxx.jar
而我们自己的项目定义的jar应该是:
- xxx-spring-boot-starter.jar
审核编辑 :李倩
-
数据库
+关注
关注
7文章
3857浏览量
64809 -
代码
+关注
关注
30文章
4841浏览量
69223 -
spring
+关注
关注
0文章
340浏览量
14427 -
SpringBoot
+关注
关注
0文章
174浏览量
202
原文标题:天天用SpringBoot写代码,结果连Starter是什么都不知道?
文章出处:【微信号:芋道源码,微信公众号:芋道源码】欢迎添加关注!文章转载请注明出处。
发布评论请先 登录
相关推荐
请问tas5731m PBTL模式,单声道输出(AB连一起,CD连一起)如何实现左右声道的混音输出?
隔离电源的地能接在一起吗,隔离电源能不能直接共地使用
模拟地和电源地能接在一起吗
VeriStand的执行机制
DAC8771RGZ电流输出端IOUT和电压输VOUT出端是连在一起的,是否可以不并在一起?
普通门电路的输出端能否连在一起
如何将atoi与esp8266 sdk一起使用?
六类网线可以和强电一起走吗
#新开端、新起点,2024一起加油#
一起聊聊faro orbis-它的商业价值有哪些



 一起聊聊SpringBoot的starter机制


评论