前言
为什么使用spring-authorization-server?
真实原因:原先是因为个人原因,需要研究新版鉴权服务,看到了spring-authorization-server,使用过程中,想着能不能整合新版本cloud,因此此处先以springboot搭建spring-authorization-server,后续再替换为springcloud2021。
官方原因:原先使用Spring Security OAuth,而该项目已经逐渐被淘汰,虽然网上还是有不少该方案,但秉着技术要随时代更新,从而使用spring-authorization-server
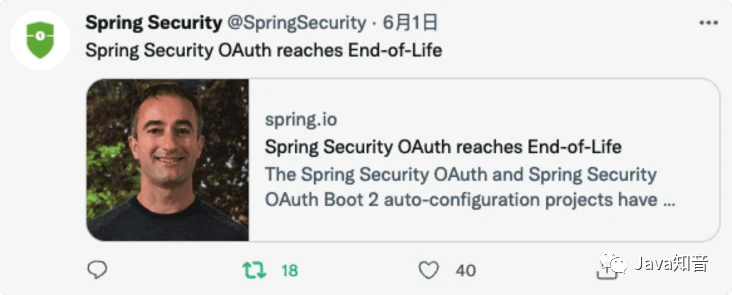
Spring 团队正式宣布 Spring Security OAuth 停止维护,该项目将不会再进行任何的迭代
项目构建
以springboot搭建spring-authorization-server(即认证与资源服务器)
数据库相关表结构构建
需要创建3张表,sql分别如下
CREATETABLE`oauth2_authorization`(
`id`varchar(100)CHARACTERSETutf8mb4COLLATEutf8mb4_unicode_ciNOTNULL,
`registered_client_id`varchar(100)CHARACTERSETutf8mb4COLLATEutf8mb4_unicode_ciNOTNULL,
`principal_name`varchar(200)CHARACTERSETutf8mb4COLLATEutf8mb4_unicode_ciNOTNULL,
`authorization_grant_type`varchar(100)CHARACTERSETutf8mb4COLLATEutf8mb4_unicode_ciNOTNULL,
`attributes`varchar(4000)CHARACTERSETutf8mb4COLLATEutf8mb4_unicode_ciNULLDEFAULTNULL,
`state`varchar(500)CHARACTERSETutf8mb4COLLATEutf8mb4_unicode_ciNULLDEFAULTNULL,
`authorization_code_value`blobNULL,
`authorization_code_issued_at`timestamp(0)NULLDEFAULTNULL,
`authorization_code_expires_at`timestamp(0)NULLDEFAULTNULL,
`authorization_code_metadata`varchar(2000)CHARACTERSETutf8mb4COLLATEutf8mb4_unicode_ciNULLDEFAULTNULL,
`access_token_value`blobNULL,
`access_token_issued_at`timestamp(0)NULLDEFAULTNULL,
`access_token_expires_at`timestamp(0)NULLDEFAULTNULL,
`access_token_metadata`varchar(2000)CHARACTERSETutf8mb4COLLATEutf8mb4_unicode_ciNULLDEFAULTNULL,
`access_token_type`varchar(100)CHARACTERSETutf8mb4COLLATEutf8mb4_unicode_ciNULLDEFAULTNULL,
`access_token_scopes`varchar(1000)CHARACTERSETutf8mb4COLLATEutf8mb4_unicode_ciNULLDEFAULTNULL,
`oidc_id_token_value`blobNULL,
`oidc_id_token_issued_at`timestamp(0)NULLDEFAULTNULL,
`oidc_id_token_expires_at`timestamp(0)NULLDEFAULTNULL,
`oidc_id_token_metadata`varchar(2000)CHARACTERSETutf8mb4COLLATEutf8mb4_unicode_ciNULLDEFAULTNULL,
`refresh_token_value`blobNULL,
`refresh_token_issued_at`timestamp(0)NULLDEFAULTNULL,
`refresh_token_expires_at`timestamp(0)NULLDEFAULTNULL,
`refresh_token_metadata`varchar(2000)CHARACTERSETutf8mb4COLLATEutf8mb4_unicode_ciNULLDEFAULTNULL,
PRIMARYKEY(`id`)USINGBTREE
)ENGINE=InnoDBCHARACTERSET=utf8mb4COLLATE=utf8mb4_unicode_ciROW_FORMAT=Dynamic;


CREATETABLE`oauth2_authorization_consent`(
`registered_client_id`varchar(100)CHARACTERSETutf8mb4COLLATEutf8mb4_unicode_ciNOTNULL,
`principal_name`varchar(200)CHARACTERSETutf8mb4COLLATEutf8mb4_unicode_ciNOTNULL,
`authorities`varchar(1000)CHARACTERSETutf8mb4COLLATEutf8mb4_unicode_ciNOTNULL,
PRIMARYKEY(`registered_client_id`,`principal_name`)USINGBTREE
)ENGINE=InnoDBCHARACTERSET=utf8mb4COLLATE=utf8mb4_unicode_ciROW_FORMAT=Dynamic;


CREATETABLE`oauth2_registered_client`(
`id`varchar(100)CHARACTERSETutf8mb4COLLATEutf8mb4_unicode_ciNOTNULL,
`client_id`varchar(100)CHARACTERSETutf8mb4COLLATEutf8mb4_unicode_ciNOTNULL,
`client_id_issued_at`timestamp(0)NOTNULLDEFAULTCURRENT_TIMESTAMP(0),
`client_secret`varchar(200)CHARACTERSETutf8mb4COLLATEutf8mb4_unicode_ciNULLDEFAULTNULL,
`client_secret_expires_at`timestamp(0)NULLDEFAULTNULL,
`client_name`varchar(200)CHARACTERSETutf8mb4COLLATEutf8mb4_unicode_ciNOTNULL,
`client_authentication_methods`varchar(1000)CHARACTERSETutf8mb4COLLATEutf8mb4_unicode_ciNOTNULL,
`authorization_grant_types`varchar(1000)CHARACTERSETutf8mb4COLLATEutf8mb4_unicode_ciNOTNULL,
`redirect_uris`varchar(1000)CHARACTERSETutf8mb4COLLATEutf8mb4_unicode_ciNULLDEFAULTNULL,
`scopes`varchar(1000)CHARACTERSETutf8mb4COLLATEutf8mb4_unicode_ciNOTNULL,
`client_settings`varchar(2000)CHARACTERSETutf8mb4COLLATEutf8mb4_unicode_ciNOTNULL,
`token_settings`varchar(2000)CHARACTERSETutf8mb4COLLATEutf8mb4_unicode_ciNOTNULL,
PRIMARYKEY(`id`)USINGBTREE
)ENGINE=InnoDBCHARACTERSET=utf8mb4COLLATE=utf8mb4_unicode_ciROW_FORMAT=Dynamic;
先进行认证服务器相关配置
pom.xml引入依赖
注意!!!spring boot版本需2.6.x以上,是为后面升级成cloud做准备
<dependency>
<groupId>org.projectlombokgroupId>
<artifactId>lombokartifactId>
<version>1.18.22version>
dependency>


<dependency>
<groupId>com.xxxx.iovgroupId>
<artifactId>iov-cloud-framework-webartifactId>
<version>2.0.0-SNAPSHOTversion>
<exclusions>

<exclusion>
<groupId>org.springframework.bootgroupId>
<artifactId>spring-boot-starter-webartifactId>
exclusion>
exclusions>
dependency>

<dependency>
<groupId>org.springframework.bootgroupId>
<artifactId>spring-boot-starter-webartifactId>
<version>2.6.6version>
dependency>


<dependency>
<groupId>cn.hutoolgroupId>
<artifactId>hutool-allartifactId>
<version>5.8.0version>
dependency>


<dependency>
<groupId>com.alibabagroupId>
<artifactId>fastjsonartifactId>
<version>1.2.39version>
dependency>


<dependency>
<groupId>org.springframework.bootgroupId>
<artifactId>spring-boot-starter-securityartifactId>
dependency>


<dependency>
<groupId>org.springframework.securitygroupId>
<artifactId>spring-security-oauth2-authorization-serverartifactId>
<version>0.2.3version>
dependency>


<dependency>
<groupId>org.springframework.securitygroupId>
<artifactId>spring-security-casartifactId>
dependency>


<dependency>
<groupId>org.springframework.bootgroupId>
<artifactId>spring-boot-starter-thymeleafartifactId>
dependency>


<dependency>
<groupId>com.alibabagroupId>
<artifactId>druid-spring-boot-starterartifactId>
<version>1.2.9version>
dependency>


<dependency>
<groupId>mysqlgroupId>
<artifactId>mysql-connector-javaartifactId>
<version>8.0.28version>
dependency>


<dependency>
<groupId>com.baomidougroupId>
<artifactId>mybatis-plus-boot-starterartifactId>
<version>3.5.1version>
dependency>


<dependency>
<groupId>com.google.guavagroupId>
<artifactId>guavaartifactId>
<version>31.1-jreversion>
dependency>
创建自定义登录页面 login.html (可不要,使用自带的登录界面)
html>
<htmllang="en"
xmlns:th="https://www.thymeleaf.org"
xmlns:sec="http://www.thymeleaf.org/thymeleaf-extras-springsecurity5">
<head>
<metacharset="utf-8">
<metaname="author"content="test">
<metaname="viewport"content="width=device-width,initial-scale=1">
<metaname="description"content="ThisisaloginpagetemplatebasedonBootstrap5">
<title>LoginPagetitle>
<style>
.is-invalid{
color:red;
}

.invalid-feedback{
color:red;
}

.mb-3{
margin-bottom:3px;
}
style>
<scriptth:inline="javascript">
/**/
if(window!==top){
top.location.href=location.href;
}
script>
head>
<bodyclass="hold-transitionlogin-page">
<divclass="login-box">
<divclass="card">
<divclass="card-bodylogin-card-body">
<pclass="login-box-msg">Signintostartyoursessionp>
<divth:if="${param.error}"class="alertalert-error">
Invalidusernameandpassword.
div>
<divth:if="${param.logout}"class="alertalert-success">
Youhavebeenloggedout.
div>
<formth:action="@{/login}"method="post"id="loginForm">
<divclass="input-groupmb-3">
<inputtype="text"class="form-control"value="zxg"name="username"placeholder="Email"
autocomplete="off">
div>
<divclass="input-groupmb-3">
<inputtype="password"id="password"name="password"value="123"class="form-control"
maxlength="25"placeholder="Password"
autocomplete="off">
div>
<divclass="row">
<divclass="col-4">
<buttontype="submit"id="submitBtn">SignInbutton>
div>
div>
form>
<pclass="mb-1">
<ahref="javascript:void(0)">Iforgotmypassworda>
p>
<pclass="mb-0">
<ahref="javascript:void(0)"class="text-center">Registeranewmembershipa>
p>
div>
div>
div>

<scriptsrc="https://cdn.bootcdn.net/ajax/libs/jquery/3.6.0/jquery.js">script>
<scriptsrc="https://cdn.bootcdn.net/ajax/libs/jsencrypt/3.1.0/jsencrypt.min.js">script>
<scriptsrc="https://cdn.bootcdn.net/ajax/libs/jquery-validate/1.9.0/jquery.validate.min.js">script>
<scriptsrc="https://cdn.bootcdn.net/ajax/libs/jquery-validate/1.9.0/additional-methods.min.js">script>

<scriptth:inline="javascript">

$(function(){
varencrypt=newJSEncrypt();

$.validator.setDefaults({
submitHandler:function(form){
console.log("Formsuccessfulsubmitted!");
form.submit();
}
});

});
script>
body>
html>
创建自定义授权页面 consent.html(可不要,可使用自带的授权页面)
html>
<htmllang="en">
<head>
<metacharset="utf-8">
<metaname="viewport"content="width=device-width,initial-scale=1,shrink-to-fit=no">
<linkrel="stylesheet"href="https://stackpath.bootstrapcdn.com/bootstrap/4.5.2/css/bootstrap.min.css"
integrity="sha384-JcKb8q3iqJ61gNV9KGb8thSsNjpSL0n8PARn9HuZOnIxN0hoP+VmmDGMN5t9UJ0Z"crossorigin="anonymous">
<title>授权页面title>
<style>
body{
background-color:aliceblue;
}
style>
<script>
functioncancelConsent(){
document.consent_form.reset();
document.consent_form.submit();
}
script>
head>
<body>
<divclass="container">
<divclass="py-5">
<h1class="text-centertext-primary">用户授权确认h1>
div>
<divclass="row">
<divclass="coltext-center">
<p>
应用
<ahref="https://felord.cn"><spanclass="font-weight-boldtext-primary"th:text="${clientName}">span>a>
想要访问您的账号
<spanclass="font-weight-bold"th:text="${principalName}">span>
p>
div>
div>
<divclass="rowpb-3">
<divclass="coltext-center"><p>上述应用程序请求以下权限<br/>请审阅以下选项并勾选您同意的权限p>div>
div>
<divclass="row">
<divclass="coltext-center">
<formname="consent_form"method="post"action="/oauth2/authorize">
<inputtype="hidden"name="client_id"th:value="${clientId}">
<inputtype="hidden"name="state"th:value="${state}">

<divth:each="scope:${scopes}"class="form-groupform-checkpy-1">
<inputclass="form-check-input"
type="checkbox"
name="scope"
th:value="${scope.scope}"
th:id="${scope.scope}">
<labelclass="form-check-labelfont-weight-bold"th:for="${scope.scope}"th:text="${scope.scope}">label>
<pclass="text-primary"th:text="${scope.description}">p>
div>

<pth:if="${not#lists.isEmpty(previouslyApprovedScopes)}">您已对上述应用授予以下权限:p>
<divth:each="scope:${previouslyApprovedScopes}"class="form-groupform-checkpy-1">
<inputclass="form-check-input"
type="checkbox"
th:id="${scope.scope}"
disabled
checked>
<labelclass="form-check-labelfont-weight-bold"th:for="${scope.scope}"th:text="${scope.scope}">label>
<pclass="text-primary"th:text="${scope.description}">p>
div>

<divclass="form-grouppt-3">
<buttonclass="btnbtn-primarybtn-lg"type="submit"id="submit-consent">
同意授权
button>
div>
<divclass="form-group">
<buttonclass="btnbtn-linkregular"type="button"id="cancel-consent"onclick="cancelConsent();">
取消授权
button>
div>
form>
div>
div>
<divclass="rowpt-4">
<divclass="coltext-center">
<p>
<small>
需要您同意并提供访问权限。
<br/>如果您不同意,请单击<spanclass="font-weight-boldtext-primary">取消授权span>,将不会为上述应用程序提供任何您的信息。
small>
p>
div>
div>
div>
body>
html>
修改配置文件 application.yml(配置内容可自行简略)
server:
port:9000

spring:
application:
name:authorization-server
thymeleaf:
cache:false
datasource:
url:jdbc//192.168.1.69:3306/test
username:root
password:root
driver-class-name:com.mysql.cj.jdbc.Driver
security:
oauth2:
resourceserver:
jwt:
issuer-uri:http://127.0.0.1:9000#认证中心端点,作为资源端的配置

application:
security:
excludeUrls:#excludeUrls中存放白名单地址
-"/favicon.ico"

#mybatisplus配置
mybatis-plus:
mapper-locations:classpath:/mapper/*Mapper.xml
global-config:
#关闭MP3.0自带的banner
banner:false
db-config:
#主键类型0:"数据库ID自增",1:"不操作",2:"用户输入ID",3:"数字型snowflake",4:"全局唯一IDUUID",5:"字符串型snowflake";
id-type:AUTO
#字段策略
insert-strategy:not_null
update-strategy:not_null
select-strategy:not_null
#驼峰下划线w转换
table-underline:true
#逻辑删除配置
#逻辑删除全局值(1表示已删除,这也是MybatisPlus的默认配置)
logic-delete-value:1
#逻辑未删除全局值(0表示未删除,这也是MybatisPlus的默认配置)
logic-not-delete-value:0
configuration:
#驼峰
map-underscore-to-camel-case:true
#打开二级缓存
cache-enabled:true
#log-impl:org.apache.ibatis.logging.stdout.StdOutImpl#开启sql日志
新增认证服务器配置文件 AuthorizationServerConfig
@Configuration(proxyBeanMethods=false)
publicclassAuthorizationServerConfig{
/**
*自定义授权页面
*使用系统自带的即不用
*/
privatestaticfinalStringCUSTOM_CONSENT_PAGE_URI="/oauth2/consent";
/**
*自定义UserDetailsService
*/
@Autowired
privateUserServiceuserService;
/**
*
*使用默认配置进行form表单登录
*OAuth2AuthorizationServerConfiguration.applyDefaultSecurity(http)
*/
@Bean
@Order(Ordered.HIGHEST_PRECEDENCE)
publicSecurityFilterChainauthorizationServerSecurityFilterChain(HttpSecurityhttp)throwsException{
OAuth2AuthorizationServerConfigurerauthorizationServerConfigurer=newOAuth2AuthorizationServerConfigurer<>();
authorizationServerConfigurer.authorizationEndpoint(authorizationEndpoint->authorizationEndpoint.consentPage(CUSTOM_CONSENT_PAGE_URI));
RequestMatcherendpointsMatcher=authorizationServerConfigurer.getEndpointsMatcher();
http
.requestMatcher(endpointsMatcher)
.userDetailsService(userService)
.authorizeRequests(authorizeRequests->authorizeRequests.anyRequest().authenticated())
.csrf(csrf->csrf.ignoringRequestMatchers(endpointsMatcher))
.apply(authorizationServerConfigurer);
returnhttp.formLogin(Customizer.withDefaults()).build();
}
/**
*注册客户端应用
*/
@Bean
publicRegisteredClientRepositoryregisteredClientRepository(JdbcTemplatejdbcTemplate){
//Saveregisteredclientindbasifin-jdbc
RegisteredClientregisteredClient=RegisteredClient.withId(UUID.randomUUID().toString())
.clientId("zxg")
.clientSecret("123")
.clientAuthenticationMethod(ClientAuthenticationMethod.CLIENT_SECRET_BASIC)
.authorizationGrantType(AuthorizationGrantType.AUTHORIZATION_CODE)
.authorizationGrantType(AuthorizationGrantType.REFRESH_TOKEN)
.authorizationGrantType(AuthorizationGrantType.CLIENT_CREDENTIALS)
//回调地址
.redirectUri("http://www.baidu.com")
//scope自定义的客户端范围
.scope(OidcScopes.OPENID)
.scope("message.read")
.scope("message.write")
//client请求访问时需要授权同意
.clientSettings(ClientSettings.builder().requireAuthorizationConsent(true).build())
//token配置项信息
.tokenSettings(TokenSettings.builder()
//token有效期100分钟
.accessTokenTimeToLive(Duration.ofMinutes(100L))
//使用默认JWT相关格式
.accessTokenFormat(OAuth2TokenFormat.SELF_CONTAINED)
//开启刷新token
.reuseRefreshTokens(true)
//refreshToken有效期120分钟
.refreshTokenTimeToLive(Duration.ofMinutes(120L))
.idTokenSignatureAlgorithm(SignatureAlgorithm.RS256).build()
)
.build();
//Saveregisteredclientindbasifin-memory
JdbcRegisteredClientRepositoryregisteredClientRepository=newJdbcRegisteredClientRepository(jdbcTemplate);
registeredClientRepository.save(registeredClient);
returnregisteredClientRepository;
}
/**
*授权服务:管理OAuth2授权信息服务
*/
@Bean
publicOAuth2AuthorizationServiceauthorizationService(JdbcTemplatejdbcTemplate,RegisteredClientRepositoryregisteredClientRepository){
returnnewJdbcOAuth2AuthorizationService(jdbcTemplate,registeredClientRepository);
}
/**
*授权确认信息处理服务
*/
@Bean
publicOAuth2AuthorizationConsentServiceauthorizationConsentService(JdbcTemplatejdbcTemplate,RegisteredClientRepositoryregisteredClientRepository){
returnnewJdbcOAuth2AuthorizationConsentService(jdbcTemplate,registeredClientRepository);
}
/**
*加载JWK资源
*JWT:指的是JSONWebToken,不存在签名的JWT是不安全的,存在签名的JWT是不可窜改的
*JWS:指的是签过名的JWT,即拥有签名的JWT
*JWK:既然涉及到签名,就涉及到签名算法,对称加密还是非对称加密,那么就需要加密的密钥或者公私钥对。此处我们将JWT的密钥或者公私钥对统一称为JSONWEBKEY,即JWK。
*/
@Bean
publicJWKSourcejwkSource() {
RSAKeyrsaKey=JwksUtils.generateRsa();
JWKSetjwkSet=newJWKSet(rsaKey);
return(jwkSelector,securityContext)->jwkSelector.select(jwkSet);
}
/**
*配置OAuth2.0提供者元信息
*/
@Bean
publicProviderSettingsproviderSettings(){
returnProviderSettings.builder().issuer("http://127.0.0.1:9000").build();
}
}
新增Security的配置文件WebSecurityConfig
@Configuration
@EnableWebSecurity(debug=true)//开启Security
publicclassWebSecurityConfig{
@Autowired
privateApplicationPropertiesproperties;

/**
*设置加密方式
*/
@Bean
publicPasswordEncoderpasswordEncoder(){
////将密码加密方式采用委托方式,默认以BCryptPasswordEncoder方式进行加密,兼容ldap,MD4,MD5等方式
//returnPasswordEncoderFactories.createDelegatingPasswordEncoder();

//此处我们使用明文方式不建议这样
returnNoOpPasswordEncoder.getInstance();
}

/**
*使用WebSecurity.ignoring()忽略某些URL请求,这些请求将被SpringSecurity忽略
*/
@Bean
WebSecurityCustomizerwebSecurityCustomizer(){
returnnewWebSecurityCustomizer(){
@Override
publicvoidcustomize(WebSecurityweb){
//读取配置文件application.security.excludeUrls下的链接进行忽略
web.ignoring().antMatchers(properties.getSecurity().getExcludeUrls().toArray(newString[]{}));
}
};
}

/**
*针对http请求,进行拦截过滤
*
*CookieCsrfTokenRepository进行CSRF保护的工作方式:
*1.客户端向服务器发出GET请求,例如请求主页
*2.Spring发送GET请求的响应以及Set-cookie标头,其中包含安全生成的XSRF令牌
*/
@Bean
publicSecurityFilterChainhttpSecurityFilterChain(HttpSecurityhttpSecurity)throwsException{
httpSecurity
.authorizeRequests(authorizeRequests->
authorizeRequests.antMatchers("/login").permitAll()
.anyRequest().authenticated()
)

//使用默认登录页面
//.formLogin(withDefaults())

//设置form登录,设置且放开登录页login
.formLogin(fromlogin->fromlogin.loginPage("/login").permitAll())

//SpringSecurityCSRF保护
.csrf(csrfToken->csrfToken.csrfTokenRepository(newCookieCsrfTokenRepository()))

////开启认证服务器的资源服务器相关功能,即需校验token
//.oauth2ResourceServer()
//.accessDeniedHandler(newSimpleAccessDeniedHandler())
//.authenticationEntryPoint(newSimpleAuthenticationEntryPoint())
//.jwt()
;
returnhttpSecurity.build();
}

}
新增读取application配置的类 ApplicationProperties
/**
*此步主要是获取配置文件中配置的白名单,可自行舍去或自定义实现其他方式
**/
@Data
@Component
@ConfigurationProperties("application")
publicclassApplicationProperties{
privatefinalSecuritysecurity=newSecurity();

@Data
publicstaticclassSecurity{
privateOauth2oauth2;
privateListexcludeUrls=newArrayList<>();

@Data
publicstaticclassOauth2{
privateStringissuerUrl;

}
}
}
新增 JwksUtils 类和 KeyGeneratorUtils,这两个类作为JWT对称加密
publicfinalclassJwksUtils{

privateJwksUtils(){
}

/**
*生成RSA加密key(即JWK)
*/
publicstaticRSAKeygenerateRsa(){
//生成RSA加密的key
KeyPairkeyPair=KeyGeneratorUtils.generateRsaKey();
//公钥
RSAPublicKeypublicKey=(RSAPublicKey)keyPair.getPublic();
//私钥
RSAPrivateKeyprivateKey=(RSAPrivateKey)keyPair.getPrivate();
//构建RSA加密key
returnnewRSAKey.Builder(publicKey)
.privateKey(privateKey)
.keyID(UUID.randomUUID().toString())
.build();
}

/**
*生成EC加密key(即JWK)
*/
publicstaticECKeygenerateEc(){
//生成EC加密的key
KeyPairkeyPair=KeyGeneratorUtils.generateEcKey();
//公钥
ECPublicKeypublicKey=(ECPublicKey)keyPair.getPublic();
//私钥
ECPrivateKeyprivateKey=(ECPrivateKey)keyPair.getPrivate();
//根据公钥参数生成曲线
Curvecurve=Curve.forECParameterSpec(publicKey.getParams());
//构建EC加密key
returnnewECKey.Builder(curve,publicKey)
.privateKey(privateKey)
.keyID(UUID.randomUUID().toString())
.build();
}

/**
*生成HmacSha256密钥
*/
publicstaticOctetSequenceKeygenerateSecret(){
SecretKeysecretKey=KeyGeneratorUtils.generateSecretKey();
returnnewOctetSequenceKey.Builder(secretKey)
.keyID(UUID.randomUUID().toString())
.build();
}
}


classKeyGeneratorUtils{

privateKeyGeneratorUtils(){
}

/**
*生成RSA密钥
*/
staticKeyPairgenerateRsaKey(){
KeyPairkeyPair;
try{
KeyPairGeneratorkeyPairGenerator=KeyPairGenerator.getInstance("RSA");
keyPairGenerator.initialize(2048);
keyPair=keyPairGenerator.generateKeyPair();
}catch(Exceptionex){
thrownewIllegalStateException(ex);
}
returnkeyPair;
}

/**
*生成EC密钥
*/
staticKeyPairgenerateEcKey(){
EllipticCurveellipticCurve=newEllipticCurve(
newECFieldFp(
newBigInteger("115792089210356248762697446949407573530086143415290314195533631308867097853951")),
newBigInteger("115792089210356248762697446949407573530086143415290314195533631308867097853948"),
newBigInteger("41058363725152142129326129780047268409114441015993725554835256314039467401291"));
ECPointecPoint=newECPoint(
newBigInteger("48439561293906451759052585252797914202762949526041747995844080717082404635286"),
newBigInteger("36134250956749795798585127919587881956611106672985015071877198253568414405109"));
ECParameterSpececParameterSpec=newECParameterSpec(
ellipticCurve,
ecPoint,
newBigInteger("115792089210356248762697446949407573529996955224135760342422259061068512044369"),
1);

KeyPairkeyPair;
try{
KeyPairGeneratorkeyPairGenerator=KeyPairGenerator.getInstance("EC");
keyPairGenerator.initialize(ecParameterSpec);
keyPair=keyPairGenerator.generateKeyPair();
}catch(Exceptionex){
thrownewIllegalStateException(ex);
}
returnkeyPair;
}

/**
*生成HmacSha256密钥
*/
staticSecretKeygenerateSecretKey(){
SecretKeyhmacKey;
try{
hmacKey=KeyGenerator.getInstance("HmacSha256").generateKey();
}catch(Exceptionex){
thrownewIllegalStateException(ex);
}
returnhmacKey;
}
}
新建 ConsentController,编写登录和认证页面的跳转
如果在上面没有使用自定义的登录和授权页面,下面的跳转方法按需舍去
@Slf4j
@Controller
publicclassConsentController{
privatefinalRegisteredClientRepositoryregisteredClientRepository;
privatefinalOAuth2AuthorizationConsentServiceauthorizationConsentService;
publicConsentController(RegisteredClientRepositoryregisteredClientRepository,
OAuth2AuthorizationConsentServiceauthorizationConsentService){
this.registeredClientRepository=registeredClientRepository;
this.authorizationConsentService=authorizationConsentService;
}
@ResponseBody
@GetMapping("/favicon.ico")
publicStringfaviconico(){
return"favicon.ico";
}
@GetMapping("/login")
publicStringloginPage(){
return"login";
}
@GetMapping(value="/oauth2/consent")
publicStringconsent(Principalprincipal,Modelmodel,
@RequestParam(OAuth2ParameterNames.CLIENT_ID)StringclientId,
@RequestParam(OAuth2ParameterNames.SCOPE)Stringscope,
@RequestParam(OAuth2ParameterNames.STATE)Stringstate){
//Removescopesthatwerealreadyapproved
SetscopesToApprove=newHashSet<>();
SetpreviouslyApprovedScopes=newHashSet<>();
RegisteredClientregisteredClient=this.registeredClientRepository.findByClientId(clientId);
OAuth2AuthorizationConsentcurrentAuthorizationConsent=
this.authorizationConsentService.findById(registeredClient.getId(),principal.getName());
SetauthorizedScopes;
if(currentAuthorizationConsent!=null){
authorizedScopes=currentAuthorizationConsent.getScopes();
}else{
authorizedScopes=Collections.emptySet();
}
for(StringrequestedScope:StringUtils.delimitedListToStringArray(scope,"")){
if(authorizedScopes.contains(requestedScope)){
previouslyApprovedScopes.add(requestedScope);
}else{
scopesToApprove.add(requestedScope);
}
}
model.addAttribute("clientId",clientId);
model.addAttribute("state",state);
model.addAttribute("scopes",withDescription(scopesToApprove));
model.addAttribute("previouslyApprovedScopes",withDescription(previouslyApprovedScopes));
model.addAttribute("principalName",principal.getName());
return"consent";
}
privatestaticSetwithDescription(Setscopes) {
SetscopeWithDescriptions=newHashSet<>();
for(Stringscope:scopes){
scopeWithDescriptions.add(newScopeWithDescription(scope));
}
returnscopeWithDescriptions;
}
publicstaticclassScopeWithDescription{
privatestaticfinalStringDEFAULT_DESCRIPTION="UNKNOWNSCOPE-Wecannotprovideinformationaboutthispermission,usecautionwhengrantingthis.";
privatestaticfinalMapscopeDescriptions=newHashMap<>();
static{
scopeDescriptions.put(
"message.read",
"Thisapplicationwillbeabletoreadyourmessage."
);
scopeDescriptions.put(
"message.write",
"Thisapplicationwillbeabletoaddnewmessages.Itwillalsobeabletoeditanddeleteexistingmessages."
);
scopeDescriptions.put(
"other.scope",
"Thisisanotherscopeexampleofascopedescription."
);
}
publicfinalStringscope;
publicfinalStringdescription;
ScopeWithDescription(Stringscope){
this.scope=scope;
this.description=scopeDescriptions.getOrDefault(scope,DEFAULT_DESCRIPTION);
}
}
}
新建 UserController,User,UserService等标准的自定义用户业务,此处仅放出UserServiceImpl
@RequiredArgsConstructor
@Slf4j
@Component
classUserServiceImplimplementsUserService{
privatefinalUserMapperuserMapper;

@Override
publicUserDetailsloadUserByUsername(Stringusername)throwsUsernameNotFoundException{
Useruser=userMapper.selectOne(newLambdaQueryWrapper().eq(User::getUsername,username));
returnneworg.springframework.security.core.userdetails.User(username,user.getPassword(),newArrayList<>());
}
}
启动项目,如下图

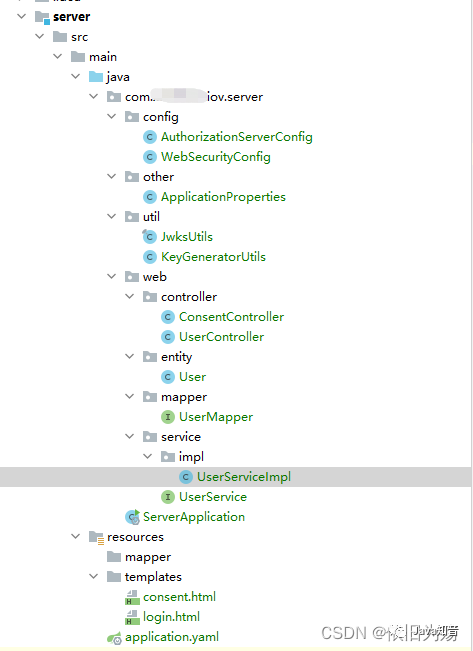
认证服务器整体结构图
资源服务器相关配置
pom.xml引入资源服务器相关依赖
<dependency>
<groupId>org.springframework.bootgroupId>
<artifactId>spring-boot-starter-oauth2-resource-serverartifactId>
dependency>


<dependency>
<groupId>org.springframework.bootgroupId>
<artifactId>spring-boot-starter-securityartifactId>
dependency>
新增配置文件 application.yaml
server:
port:9003
spring:
application:
name:resource
security:
oauth2:
resourceserver:
jwt:
issuer-uri:http://127.0.0.1:9000
feign:
client:
config:
default:#配置超时时间
connect-timeout:10000
read-timeout:10000
新增资源服务器配置文件 ResourceServerConfiguration
@Configuration
@EnableWebSecurity(debug=true)
@EnableGlobalMethodSecurity(prePostEnabled=true)//开启鉴权服务
publicclassResourceServerConfiguration{

@Bean
publicSecurityFilterChainhttpSecurityFilterChain(HttpSecurityhttpSecurity)throwsException{
//所有请求都进行拦截
httpSecurity.authorizeRequests().anyRequest().authenticated();
//关闭session
httpSecurity.sessionManagement().disable();
//配置资源服务器的无权限,无认证拦截器等以及JWT验证
httpSecurity.oauth2ResourceServer()
.accessDeniedHandler(newSimpleAccessDeniedHandler())
.authenticationEntryPoint(newSimpleAuthenticationEntryPoint())
.jwt();
returnhttpSecurity.build();
}

}
新增相关无认证无权限统一拦截回复 SimpleAccessDeniedHandler 和 SimpleAuthenticationEntryPoint
/**
*携带了token而且token合法但是权限不足以访问其请求的资源403
*@authorzxg
*/
publicclassSimpleAccessDeniedHandlerimplementsAccessDeniedHandler{

@Override
publicvoidhandle(HttpServletRequestrequest,HttpServletResponseresponse,AccessDeniedExceptionaccessDeniedException)throwsIOException,ServletException{
response.setStatus(HttpServletResponse.SC_FORBIDDEN);
response.setCharacterEncoding("utf-8");
response.setContentType(MediaType.APPLICATION_JSON_VALUE);
ObjectMapperobjectMapper=newObjectMapper();
StringresBody=objectMapper.writeValueAsString(SingleResultBundle.failed("无权访问"));
PrintWriterprintWriter=response.getWriter();
printWriter.print(resBody);
printWriter.flush();
printWriter.close();
}
}


/**
*在资源服务器中不携带token或者token无效401
*@authorzxg
*/
@Slf4j
publicclassSimpleAuthenticationEntryPointimplementsAuthenticationEntryPoint{
@Override
publicvoidcommence(HttpServletRequestrequest,HttpServletResponseresponse,AuthenticationExceptionauthException)throwsIOException,ServletException{
if(response.isCommitted()){
return;
}

Throwablethrowable=authException.fillInStackTrace();

StringerrorMessage="认证失败";

if(throwableinstanceofBadCredentialsException){
errorMessage="错误的客户端信息";
}else{
Throwablecause=authException.getCause();

if(causeinstanceofJwtValidationException){
log.warn("JWTToken过期,具体内容:"+cause.getMessage());
errorMessage="无效的token信息";
}elseif(causeinstanceofBadJwtException){
log.warn("JWT签名异常,具体内容:"+cause.getMessage());
errorMessage="无效的token信息";
}elseif(causeinstanceofAccountExpiredException){
errorMessage="账户已过期";
}elseif(causeinstanceofLockedException){
errorMessage="账户已被锁定";
//}elseif(causeinstanceofInvalidClientException||causeinstanceofBadClientCredentialsException){
//response.getWriter().write(JSON.toJSONString(SingleResultBundle.failed(401,"无效的客户端")));
//}elseif(causeinstanceofInvalidGrantException||causeinstanceofRedirectMismatchException){
//response.getWriter().write(JSON.toJSONString(SingleResultBundle.failed("无效的类型")));
//}elseif(causeinstanceofUnauthorizedClientException){
//response.getWriter().write(JSON.toJSONString(SingleResultBundle.failed("未经授权的客户端")));
}elseif(throwableinstanceofInsufficientAuthenticationException){
Stringmessage=throwable.getMessage();
if(message.contains("Invalidtokendoesnotcontainresourceid")){
errorMessage="未经授权的资源服务器";
}elseif(message.contains("Fullauthenticationisrequiredtoaccessthisresource")){
errorMessage="缺少验证信息";
}
}else{
errorMessage="验证异常";
}
}

response.setStatus(HttpServletResponse.SC_UNAUTHORIZED);
response.setCharacterEncoding("utf-8");
response.setContentType(MediaType.APPLICATION_JSON_VALUE);
ObjectMapperobjectMapper=newObjectMapper();
StringresBody=objectMapper.writeValueAsString(SingleResultBundle.failed(errorMessage));
PrintWriterprintWriter=response.getWriter();
printWriter.print(resBody);
printWriter.flush();
printWriter.close();
}
}
新增 ResourceController 进行接口测试
@Slf4j
@RestController
publicclassResourceController{
/**
*测试SpringAuthorizationServer,测试权限
*/
@PreAuthorize("hasAuthority('SCOPE_message.read')")
@GetMapping("/getTest")
publicStringgetTest(){
return"getTest";
}
/**
*默认登录成功跳转页为/防止404状态
*
*@returnthemap
*/
@GetMapping("/")
publicMapindex() {
returnCollections.singletonMap("msg","loginsuccess!");
}
@GetMapping("/getResourceTest")
publicSingleResultBundlegetResourceTest() {
returnSingleResultBundle.success("这是resource的测试方法getResourceTest()");
}
}
启动项目,效果如下

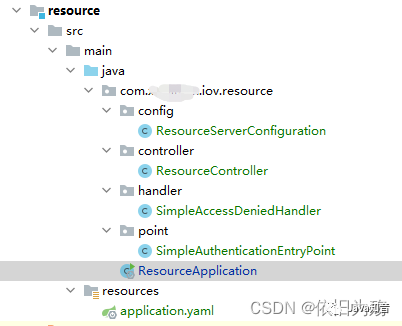
项目总体结构如下
测试认证鉴权
#调用/oauth2/authorize,获取code
http://127.0.0.1:9000/oauth2/authorize?client_id=zxg&response_type=code&scope=message.read&redirect_uri=http://www.baidu.com
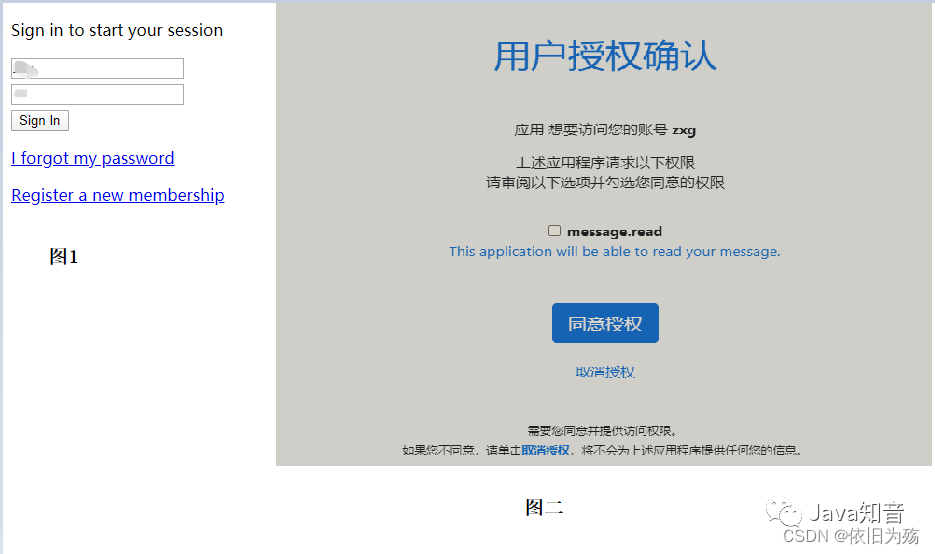
#会判断是否登录,若没有,则跳转到登录页面,如下图1
#登录完成后,会提示是否授权,若没有,则跳转到授权界面,如下图2
#授权成功后,跳转到回调地址,并带上code,如图3

打开postman,进行获取access_token
#访问/oauth2/token地址
#在Authorization中选择BasicAuth模式,填入对应客户端,其会在header中生成Authorization,如下图右侧
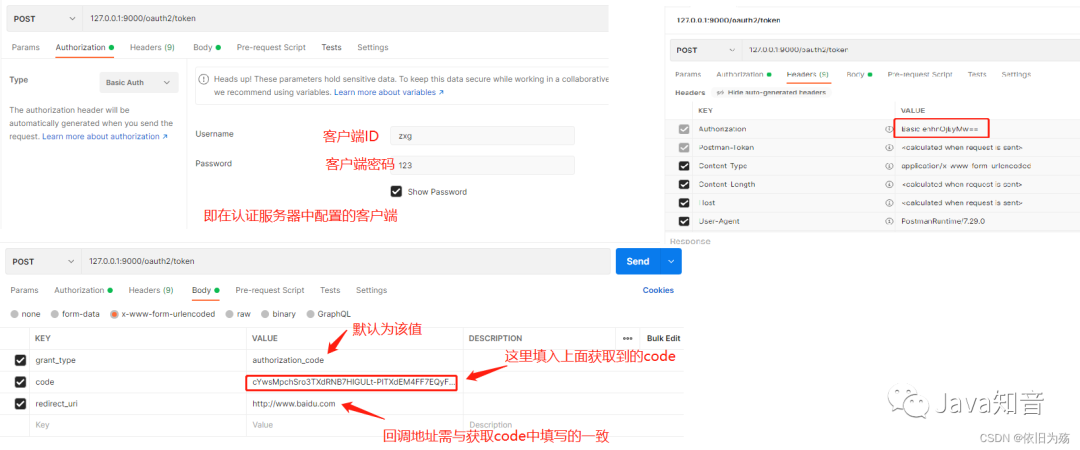
返回结果如下

调用ResourceController中的接口,测试token是否生效
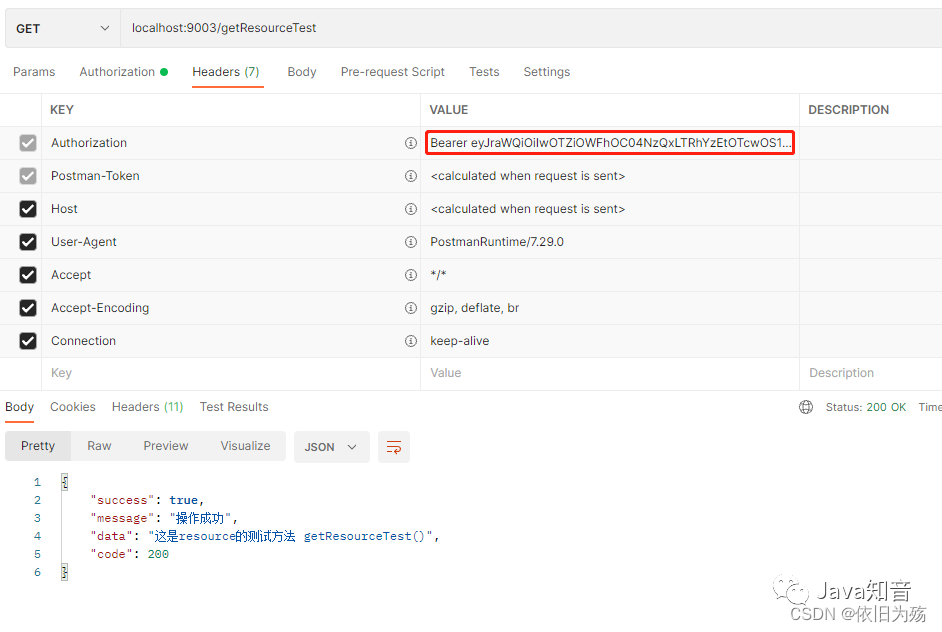
源码下载地址
- https://gitee.com/rjj521/authorization-server-learn
总结
至此,spring-authorization-server的基础使用已完成,总体上和原Spring Security OAuth大差不差,个别配置项不同。期间在网上搜寻了很多资料,然后进行整合,因此文中存在与其他网上教程相同代码,如有争议,请联系我删除改正,谢谢。
审核编辑 :李倩
-
服务器
+关注
关注
12文章
9237浏览量
85673 -
数据库
+关注
关注
7文章
3827浏览量
64518 -
spring
+关注
关注
0文章
340浏览量
14358
原文标题:拥抱 Spring 全新 OAuth 解决方案:spring-authorization-server 该怎么玩?
文章出处:【微信号:AndroidPush,微信公众号:Android编程精选】欢迎添加关注!文章转载请注明出处。
发布评论请先 登录
相关推荐
AI Server市场持续扩张,2025年产值有望逼近3000亿美元
Spring 应用合并之路(二):峰回路转,柳暗花明
虚拟化数据恢复—VMware ESX SERVER无法连接STORAGE的数据恢复案例
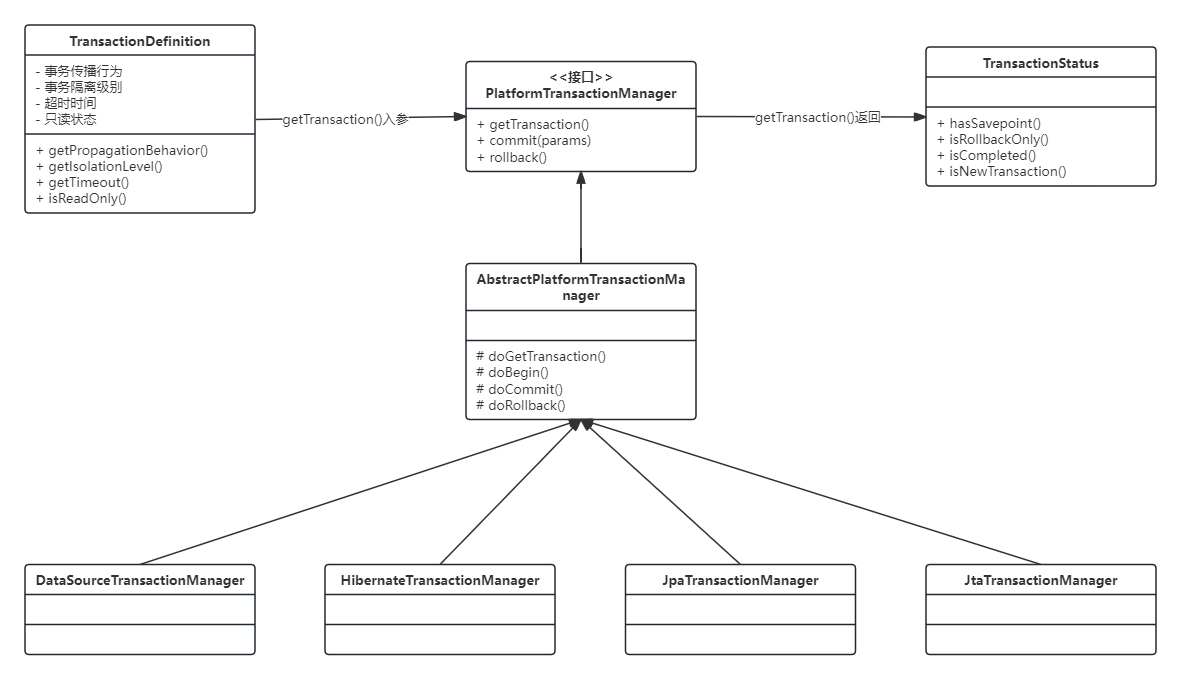
Spring事务实现原理
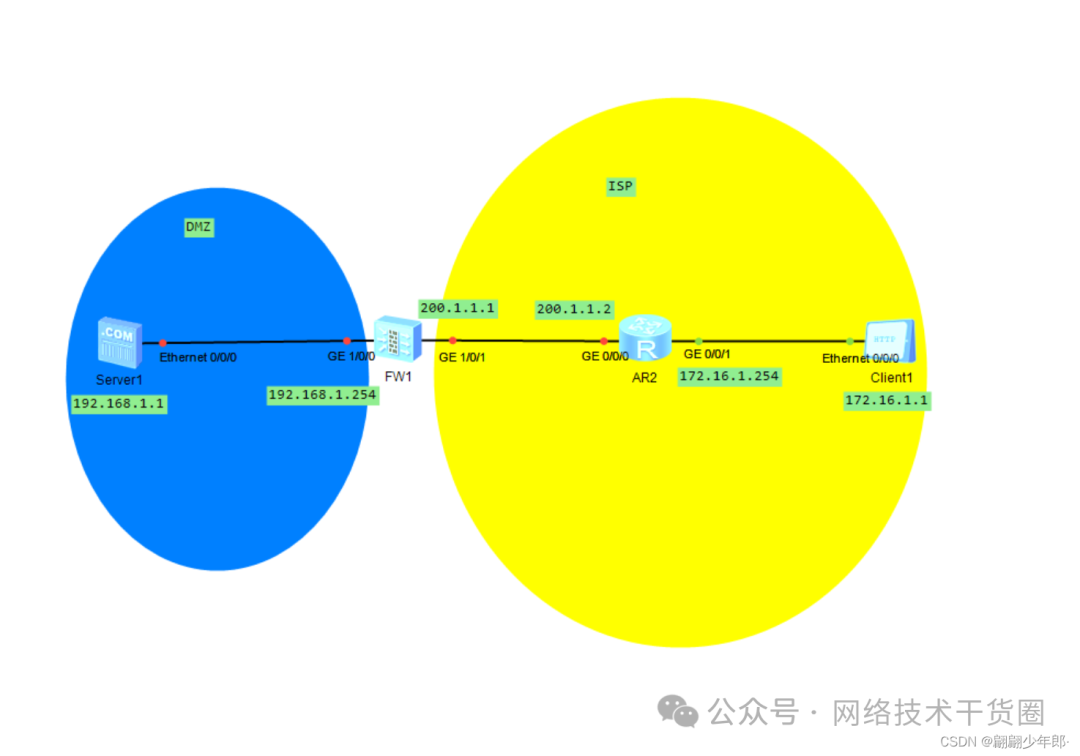
Nat server技术原理和配置过程
数据库数据恢复—SQL Server数据库出现823错误的数据恢复案例
Spring Cloud Gateway网关框架
数据库数据恢复—SQL Server数据库所在分区空间不足报错的数据恢复案例
如何使用AT固件开启ESP32 Ethernet DHCP Server模式?
玩转Spring状态机


 为什么使用spring-authorization-server?


评论