1 背景
BB-BLACK是16年买的一块开发板,时隔5年,板子上面却看不到一丝岁月的痕迹,这两天研究一下linux下串口的应用开发。
2 所使用的镜像文件以及rootfs
| 名称 | 描述 |
|---|---|
| U-引导 | bb-black-debian-u-boot.tar.bz2 |
| 内核 | bb-black-debian-kernel-3.8.tar.bz2 |
| 根FS | prebuild-BBB-Exp-V2-eMMC-flasher-20140626.tar.gz/build/systems/Debian/rootfs.tar.gz |
3 硬件连接
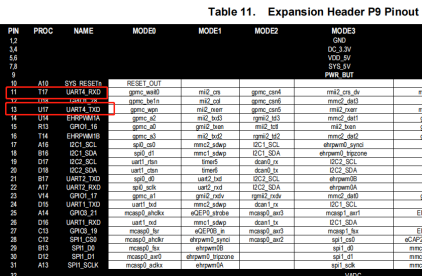
选择串口4

4 cape的使用
BB-BLACK的一些引脚功能,外设接口设备都可以通过cape来管理,我们要使用串口4设备,那就需要向这个cape中插入串口4设备
4.1 添加环境变量
export SLOTS=/sys/devices/bone_capemgr.9/slots
4.2 查看当前设备
cat $SLOTS
 0: 54:PF---
 1: 55:PF---
 2: 56:PF---
 3: 57:PF---
 4: ff:P-O-L Bone-LT-eMMC-2G,00A0,Texas Instrument,BB-BONE-EMMC-2G
 5: ff:P-O-L Bone-Black-HDMI,00A0,Texas Instrument,BB-BONELT-HDMI
4.3 向cape中添加串口4设备
echo BB-UART4 > $SLOTS
4.4 检查是否添加成功
ls ttyO*
ttyO0  ttyO4
4.5 设置波特率
stty -F /dev/ttyO4 115200
4.6 简单测试收发
echo "test" > /dev/ttyO4
cat /dev/ttyO4
5 安装辅助工具
基本的收发测试正常后就可以进行应用开发了,我们需要安装一些工具来提高效率
5.1 挂载nfs文件系统
5.1.1 ubuntu下安装nfs
sudo apt-get install nfs-kernel-server
sudo apt-get install nfs-common
5.1.2 设置路径
/home/samba *(rw,sync,no_root_squash)
5.1.3 测试挂载
mount -t nfs 192.168.0.193:/home/samba /mnt -o nolock
如果报错提示报错可能是路径不对、目录权限问题
mount.nfs: access denied by server while mounting
192.168.0.193:/home/samba
5.2 安装samba实现windows和ubuntu之间的文件共享
5.2.1 安装samba
sudo apt install samba samba-common -y
5.2.2 配置samba
sudo mkdir /home/samba
sudo vim /etc/samba/smb.conf
[samba]
    comment=samba
    path = /home/samba
    public = yes
    writable = yes
    create mask = 0777
    directory mask = 0777
5.2.3 开机启动samba
systemctl enable smbd
5.2.4 启动samba
samba systemctl start smbd
5.3 安装出错时可能需要重新配置一下dpkg
sudo dpkg --configure -a
sudo apt update
6 应用测试
6.1 相关代码
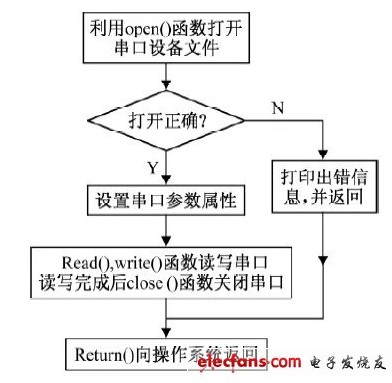
6.1.1 串口的配置、打开、关闭、读写接口
int uart_open(int fd,char*port)
{
    fd = open( port, O_RDWR|O_NOCTTY|O_NDELAY);
    if (fd<0)
    {
        perror("Can't Open Serial Port");
        return(RES_UART_FALSE);
    }
    //恢复串口为阻塞状态
    if(fcntl(fd, F_SETFL, 0) < 0)
    {
        printf("fcntl failed!\\n");
        return(RES_UART_FALSE);
    }
    else
    {
        printf("fcntl=%d\\n",fcntl(fd, F_SETFL,0));
    }
    return fd;
}


void uart_close(int fd)
{
    close(fd);
}


int uart_config(int fd,int speed,int flow_ctrl,int databits,int stopbits,int parity)
{

    int   i;
    int   status;
    int   speed_arr[] = { B115200, B19200, B9600, B4800, B2400, B1200, B300};
    int   name_arr[] = {115200,  19200,  9600,  4800,  2400,  1200,  300};

    struct termios options;

    int res = tcgetattr( fd,&options);
    if( res  !=  0)
    {
        perror("SetupSerial 1");
        return(RES_UART_FALSE);
    }

    //设置串口输入波特率和输出波特率
    for ( i= 0;  i < sizeof(speed_arr) / sizeof(int);  i++)
    {
        if  (speed == name_arr[i])
        {
            cfsetispeed(&options, speed_arr[i]);
            cfsetospeed(&options, speed_arr[i]);
        }
    }

    //修改控制模式,保证程序不会占用串口
    options.c_cflag |= CLOCAL;
    //修改控制模式,使得能够从串口中读取输入数据
    options.c_cflag |= CREAD;

    //设置数据流控制
    switch(flow_ctrl)
    {

        case 0 ://不使用流控制
              options.c_cflag &= ~CRTSCTS;
              break;

        case 1 ://使用硬件流控制
              options.c_cflag |= CRTSCTS;
              break;
        case 2 ://使用软件流控制
              options.c_cflag |= IXON | IXOFF | IXANY;
              break;
    }
    //设置数据位
    //屏蔽其他标志位
    options.c_cflag &= ~CSIZE;
    switch (databits)
    {
        case 5    :
                     options.c_cflag |= CS5;
                     break;
        case 6    :
                     options.c_cflag |= CS6;
                     break;
        case 7    :
                 options.c_cflag |= CS7;
                 break;
        case 8:
                 options.c_cflag |= CS8;
                 break;
        default:
                 fprintf(stderr,"Unsupported data size\\n");
                 return (RES_UART_FALSE);
    }
    //设置校验位
    switch (parity)
    {
        case 'n':
        case 'N': //无奇偶校验位。
                 options.c_cflag &= ~PARENB;
                 options.c_iflag &= ~INPCK;
                 break;
        case 'o':
        case 'O'://设置为奇校验
                 options.c_cflag |= (PARODD | PARENB);
                 options.c_iflag |= INPCK;
                 break;
        case 'e':
        case 'E'://设置为偶校验
                 options.c_cflag |= PARENB;
                 options.c_cflag &= ~PARODD;
                 options.c_iflag |= INPCK;
                 break;
        case 's':
        case 'S': //设置为空格
                 options.c_cflag &= ~PARENB;
                 options.c_cflag &= ~CSTOPB;
                 break;
        default:
                 fprintf(stderr,"Unsupported parity\\n");
                 return (RES_UART_FALSE);
    }
    // 设置停止位
    switch (stopbits)
    {
        case 1:
                 options.c_cflag &= ~CSTOPB; break;
        case 2:
                 options.c_cflag |= CSTOPB; break;
        default:
                       fprintf(stderr,"Unsupported stop bits\\n");
                       return (RES_UART_FALSE);
    }

    //修改输出模式,原始数据输出
    options.c_oflag &= ~OPOST;

    options.c_lflag &= ~(ICANON | ECHO | ECHOE | ISIG);
    //options.c_lflag &= ~(ISIG | ICANON);

    //设置等待时间和最小接收字符
    options.c_cc[VTIME] = 1; /* 读取一个字符等待1*(1/10)s */
    options.c_cc[VMIN] = 1; /* 读取字符的最少个数为1 */

    //如果发生数据溢出,接收数据,但是不再读取 刷新收到的数据但是不读
    tcflush(fd,TCIFLUSH);

    //激活配置 (将修改后的termios数据设置到串口中)
    if (tcsetattr(fd,TCSANOW,&options) != 0)
    {
        perror("com set error!\\n");
        return (RES_UART_FALSE);
    }
    return (RES_UART_TRUE);
}


int uart_init(int fd, int speed,int flow_ctrl,int databits,int stopbits,int parity)
{
    int err;
    //设置串口数据帧格式
    if (uart_config(fd,speed,flow_ctrl,databits,stopbits,parity) == RES_UART_FALSE)
    {
        return RES_UART_FALSE;
    }
    else
    {
        return  RES_UART_TRUE;
    }
}

int uart_read(int fd, char *rcv_buf,int data_len)
{
    int len,fs_sel;
    fd_set fs_read;

    struct timeval time;

    FD_ZERO(&fs_read);
    FD_SET(fd,&fs_read);

    time.tv_sec = 10;
    time.tv_usec = 0;

    //使用select实现串口的多路通信
    fs_sel = select(fd+1,&fs_read,NULL,NULL,&time);
    //printf("fs_sel = %d\\n",fs_sel);
    if(fs_sel)
    {
        len = read(fd,rcv_buf,data_len);
        return len;
    }
    else
    {
        return RES_UART_FALSE;
    }
}


int uart_write(int fd, char *send_buf,int data_len)
{
    int len = 0;

    len = write(fd,send_buf,data_len);
    if (len == data_len )
    {
        printf("send data is %s\\n",send_buf);
        return len;
    }
    else
    {

        tcflush(fd,TCOFLUSH);
        return RES_UART_FALSE;
    }

}
6.1.2 测试代码
#include "stdint.h"
#include "app_usart.h"
#include "app_config.h"
#include "rtservice.h"
#include "ful_communication.h"
#includeuint8_t ch = rcv_buf[idx];
printf("%02x ",ch);
g_ful_com_detect_command(ch);
}
printf("\\n");
}
usleep(10000);
}
uart_close(fd);
close(fd_drv_uart);
}
6.1.3 生成文件
CFILE = $(wildcard  *.c)
  CFILE += $(wildcard functions/*.c)
  CFILE += $(wildcard app/*.c)
  DIRSRC += -I functions/include
  DIRSRC += -I app/include
all:
  @gcc $(CFILE) $(DIRSRC) -o u_app
#gcc *.c  -o  usart


.PHONY:clean
clean:
  @-rm u_app
6.1.4 目录结构
app
--include
--app_test.c
--app_uart.c
functions
--include
--fun_communication.c
Makefile
u_app
6.3 串口应用的开机自启动
开机自启动,运行在后台,u_app需要添加可执行权限
cp u_app /usr/my_app
vim /etc/rc.local
./usr/my_app/u_app /dev/ttyO4 &
exit 0
6.4 测试
可正常解析指令,返回结果

7 总结
用虚拟机来跑ubuntu总是不太稳定,如果不能进入桌面系统也不能进入tty控制台基本上就要重装了,还是得找个稳定的ubuntu镜像才行呀。
-
Linux
+关注
关注
87文章
11296浏览量
209358 -
串口
+关注
关注
14文章
1551浏览量
76440 -
开发板
+关注
关注
25文章
5035浏览量
97384 -
应用开发
+关注
关注
0文章
58浏览量
9358 -
BB-Black
+关注
关注
1文章
15浏览量
13197
发布评论请先 登录
相关推荐
基于Linux环境下串口通信的应用设计
Linux下串口编程下载
Linux下ARM 和单片机的串口通信设计

基于嵌入式linux系统下的串口编程具体设置详解
【嵌入式Linux(环境篇)】Linux下的串口助手 —— minicom或putty


 linux下串口的应用开发


评论