 如何在Raspberry Pi项目中添加Siri控制
这篇文章来源于DevicePlus.com英语网站的翻译稿。
1. 目的
本教程旨在教您如何使用SiriControl开源Python框架在RaspberryPi项目中添加Siri功能和控制功能。
2. 概述
在本教程中,我将介绍如何设置和使用SiriControl Python框架。我将利用SiriControl模块和Raspberry Pi 3来点亮和熄灭一个LED。学完本教程之后,您将能够使用SiriControl将Siri语音命令添加到任何Raspberry Pi项目中。开始学习之前,请确保您拥有以下设备和材料,并确保已经安装RaspberryPi且软件能够正常运行。
3. 设备
Raspberry Pi 3 – Raspberry Pi链接
HDMI线–HDMI线链接
LED – LED的Adafruit链接
鼠标 + 键盘 – 键盘/鼠标的Amazon链接
显示器/TV – 任何带HDMI接口的TV或显示器
跳线 – 跳线的Amazon链接
Micro USB电缆 – Micro USB 电缆的Amazon链接
面包板 – 面包板的Amazon链接
4. 目录
为SiriControl创建一个Gmail帐户
iOS设备设置
SiriControl
设置SiriControl
创建自己的模块
电路接线
上传并运行程序
程序
1.0 为SiriControl创建一个Gmail帐户
SiriControl模块需要一个Gmail帐户才能工作。我创建了一个新的Gmail帐户,仅供SiriControl使用。我建议您也这样做。这是一个好主意,因为Python脚本可以包含该帐户的用户名和密码。
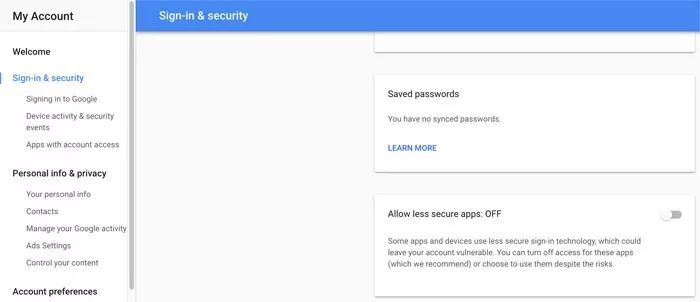
创建帐户后,我们需要允许不太安全的应用程序访问Gmail。这是因为Gmail服务器将Python脚本视为不太安全的应用程序。我们可以在Sign-in & Security(登录和安全) 部分进行设置。

图1:应用程序访问(关闭)
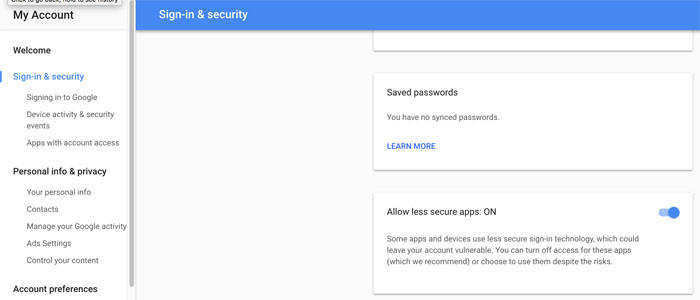
图2:应用程序访问(开启)
设置Gmail帐户的最后一步是启用IMAP协议。设置路径如下: Gmail->Settings->Gear Part->Settings->Forwarding and POP/IMAP->IMAP Access.
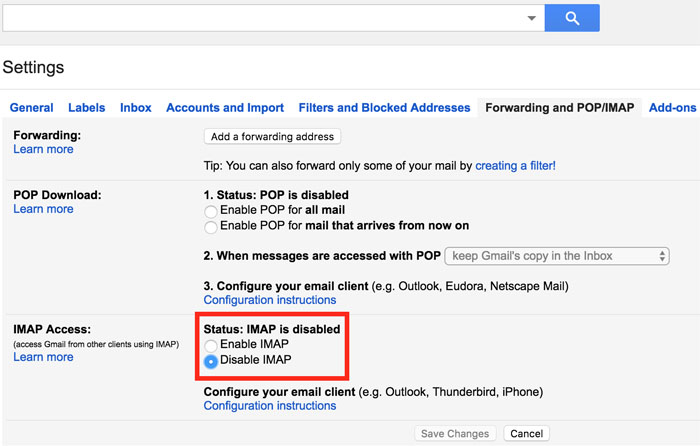
图3:IMAP(禁用)
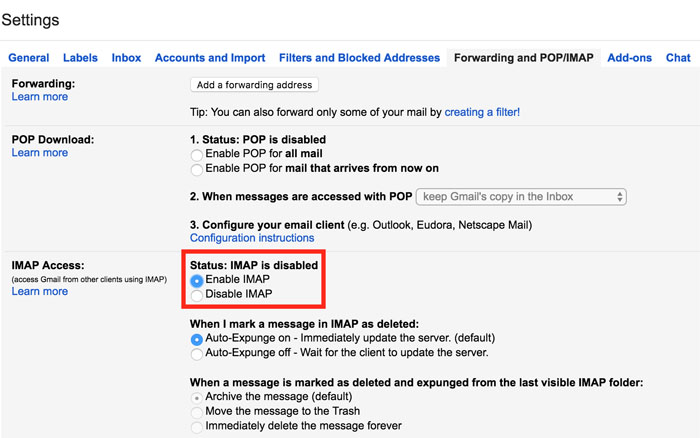
图4:IMAP(启用)
2.0 iOS设备设置
将iOS设备上的“Notes”连至已经设置好与SiriControl配合使用的Gmail帐户。选择 Settings->Accounts & Passwords->Add Account(设置->帐户和密码->添加帐户), 添加刚才设置好的Gmail帐户。添加该帐户后,选择它并启用Notes(图6:Gmail帐户下的Notes)。接下来,选择 Settings->Notes,并启用“On My iPhone” Account(我iPhone上的帐户)。 然后,将 Default Account 改为Gmail帐户。现在,我的iOS设备设置完毕。
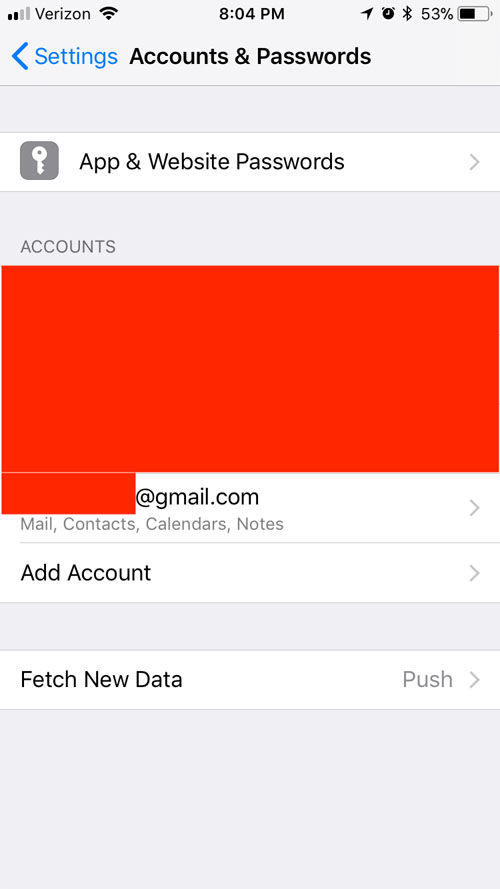
图5:帐户和密码
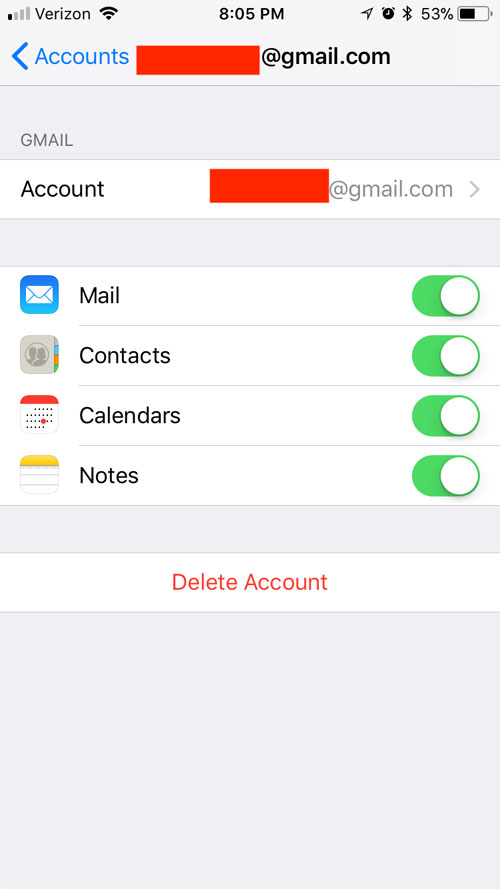
图6:Gmail帐户下的Notes
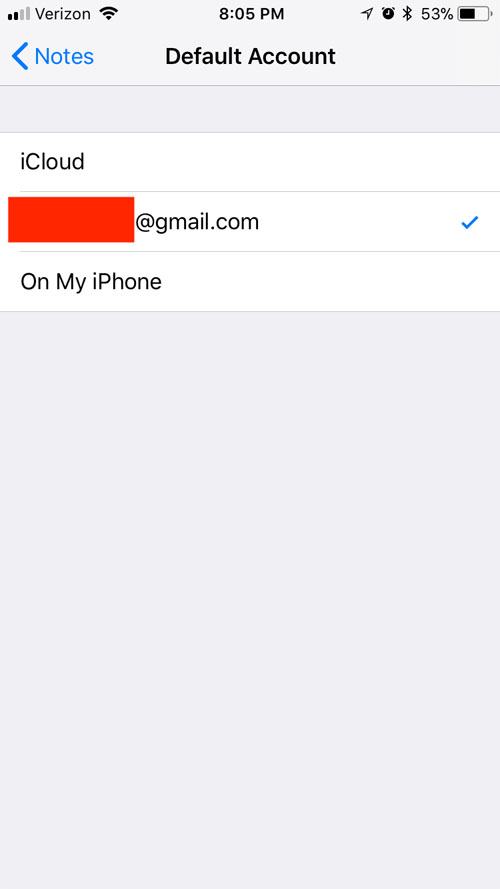
图7:默认帐户-Notes
3.0 Siri控制
3.1 设置SiriControl
要使用SiriControl,我们需要将模块的资源库克隆到RaspberryPi。要做到这一点,请打开终端窗口并输入以下命令:
1. sudo apt-get update
2. sudo apt-get install git-core
3. git clone https://github.com/theraspberryguy/SiriControl-System
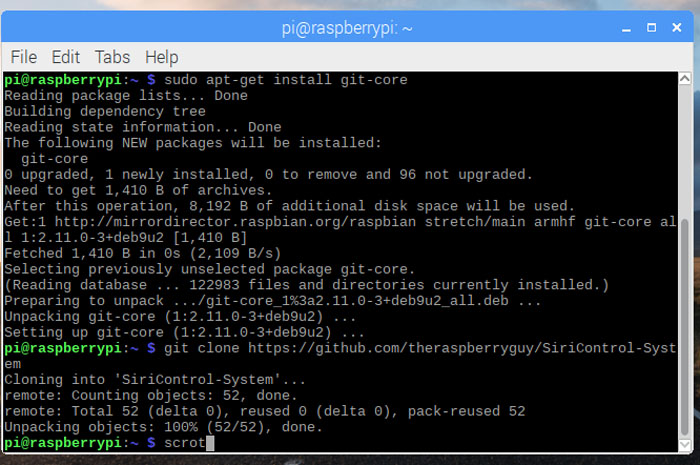
图8:克隆资源库
克隆资源库之后,打开脚本siricontrol.py。在脚本中输入Gmail帐户的用户名和密码,然后保存脚本。
3.2 创建自己的模块
Siricontrol.py 运行时,会从模块(modules)文件夹中加载模块脚本。执行不同的任务时,按照模板编写新的模块脚本很重要。因为我想控制一个LED,所以我写了一个脚本来打开LED (LED_on.py) 和一个脚本来关闭LED (LED_off.py).
要制作自己的模块,请在模板脚本中执行以下步骤:
1. 在“moduleName”中命名该模块
2. 为模块提供“commandWords”,以便让Siri执行命令。
3. 在execute(command) 函数下写入想要执行的功能。
4. 确保将脚本保存在模块文件夹中。
4.0 连接电路
为了让SiriControl执行命令,我搭建了一个简单的LED电路。我总是喜欢用Fritzing绘制接线图。Fritzing是一款开源原理图设计和PCB布线软件。Fritzing的下载地址(可选)如下:https://fritzing.org/home/
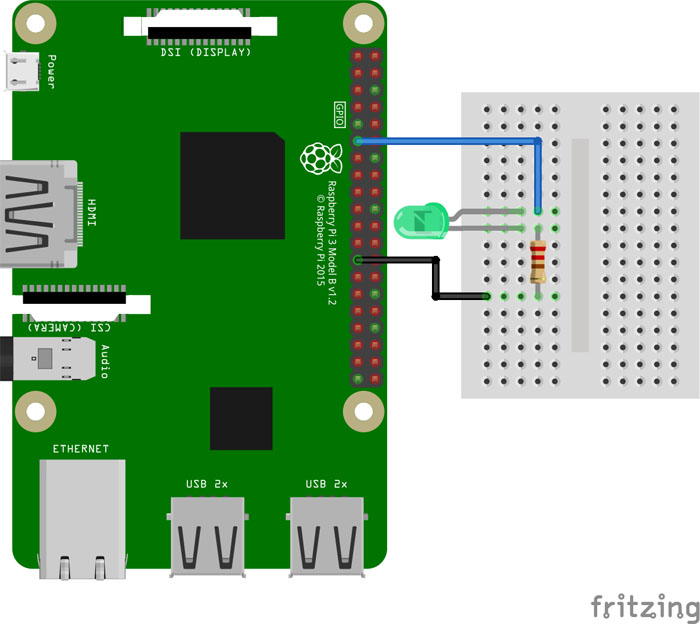
图9:Raspberry Pi LED原理图
LED和电阻应串联在引脚11(GPIO17)和引脚25(地)之间。电阻的作用是限制流过LED的电流,并应根据您的LED进行相应调整,以防止电流过大将LED烧坏。请记住,LED较长的引线是正极,应连接到引脚11。
5.0 上传并运行程序
完成上述步骤后,我使用以下命令运行SiriControl脚本:
python siricontrol.py
该脚本开始运行,并使用模块文件夹中的所有模块进行初始化。
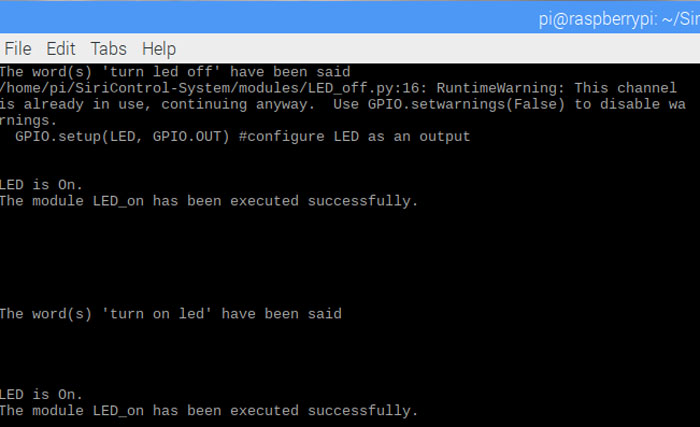
图10:执行LED点亮
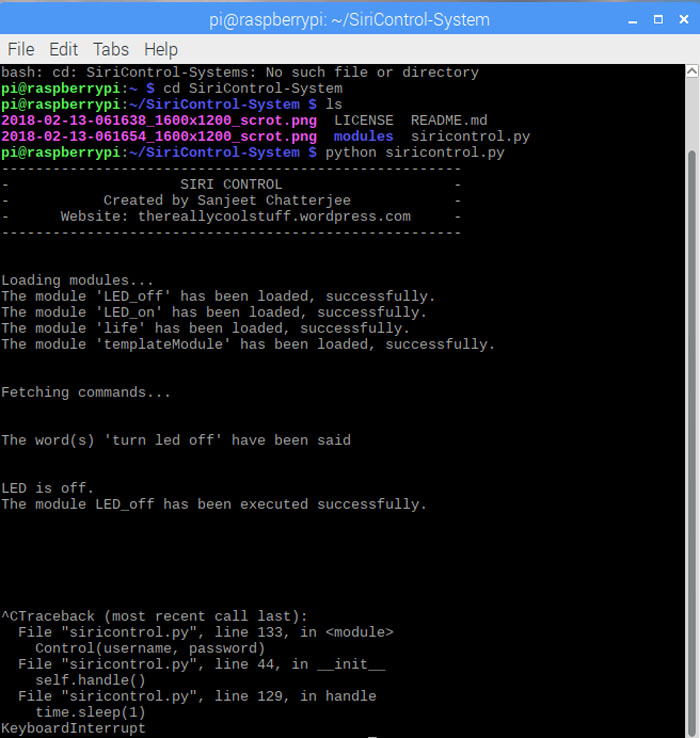
图11:执行LED熄灭
现在我命令Siri,“Note: Turn on LED(注意:打开LED)”,LED灯亮起,同时脚本会告诉我它执行了我的命令并且正在倾听另一个命令。我现在说,“Note: Turn off LED(注意:关闭LED)”,LED熄灭。只要符合以下条件,该脚本就会执行我(不管在任何地方)对Siri发出的命令:
1. Raspberry Pi正在运行该脚本。
2. Raspberry Pi已连至互联网,以便可以轮询Gmail帐户。
现在,您可以为任意Raspberry Pi项目添加任何SiriControl控制模块。虽然我在这个项目中使用了Pi,但是该教程在安装了Python的其他Linux开发板上同样可以工作。
6.0 附件:脚本
6.1 Siricontrol.py
import time


import imaplib


import email


import os


import pkgutil


##########################################


# Add your gmail username and password here


username = ""


password = ""


##########################################


class ControlException(Exception):


    pass


class Control():


    def __init__(self, username, password):


        print("------------------------------------------------------")


        print("-                	SIRI CONTROL                	-")


        print("-       	Created by Sanjeet Chatterjee        	-")


        print("-  	Website: thereallycoolstuff.wordpress.com     -")


        print("------------------------------------------------------")


        try:


        	self.last_checked = -1


        	self.mail = imaplib.IMAP4_SSL("imap.gmail.com", 993)


        	self.mail.login(username, password)


        	self.mail.list()


        	self.mail.select("Notes")


        	# Gets last Note id to stop last command from executing


        	result, uidlist = self.mail.search(None, "ALL")


        	try:


            	self.last_checked = uidlist[0].split()[-1]


        	except IndexError:


            	pass


        	self.load()


        	self.handle()


        except imaplib.IMAP4.error:


        	print("Your username and password is incorrect")


        	print("Or IMAP is not enabled.")


    def load(self):


        """Try to load all modules found in the modules folder"""


        print("n")


        print("Loading modules...")


        self.modules = []


        path = os.path.join(os.path.dirname(__file__), "modules")


        directory = pkgutil.iter_modules(path=[path])


        for finder, name, ispkg in directory:


        	try:


            	loader = finder.find_module(name)


            	module = loader.load_module(name)


            	if hasattr(module, "commandWords")


                    	and hasattr(module, "moduleName")


                    	and hasattr(module, "execute"):


                	self.modules.append(module)


                	print("The module '{0}' has been loaded, "


                      	"successfully.".format(name))


            	else:


                	print("[ERROR] The module '{0}' is not in the "


                      	"correct format.".format(name))


        	except:


            	print("[ERROR] The module '" + name + "' has some errors.")


        print("n")


    def fetch_command(self):


        """Retrieve the last Note created if new id found"""


        self.mail.list()


        self.mail.select("Notes")


        result, uidlist = self.mail.search(None, "ALL")


        try:


        	latest_email_id = uidlist[0].split()[-1]


        except IndexError:


        	return


        if latest_email_id == self.last_checked:


        	return


        self.last_checked = latest_email_id


        result, data = self.mail.fetch(latest_email_id, "(RFC822)")


        voice_command = email.message_from_string(data[0][1].decode('utf-8'))


        return str(voice_command.get_payload()).lower().strip()


    def handle(self):


        """Handle new commands


        Poll continuously every second and check for new commands.


        """


        print("Fetching commands...")


        print("n")


        while True:


        	try:


            	command = self.fetch_command()


            	if not command:


                	raise ControlException("No command found.")


            	print("The word(s) '" + command + "' have been said")


            	for module in self.modules:


                	foundWords = []


                	for word in module.commandWords:


                    	if str(word) in command:


                            foundWords.append(str(word))


                	if len(foundWords) == len(module.commandWords):


                    	try:


                            module.execute(command)


                        	print("The module {0} has been executed "


                              	"successfully.".format(module.moduleName))


                    	except:


                        	print("[ERROR] There has been an error "


                              	"when running the {0} module".format(


                                      module.moduleName))


                	else:


                    	print("n")


        	except (TypeError, ControlException):


            	pass


        	except Exception as exc:


            	print("Received an exception while running: {exc}".format(


                	**locals()))


            	print("Restarting...")


        	time.sleep(1)


if __name__ == '__main__':


    Control(username, password)
6.2 Led_on.py
#You can import any modules required here
import RPi.GPIO as GPIO #import GPIO module
import time
#This is name of the module – it can be anything you want
moduleName = “LED_on”
#These are the words you must say for this module to be executed
commandWords = [“turn”, “on”, “led”]
#This is the main function which will be execute when the above command words are said
def execute(command):
LED = 11 # Set LED pin to pin 11
GPIO.setmode(GPIO.BOARD)
GPIO.setup(LED, GPIO.OUT) #configure LED as an output
print(“n”)
print(“LED is On.”)
6.3 Led_off.py
#You can import any modules required here
import RPi.GPIO as GPIO #import GPIO module
import time
#This is name of the module – it can be anything you want
moduleName = “LED_off”
#These are the words you must say for this module to be executed
commandWords = [“turn”, “off”, “led”]
#This is the main function which will be execute when the above command words are said
def execute(command):
LED = 11 # Set LED pin to pin 11
GPIO.setmode(GPIO.BOARD)
GPIO.setup(LED, GPIO.OUT) #configure LED as an output
print(“n”)
print(“LED is off.”)
GPIO.output(LED, GPIO.LOW) #turn LED on
审核编辑:汤梓红
-
led
+关注
关注
242文章
23527浏览量
666895 -
HDMI
+关注
关注
32文章
1792浏览量
153459
发布评论请先 登录
相关推荐
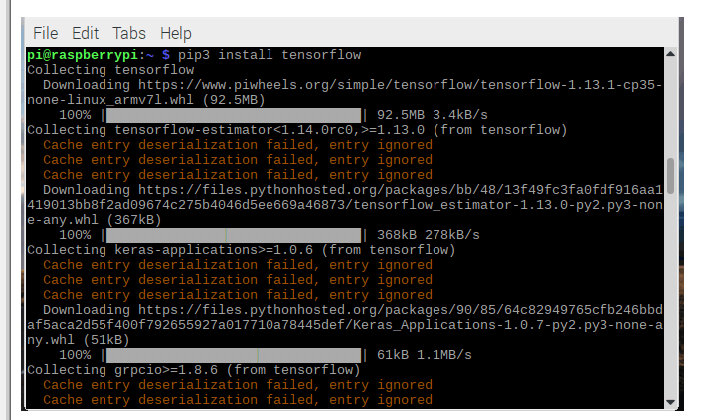
如何在Raspberry Pi上安装TensorFlow
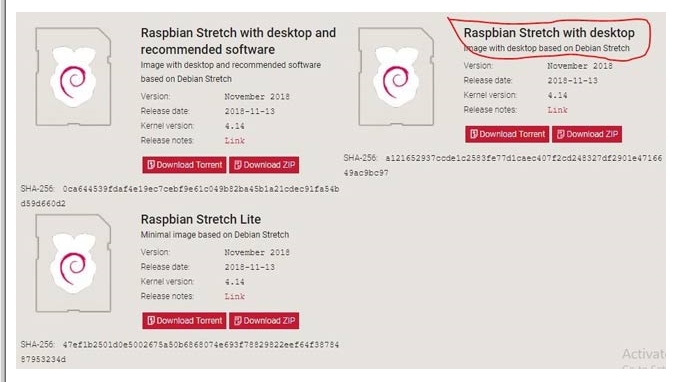
如何在Raspbian上设置没有显示器和键盘的Raspberry Pi
如何使用Raspberry pi和Python来控制Arduino
如何在基于Raspberry Pi的项目中使用霍尔传感器

基于Raspberry Pi 5的蜂窝物联网项目

安装Raspberry Pi Clock Hat的教程分享
分享一个不错的Raspberry Pi串行控制台迷你帽项目
分享在Raspberry Pi项目中添加Siri控制的方案设计
如何在Raspberry Pi Pico中使用OLED显示器

基于诺基亚5110的Raspberry Pi帽子
在Raspberry Pi上模拟Commodore Amiga

基于Raspberry Pi的DIY面部识别功能

如何在Raspberry Pi零2W上阻止带有Pi孔的广告


 工商网监
工商网监
评论