前言
学习SpringBoot,绝对避不开自动装配这个概念,这也是SpringBoot的关键之一
本人也是SpringBoot的初学者,下面的一些总结都是结合个人理解和实践得出的,如果有错误或者疏漏,请一定一定一定(不是欢迎,是一定)帮我指出,在评论区回复即可,一起学习!
篇幅较长分四篇了,希望你可以有耐心.
如果只关心SpringBoot装配过程,可以直接跳到第7部分
想要理解spring自动装配,需要明确两个含义:
- 装配,装配什么?
- 自动,怎么自动?
1. Warm up
在开始之前,让我们先来看点简单的开胃菜:spring中bean注入的三种形式
首先我们先来一个Person类,这里为了篇幅长度考虑使用了lombok
如果你不知道lombok是什么,那就最好不要知道,加了几个注解之后我的pojo类Person就完成了
/**
 * @author dzzhyk
 */
@Data
@NoArgsConstructor
@AllArgsConstructor
public class Person {
    private String name;
    private Integer age;
    private Boolean sex;
}
在Spring中(不是Spring Boot),要实现bean的注入,我们有3种注入方式:
1.1 setter注入
这是最基本的注入方式
首先我们创建applicationContext.xml文件,在里面加入:
<bean id="person" class="pojo.Person">
    <property name="name" value="dzzhyk"/>
    <property name="age" value="20"/>
    <property name="sex" value="true"/>
<span class="hljs-name"bean>
这里使用property为bean对象赋值
紧接着我们会在test包下写一个version1.TestVersion1类
/**
 * 第一种bean注入实现方式 - 在xml文件中直接配置属性
 */
public class TestVersion1 {
    @Test
    public void test(){
        ApplicationContext ca = new   ClassPathXmlApplicationContext("applicationContext.xml");
        Person person = ca.getBean("person", Person.class);
        System.out.println(person);
    }
}
这里我使用了ClassPathXmlApplicationContext来加载spring配置文件并且读取其中定义的bean,然后使用getBean方法使用id和类来获取这个Person的Bean对象,结果成功输出:
Person(name=dzzhyk, age=20, sex=true)
1.2 构造器注入
接下来是使用构造器注入,我们需要更改applicationContext.xml文件中的property为construct-arg
class="pojo.Person">
    index="0" type="java.lang.String" value="dzzhyk" />
    index="1" type="java.lang.Integer" value="20"/>
    index="2" type="java.lang.Boolean" value="true"/>
class="hljs-name"bean>
version2.TestVersion2内容不变:
public class TestVersion2 {
    @Test
    public void test(){
        ApplicationContext ca = new ClassPathXmlApplicationContext("applicationContext.xml");
        Person person = ca.getBean("person", Person.class);
        System.out.println(person);
    }
}
依然正常输出结果:
Person(name=dzzhyk, age=20, sex=true)
1.3 属性注入
使用注解方式的属性注入Bean是比较优雅的做法
首先我们需要在applicationContext.xml中开启注解支持和自动包扫描:
<context:annotation-config />
<context:component-scan base-package="pojo"/>
在pojo类中对Person类加上@Component注解,将其标记为组件,并且使用@Value注解为各属性赋初值
@Component
public class Person {

    @Value("dzzhyk")
    private String name;
    @Value("20")
    private Integer age;
    @Value("true")
    private Boolean sex;
}
然后添加新的测试类version3.TestVersion3
public class TestVersion3 {
    @Test
    public void test(){
        ApplicationContext ac = new ClassPathXmlApplicationContext("applicationContext.xml");
        Person person = ac.getBean("person", Person.class);
        System.out.println(person);
    }
}
运行也可以得到如下结果:
Person(name=dzzhyk, age=20, sex=true)
2. Warm up again
什么?还有什么?接下来我们来聊聊Spring的两种配置方式:基于XML的配置和基于JavaConfig类的配置方式,这对于理解SpringBoot的自动装配原理是非常重要的。
首先我们在Person的基础上再创建几个pojo类:这个Person有Car、有Dog
public class Car {
    private String brand;
    private Integer price;
}

public class Dog {
    private String name;
    private Integer age;
}

public class Person {
    private String name;
    private Integer age;
    private Boolean sex;
    private Dog dog;
    private Car car;
}
2.1 基于XML的配置
接下来让我们尝试使用XML的配置方式来为一个Person注入
class="pojo.Person">
    name="name" value="dzzhyk"/>
    name="age" value="20"/>
    name="sex" value="true"/>
    name="dog" ref="dog"/>
    name="car" ref="car"/>
class="hljs-name"bean>

class="pojo.Dog">
    name="name" value="旺财"/>
    name="age" value="5" />
class="hljs-name"bean>

class="pojo.Car">
    name="brand" value="奥迪双钻"/>
    name="price" value="100000"/>
class="hljs-name"bean>
然后跟普通的Bean注入一样,使用ClassPathXmlApplicationContext来加载配置文件,然后获取Bean
/**
 * 使用XML配置
 */
public class TestVersion1 {
    @Test
    public void test(){
        ClassPathXmlApplicationContext ca = new ClassPathXmlApplicationContext("applicationContext.xml");
        Person person = ca.getBean("person", Person.class);
        System.out.println(person);
    }
}
输出结果如下:
Person(name=dzzhyk, age=20, sex=true, dog=Dog(name=旺财, age=5), car=Car(brand=奥迪双钻, price=100000))
2.2 基于JavaConfig类的配置
想要成为JavaConfig类,需要使用@Configuration注解
我们新建一个包命名为config,在config中新增一个PersonConfig类
@Configuration
@ComponentScan
public class PersonConfig {

    @Bean
    public Person person(Dog dog, Car car){
        return new Person("dzzhyk", 20, true, dog, car);
    }

    @Bean
    public Dog dog(){
        return new Dog("旺财", 5);
    }

    @Bean
    public Car car(){
        return new Car("奥迪双钻", 100000);
    }
}
此时我们的XML配置文件可以完全为空了,此时应该使用AnnotationConfigApplicationContext来获取注解配置
/**
 * 使用JavaConfig配置
 */
public class TestVersion2 {
    @Test
    public void test(){
        AnnotationConfigApplicationContext ac = new AnnotationConfigApplicationContext(PersonConfig.class);
        Person person = ac.getBean("person", Person.class);
        System.out.println(person);
    }
}
仍然正常输出了结果:
Person(name=dzzhyk, age=20, sex=true, dog=Dog(name=旺财, age=5), car=Car(brand=奥迪双钻, price=100000))
3. BeanDefinition
AbstractBeanDefinition
是spring中所有bean的抽象定义对象,我把他叫做bean定义
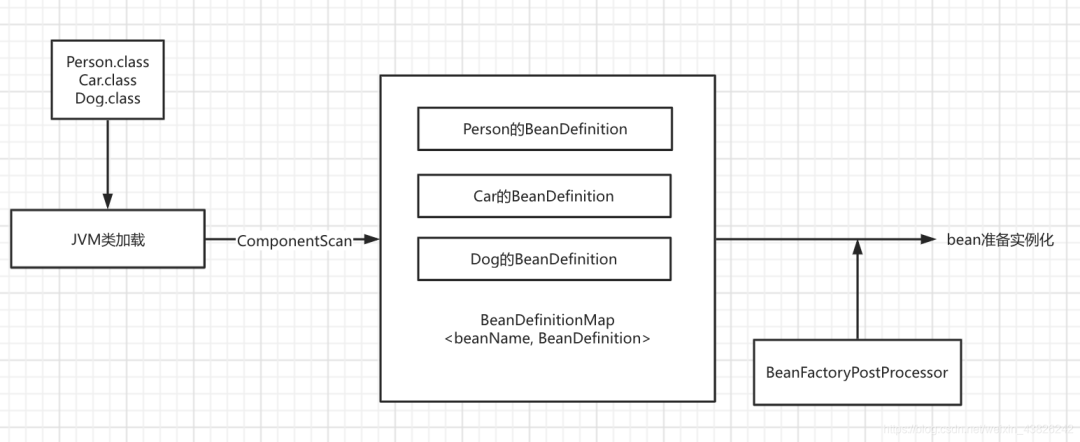
当bean.class被JVM类加载到内存中时,会被spring扫描到一个map容器中:
BeanDefinitionMap
这个容器存储了bean定义,但是bean此时还没有进行实例化,在进行实例化之前,还有一个
BeanFactoryPostProcessor
可以对bean对象进行一些自定义处理
我们打开BeanFactoryProcessor这个接口的源码可以发现如下内容:
/*
* Modify the application context's internal bean factory after its standard
* initialization. All bean definitions will have been loaded, but no beans
* will have been instantiated yet. This allows for overriding or adding
* properties even to eager-initializing beans.
*/
在spring完成标准的初始化过程后,实现BeanFactoryPostProcessor接口的对象可以用于定制bean factory,所有的bean definition都会被加载,但是此时还没有被实例化。这个接口允许对一些bean定义做出属性上的改动。
简言之就是实现了BeanFactoryPostProcessor这个接口的类,可以在bean实例化之前完成一些对bean的改动。
大致流程我画了个图:

至此我们能总结出springIOC容器的本质:(我的理解)
由BeanDefinitionMap、BeanFactoryPostProcessor、BeanPostProcessor、BeanMap等等容器共同组成、共同完成、提供依赖注入和控制反转功能的一组集合,叫IOC容器。
-
spring
+关注
关注
0文章
340浏览量
14574 -
源码分析
+关注
关注
0文章
5浏览量
5594 -
自动装配
+关注
关注
0文章
7浏览量
686
发布评论请先 登录
相关推荐
PCB LAYOUT初学者必看!
ARM与嵌入式linux入门的建议(初学者必看)

初学者必看的SpringBoo自动装配原理2
初学者必看的SpringBoo自动装配原理3

初学者必看的SpringBoo自动装配原理4


 初学者必看的SpringBoo自动装配原理1


评论