本文将介绍如何使用 cpp 编写用于小型系统的 app。
Ability相关介绍
Ability 是应用所具备能力的抽象,也是应用程序的重要组成部分。Ability 是系统调度应用的最小单元,是能够完成一个独立功能的组件。
一个应用可以包含一个或多个 Ability。其中 Ability 又分为 Page 类型的和 Service 类型的,前者是为用户提供人机交互能力的,后者是提供后台任务机制的。
简单来讲就是 Page 带界面,Service 不带界面。这里将重点介绍 Page 类型的 Ability。
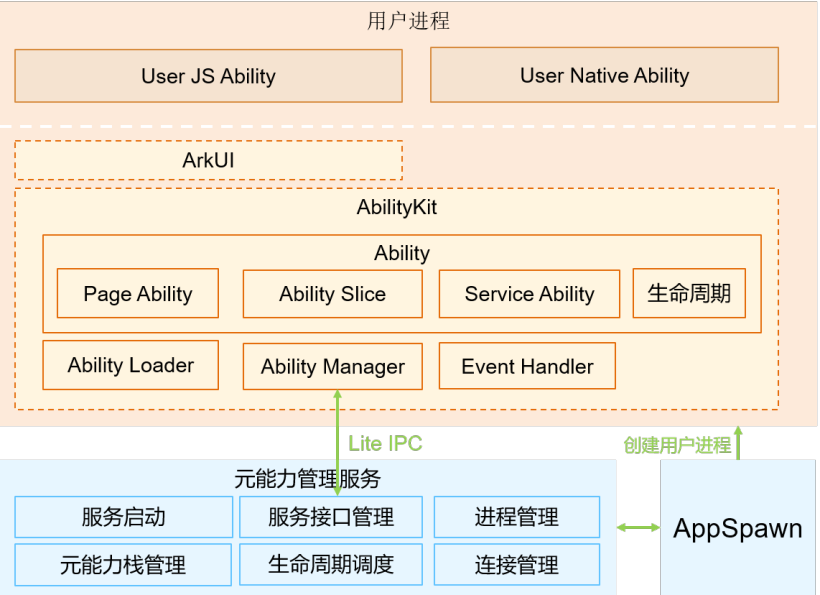
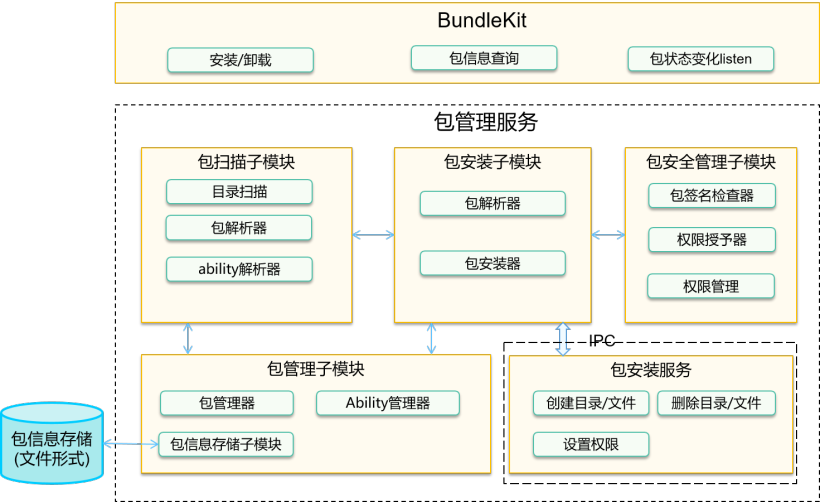
使用到的子系统有 Ability 子系统、包管理子系统和图形 UI 子系统。
Ability 子系统是管理 OpenHarmony 应用运行状态的开发框架;包管理子系统是 OpenHarmony 为开发者提供的安装包管理框架;图形 UI 子系统提供基础 UI 组件和容器类组件。
简单实现
①ability 和 abilityslice
abilityslice 是单个页面及其控制逻辑的总和,是 Page 类型 Ability 特有的组件。
一个 Page 类型的 Ability 可以包含多个 AbilitySlice,此时,这些页面提供的业务能力应当是高度相关的。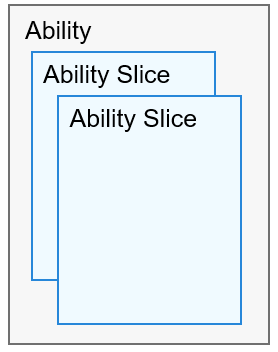
②生命周期
整体流程下来大致有 OnStart()、OnAvtive()、OnInactive()、OnBackground() 和 OnStop() 五阶段。
abilityslice 生命周期与 ability 相似,但是仍要区分。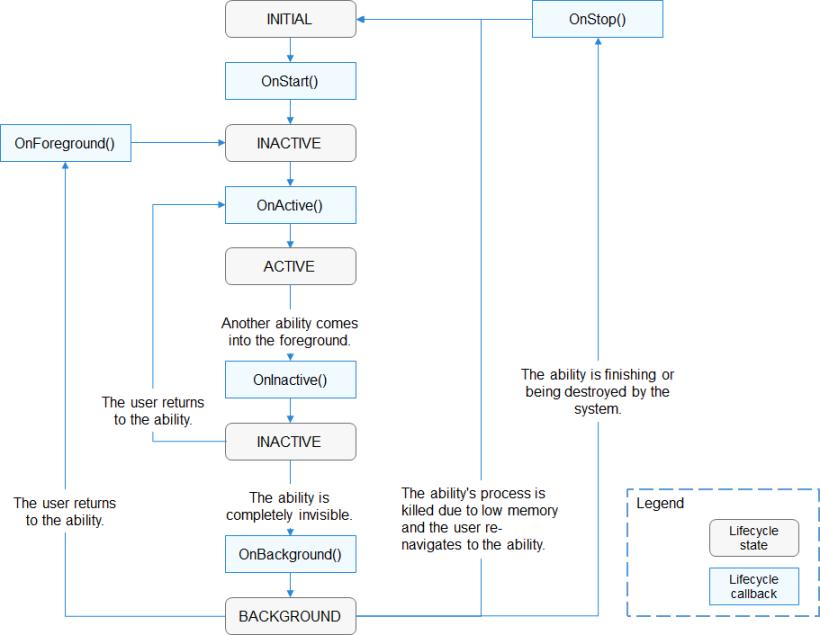
③hello world
./helloworld/
├──config.json//配置文件
├──resource//资源
└──src//主要文件
├──include
│├──main_ability.h
│└──main_ability_slice.h
└──main
├──main_ability.cpp
└──main_ability_slice.cpp
首先定义并注册 ability:
//main_ability.h
#ifndefHELLO_MAIN_ABILITY_H
#defineHELLO_MAIN_ABILITY_H

#include"ability_loader.h"

namespaceOHOS{
classMainAbility:publicAbility{
protected:
voidOnStart(constWant&want)override;//Want结构体,ability的相关信息
/*
*由于在这里我们只要简单的展示helloworld标签,其它函数不需要重载。
*/
//voidOnInactive()override;
//voidOnActive(constWant&want)override;
//voidOnBackground()override;
//voidOnStop()override;
};
}

#endif
//main_ability.cpp
#include"main_ability.h"

namespaceOHOS{
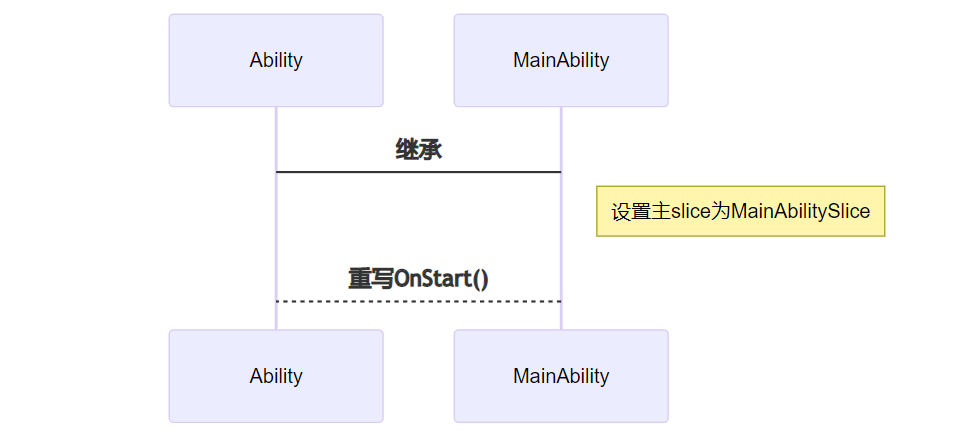
REGISTER_AA(MainAbility)//使用REGISTER_AA注册ability

voidMainAbility::OnStart(constWant&want)
{
printf("ThisisMainAbilityOnStartstatus!
");
SetMainRoute("MainAbilitySlice");//设置主页面为MainAbilitySlice,这要与后续的slice名字匹配

Ability::OnStart(want);
}
}
//main_ability_slice.h
#ifndefHELLO_ABILITY_SLICE_H
#defineHELLO_ABILITY_SLICE_H

#include"ability_loader.h"
#include"ability_manager.h"
#include"bundle_manager.h"
#include"components/ui_label.h"

namespaceOHOS{
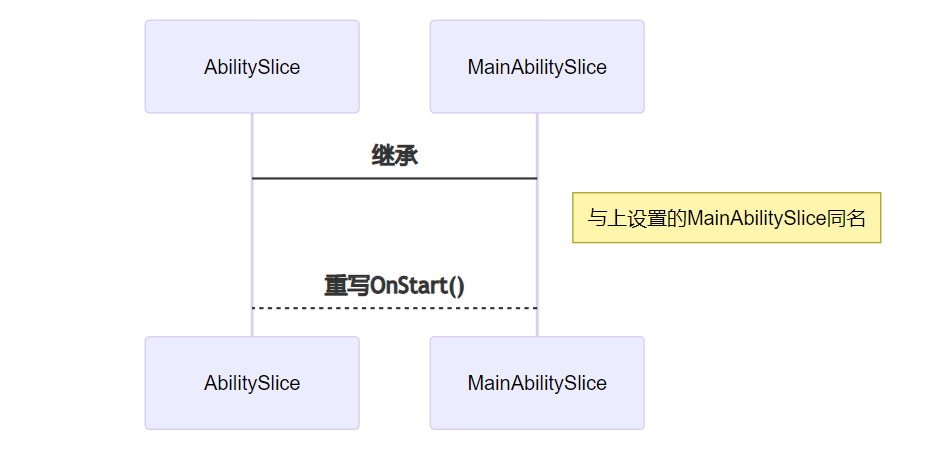
classMainAbilitySlice:publicAbilitySlice{//创建AbilitySlice类与上面同名
public:
MainAbilitySlice()=default;
virtual~MainAbilitySlice();

protected:
voidOnStart(constWant&want)override;
/*
*同理
*/
//voidOnInactive()override;
//voidOnActive(constWant&want)override;
//voidOnBackground()override;
//voidOnStop()override;
};
}
#endif
//main_ability_slice.cpp
#include"main_ability_slice.h"
constintscreen_width=720;
constintscreen_height=1280;

namespaceOHOS{
REGISTER_AS(MainAbilitySlice)

MainAbilitySlice::~MainAbilitySlice()
{
printf("Thisis~MainAbilitySlice!rn");
}

voidMainAbilitySlice::OnStart(constWant&want)
{
AbilitySlice::OnStart(want);
RootView*rootView_=RootView::GetWindowRootView();//创建底层界面
rootView_->SetPosition(0,0,screen_width,screen_height);
rootView_->SetStyle(STYLE_BACKGROUND_COLOR,Color::Black()));
rootView_->SetFocusable(true);
rootView_->SetInterceptFocus(false);

UILabel*label=newUILabel();//创建label写入HelloWorld
label->SetPosition(0,0,720,64);
label->SetText("HelloWorld!");
label->SetFont("SourceHanSansSC-Regular.otf",64);
label->SetStyle(STYLE_TEXT_COLOR,Color::White()));

rootView_->Add(label);//将label放入rootView

SetUIContent(rootView_);//设置显示RootViewUI
}
}
#endif
④config.json 的编写
//config.json
{
"app":{
"bundleName":"com.sample.hello",
"vendor":"sample",
"version":{
"code":1,
"name":"1.0"
},
"apiVersion":{
"compatible":3,
"target":4
}
},
"deviceConfig":{
"default":{
}
},
"module":{
"package":"com.sample.hello",
"name":".MyHarmonyAbilityPackage",
"deviceType":[
"phone",
"tv",
"tablet",
"pc",
"car",
"smartWatch",
"sportsWatch",
"smartVision"
],
"distro":{
"deliveryWithInstall":true,
"moduleName":"hello",
"moduleType":"entry"
},
"abilities":[//ability配置声明
{
"name":"MainAbility",
"label":"helloworldapp",
"launchType":"standard",
"type":"page",
"visible":true
}
]
}
}
hap编译
①通过 BUILD.gn 与系统一并编译使用到编译链中的 hap_pack,添加配置:
import(“/ildte/config/hap_pack.gni”)
import("//build/lite/config/hap_pack.gni")

shared_library("hello"){
sources=[
"src/main/main_ability.cpp",
"src/main/main_ability_slice.cpp"
]#将主要文件编译出库

deps=[
"${aafwk_lite_path}/frameworks/ability_lite:aafwk_abilitykit_lite",
"${appexecfwk_lite_path}/frameworks/bundle_lite:bundle",
"//foundation/graphic/ui:lite_ui",
"//foundation/graphic/utils:lite_graphic_utils",
"//foundation/systemabilitymgr/samgr_lite/samgr:samgr",
]

include_dirs=[
"src/include",
"${aafwk_lite_path}/interfaces/kits/ability_lite",
"${aafwk_lite_path}/interfaces/kits/want_lite",
"${appexecfwk_lite_path}/interfaces/kits/bundle_lite",
]

ldflags=["-shared"]
ldflags+=["-lstdc++"]
ldflags+=["-L$ohos_root_path/sysroot/usr/lib"]
ldflags+=["-Wl,-rpath-link=$ohos_root_path/sysroot/usr/lib"]
ldflags+=[
"-lui",
"-lability",
]#添加依赖

defines=[
"ENABLE_WINDOW=1",
"ABILITY_WINDOW_SUPPORT",
"OHOS_APPEXECFWK_BMS_BUNDLEMANAGER",
]#配置定义
}

hap_pack("hello_hap"){#打包成hap
deps=[":hello"]
mode="hap"
json_path="config.json"
ability_so_path="$root_out_dir/libhello.so"#编译后的库文件
force="true"
cert_profile="com.huawei.launcher_AppProvision_release.p7b"#由于不清楚获取证书方法先用源码案例自带的证书代替
resources_path="resources"
hap_name="hello"
}
②通过 app_packing_tool 单独编译
该打包工具在源码目录 developtools/packing_tool/jar 下。
主要参数如下:

./out/
├──config.json
└──libhello.so
最后使用 java -jar app_packing_tool.jar 进行打包,如下:
java-jarapp_packing_tool.jar|
--modehap|
--json-path./config.json|
--ability-out-path./libhello.so|
--out-path./hello.hap
hap安装
①安装命令 bm
由于小型系统不支持使用 HDC 工具,我们需要使用到 bm 命令进行安装程序。
bmset-sdisable//取消签名安装。
bminstall-psystem/internal/hello.hap//使用BUILD.gn一起编译的hap默认会在这个路径,如果使用工具打包的,视情况填写路径。
②相关参数
#bm
Usage:installhap-path[options]
Description:
--help|-hhelpmenu
--happath|-plocationofthehaptoinstall
Usage:uninstallbundle-name[options]
Description:
--help|-hhelpmenu
--bundlename|-nnameofthebundletouninstall
Usage:dump[options]
OptionDescription:
--help|-hhelpmenu
--list|-lapplist
--bundlename|-ndumpinstalledhap'sinfo
--metadatakey|-mdumpbundleNamesmatchmetaDatakey
Usage:set[options]
OptionDescription:
--externalmode|-estatusenableexternalmode
--debugmode|-dstatusenabledebugmode
--signmode|-sstatusenablesignmode
小型系统的 bm 指令是标准系统的阉割版。
安装成功后就可以打开该 app,部分小型系统的设备屏幕没有触摸功能和鼠标驱动,我们可以使用 aa 命令来启动 app。
aastart-pcom.sample.hello-nMainAbility//包名和ability名都在config.json中定义
#aa
Usage:
aastart-pbundlename-nability_name
aastopability-pbundlename-nability_name
aaterminate-pbundlename
aadump-pbundlename-nability_name-eextra_option
aadump-a

Options:
-h(--help)Showthehelpinformation.[eg:aa-h]
-p(--bundlename)Appointthebundlenamename.[eg:-pcom.huawei]
-n(--abilityname)Appointtheabilityname.[eg:-nMyAbility]
-a(--all)[Unnecessary]dumpallabilityinfo.[eg:-a]
-e(--extra)[Unnecessary]extrainfowhendump.[eg:-e]

Commands:
aastartStartthetargetability.
aastopabilityStopthetargetserviceability.
aaterminateTerminatethetargetapp.
aadumpDumpability
总结
使用 cpp 编写用户应用程序,我们可以更方便有效的调用南向接口,这将会在开发和调试的过程中给我们带来极大的便利。
审核编辑 :李倩
-
APP
+关注
关注
33文章
1573浏览量
72444 -
应用程序
+关注
关注
37文章
3267浏览量
57682 -
OpenHarmony
+关注
关注
25文章
3716浏览量
16260
原文标题:OpenHarmony上编写app
文章出处:【微信号:gh_834c4b3d87fe,微信公众号:OpenHarmony技术社区】欢迎添加关注!文章转载请注明出处。
发布评论请先 登录
相关推荐
idf4.4在cmakelists中设置了main.cpp依然找不到app_main ?为什么?
CPP和C共存的诀窍是什么?
Stm32的bootloader和App的编写注意事项有哪些?
OpenHarmony轻量与小型系统入门概述
idf4.4在cmakelists.txt中设置了main.cpp依然找不到app_main是为什么?
(远程控制)App inventor 编写安卓app控制 ESP8266


 如何使用cpp编写用于小型系统的app


评论