 Event Recoder调试组件在stm32上的使用
Event Recoder调试组件在stm32上的使用
本文目标:Event_Recoder调试组件在stm32上的使用
按照本文的描述,应该可以在你所处的硬件上跑通代码。
先决条件:装有编译和集成的开发环境,比如:Keil uVision5。
板子硬件要求:无,属于调试功能。
起源
因为做产品开发,设计东西有时候考虑得多,mcu的并没有多余的串口供使用调试,在调试一些初期进行验证时,必要的调试的打印信息是需要的。
Event Recoder调试组件简介
嵌入式的Event_Recoder调试组件是一种可以在MDK开发环境下使用的高级调试工具,它可以记录软件运行的一些标志信息,并以图形化的形式显示出来。它可以帮助你了解和分析内部操作,支持Keil RTX操作系统调试以及MDK自带的中间件的调试。它还可以测量代码运行的时间和功耗。它不需要占用芯片的外设资源,也不会影响代码的执行速度。
Event Recoder调试组件是MDK开发环境的一部分,官网是https://www.keil.com/。可以在这里找到更多关于Event Recoder调试组件的信息,比如使用教程,API文档,示例代码等。
使用
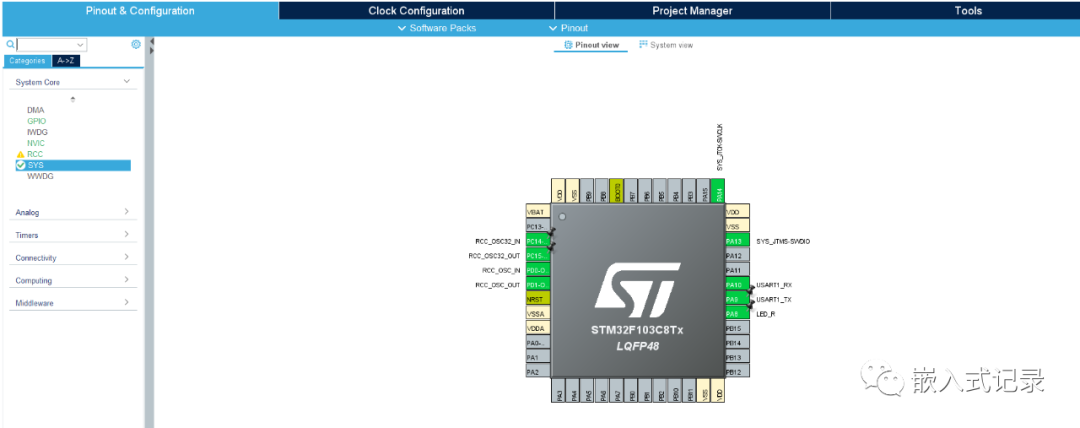
第1步:准备好一个工程模板,这里我使用的stm32cubemx生成的工程,大致配置如下:
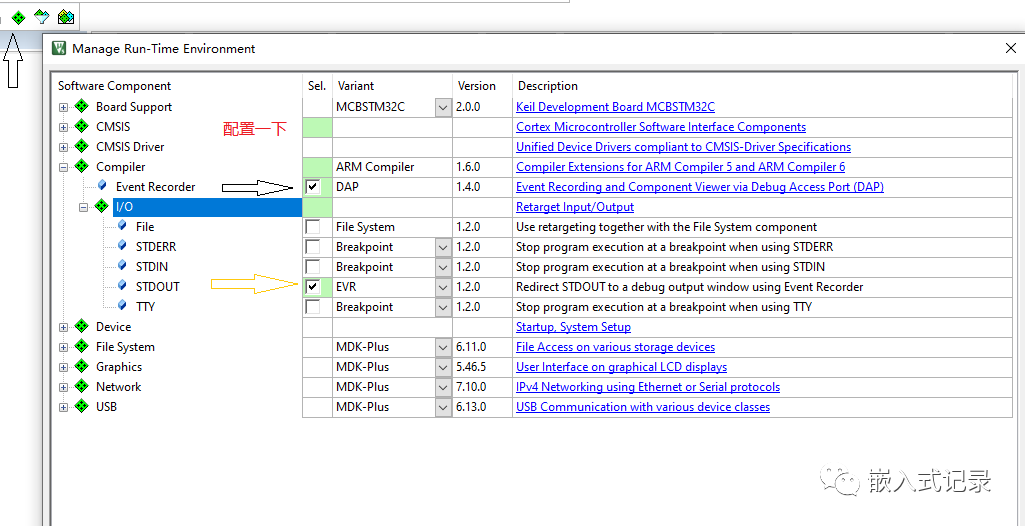
第2步:使用MDK打开工程,创建RTE环境,并勾选对应Event Recoder功能的,如下:
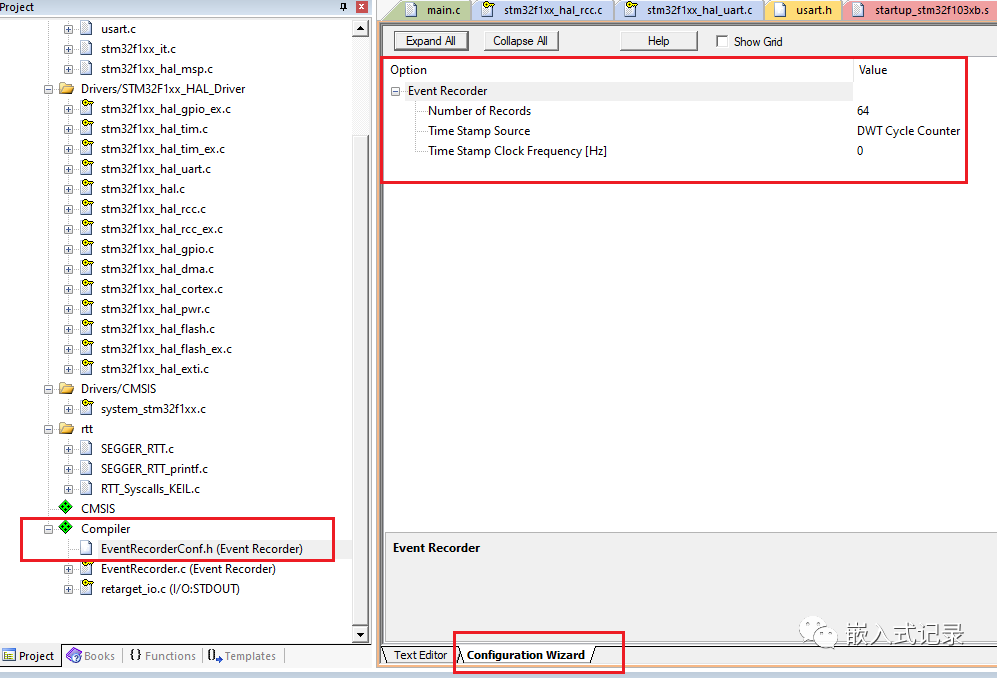
第3步:工程添加的文件 EventRecorderConf.h,按照如下进行配置:
第4步:编写必要的代码进行验证
这里我在main.c中编写一些必要代码,代码片段如下:
/* USER CODE BEGIN Header */
/**
******************************************************************************
* @file : main.c
* @brief : Main program body
******************************************************************************
* @attention
*
* © Copyright (c) 2021 STMicroelectronics.
* All rights reserved.
*
* This software component is licensed by ST under BSD 3-Clause license,
* the "License"; You may not use this file except in compliance with the
* License. You may obtain a copy of the License at:
* opensource.org/licenses/BSD-3-Clause
*
******************************************************************************
*/
/* USER CODE END Header */
/* Includes ------------------------------------------------------------------*/
#include "main.h"
#include "usart.h"
#include "gpio.h"
/* Private includes ----------------------------------------------------------*/
/* USER CODE BEGIN Includes */
#include
#include "SEGGER_RTT.h"
#include "SEGGER_RTT_Conf.h"
#include "EventRecorder.h"
#include "EventRecorderConf.h"
/* USER CODE END Includes */
/* Private typedef -----------------------------------------------------------*/
/* USER CODE BEGIN PTD */
/* USER CODE END PTD */
/* Private define ------------------------------------------------------------*/
/* USER CODE BEGIN PD */
/* USER CODE END PD */
/* Private macro -------------------------------------------------------------*/
/* USER CODE BEGIN PM */
/* USER CODE END PM */
/* Private variables ---------------------------------------------------------*/
/* USER CODE BEGIN PV */
/* USER CODE END PV */
/* Private function prototypes -----------------------------------------------*/
void SystemClock_Config(void);
/* USER CODE BEGIN PFP */
/* USER CODE END PFP */
/* Private user code ---------------------------------------------------------*/
/* USER CODE BEGIN 0 */
//int fputc( int ch, FILE *f )
//{
// USART_TypeDef* USARTx = USART1;
// while ((USARTx->SR & (1<<7)) == 0);
// USARTx->DR = ch;
// return ch;
//}
void Get_ChipID(uint32_t *ChipUniqueID)
{
ChipUniqueID[0] = *(__IO uint32_t *)(0X1FFFF7F0); // 高字节
ChipUniqueID[1] = *(__IO uint32_t *)(0X1FFFF7EC); //
ChipUniqueID[2] = *(__IO uint32_t *)(0X1FFFF7E8); // 低字节
}
/* USER CODE END 0 */
/**
* @brief The application entry point.
* @retval int
*/
int main(void)
{
/* USER CODE BEGIN 1 */
uint32_t ChipUniqueID[3] = {0};
/* USER CODE END 1 */
/* MCU Configuration--------------------------------------------------------*/
/* Reset of all peripherals, Initializes the Flash interface and the Systick. */
HAL_Init();
/* USER CODE BEGIN Init */
/* USER CODE END Init */
/* Configure the system clock */
SystemClock_Config();
/* USER CODE BEGIN SysInit */
/* USER CODE END SysInit */
/* Initialize all configured peripherals */
MX_GPIO_Init();
MX_USART1_UART_Init();
MX_USART2_UART_Init();
/* USER CODE BEGIN 2 */
EventRecorderInitialize(EventRecordAll, 1U);
EventRecorderStart();
Get_ChipID(ChipUniqueID);
printf("\\r\\n芯片的唯一ID为: \\r\\n");
// SEGGER_RTT_printf(0,"#define id_buff_0 0X%08X\\r\\n#define id_buff_1 0X%08X \\r\\n#define id_buff_2 0X%08X\\r\\n",
// ChipUniqueID[2],ChipUniqueID[1],ChipUniqueID[0]);
// SEGGER_RTT_printf(0,"\\r\\n芯片flash的容量为: %dK \\r\\n", *(__IO uint16_t *)(0X1FFFF7E0));
printf("#define id_buff_0 0X%08X\\r\\n#define id_buff_1 0X%08X \\r\\n#define id_buff_2 0X%08X\\r\\n",
ChipUniqueID[2],ChipUniqueID[1],ChipUniqueID[0]);
printf("系统时钟:%d\\r\\n",SystemCoreClock);
/* USER CODE END 2 */
/* Infinite loop */
/* USER CODE BEGIN WHILE */
while (1)
{
/* USER CODE END WHILE */
/* USER CODE BEGIN 3 */
HAL_Delay(500);
HAL_GPIO_TogglePin(LED_B_GPIO_Port,LED_B_Pin);
}
/* USER CODE END 3 */
}
/**
* @brief System Clock Configuration
* @retval None
*/
void SystemClock_Config(void)
{
RCC_OscInitTypeDef RCC_OscInitStruct = {0};
RCC_ClkInitTypeDef RCC_ClkInitStruct = {0};
/** Initializes the CPU, AHB and APB busses clocks
*/
RCC_OscInitStruct.OscillatorType = RCC_OSCILLATORTYPE_HSE;
RCC_OscInitStruct.HSEState = RCC_HSE_ON;
RCC_OscInitStruct.HSEPredivValue = RCC_HSE_PREDIV_DIV1;
RCC_OscInitStruct.HSIState = RCC_HSI_ON;
RCC_OscInitStruct.PLL.PLLState = RCC_PLL_ON;
RCC_OscInitStruct.PLL.PLLSource = RCC_PLLSOURCE_HSE;
RCC_OscInitStruct.PLL.PLLMUL = RCC_PLL_MUL9;
if (HAL_RCC_OscConfig(&RCC_OscInitStruct) != HAL_OK)
{
Error_Handler();
}
/** Initializes the CPU, AHB and APB busses clocks
*/
RCC_ClkInitStruct.ClockType = RCC_CLOCKTYPE_HCLK|RCC_CLOCKTYPE_SYSCLK
|RCC_CLOCKTYPE_PCLK1|RCC_CLOCKTYPE_PCLK2;
RCC_ClkInitStruct.SYSCLKSource = RCC_SYSCLKSOURCE_PLLCLK;
RCC_ClkInitStruct.AHBCLKDivider = RCC_SYSCLK_DIV1;
RCC_ClkInitStruct.APB1CLKDivider = RCC_HCLK_DIV2;
RCC_ClkInitStruct.APB2CLKDivider = RCC_HCLK_DIV1;
if (HAL_RCC_ClockConfig(&RCC_ClkInitStruct, FLASH_LATENCY_2) != HAL_OK)
{
Error_Handler();
}
}
/* USER CODE BEGIN 4 */
/* USER CODE END 4 */
/**
* @brief This function is executed in case of error occurrence.
* @retval None
*/
void Error_Handler(void)
{
/* USER CODE BEGIN Error_Handler_Debug */
/* User can add his own implementation to report the HAL error return state */
/* USER CODE END Error_Handler_Debug */
}
#ifdef USE_FULL_ASSERT
/**
* @brief Reports the name of the source file and the source line number
* where the assert_param error has occurred.
* @param file: pointer to the source file name
* @param line: assert_param error line source number
* @retval None
*/
void assert_failed(uint8_t *file, uint32_t line)
{
/* USER CODE BEGIN 6 */
/* User can add his own implementation to report the file name and line number,
tex: printf("Wrong parameters value: file %s on line %d\\r\\n", file, line) */
/* USER CODE END 6 */
}
#endif /* USE_FULL_ASSERT */
/************************ (C) COPYRIGHT STMicroelectronics *****END OF FILE****/
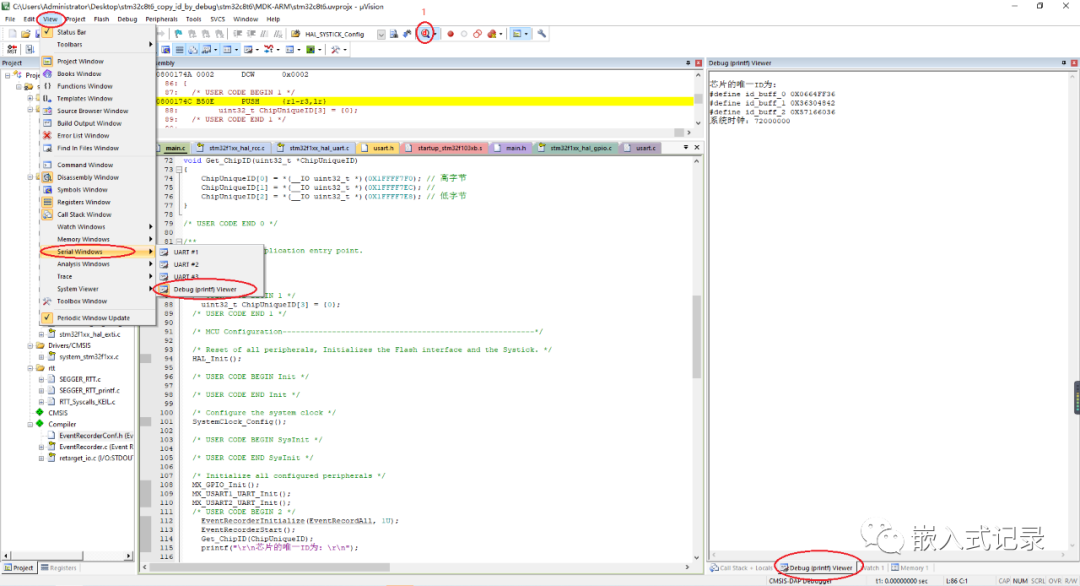
实验结果
按照代码的逻辑,使用MDK自带的仿真功能,已经可以在调试的窗口中出现实验现象了,我这里主要是测试了一下必要的打印,上面的代码片段现象如下:
注意事项:
工程代码中不应该有对硬件串口的重映射,因为这里输出的内容是在控制台,而不是真实的串口。我在代码片段中就屏蔽了相关代码
//int fputc( int ch, FILE *f )
//{
// USART_TypeDef* USARTx = USART1;
// while ((USARTx->SR & (1<<7)) == 0);
// USARTx->DR = ch;
// return ch;
//}
我这里MDK的版本是5.28,如果版本太低的话,可能也没有实验现象,建议MDK的版本在5.22以上来跑,Compiler组件要在1.4.0以上。测试了一下,使用Jlink、CMSIS-DAP下载器均有实验现象,ST-Link理论上也支持,没测试。
-
mcu
+关注
关注
146文章
17388浏览量
353098 -
STM32
+关注
关注
2274文章
10931浏览量
358167 -
调试
+关注
关注
7文章
590浏览量
34118 -
串口
+关注
关注
14文章
1563浏览量
77302 -
keil
+关注
关注
69文章
1214浏览量
167482
发布评论请先 登录
相关推荐
【原创专题教程第7期】终极调试组件Event Recorder,各种Link通吃,支持时间和功耗测量,printf打印,RTX5及中间件调试
浅析基于GD32F427适配RTX4+调试组件Event Recorder
可以将终端控制台定向为调试器的Real Time Transfer或Event Recoder吗?如何操作?
stm32固件库在stm3210e-eval开发板上的移植

【STM32F429开发板用户手册】第8章 STM32F429的终极调试组件Event Recorder

【STM32F407开发板用户手册】第8章 STM32F407的终极调试组件Event Recorder
RT-Thread文件系统组件在STM32H743上的应用
【STM32H7教程】第8章 STM32H7的终极调试组件Event Recorder
STM32 低功耗睡眠模式(SLEEP)事件(EVENT)唤醒实现及优化


 工商网监
工商网监
评论