Following the release of our new NanoBeacon BLE Scanner mobile app, we thought it would be great to publish a few tutorials on how you would use the new app along with our popular NanoBeacon IN100 beacon.
随着我们新的NanoBeacon BLE扫描器移动应用程序的发布,我们认为发布一些关于如何使用新的应用程序和我们流行的NanoBeacon IN100信标的教程将是非常好的。
In this series of tutorials, we will cover:
在这一系列的教程中,我们将涵盖:
Installation and setup steps.
安装和设置步骤。
Detailed walkthroughs of various examples and how to utilize the mobile app for these use cases.
各种例子的详细演练,以及如何在这些使用情况下利用移动应用程序。
The differences between the iOS and Android versions of the app.
应用程序的iOS和Android版本之间的差异。
How to export logs from the app for captured advertising sets and packets.
如何从应用中导出捕获的广播集和数据包的日志。
How to use the new NanoBeaconLib, which provides a framework for building your own custom mobile app with minimal effort.
如何使用新的NanoBeaconLib,它提供了一个框架,以最小的努力建立自己的自定义移动应用程序。
Requirements, Installation, and Setup要求、安装和设置
Before diving into the details of using the mobile app, you will need the following:
在深入了解使用移动应用程序的细节之前,你将需要以下条件:
An IN100 EVK, specifically a programmer board, an IN100 development board, and a micro USB cable to connect them to your PC.
一块IN100 EVK,特别是一块编程板,一块IN100开发板,以及一根Micro USB数据线,将它们连接到你的PC。
The NanoBeacon Config Tool PC app, version 3.2.15 or later (available for Windows, macOS, and Linux). You can download ithere.
NanoBeacon配置工具PC应用程序,3.2.15或更高版本(可用于Windows、macOS和Linux)。你可以在这里下载。(NanoBeacon Config Tool — InPlay (inplay-tech.com))
The latest version of the NanoBeacon BLE Scanner mobile app, which is available for both Android and iOS. You can download it here.
最新版本的NanoBeacon BLE扫描器移动应用程序,可用于Android和iOS。你可以在这里下载。(NanoBeacon Config Tool — InPlay (inplay-tech.com))
Once you have all the necessary components and applications, you’re ready to move on.
一旦你有了所有必要的组件和应用程序,你就可以继续前进了。
Overview of the NanoBeacon Mobile App (iOS)
NanoBeacon移动应用程序(iOS)的概述
There are a few UI and functional differences between the iOS and Android versions of the mobile app due to the limitations and differences between the two operating systems. Still, most of the functionality should be very similar.
由于两个操作系统的限制和差异,iOS和Android版本的移动应用程序之间有一些UI和功能的差异。不过,大部分功能应该是非常相似的。
In this tutorial, we will be focusing on the Android app.
在本教程中,我们将专注于Android应用程序。
After launching the mobile app, you will be presented with the Scanner view:
启动移动应用程序后,你将看到扫描器视图:
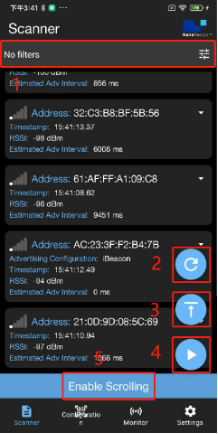
The different buttons within this view are:
该视图中的不同按钮是:
1.Filters: allow you to filter out and only display devices that match specific filters.
1.过滤器:允许你过滤掉,只显示符合特定过滤条件的设备。
2.Clear:clears the list of discovered devices.
2.清除:清除已发现设备的列表。
3.Scroll to Top: this allows you to scroll to the top of the list when the number of discovered items extends beyond a single-screen view.
3.滚动到顶部:当发现的项目数量超出单屏视图时,这允许你滚动到列表的顶部。
4.Resume Scanning: the difference between this andRescan is that it does not clear the list of discovered devices.
4.恢复扫描:这和重新扫描的区别是,它不会清除已发现的设备的列表。
5.Enable Scrolling: this enables automatic scrolling to always show the latest discovered devices.
5.启用滚动:这将启用自动滚动,以始终显示最新发现的设备。
Filter Options筛选选项
When clicking the Filter options button (three sliders icon), you’re presented with the following view and options:
当点击过滤选项按钮(三个滑块图标)时,你会看到以下视图和选项:
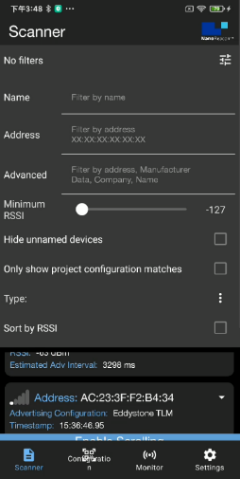
Name: this allows you to filter by device name.
名称:这允许你按设备名称过滤。
Advanced: allows you to filter by raw data included in the advertising data, company name, etc. On Android, filtering by Bluetooth Address is also possible.
高级:允许你按广播数据中包含的原始数据、公司名称等进行过滤。在安卓系统上,也可以通过蓝牙地址进行过滤。
Minimum RSSI: this allows you to filter out devices that are discovered with an RSSI lower than the set value.
最小RSSI:这允许你过滤掉那些发现的RSSI低于设定值的设备。
Hide unnamed devices: this allows you to hide devices that do not advertise a device name.
隐藏未命名的设备:这允许你隐藏那些没有公布设备名称的设备。
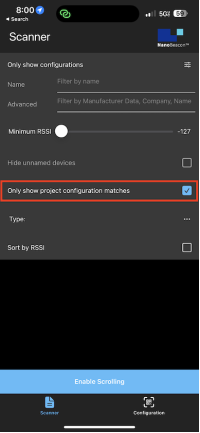
Only show project configuration matches: allows you to only show devices that match the imported IN100 configuration (via scanning the QR code from the NanoBeacon Config Tool app).
只显示项目配置匹配:允许你只显示与导入的IN100配置匹配的设备(通过扫描NanoBeacon配置工具应用程序的QR码)。
Sort by RSSI: this allows you to sort the list of devices by detected RSSI (starting with the device with the strongest signal).
按RSSI排序: 这允许你按检测到的RSSI对设备列表进行排序(从信号最强的设备开始)。
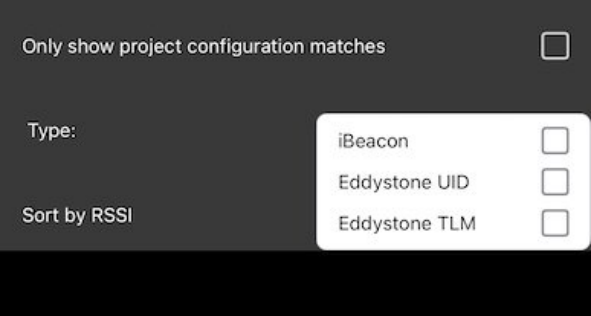
Type: allows you to only show any combination of iBeacon, Eddystone UID, and Eddystone TLM advertising devices, as shown below:
类型:允许你只显示iBeacon、Eddystone UID和Eddystone TLM广播设备的任何组合,如下所示:
The other view (accessible from the bottom section of the app) is the “Configuration” view:
另一个视图(可从应用程序的底部部分访问)是 "配置 "视图:
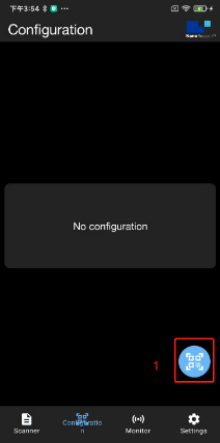
QR Code Scan button allow you to scan the QR Code that the NanoBeacon Config Tool displays to import the IN100 configuration into the mobile app:
QR代码扫描按钮允许你扫描NanoBeacon配置工具显示的QR代码,将IN100的配置导入移动应用程序:
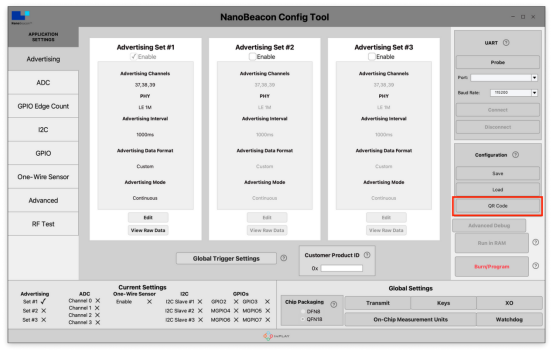
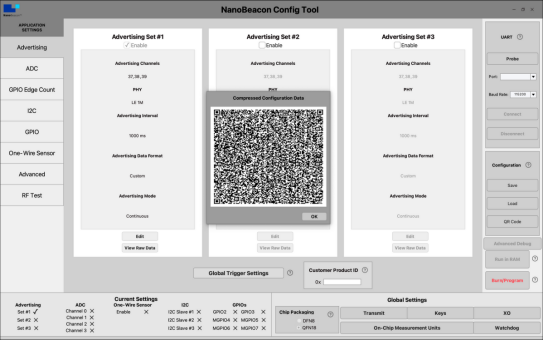
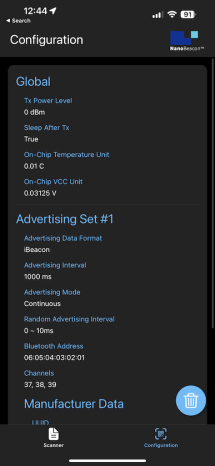
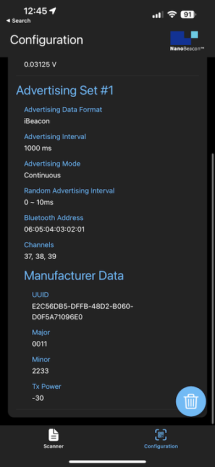
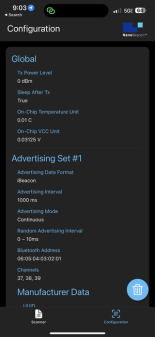
Once the configuration is imported into the mobile app, the Configurationview will show the details of the configuration:
一旦配置被导入移动应用程序,配置视图将显示配置的细节:
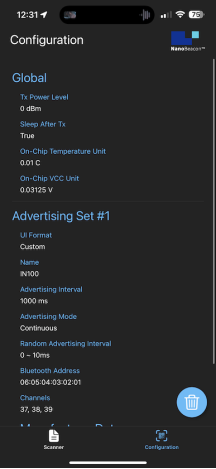
To import a new configuration, you can delete the existing one by clicking the Trash icon.()After that, the QR Scan and Import Configuration buttons will become visible on the screen.
要导入一个新的配置,您可以通过点击垃圾桶图标()删除现有的配置。之后,QR扫描和导入配置按钮将在屏幕上可见。
Let’s run through a couple of test cases to show how this works!
让我们通过几个测试案例来说明这是如何工作的!
Test Case #1: One Advertising Set (iBeacon)
测试案例#1:一个广播集(iBeacon)
Let’s first start by configuring the IN100 in the NanoBeacon Config Tool application on the PC. We will configure it with the following:
让我们首先在PC上的NanoBeacon配置工具应用程序中配置IN100。我们将对其进行如下配置:
One Advertising Set (Continuous)
一个广播组(连续)
iBeacon type
iBeacon类型
UUID: E2C56DB5DFFB48D2B060D0F5A71096E0 (randomly generated, you can generate your own UUID here)
UUID: E2C56DB5DFFB48D2B060D0F5A71096E0(随机生成,你可以在这里生成你自己的UUID)
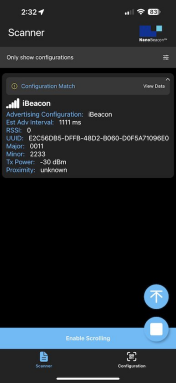
Major: 0011
Minor: 2233
Tx Power: -30 dBm
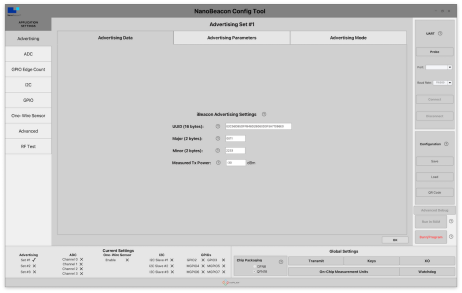
Make sure your IN100 development and programmer boards are connected together and to the PC. Next, you’ll want to Probe and Connect to the device within NanoBeacon Config Tool. Finally, click the “Run in RAM” button.
确保你的IN100开发板和编程板连接在一起并与电脑连接。接下来,你要在NanoBeacon配置工具中探测和连接到设备。最后,点击 "在RAM中运行 "按钮。
Now, to import the configuration into the mobile app, we will use the new QR Code button available in NanoBeacon Config Tool. To import, navigate to the Configuration view and click the QR Code Scanner (or the Load Configuration) button.
现在,为了将配置导入移动应用程序,我们将使用NanoBeacon配置工具中的新QR码按钮。要导入,导航到配置视图,点击QR码扫描器(或加载配置)按钮。
Once the configuration is imported, we can see the settings on the screen:
一旦配置被导入,我们就可以看到屏幕上的设置:
Now we can switch to the Scanner view to discover our device.
现在我们可以切换到扫描器视图来发现我们的设备。
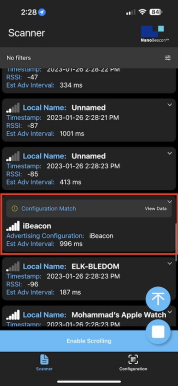
In the Scanner view, you’ll likely see many discovered devices, which makes it difficult to find your specific device. One way around that is to look for the device that shows “Configuration Match” in its title:
在扫描器视图中,你可能会看到许多已发现的设备,这使你很难找到你的特定设备。解决这个问题的一个方法是寻找标题中显示 "配置匹配 "的设备:
But the more straightforward method is to apply the filter “Only show project configuration matches,” which will filter out all other non-matching devices.
但更直接的方法是应用过滤器 "只显示项目配置匹配",这将过滤掉所有其他不匹配的设备。
Once applied, you’ll get a much better view:
一旦应用,你会得到一个更好的视图:
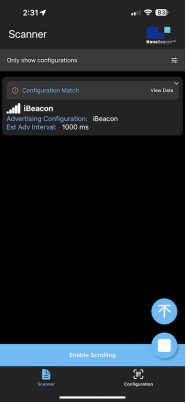
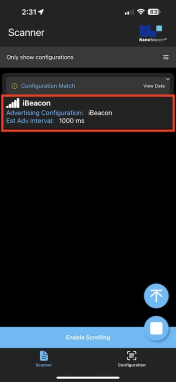
You can then click on the area (in the red box below) with the device information to view more details:
然后你可以点击有设备信息的区域(在下面的红框内),查看更多细节:
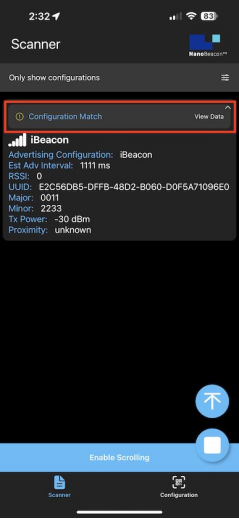
For even more details (especially for types other than iBeacon), click on the “View Data” area (in the redbox below):
要想了解更多细节(尤其是iBeacon以外的类型),请点击 "查看数据 "区域(在下面的红框内):
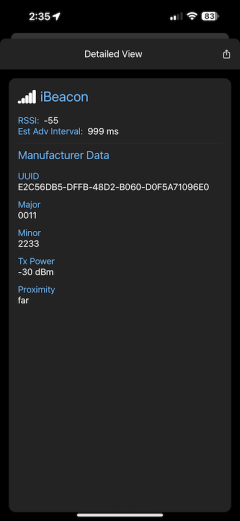
Test Case #2: Three Advertising Sets (iBeacon, Eddystone, Custom Data)
测试案例#2:三个广播集(iBeacon、Eddystone、自定义数据)。
For a more advanced test case, let’s set up three advertising sets:
对于一个更高级的测试案例,让我们设置三个广播集:
1.iBeacon(same as in Test Case #1):
1. iBeacon(与测试案例#1相同):
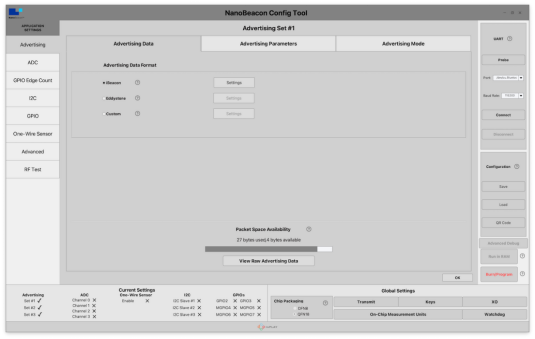
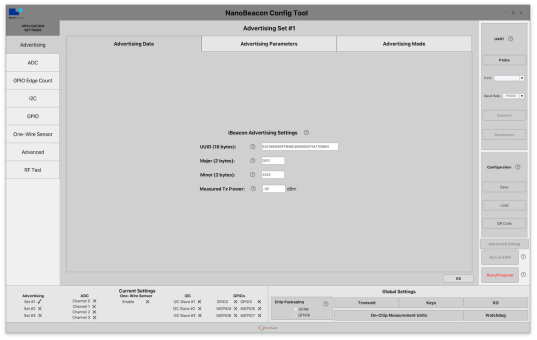
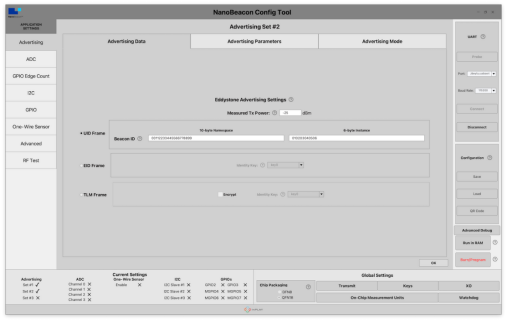
2. Eddystone UID
2. Eddystone UID
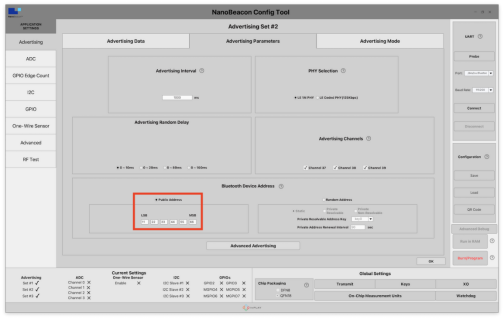
Modify the Bluetooth Address to something different than what’s set in Advertising Set #1. This is necessary for the mobile app to be able to distinguish between the different advertising sets and display them as separate “devices.” This setting can be found under “Advertising Parameters.”
将蓝牙地址修改为与广播集#1中的设置不同的内容。这是必要的,以便移动应用程序能够区分不同的广播集,并将它们显示为独立的 "设备"。这个设置可以在 "广播参数 "下找到。
Measured Tx Power: -25 dBm
Beacon ID:
① 10-byte Namespace: 00112233445566778899
① 10字节的名称空间:00112233445566778899
② 6-byte Instance: 010203040506
② 6字节的实例:010203040506
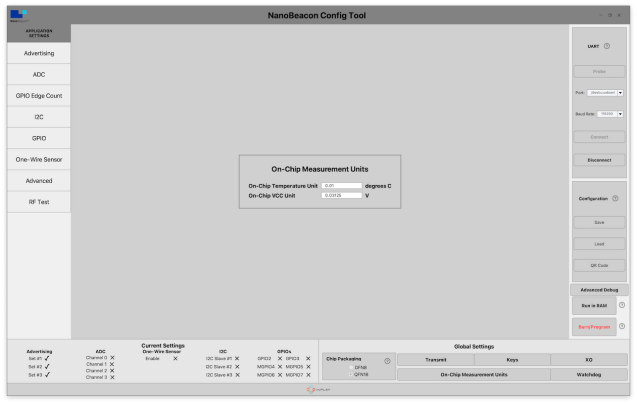
Here are screenshots showing this configuration in NanoBeacon Config Tool:
下面是在NanoBeacon配置工具中显示此配置的截图:
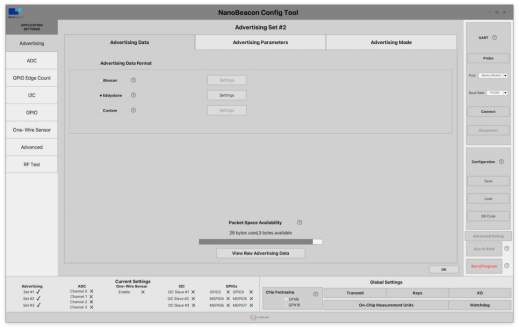
3. Custom Type(Triggered)
3. 自定义类型(触发式)
Modify the Bluetooth Addressto something different than what’s set in Advertising Set #1. This is necessary for the mobile app to be able to distinguish between the different advertising sets and display them as separate “devices.” This setting can be found under “Advertising Parameters.”
将蓝牙地址修改为与广播集#1中的设置不同的内容。这是必要的,以便移动应用程序能够区分不同的广播集,并将它们作为独立的 "设备 "显示。这个设置可以在 "广播参数 "下找到。
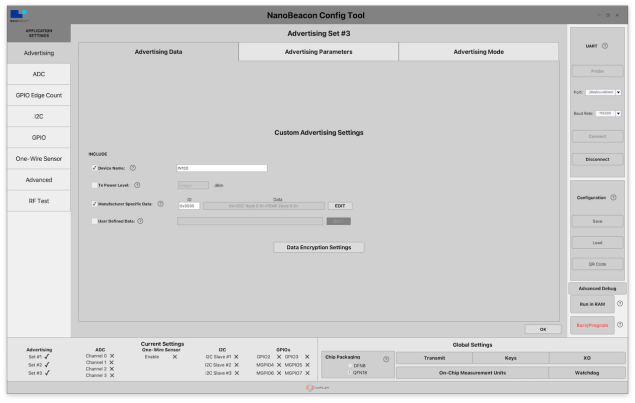
Device Name:“IN100”
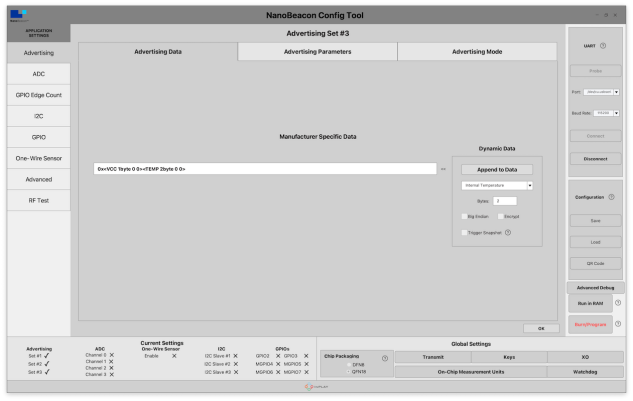
Manufacturer Specific Data:
· Company ID: 0505 (InPlay)
· 公司ID: 0505 (InPlay)
· VCC
· VCC
· Internal Temperature
· 内部温度
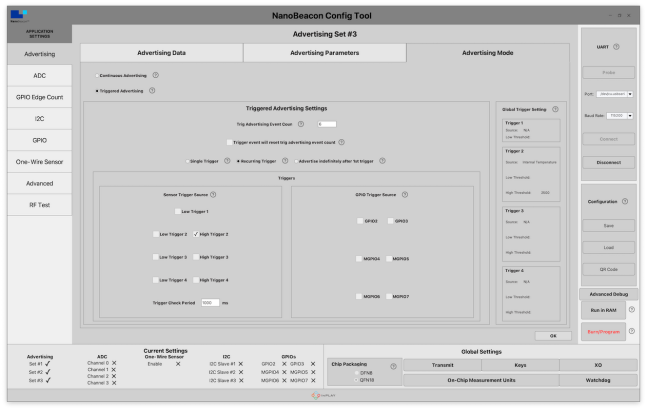
Triggered Advertising:
触发式广播:
We will be configuring this advertising set as aTriggeredtype.
我们将把这个广播集配置成一个触发式的类型。
This will ensure that the advertising packets are only sent when specific conditions are met.
这将确保广播数据包只在满足特定条件时发送。
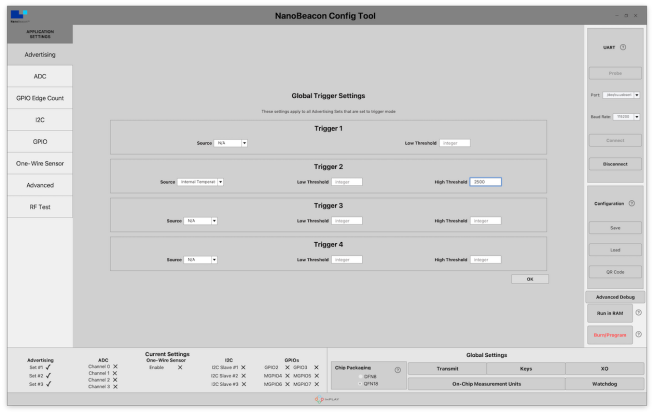
We will set a High Threshold Trigger to 25 degrees Celsius (Internal Temperature), meaning that when the internal temperature reaches 25 degrees C, this specific advertising set will be triggered and will then show up in the mobile app.
我们将把高阈值触发器设置为25摄氏度(内部温度),这意味着当内部温度达到25摄氏度时,这个特定的广播集将被触发,然后在移动应用程序中显示出来。
To configure this, do the following:
要配置这一点,请执行以下操作:
Navigate to Global Triggersettings → For Trigger #2, modify select Internal Temperature as the source → set the High Threshold to 2500 (this translates to Threshold * Unit,whereUnit is found in the On-Chip Measurement Units settings).
导航到全局触发器设置→对于触发器#2,修改选择内部温度作为来源→将高阈值设置为2500(这转化为阈值*单位,其中单位在On-Chip MeasurementUnits设置中找到)。
Next, we need to modify the Advertising Mode to be of the Triggeredtype → under the "Advertising Mode” tab, select “Triggered Advertising,” and under “Sensor Trigger Source,” check the box next to “High Trigger 2”.
接下来,我们需要将广播模式修改为触发式→在 "Advertising Mode"标签下,选择 "Triggered Advertising",在 "传感器触发源 "下,选中 "高触发器2 "旁边的方框。
Here are screenshots showing these configuration settings within NanoBeacon Config Tool:
下面是在NanoBeacon配置工具中显示这些配置设置的屏幕截图:
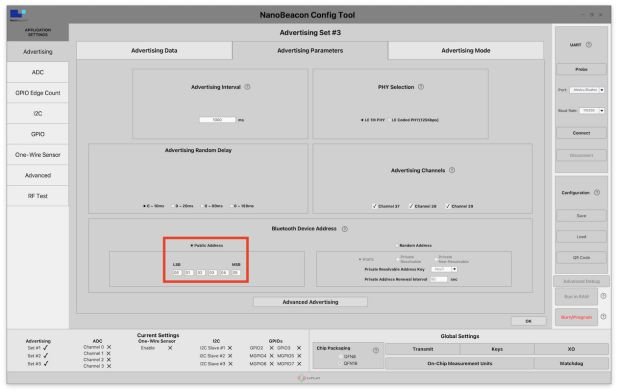
Bluetooth Address (Adv Set #3)
蓝牙地址(Adv Set #3)
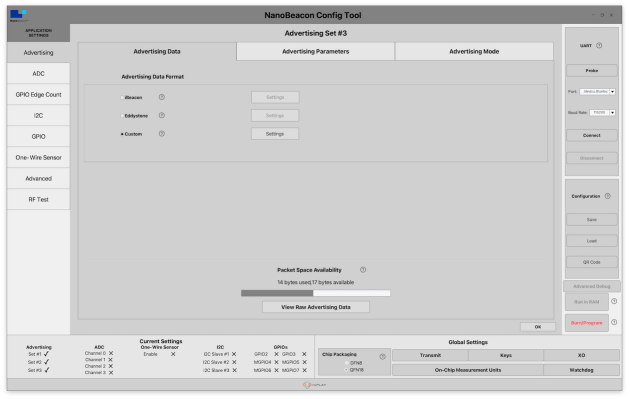
Custom Adv Data Format
自定义Adv数据格式
Now, we’re ready to run the configuration, import it into the mobile app, and start testing!
现在,我们已经准备好运行配置,将其导入到移动应用程序,并开始测试了!
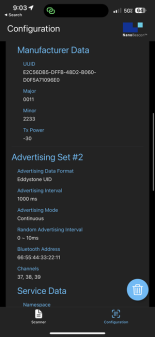
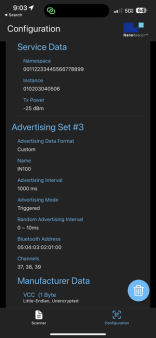
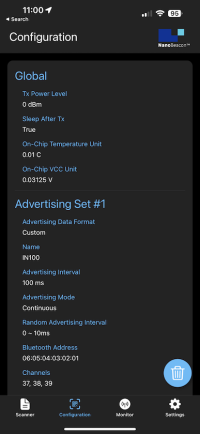
Once you’ve imported the configuration, you should see the following in your Configuration view:
一旦你导入了配置,你应该在你的配置视图中看到以下内容:
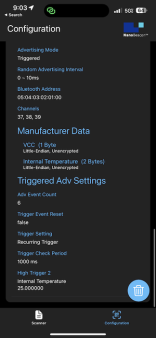
After importing the configuration, we are now ready to start scanning. Let’s switch to the Scannerview.
导入配置后,我们现在准备开始扫描。让我们切换到扫描器视图。
We’ll also double-check to make sure that the “Only show project configuration matches” is enabled. The scanner should now show us the two advertising sets (#1 & #2), the iBeacon and Eddystone advertising sets:
我们还将仔细检查,以确保 "只显示项目配置匹配 "被启用。扫描仪现在应该向我们显示两个广播集(#1和#2),即iBeacon和Eddystone广播集:
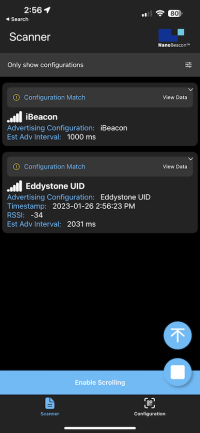
And we can navigate into the detailed views each of these advertising sets:
而且我们可以浏览到这些广播集的每一个详细视图:
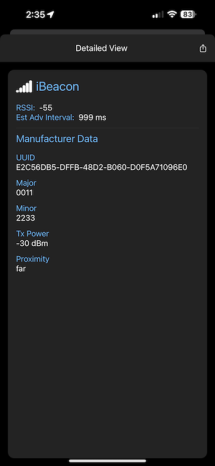

Notice the third advertising set (which is configured for a Triggered Custom Advertising Data Type) does not show up in the list. This is because the current internal temperature reading is under 25 deg C (at room temperature, around 21 deg C).
注意第三个广播集(它被配置为触发式自定义广播数据类型)没有显示在列表中。这是因为当前的内部温度读数低于25摄氏度(在室温下,大约21摄氏度)。
To test out the triggered advertisements, I will apply some heat to the IN100 chipset on the development board (by simply pressing down on it for a few seconds). Once the temperature reaches 25 deg C, we start seeing the third advertising set in the list:
为了测试触发式广播,我将对开发板上的IN100芯片组施加一些热量(通过简单地按下它几秒钟)。一旦温度达到25摄氏度,我们就开始看到列表中的第三个广播集:
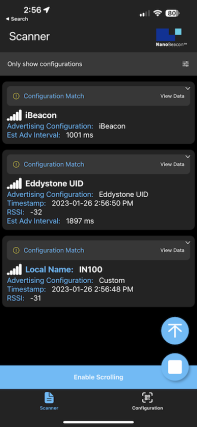
Let’s go into the detailed view to look at the advertising data:
让我们进入详细视图,看看广播数据:
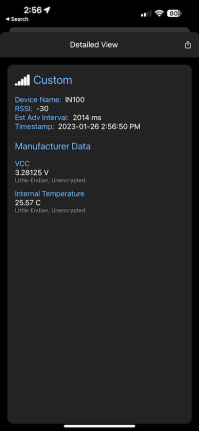
Notice that the data is actually parsed into a human-readable format and not just hex values! This is the power of using our mobile app in combination with the IN100.
请注意,数据实际上被解析成了人类可读的格式,而不仅仅是十六进制的数值!这就是使用我们的移动应用程序与IN100相结合的力量!
We also see that the Internal Temperature value has crossed the 25 deg C mark confirming the functionality of the Triggered Advertising Mode.
我们还看到,内部温度值已经超过了25摄氏度,证实了触发式广播模式的功能。
Summary & Closing
总结与结束
In the following tutorials in this series, we will cover lots more, including:
在本系列的后续教程中,我们将涵盖更多内容,包括:
How to export logging data for captured advertising sets and analyze them
如何为捕获的广播集导出日志数据并进行分析
App notifications for Triggered Advertising Mode advertising sets
触发式广播模式广播集的应用程序通知
The differences between the Android and iOS apps
安卓和iOS应用程序之间的差异
Diving more into the various filtering options
深入研究各种过滤选
The new NanoBeaconLib mobile app library (allows you to develop a custom N100-interfacing mobile app in no time!)
新的NanoBeaconLib移动应用程序库(允许你在短时间内开发一个自定义的与IN100连接的移动应用程序!)
and more!
以及更多!
Be sure to download our free mobile app(NanoBeacon Config Tool — InPlay (inplay-tech.com))and check it out for yourself!
请务必下载我们的免费移动应用程序,并亲自检查一下!
-
usb
+关注
关注
60文章
7936浏览量
264454 -
iOS
+关注
关注
8文章
3395浏览量
150564 -
应用程序
+关注
关注
37文章
3265浏览量
57677 -
BLE
+关注
关注
12文章
660浏览量
59391 -
扫描器
+关注
关注
0文章
164浏览量
11908
原文标题:NanoBeacon™ BLE扫描器教程(第一部分)
文章出处:【微信号:gh_3f4003bc6add,微信公众号:橙群微电子】欢迎添加关注!文章转载请注明出处。
发布评论请先 登录
相关推荐
NanoBeacon™ BLE扫描器教程(第一部分)


 NanoBeacon™ BLE扫描器教程(第一部分)
![AN-388: 使用Σ-Δ转换<b class='flag-5'>器</b>—<b class='flag-5'>第一部分</b>[中文版]](https://file.elecfans.com/web1/M00/D9/4E/pIYBAF_1ac2Ac0EEAABDkS1IP1s689.png)


评论