一、技术栈选择
1. 代码库管理方式 - Monorepo:将多个项目存放在同一个代码库中
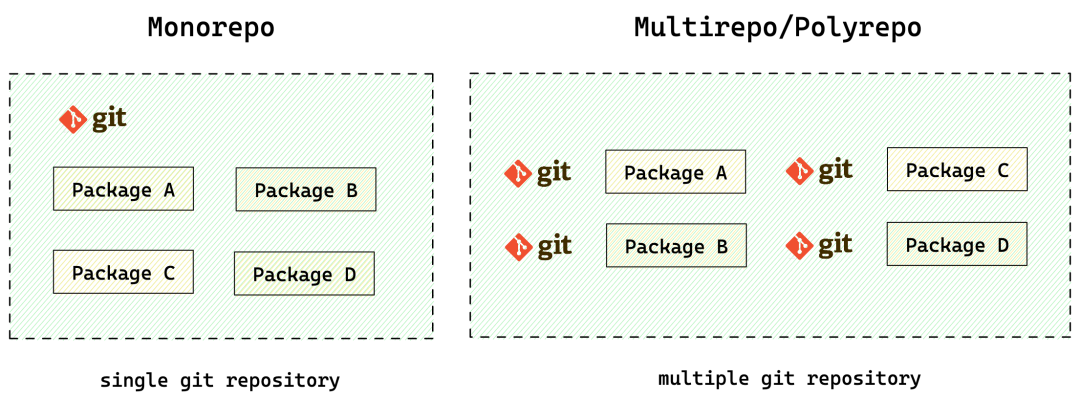
选择理由
1:多个应用(可以按业务线产品粒度划分)在同一个 repo 管理,便于统一管理代码规范、共享工作流 选择理由
2:解决跨项目 / 应用之间物理层面的代码复用,不用通过发布 / 安装 npm 包解决共享问题
2. 依赖管理 - PNPM:消除依赖提升、规范拓扑结构
选择理由 1:通过软 / 硬链接方式,最大程度节省磁盘空间 选择理由 2:解决幽灵依赖问题,管理更清晰
3. 构建工具 - Vite:基于 ESM 和 Rollup 的构建工具
选择理由:省去本地开发时的编译过程,提升本地开发效率
4. 前端框架 - Vue3:Composition API
选择理由:除了组件复用之外,还可以复用一些共同的逻辑状态,比如请求接口 loading 与结果的逻辑
5. 模拟接口返回数据 - Mockjs
选择理由:前后端统一了数据结构后,即可分离开发,降低前端开发依赖,缩短开发周期
二、目录结构设计:重点关注 src 部分
1. 常规 / 简单模式:根据文件功能类型集中管理
```
mesh-fe
├── .husky                  #git提交代码触发
│   ├── commit-msg
│   └── pre-commit
├── mesh-server             #依赖的node服务
│   ├── mock
│   │   └── data-service   #mock接口返回结果
│   └── package.json
├── README.md
├── package.json
├── pnpm-workspace.yaml     #PNPM工作空间
├── .eslintignore           #排除eslint检查
├── .eslintrc.js            #eslint配置
├── .gitignore
├── .stylelintignore        #排除stylelint检查
├── stylelint.config.js     #style样式规范
├── commitlint.config.js    #git提交信息规范
├── prettier.config.js      #格式化配置
├── index.html              #入口页面
└── mesh-client #不同的web应用package
    ├── vite-vue3
        ├── src
            ├── api                 #api调用接口层
            ├── assets              #静态资源相关
            ├── components          #公共组件
            ├── config              #公共配置,如字典/枚举等
            ├── hooks               #逻辑复用
            ├── layout              #router中使用的父布局组件
            ├── router              #路由配置
            ├── stores              #pinia全局状态管理
            ├── types               #ts类型声明
            ├── utils
            │   ├── index.ts
            │   └── request.js     #Axios接口请求封装
            ├── views               #主要页面
            ├── main.ts             #js入口
            └── App.vue
```
2. 基于 domain 领域模式:根据业务模块集中管理
```
mesh-fe
├── .husky                  #git提交代码触发
│   ├── commit-msg
│   └── pre-commit
├── mesh-server             #依赖的node服务
│   ├── mock
│   │   └── data-service   #mock接口返回结果
│   └── package.json
├── README.md
├── package.json
├── pnpm-workspace.yaml     #PNPM工作空间
├── .eslintignore           #排除eslint检查
├── .eslintrc.js            #eslint配置
├── .gitignore
├── .stylelintignore        #排除stylelint检查
├── stylelint.config.js     #style样式规范
├── commitlint.config.js    #git提交信息规范
├── prettier.config.js      #格式化配置
├── index.html              #入口页面
└── mesh-client             #不同的web应用package
    ├── vite-vue3
        ├── src                    #按业务领域划分
            ├── assets              #静态资源相关
            ├── components          #公共组件
            ├── domain              #领域
            │   ├── config.ts
            │   ├── service.ts
            │   ├── store.ts
            │   ├── type.ts
            ├── hooks               #逻辑复用
            ├── layout              #router中使用的父布局组件
            ├── router              #路由配置
            ├── utils
            │   ├── index.ts
            │   └── request.js     #Axios接口请求封装
            ├── views               #主要页面
            ├── main.ts             #js入口
            └── App.vue
```
可以根据具体业务场景,选择以上 2 种方式其中之一。
三、搭建部分细节
1.Monorepo+PNPM 集中管理多个应用(workspace)
根目录创建 pnpm-workspace.yaml,mesh-client 文件夹下每个应用都是一个 package,之间可以相互添加本地依赖:pnpm install
packages:
  # all packages in direct subdirs of packages/
  - 'mesh-client/*'
  # exclude packages that are inside test directories
  - '!**/test/**'
pnpm install #安装所有package中的依赖 pnpm install -w axios #将axios库安装到根目录 pnpm --filter | -F
2.Vue3 请求接口相关封装
request.ts 封装:主要是对接口请求和返回做拦截处理,重写 get/post 方法支持泛型
import axios, { AxiosError } from 'axios'
import type { AxiosRequestConfig, AxiosResponse } from 'axios'

// 创建 axios 实例
const service = axios.create({
  baseURL: import.meta.env.VITE_APP_BASE_URL,
  timeout: 1000 * 60 * 5, // 请求超时时间
  headers: { 'Content-Type': 'application/json;charset=UTF-8' },
})

const toLogin = (sso: string) => {
  const cur = window.location.href
  const url = `${sso}${encodeURIComponent(cur)}`
  window.location.href = url
}

// 服务器状态码错误处理
const handleError = (error: AxiosError) => {
  if (error.response) {
    switch (error.response.status) {
      case 401:
        // todo
        toLogin(import.meta.env.VITE_APP_SSO)
        break
      // case 404:
      //   router.push('/404')
      //   break
      // case 500:
      //   router.push('/500')
      //   break
      default:
        break
    }
  }
  return Promise.reject(error)
}

// request interceptor
service.interceptors.request.use((config) => {
  const token = ''
  if (token) {
    config.headers!['Access-Token'] = token // 让每个请求携带自定义 token 请根据实际情况自行修改
  }
  return config
}, handleError)

// response interceptor
service.interceptors.response.use((response: AxiosResponse) => {
  const { code } = response.data
  if (code === '10000') {
    toLogin(import.meta.env.VITE_APP_SSO)
  } else if (code !== '00000') {
    // 抛出错误信息,页面处理
    return Promise.reject(response.data)
  }
  // 返回正确数据
  return Promise.resolve(response)
  // return response
}, handleError)

// 后端返回数据结构泛型,根据实际项目调整
interface ResponseData {
  code: string
  message: string
  result: T
}

export const httpGet = async (url: string, config?: AxiosRequestConfig) => {
  return service.get>(url, config).then((res) => res.data)
}

export const httpPost = async (
  url: string,
  data?: D,
  config?: AxiosRequestConfig,
) => {
  return service.post>(url, data, config).then((res) => res.data)
}

export { service as axios }

export type { ResponseData }
useRequest.ts 封装:基于 vue3 Composition API,将请求参数、状态以及结果等逻辑封装复用
import { ref } from 'vue'
import type { Ref } from 'vue'
import { ElMessage } from 'element-plus'
import type { ResponseData } from '@/utils/request'
export const useRequest = (
  api: (...args: P[]) => Promise>,
  defaultParams?: P,
) => {
  const params = ref() as Ref
  if (defaultParams) {
    params.value = {
      ...defaultParams,
    }
  }
  const loading = ref(false)
  const result = ref()
  const fetchResource = async (...args: P[]) => {
    loading.value = true
    return api(...args)
      .then((res) => {
        if (!res?.result) return
        result.value = res.result
      })
      .catch((err) => {
        result.value = undefined
        ElMessage({
          message: typeof err === 'string' ? err : err?.message || 'error',
          type: 'error',
          offset: 80,
        })
      })
      .finally(() => {
        loading.value = false
      })
  }
  return {
    params,
    loading,
    result,
    fetchResource,
  }
}
API 接口层
import { httpGet } from '@/utils/request'

const API = {
  getLoginUserInfo: '/userInfo/getLoginUserInfo',
}
type UserInfo = {
  userName: string
  realName: string
}
export const getLoginUserInfoAPI = () => httpGet(API.getLoginUserInfo)
页面使用:接口返回结果 userInfo,可以自动推断出 UserInfo 类型,
// 方式一:推荐 const { loading, result: userInfo, fetchResource: getLoginUserInfo, } = useRequest(getLoginUserInfoAPI) // 方式二:不推荐,每次使用接口时都需要重复定义type type UserInfo = { userName: string realName: string } const { loading, result: userInfo, fetchResource: getLoginUserInfo, } = useRequest3.Mockjs 模拟后端接口返回数据(getLoginUserInfoAPI) onMounted(async () => { await getLoginUserInfo() if (!userInfo.value) return const user = useUserStore() user.$patch({ userName: userInfo.value.userName, realName: userInfo.value.realName, }) })
import Mock from 'mockjs'
const BASE_URL = '/api'
Mock.mock(`${BASE_URL}/user/list`, {
  code: '00000',
  message: '成功',
  'result|10-20': [
    {
      uuid: '@guid',
      name: '@name',
      tag: '@title',
      age: '@integer(18, 35)',
      modifiedTime: '@datetime',
      status: '@cword("01")',
    },
  ],
})
四、统一规范
1.ESLint
注意:不同框架下,所需要的 preset 或 plugin 不同,建议将公共部分提取并配置在根目录中,package 中的 eslint 配置设置 extends。
/* eslint-env node */
require('@rushstack/eslint-patch/modern-module-resolution')

module.exports = {
  root: true,
  extends: [
    'plugin:vue/vue3-essential',
    'eslint:recommended',
    '@vue/eslint-config-typescript',
    '@vue/eslint-config-prettier',
  ],
  overrides: [
    {
      files: ['cypress/e2e/**.{cy,spec}.{js,ts,jsx,tsx}'],
      extends: ['plugin:cypress/recommended'],
    },
  ],
  parserOptions: {
    ecmaVersion: 'latest',
  },
  rules: {
    'vue/no-deprecated-slot-attribute': 'off',
  },
}
2.StyleLint
module.exports = {
  extends: ['stylelint-config-standard', 'stylelint-config-prettier'],
  plugins: ['stylelint-order'],
  customSyntax: 'postcss-html',
  rules: {
    indentation: 2, //4空格
    'selector-class-pattern':
      '^(?:(?:o|c|u|t|s|is|has|_|js|qa)-)?[a-zA-Z0-9]+(?:-[a-zA-Z0-9]+)*(?:__[a-zA-Z0-9]+(?:-[a-zA-Z0-9]+)*)?(?:--[a-zA-Z0-9]+(?:-[a-zA-Z0-9]+)*)?(?:[.+])?$',
    // at-rule-no-unknown: 屏蔽一些scss等语法检查
    'at-rule-no-unknown': [true, { ignoreAtRules: ['mixin', 'extend', 'content', 'export'] }],
    // css-next :global
    'selector-pseudo-class-no-unknown': [
      true,
      {
        ignorePseudoClasses: ['global', 'deep'],
      },
    ],
    'order/order': ['custom-properties', 'declarations'],
    'order/properties-alphabetical-order': true,
  },
}
3.Prettier
module.exports = {
  printWidth: 100,
  singleQuote: true,
  trailingComma: 'all',
  bracketSpacing: true,
  jsxBracketSameLine: false,
  tabWidth: 2,
  semi: false,
}
4.CommitLint
module.exports = {
  extends: ['@commitlint/config-conventional'],
  rules: {
    'type-enum': [
      2,
      'always',
      ['build', 'feat', 'fix', 'docs', 'style', 'refactor', 'test', 'chore', 'revert'],
    ],
    'subject-full-stop': [0, 'never'],
    'subject-case': [0, 'never'],
  },
}
五、附录:技术栈图谱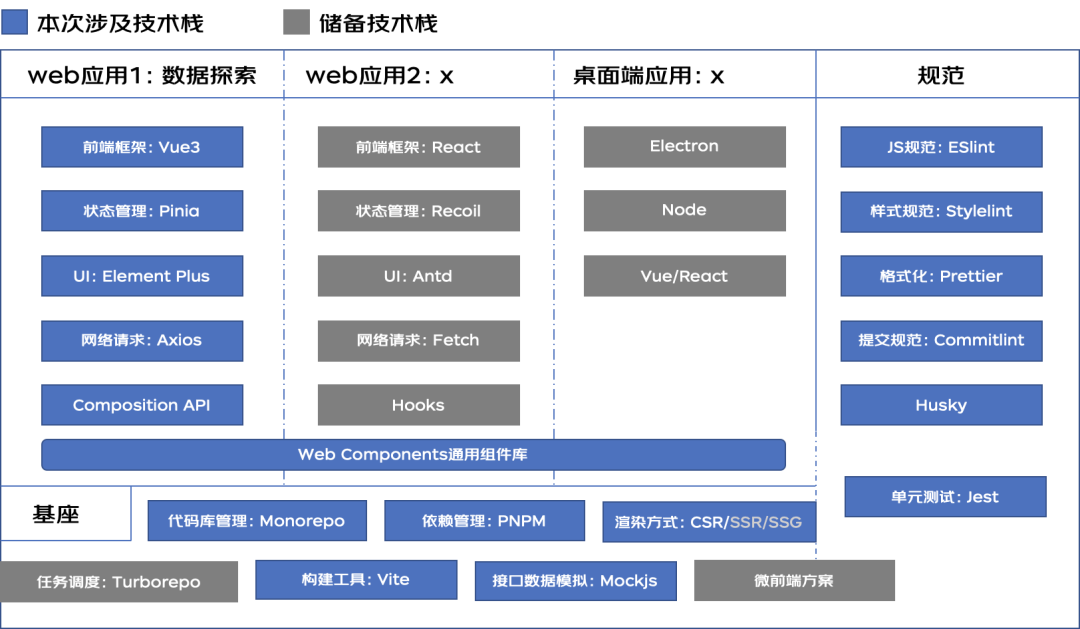
审核编辑:刘清
-
ESM
+关注
关注
0文章
9浏览量
9058 -
SRC
+关注
关注
0文章
60浏览量
18006
原文标题:基于vite3的monorepo前端工程搭建
文章出处:【微信号:OSC开源社区,微信公众号:OSC开源社区】欢迎添加关注!文章转载请注明出处。
发布评论请先 登录
相关推荐
前端工程师月薪15000元福利好[1-3年经验]
物联网LoRa系列-3:LoRa终端搭建的总体思路、步骤与架构

搭建基于Vue3+Vite2+Arco+Typescript+Pinia后台管理系统模板
Vite 4.3正式发布,前端构建工具


 基于vite3的monorepo前端工程搭建步骤



评论