 瑞萨e2studio----RTC时钟日历、闹钟、周期性中断

1.概述
本篇文章主要介绍如何使用e2studio对瑞萨进行RTC配置,并且配置RTC时钟日历,产生1s的中断让串口打印实时数据。
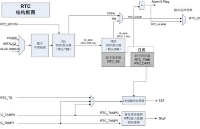
RTC时钟模块是一个时间外设,主要用于日期时间的存储和控制,有别于一般MCU中的Timer,RTC时钟有两种计时模式,日期模式和计时模式,RTC常见的操作包括设置时间、设置定时闹铃、配置周期性中断以及启动或停止操作。
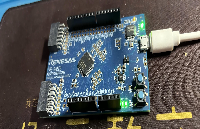
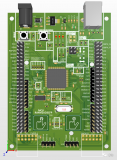
2.硬件准备
首先需要准备一个开发板,这里我准备的是芯片型号 R7FA2L1AB2DFL 的开发板。
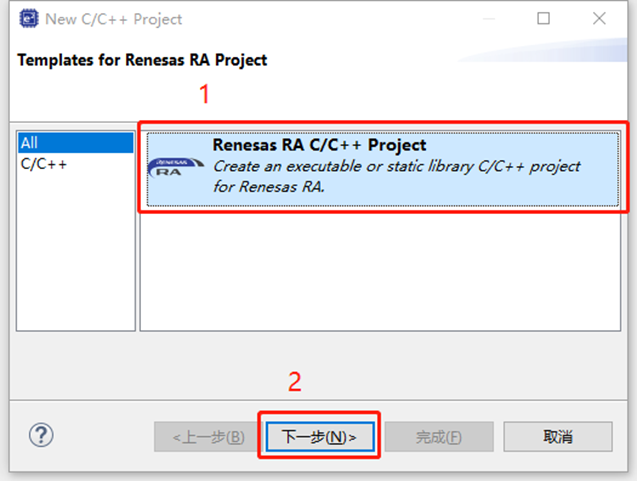
3.新建工程

4.工程模板
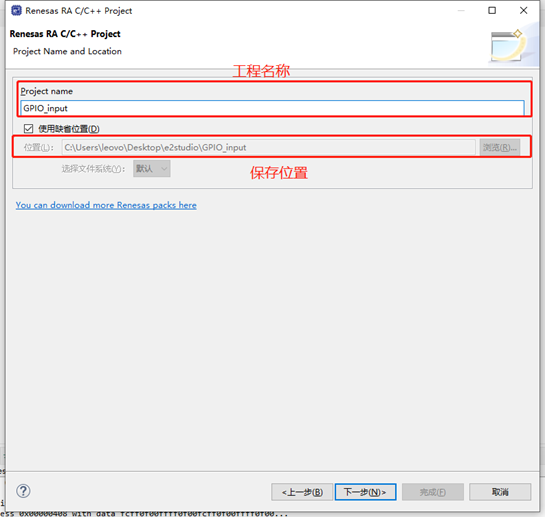
5.保存工程路径
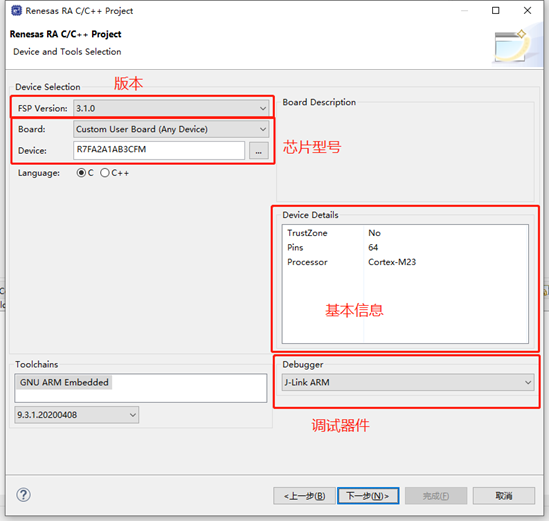
6.芯片配置
本文中使用R7FA2L1AB2DFL来进行演示。
7
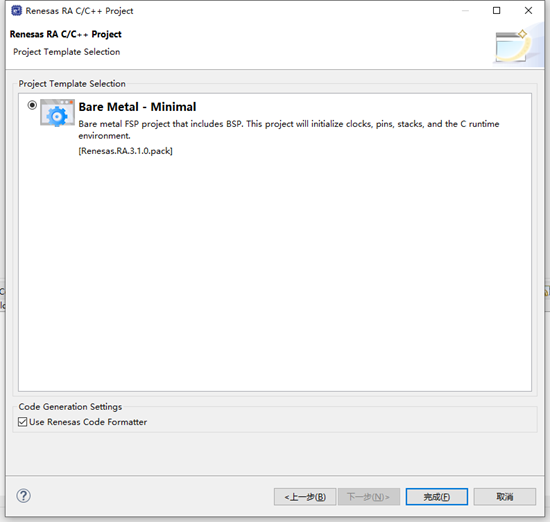
7.工程模板选择
8.RTC配置
点击Stacks->New Stack->Driver->Timers -> RTC Driver on r_rtc。

9.RTC属性配置
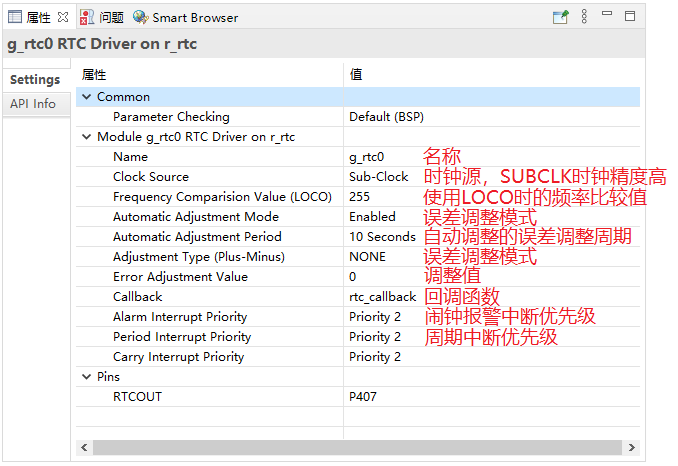
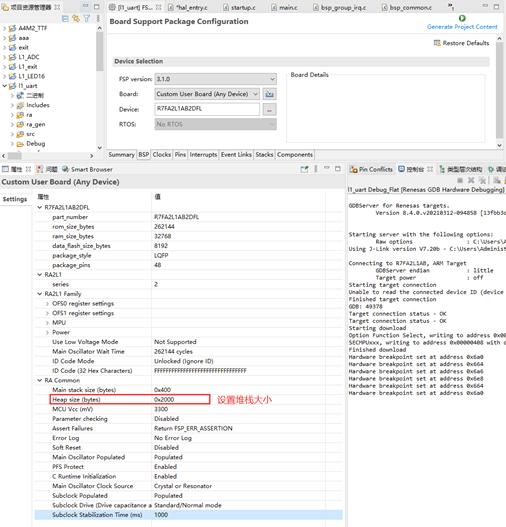
10.设置E2STUDIO堆栈
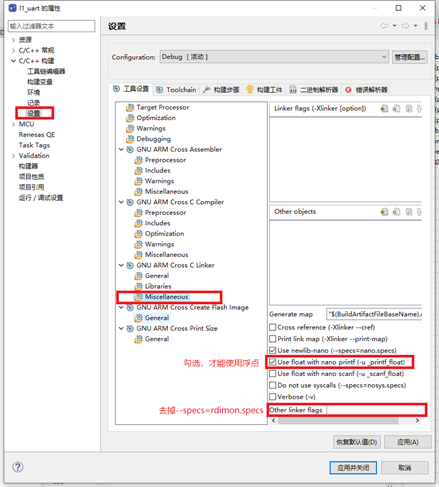
11.e2studio的重定向printf设置
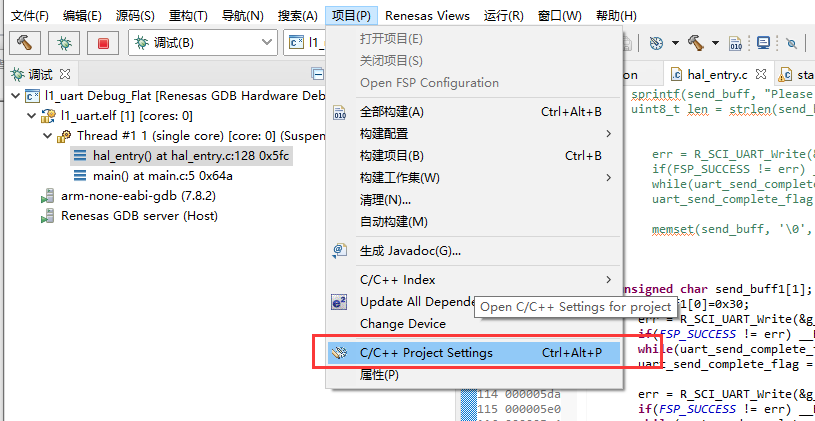
C++ 构建->设置->GNU ARM Cross C Linker->Miscellaneous去掉Other linker flags中的 “--specs=rdimon.specs”
12.printf输出重定向到串口
打印最常用的方法是printf,所以要解决的问题是将printf的输出重定向到串口,然后通过串口将数据发送出去。
注意一定要加上头文件#include
#ifdef __GNUC__                                 //串口重定向
    #define PUTCHAR_PROTOTYPE int __io_putchar(int ch)
#else
    #define PUTCHAR_PROTOTYPE int fputc(int ch, FILE *f)
#endif

PUTCHAR_PROTOTYPE
{
        err = R_SCI_UART_Write(&g_uart0_ctrl, (uint8_t *)&ch, 1);
        if(FSP_SUCCESS != err) __BKPT();
        while(uart_send_complete_flag == false){}
        uart_send_complete_flag = false;
        return ch;
}

int _write(int fd,char *pBuffer,int size)
{
    for(int i=0;i;i++)>
13.R_RTC_Open()函数原型
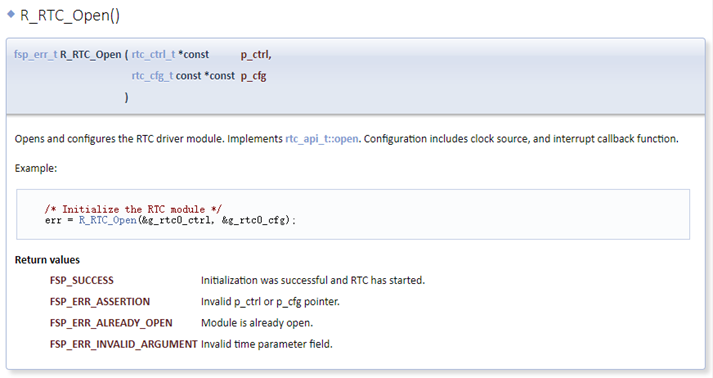
故可以用R_RTC_Open()函数进行初始化和开启RTC。
 /* Initialize the RTC module*/
    err = R_RTC_Open(&g_rtc0_ctrl, &g_rtc0_cfg);
    /* Handle any errors. This function should be defined by the user. */
    assert(FSP_SUCCESS == err);
14.R_RTC_CalendarTimeSet()函数原型
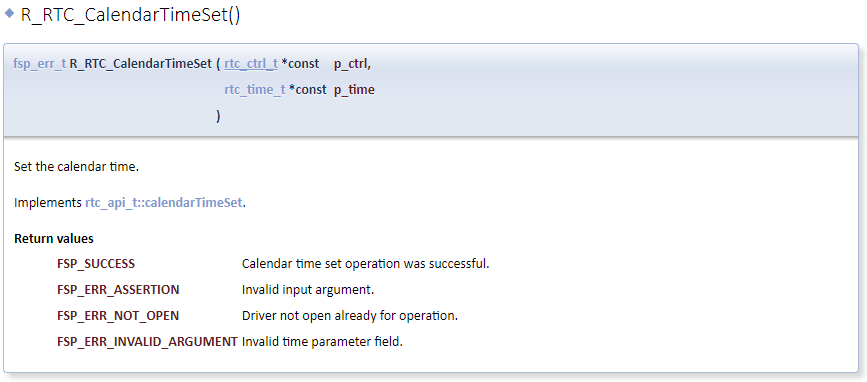
故可以用R_RTC_CalendarTimeSet()函数进行设置当前日历时间。
 /* R_RTC_CalendarTimeSet must be called at least once to start the RTC */
    R_RTC_CalendarTimeSet(&g_rtc0_ctrl, &set_time);
15.R_RTC_PeriodicIrqRateSet()函数原型
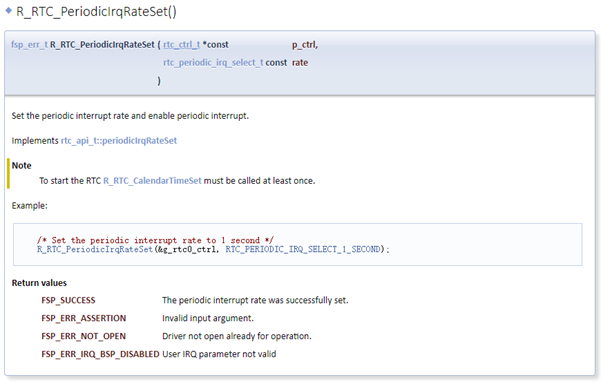
故可以用R_RTC_PeriodicIrqRateSet()函数进行设置周期中断。
 /* Set the periodic interrupt rate to 1 second */
    R_RTC_PeriodicIrqRateSet(&g_rtc0_ctrl, RTC_PERIODIC_IRQ_SELECT_1_SECOND);
16.R_RTC_CalendarAlarmSet()函数原型
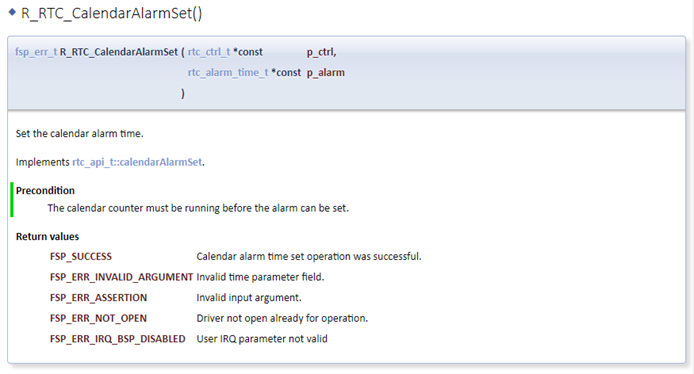
故可以用R_RTC_CalendarAlarmSet()函数进行设置闹钟。
R_RTC_CalendarAlarmSet(&g_rtc0_ctrl, &set_alarm_time1);
17.R_RTC_CalendarTimeGet()函数原型
故可以用R_RTC_CalendarTimeGet ()函数进行获取RTC计数时间。
R_RTC_CalendarTimeGet(&g_rtc0_ctrl, &get_time);//获取RTC计数时间
18.设定时间
开启RTC之后需要设定当前的时间,可以通过 R_RTC_CalendarTimeSet( &g_rtc0_ctrl , &set_time ) 设定时间,具体时间可以通过set_time进行修改,设置如下所示。
/* rtc_time_t is an alias for the C Standard time.h struct 'tm' */
rtc_time_t set_time =
{
    .tm_sec  = 0,      /* 秒,范围从 0 到 59 */
    .tm_min  = 30,      /* 分,范围从 0 到 59 */
    .tm_hour = 12,      /* 小时,范围从 0 到 23*/
    .tm_mday = 20,       /* 一月中的第几天,范围从 1 到 31*/
    .tm_mon  = 11,      /* 月份,范围从 0 到 11*/
    .tm_year = 121,     /* 自 1900 起的年数,2021为121*/
    .tm_wday = 5,       /* 一周中的第几天,范围从 0 到 6*/
//    .tm_yday=0,         /* 一年中的第几天,范围从 0 到 365*/
//    .tm_isdst=0;        /* 夏令时*/
};
19.设定周期性中断
若要用RTC进行固定延时中断,可以用 R_RTC_PeriodicIrqRateSet ( rtc_ctrl_t *const p_ctrl , rtc_periodic_irq_select_t const rate ) 来进行设置,例如设置1s,设置如下:
R_RTC_PeriodicIrqRateSet( &g_rtc0_ctrl , RTC_PERIODIC_IRQ_SELECT_1_SECOND );
每当周期性中断产生时,可以触发回调函数的事件RTC_EVENT_PERIODIC_IRQ。
20.设定日历闹钟时间
开启RTC之后可以设定需要日历闹钟时间,可以通过 R_RTC_CalendarAlarmSet( &g_rtc0_ctrl , &set_alarm_time )设定闹钟时间,具体时间可以通过 set_alarm_time 进行修改,设置如下所示。
下方例程只设置了 sec_match 为1,故每过一分钟到5s的时候的时候都会触发闹铃,若设置每天响铃一次,则需要将 min_match 和 hour_match 都设置为1。
rtc_alarm_time_t set_alarm_time=
{
     .time.tm_sec      =   5,
     .time.tm_sec  = 5,      /* 秒,范围从 0 到 59 */
     .time.tm_min  = 30,      /* 分,范围从 0 到 59 */
     .time.tm_hour = 12,      /* 小时,范围从 0 到 23*/
     .time.tm_mday = 20,       /* 一月中的第几天,范围从 1 到 31*/
     .time.tm_mon  = 11,      /* 月份,范围从 0 到 11*/
     .time.tm_year = 121,     /* 自 1900 起的年数,2021为121*/
     .time.tm_wday = 5,       /* 一周中的第几天,范围从 0 到 6*/
     .sec_match        =  1,
     .min_match        =  0,
     .hour_match       =  0,
     .mday_match       =  0,
     .mon_match        =  0,
     .year_match       =  0,
     .dayofweek_match  =  0,
    };
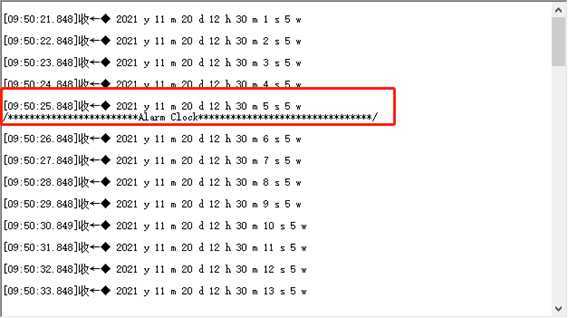
21.演示效果
设置每过1s打印一次当前时间,设置过1分钟,在5秒时候闹铃。

22.完整代码
#include "hal_data.h" #include FSP_CPP_HEADER void R_BSP_WarmStart(bsp_warm_start_event_t event); FSP_CPP_FOOTER fsp_err_t err = FSP_SUCCESS; volatile bool uart_send_complete_flag = false; void user_uart_callback (uart_callback_args_t * p_args) { if(p_args->event == UART_EVENT_TX_COMPLETE) { uart_send_complete_flag = true; } } #ifdef __GNUC__ //串口重定向 #define PUTCHAR_PROTOTYPE int __io_putchar(int ch) #else #define PUTCHAR_PROTOTYPE int fputc(int ch, FILE *f) #endif PUTCHAR_PROTOTYPE { err = R_SCI_UART_Write(&g_uart0_ctrl, (uint8_t *)&ch, 1); if(FSP_SUCCESS != err) __BKPT(); while(uart_send_complete_flag == false){} uart_send_complete_flag = false; return ch; } int _write(int fd,char *pBuffer,int size) { for(int i=0;ievent == RTC_EVENT_PERIODIC_IRQ) rtc_flag=1; else if(p_args->event == RTC_EVENT_ALARM_IRQ) rtc_alarm_flag=1; } /*******************************************************************************************************************//** * main() is generated by the RA Configuration editor and is used to generate threads if an RTOS is used. This function * is called by main() when no RTOS is used. **********************************************************************************************************************/ void hal_entry(void) { /* TODO: add your own code here */ err = R_SCI_UART_Open(&g_uart0_ctrl, &g_uart0_cfg); assert(FSP_SUCCESS == err); /* Initialize the RTC module*/ err = R_RTC_Open(&g_rtc0_ctrl, &g_rtc0_cfg); /* Handle any errors. This function should be defined by the user. */ assert(FSP_SUCCESS == err); /* R_RTC_CalendarTimeSet must be called at least once to start the RTC */ R_RTC_CalendarTimeSet(&g_rtc0_ctrl, &set_time); /* Set the periodic interrupt rate to 1 second */ R_RTC_PeriodicIrqRateSet(&g_rtc0_ctrl, RTC_PERIODIC_IRQ_SELECT_1_SECOND); R_RTC_CalendarAlarmSet(&g_rtc0_ctrl, &set_alarm_time); uint8_t rtc_second= 0; //秒 uint8_t rtc_minute =0; //分 uint8_t rtc_hour =0; //时 uint8_t rtc_day =0; //日 uint8_t rtc_month =0; //月 uint16_t rtc_year =0; //年 uint8_t rtc_week =0; //周 rtc_time_t get_time; while(1) { if(rtc_flag) { R_RTC_CalendarTimeGet(&g_rtc0_ctrl, &get_time);//获取RTC计数时间 rtc_flag=0; rtc_second=get_time.tm_sec;//秒 rtc_minute=get_time.tm_min;//分 rtc_hour=get_time.tm_hour;//时 rtc_day=get_time.tm_mday;//日 rtc_month=get_time.tm_mon;//月 rtc_year=get_time.tm_year; //年 rtc_week=get_time.tm_wday;//周 printf(" %d y %d m %d d %d h %d m %d s %d w\n",rtc_year+1900,rtc_month,rtc_day,rtc_hour,rtc_minute,rtc_second,rtc_week); } if(rtc_alarm_flag) { rtc_alarm_flag=0; printf("/************************Alarm Clock********************************/\n"); } } #if BSP_TZ_SECURE_BUILD /* Enter non-secure code */ R_BSP_NonSecureEnter(); #endif };i++)>原创:By RA_Billy Xiao
原文标题:瑞萨e2studio----RTC时钟日历&闹钟&周期性中断
文章出处:【微信公众号:RA生态工作室】欢迎添加关注!文章转载请注明出处。
-
mcu
+关注
关注
146文章
17414浏览量
353539 -
ARM
+关注
关注
134文章
9200浏览量
370435 -
嵌入式
+关注
关注
5098文章
19243浏览量
309092 -
开发板
+关注
关注
25文章
5186浏览量
98716
发布评论请先 登录
相关推荐
【RA-Eco-RA2L1-48PIN-V1.0开发板试用】——RTC时钟
DS1306带有闹钟的串行实时时钟技术手册
基于瑞萨RA0E1开发板的IIC OLED测试

【瑞萨RA2L1入门学习】2. PWM呼吸灯
【瑞萨RA2L1入门学习】1. 点亮LED
【瑞萨RA2L1入门学习】03、RTC日历及串口设置时间
【RA-Eco-RA4E2-64PIN-V1.0开发板试用】RA4E2 之RTC时钟实时年月日期显示
周期性抖动例如电源上的抖动造成时钟的Dj对 ENOB有影响吗?如何计算这部分的影响?
瑞萨e2studio(1)----瑞萨芯片之搭建FSP环境
【GD32 MCU 入门教程】GD32 MCU 常见外设介绍(14)RTC 模块介绍
瑞萨e2studio----SPI速率解析


 工商网监
工商网监
评论