RA MCU 生态工作室致力于构建一个完善的 RA 生态,这将会是一个好玩有趣的开放社区,也提供各种RA相关问题的解决方法。
1.概述
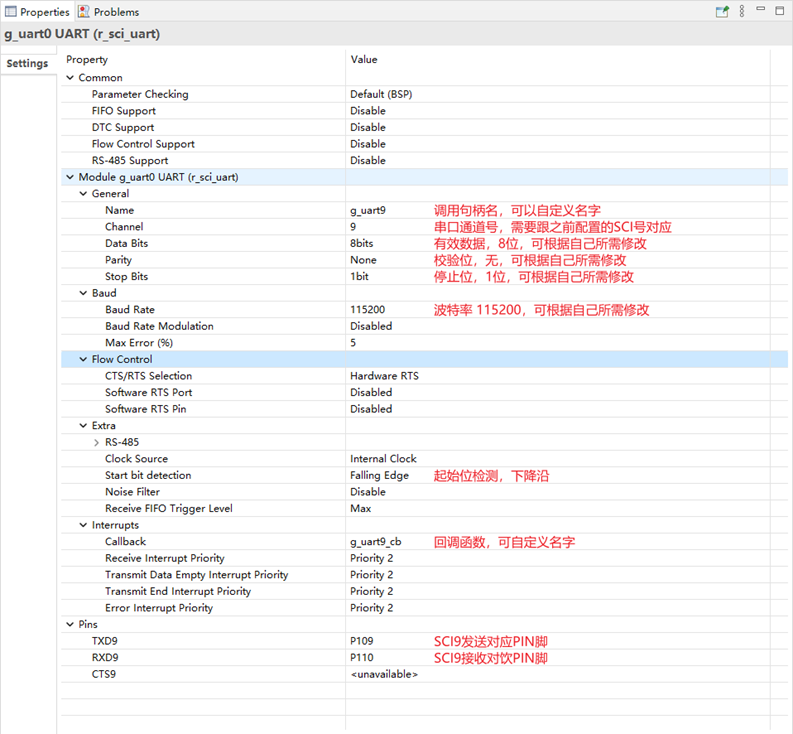
通过RASC创建一个串口工程,具体配置如下,用户可以根据自己定义来配置串口相关的基本参数。
2.创建工程
STEP1:RASC创建工程
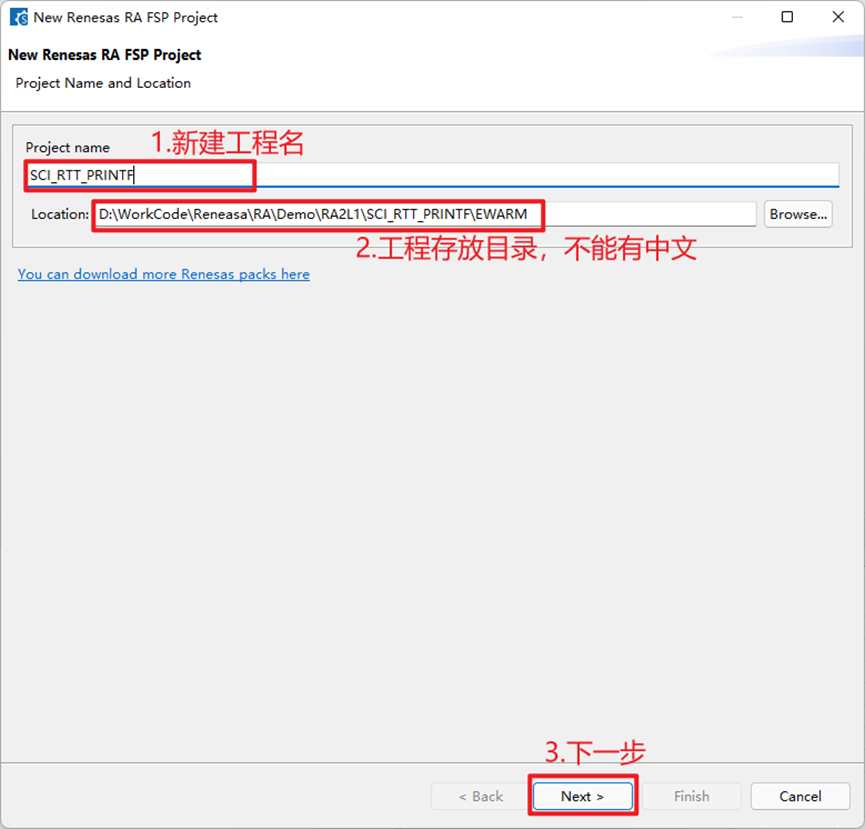
STEP2:选芯片型号跟IDE类型
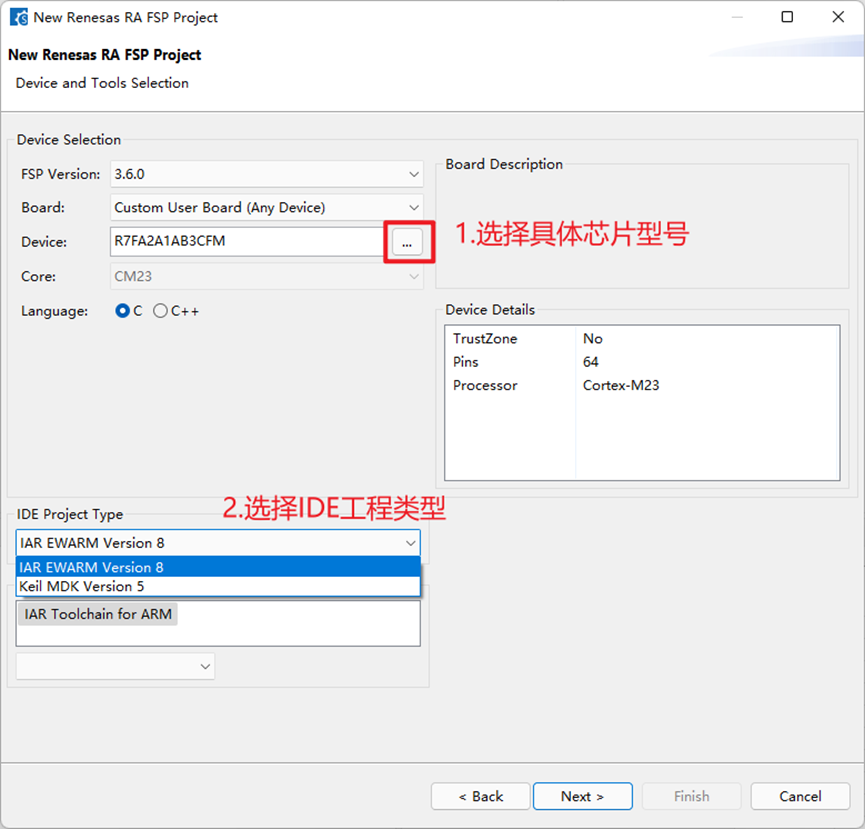
STEP3:选择芯片型号
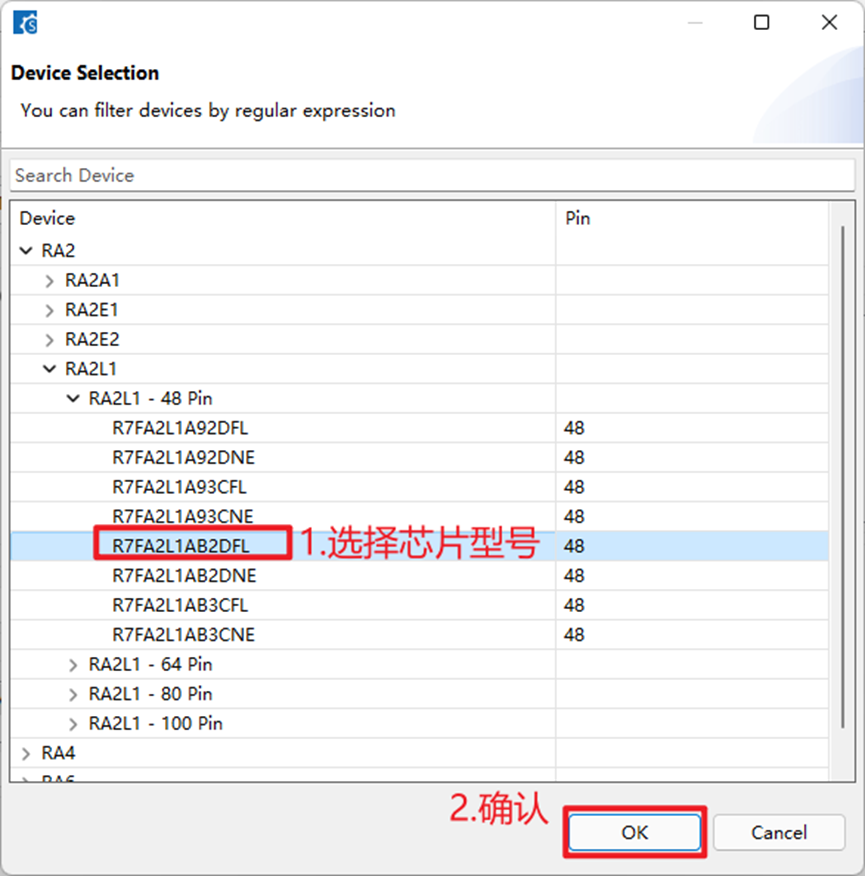
STEP4:选择无操作系统
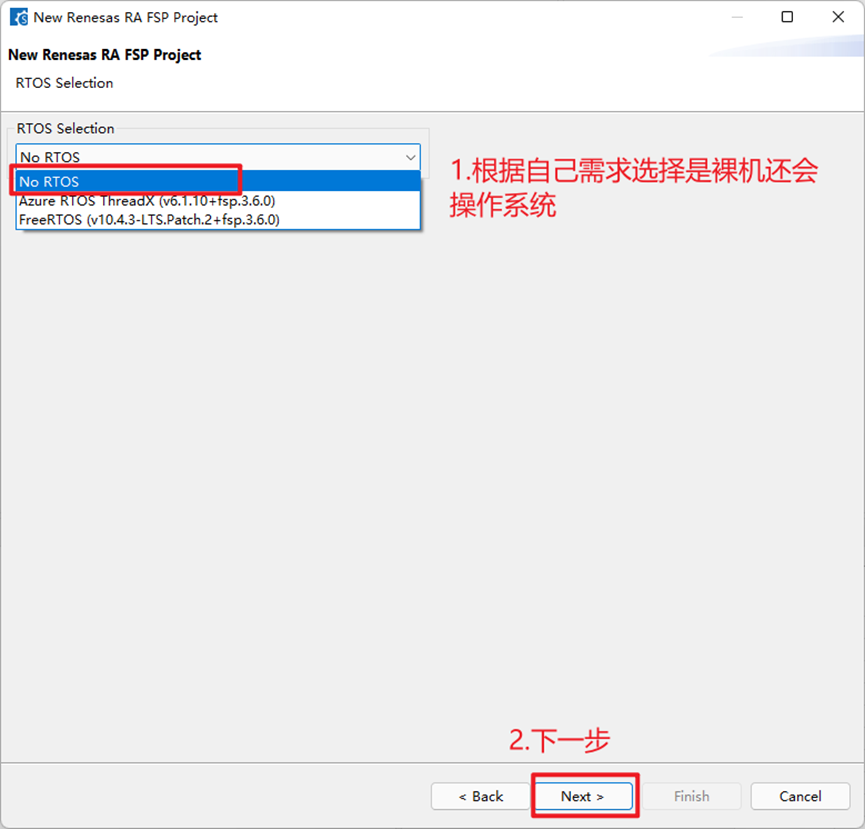
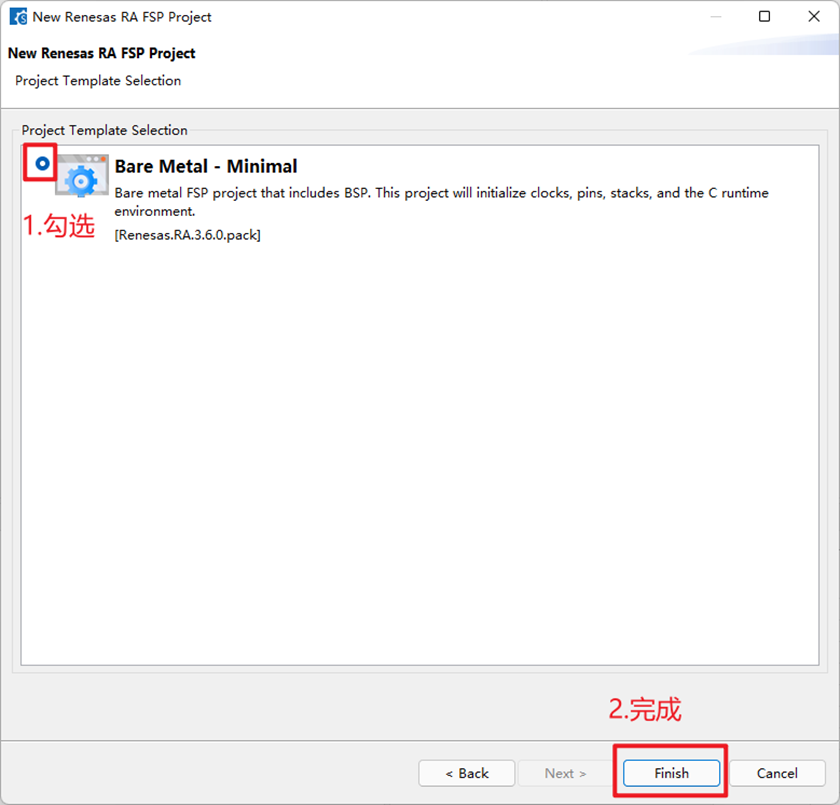
STEP5:勾选确认工程
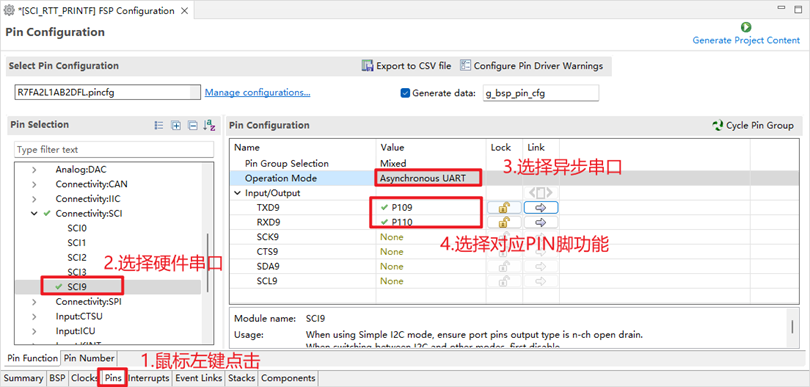
STEP6:配置串口号跟IO口
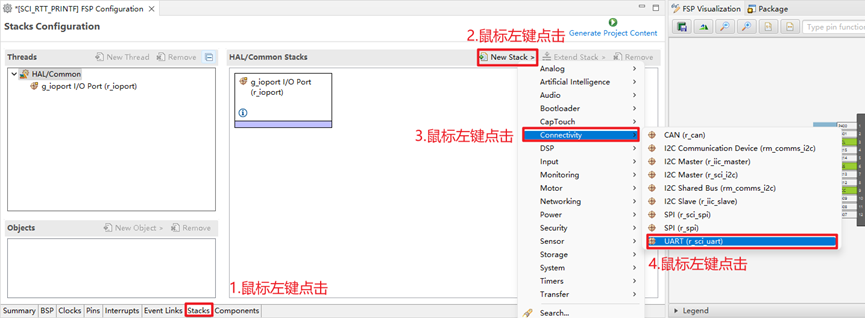
STEP7:添加串口驱动
STEP8:配置串口
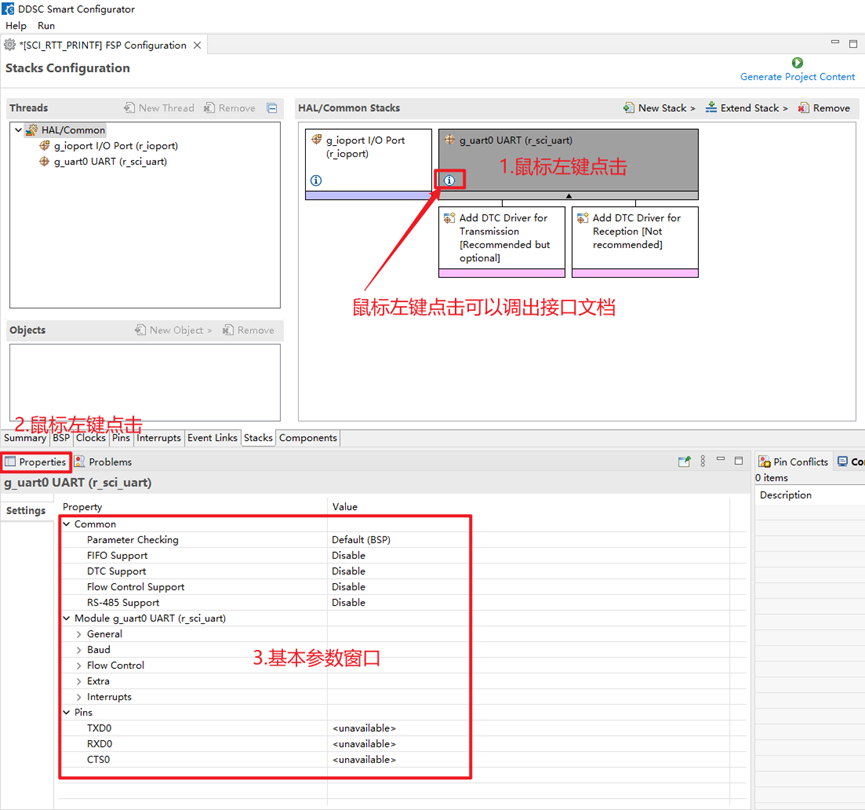
STEP9:配置串口基本属性
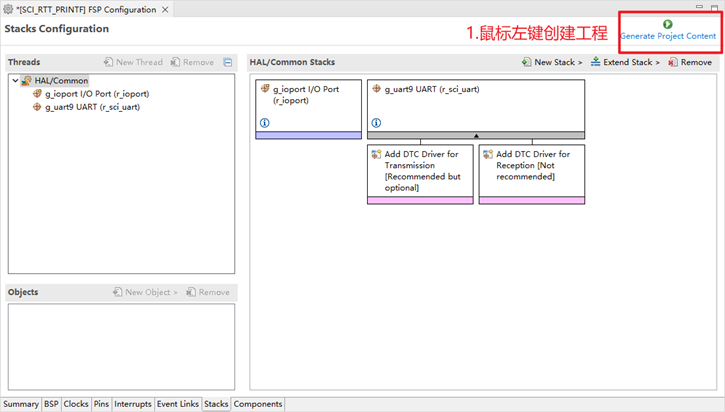
STEP10:生成工程
3.代码
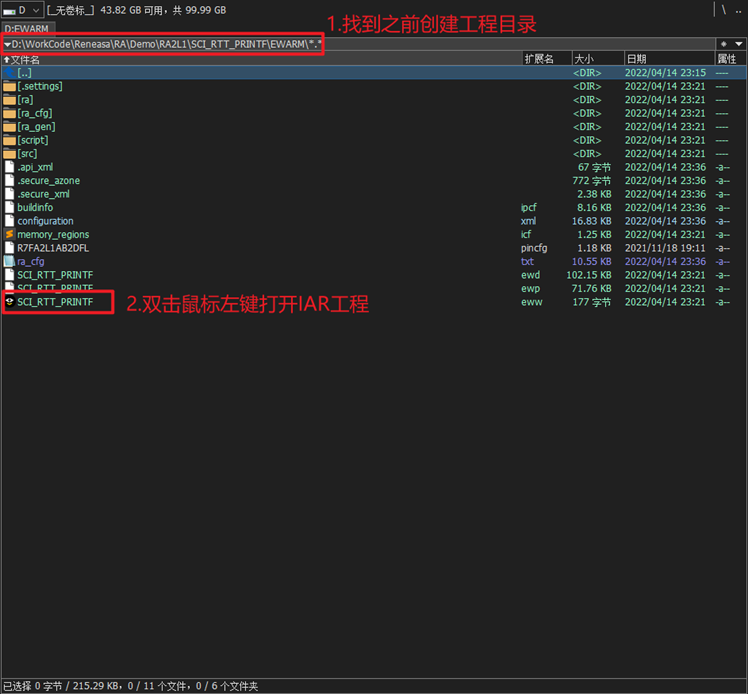
STEP11:打开工程
STEP12:添加代码
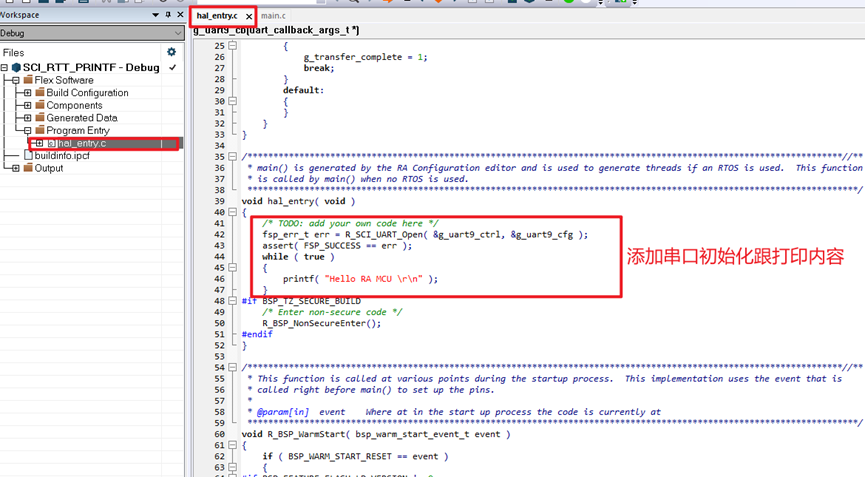
STEP13:具体代码如下
void hal_entry( void )
{
    /* TODO: add your own code here */
    fsp_err_t err = R_SCI_UART_Open( &g_uart9_ctrl, &g_uart9_cfg );
    assert( FSP_SUCCESS == err );
    while ( true )
    {
        printf( "Hello RA MCU \r\n" );
    }
#if BSP_TZ_SECURE_BUILD
    /* Enter non-secure code */
    R_BSP_NonSecureEnter();
#endif
}STEP14:添加头文件跟串口回调函数
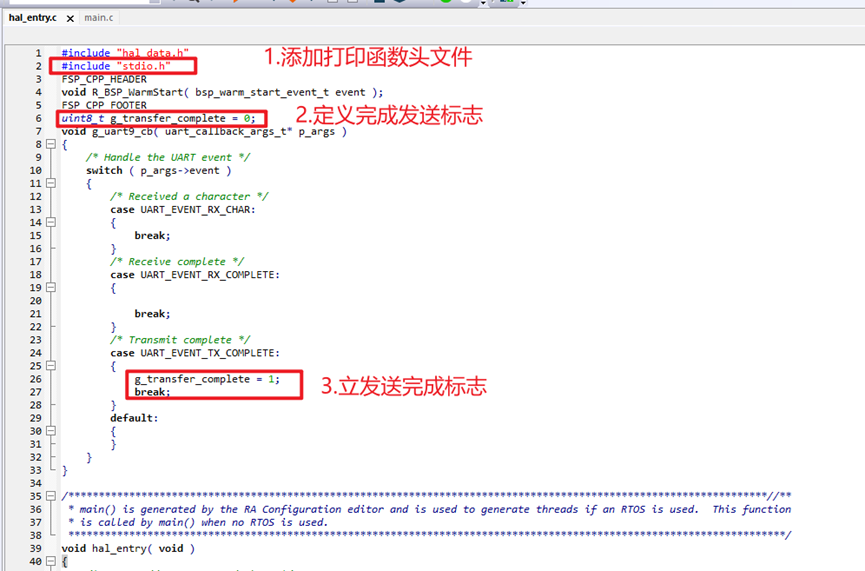
STEP15:具体代码如下
#include "hal_data.h"
#include "stdio.h"
FSP_CPP_HEADER
void R_BSP_WarmStart( bsp_warm_start_event_t event );
FSP_CPP_FOOTER
uint8_t g_transfer_complete = 0;
void g_uart9_cb( uart_callback_args_t* p_args )
{
    /* Handle the UART event */
    switch ( p_args->event )
    {
        /* Received a character */
        case UART_EVENT_RX_CHAR:
        {
            break;
        }
        /* Receive complete */
        case UART_EVENT_RX_COMPLETE:
        {

            break;
        }
        /* Transmit complete */
        case UART_EVENT_TX_COMPLETE:
        {
            g_transfer_complete = 1;
            break;
        }
        default:
        {
        }
    }
}STEP16:添加打印接口重定向代码,具体如下
/*******************
 *
 * Copyright 1998-2017 IAR Systems AB.
 *
 * This is a template implementation of the "__write" function used by
 * the standard library.  Replace it with a system-specific
 * implementation.
 *
 * The "__write" function should output "size" number of bytes from
 * "buffer" in some application-specific way.  It should return the
 * number of characters written, or _LLIO_ERROR on failure.
 *
 * If "buffer" is zero then __write should perform flushing of
 * internal buffers, if any.  In this case "handle" can be -1 to
 * indicate that all handles should be flushed.
 *
 * The template implementation below assumes that the application
 * provides the function "MyLowLevelPutchar".  It should return the
 * character written, or -1 on failure.
 *
 ********************/

#include

#pragma module_name = "?__write"

int MyLowLevelPutchar(int x)
{
  R_SCI_UART_Write(&g_uart9_ctrl, (uint8_t *)&x, 1);
  while(g_transfer_complete == 0);
  g_transfer_complete = 0;
  return x;

}

/*
 * If the __write implementation uses internal buffering, uncomment
 * the following line to ensure that we are called with "buffer" as 0
 * (i.e. flush) when the application terminates.
 */

size_t __write(int handle, const unsigned char * buffer, size_t size)
{
  /* Remove the #if #endif pair to enable the implementation */
#if 1

  size_t nChars = 0;

  if (buffer == 0)
  {
    /*
     * This means that we should flush internal buffers.  Since we
     * don't we just return.  (Remember, "handle" == -1 means that all
     * handles should be flushed.)
     */
    return 0;
  }

  /* This template only writes to "standard out" and "standard err",
   * for all other file handles it returns failure. */
  if (handle != _LLIO_STDOUT && handle != _LLIO_STDERR)
  {
    return _LLIO_ERROR;
  }

  for (/* Empty */; size != 0; --size)
  {
    if (MyLowLevelPutchar(*buffer++) < 0)
    {
      return _LLIO_ERROR;
    }

    ++nChars;
  }

  return nChars;

#else

  /* Always return error code when implementation is disabled. */
  return _LLIO_ERROR;

#endif

}
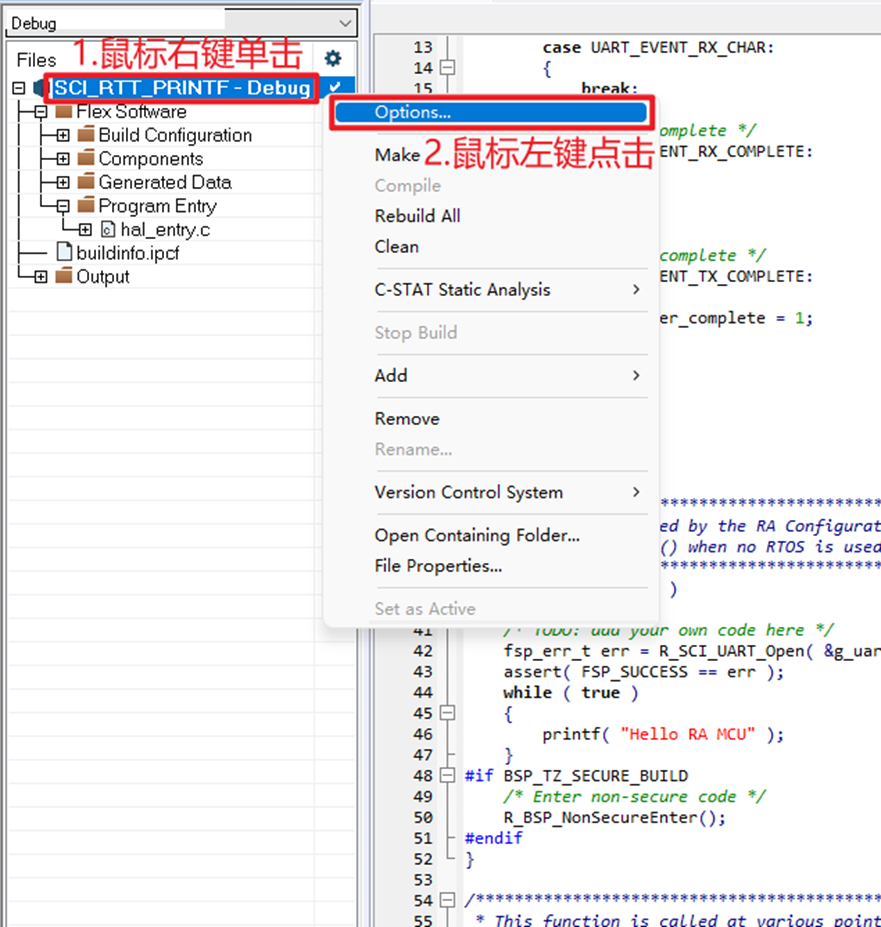
4.工程配置
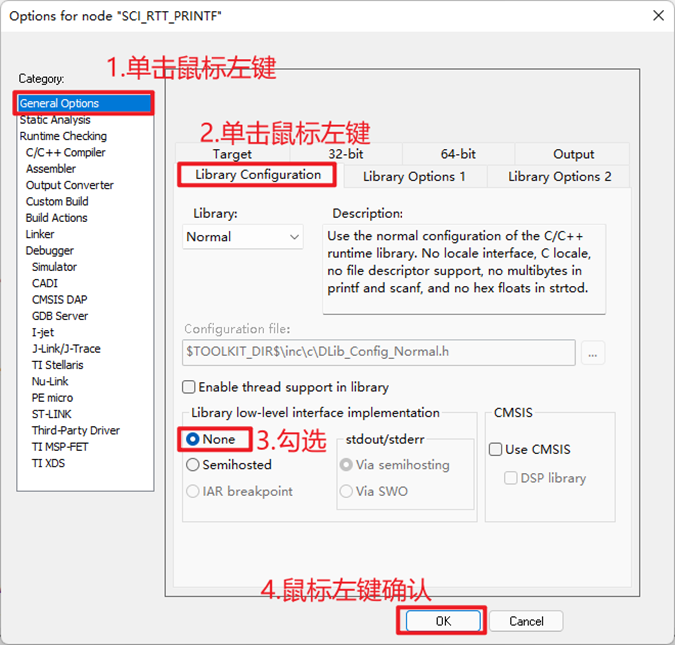
STEP17:工程配置
STEP18:弹出如下窗口
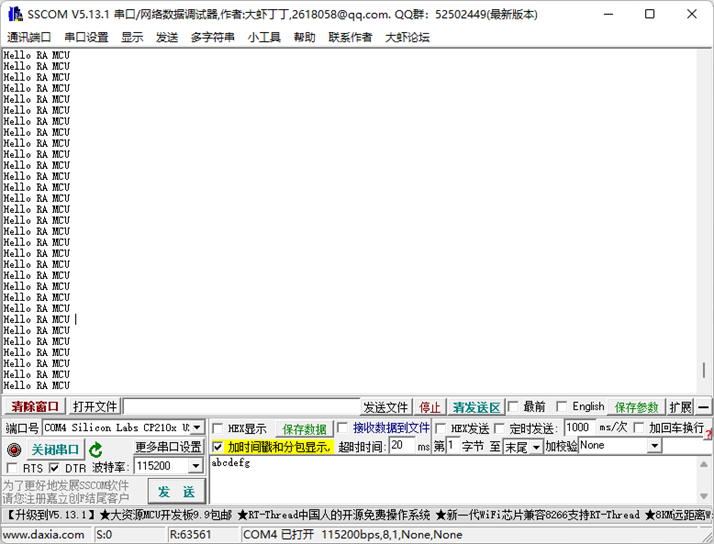
5.结果
STEP19:接上串口工具,打印如下
声明:本文内容及配图由入驻作者撰写或者入驻合作网站授权转载。文章观点仅代表作者本人,不代表电子发烧友网立场。文章及其配图仅供工程师学习之用,如有内容侵权或者其他违规问题,请联系本站处理。
举报投诉
-
mcu
+关注
关注
146文章
17135浏览量
351025
发布评论请先 登录
相关推荐
【RA-Eco-RA4E2-64PIN-V1.0开发板试用】串口打印功能
刚刚点灯完毕,现在来实现RA4E2的串口打印功能,先打开原理图,我们看到
串口使用的是P109和P110两个IO口,然后我们来进行配置
先打开
RA
发表于 12-13 13:08
【RA-Eco-RA2E1-48PIN-V1.0开发板试用】(第二篇)串口打印+SPI_OLED显示
串口打印
想要使用微库就必须将主堆栈设置大于0x1000(4K),就是这个东西,之前没有注意一直编译报错[难过]
通过手册可以得知R7FA2E1A72DFL并没有独立的UART,而是使用的SCI
发表于 11-09 01:30
【GD32 MCU 入门教程】一、GD32 MCU 开发环境搭建(2)使用 IAR 开发 GD32
GD32系列为通用型MCU,所以开发环境也可以使用通用型的IDE,目前使用较多的是KEIL、IAR、 GCC和Embedded Builder,客户可以根据个人喜好来选择相应的开发环境。
RA系列MCU Self-Test软件包介绍
下面介绍一下瑞萨自检软件套件。该软件包包括RA系列MCU诊断软件、安全手册、用户指南和功能安全证书。RA系列MCU诊断软件已通过安全标准认证,因此可以直接集成到您的系统中。无需进行认证

芯海通用 MCU应用笔记 :在 IAR 及 MDK 开发环境下使用 printf 函数重定向移植差异指南
和调试中,printf 函数是常用的打印函数,通常通过 fputc 接口的重定向,即可以通过 printf 输出串口的信息。
但在 IAR8.x 下,需要一些 IDE 的额外配置,MCU
发表于 05-16 11:56
芯海通用 MCU 应用笔记: C32F03x 系列快速应用指南
本应用笔记旨在指导用户搭建 CS32F03x/F03x-RA 系列 MCU 开发环境并进行开发和调试,包括:软件开发与移植、软硬件注意事项、开发板说明、如何 Keil/IAR/GCC
发表于 05-16 11:29
瑞萨电子RA产品家族新增RA0E1 MCU产品组
瑞萨电子RA产品家族新增RA0E1 MCU产品组。RA0E1系列是一款低功耗、低成本微控制器,结合了32MHz Arm® Cortex®-M23内核和优化的外设功能。

瑞萨电子RA家族推出RA8系列高算力通用MCU
瑞萨电子RA家族推出RA8系列高算力通用MCU,是业界首款基于Arm® Cortex®-M85(CM85)内核的32位MCU,主频高达480Mhz,超过3000 CoreMark跑分。

RA MCU中的CRC模块和使用方法
瑞萨RA单片机硬件CRC计算单元采用固定的多项式发生器来计算8位或者32位数据的CRC校验值,对数据传输或数据存储的一致性、完整性进行验证。这篇文章重点介绍RA MCU中的CRC模块和使用方法。
发表于 02-26 11:45
•952次阅读
【AWTK开源智能串口屏方案】MCU SDK使用与编译运行
代码智能串口屏方案,本系列文章介绍如何从零开发HMI程序,包括搭建开发环境、创建HMI运行时工程、修改应用界面以及开发MCU程序。MCU端简介相对于HMI端(

RA MCU CAN和CANFD IP介绍
瑞萨RA MCU(Renesas RA Microcontroller Unit)是一种高性能且多功能的微控制器单元,由瑞萨电子公司推出。它是基于ARM Cortex-M内核的先进微控制器系列,专为满足广泛的嵌入式应用需求而设计


 投稿 | 基于IAR搭建RA MCU 串口打印


评论