硬件环境:
基于STM32H743IIT6自研单板
(1)外部时钟:25MHz
(2)调试串口: PC12 ———> UART5_TX
PD2 ———> UART5_RX
(3)以太网:
PC1 ———> ETH_MDC
PA1 ———> ETH_REF_CLK
PA2 ———> ETH_MDIO
PA7 ———> ETH_CRS_DV
PC4 ———> ETH_RXD0
PC5 ———> ETH_RXD1
PB11 ———> ETH_TX_EN
PB12 ———> ETH_TXD0
PB13 ———> ETH_TXD1
PE15 ------> RESET_PHY
软件开发环境
RT-Thread Studio
版本: 2.2.6
构建ID: 202211231640
OS: Windows 10, v.10.0, x86_64 / win32
创建RT-Thread项目
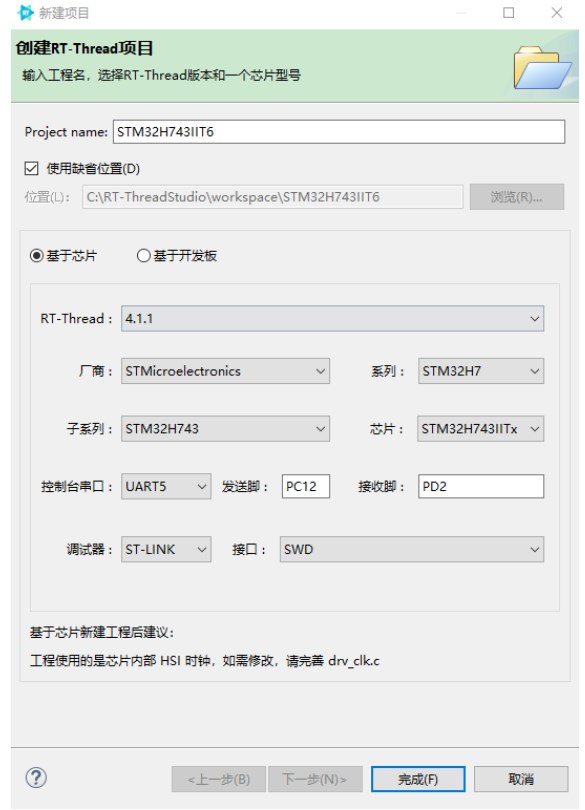
串口功能

修改时钟参数
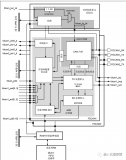
时钟树配置如下:

修改drv_clk.c文件中的system_clock_config()函数
void system_clock_config(int target_freq_mhz)
{
RCC_OscInitTypeDef RCC_OscInitStruct = {0};
RCC_ClkInitTypeDef RCC_ClkInitStruct = {0};
/** Supply configuration update enable
/
HAL_PWREx_ConfigSupply(PWR_LDO_SUPPLY);
/ * Configure the main internal regulator output voltage
/
__HAL_PWR_VOLTAGESCALING_CONFIG(PWR_REGULATOR_VOLTAGE_SCALE1);
while(!__HAL_PWR_GET_FLAG(PWR_FLAG_VOSRDY)) {}
/ * Initializes the RCC Oscillators according to the specified parameters
- in the RCC_OscInitTypeDef structure.
/
RCC_OscInitStruct.OscillatorType = RCC_OSCILLATORTYPE_HSE;
RCC_OscInitStruct.HSEState = RCC_HSE_ON;
RCC_OscInitStruct.PLL.PLLState = RCC_PLL_ON;
RCC_OscInitStruct.PLL.PLLSource = RCC_PLLSOURCE_HSE;
RCC_OscInitStruct.PLL.PLLM = 2;
RCC_OscInitStruct.PLL.PLLN = 64;
RCC_OscInitStruct.PLL.PLLP = 2;
RCC_OscInitStruct.PLL.PLLQ = 2;
RCC_OscInitStruct.PLL.PLLR = 2;
RCC_OscInitStruct.PLL.PLLRGE = RCC_PLL1VCIRANGE_3;
RCC_OscInitStruct.PLL.PLLVCOSEL = RCC_PLL1VCOWIDE;
RCC_OscInitStruct.PLL.PLLFRACN = 0;
if (HAL_RCC_OscConfig(&RCC_OscInitStruct) != HAL_OK)
{
Error_Handler();
}
/ * Initializes the CPU, AHB and APB buses clocks
*/
RCC_ClkInitStruct.ClockType = RCC_CLOCKTYPE_HCLK|RCC_CLOCKTYPE_SYSCLK
|RCC_CLOCKTYPE_PCLK1|RCC_CLOCKTYPE_PCLK2
|RCC_CLOCKTYPE_D3PCLK1|RCC_CLOCKTYPE_D1PCLK1;
RCC_ClkInitStruct.SYSCLKSource = RCC_SYSCLKSOURCE_PLLCLK;
RCC_ClkInitStruct.SYSCLKDivider = RCC_SYSCLK_DIV1;
RCC_ClkInitStruct.AHBCLKDivider = RCC_HCLK_DIV2;
RCC_ClkInitStruct.APB3CLKDivider = RCC_APB3_DIV2;
RCC_ClkInitStruct.APB1CLKDivider = RCC_APB1_DIV2;
RCC_ClkInitStruct.APB2CLKDivider = RCC_APB2_DIV2;
RCC_ClkInitStruct.APB4CLKDivider = RCC_APB4_DIV2;
if (HAL_RCC_ClockConfig(&RCC_ClkInitStruct, FLASH_LATENCY_2) != HAL_OK)
{
Error_Handler();
}
}
修改board.h文件时钟参数
/ -------------------------- CLOCK CONFIG BEGIN -------------------------- /
#define BSP_CLOCK_SOURCE ("HSE")
#define BSP_CLOCK_SOURCE_FREQ_MHZ ((int32_t)0)
#define BSP_CLOCK_SYSTEM_FREQ_MHZ ((int32_t)400)
/ -------------------------- CLOCK CONFIG END -------------------------- /
修改内存参数

修改board.h文件RAM参数
/ -------------------------- ROM/RAM CONFIG BEGIN -------------------------- /
#define ROM_START ((uint32_t)0x08000000)
#define ROM_SIZE (1024 * 1024)
#define ROM_END ((uint32_t)(ROM_START + ROM_SIZE))
//#define RAM_START (0x20000000)
//#define RAM_SIZE (128 * 1024)
//#define RAM_END (RAM_START + RAM_SIZE)
#define RAM_START (0x24000000)
#define RAM_SIZE (512 * 1024)
#define RAM_END (RAM_START + RAM_SIZE)
/ -------------------------- ROM/RAM CONFIG END -------------------------- /
使能网络配置
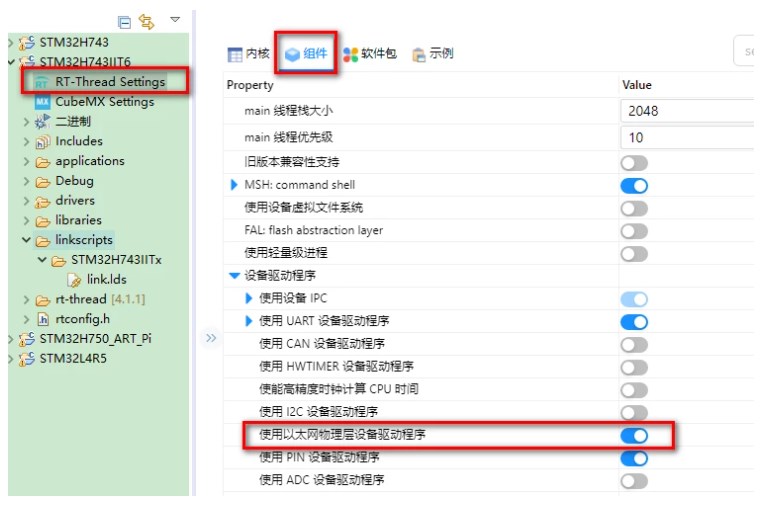
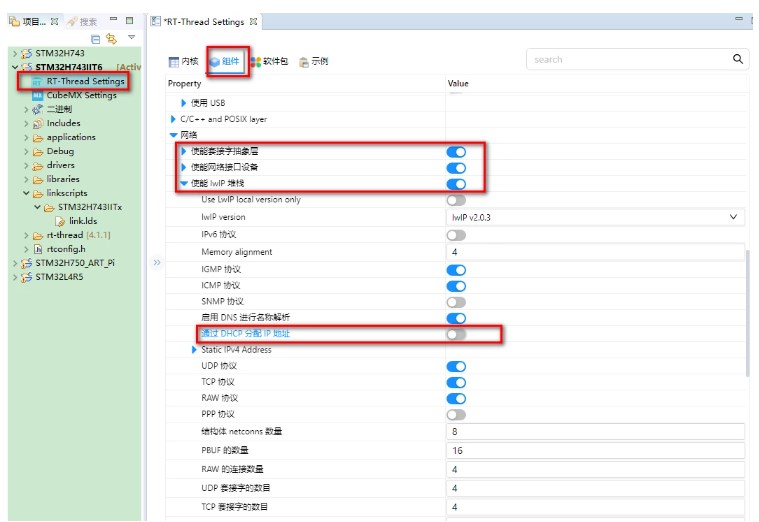
PS:采用静态IP地址,默认IP地址(192.168.1.30)见rtconfig.h文件

网络参数配置
参考board.h中的ETH CONFIG部分,按步骤配置
/ -------------------------- ETH CONFIG BEGIN -------------------------- /
/** if you want to use eth you can use the following instructions.
*
- STEP 1, define macro related to the eth
such as BSP_USING_ETH- STEP 2, copy your eth init function from stm32xxxx_hal_msp.c generated by stm32cubemx to the end if board.c file
such as void HAL_ETH_MspInit(ETH_HandleTypeDef* heth)- STEP 3, modify your stm32xxxx_hal_config.h file to support eth peripherals. define macro related to the peripherals
such as #define HAL_ETH_MODULE_ENABLED- STEP 4, config your phy type
such as #define PHY_USING_LAN8720A#define PHY_USING_DM9161CEP#define PHY_USING_DP83848C- STEP 5, implement your phy reset function in the end of board.c file
void phy_reset(void)- STEP 6, config your lwip or other network stack
/
#define BSP_USING_ETH
#ifdef BSP_USING_ETH
#define PHY_USING_LAN8720A
/ #define PHY_USING_DM9161CEP*/
/ #define PHY_USING_DP83848C /
#endif
/ -------------------------- ETH CONFIG END -------------------------- /

在board.c中添加HAL_ETH_MspInit函数
void HAL_ETH_MspInit(ETH_HandleTypeDef* ethHandle)
{
GPIO_InitTypeDef GPIO_InitStruct = {0};
if(ethHandle->Instance==ETH)
{
/* USER CODE BEGIN ETH_MspInit 0 /
/ USER CODE END ETH_MspInit 0 /
/ Enable Peripheral clock */
__HAL_RCC_ETH1MAC_CLK_ENABLE();
__HAL_RCC_ETH1TX_CLK_ENABLE();
__HAL_RCC_ETH1RX_CLK_ENABLE();
__HAL_RCC_GPIOC_CLK_ENABLE();
__HAL_RCC_GPIOA_CLK_ENABLE();
__HAL_RCC_GPIOB_CLK_ENABLE();
/**ETH GPIO Configuration
PC1 ------> ETH_MDC
PA1 ------> ETH_REF_CLK
PA2 ------> ETH_MDIO
PA7 ------> ETH_CRS_DV
PC4 ------> ETH_RXD0
PC5 ------> ETH_RXD1
PB11 ------> ETH_TX_EN
PB12 ------> ETH_TXD0
PB13 ------> ETH_TXD1
/
GPIO_InitStruct.Pin = GPIO_PIN_1|GPIO_PIN_4|GPIO_PIN_5;
GPIO_InitStruct.Mode = GPIO_MODE_AF_PP;
GPIO_InitStruct.Pull = GPIO_NOPULL;
GPIO_InitStruct.Speed = GPIO_SPEED_FREQ_VERY_HIGH;
GPIO_InitStruct.Alternate = GPIO_AF11_ETH;
HAL_GPIO_Init(GPIOC, &GPIO_InitStruct);
GPIO_InitStruct.Pin = GPIO_PIN_1|GPIO_PIN_2|GPIO_PIN_7;
GPIO_InitStruct.Mode = GPIO_MODE_AF_PP;
GPIO_InitStruct.Pull = GPIO_NOPULL;
GPIO_InitStruct.Speed = GPIO_SPEED_FREQ_VERY_HIGH;
GPIO_InitStruct.Alternate = GPIO_AF11_ETH;
HAL_GPIO_Init(GPIOA, &GPIO_InitStruct);
GPIO_InitStruct.Pin = GPIO_PIN_11|GPIO_PIN_12|GPIO_PIN_13;
GPIO_InitStruct.Mode = GPIO_MODE_AF_PP;
GPIO_InitStruct.Pull = GPIO_NOPULL;
GPIO_InitStruct.Speed = GPIO_SPEED_FREQ_VERY_HIGH;
GPIO_InitStruct.Alternate = GPIO_AF11_ETH;
HAL_GPIO_Init(GPIOB, &GPIO_InitStruct);
/ Peripheral interrupt init /
HAL_NVIC_SetPriority(ETH_IRQn, 0, 0);
HAL_NVIC_EnableIRQ(ETH_IRQn);
/ USER CODE BEGIN ETH_MspInit 1 /
/ USER CODE END ETH_MspInit 1 */
}
}
替换drv_eth.c、drv_eth.h文件
注释phy.h文件中的PHY_FULL_DUPLEX宏定义
//#define PHY_FULL_DUPLEX 1U / PHY full duplex. /
在board.h文件中添加复位管教配置
#define BSP_USING_ETH
#ifdef BSP_USING_ETH
#define PHY_USING_LAN8720A
#define ETH_RESET_PIN "PE.15"
成果展示
至此,网络已经可以ping通了,参考网友的资料,

网络内存配置
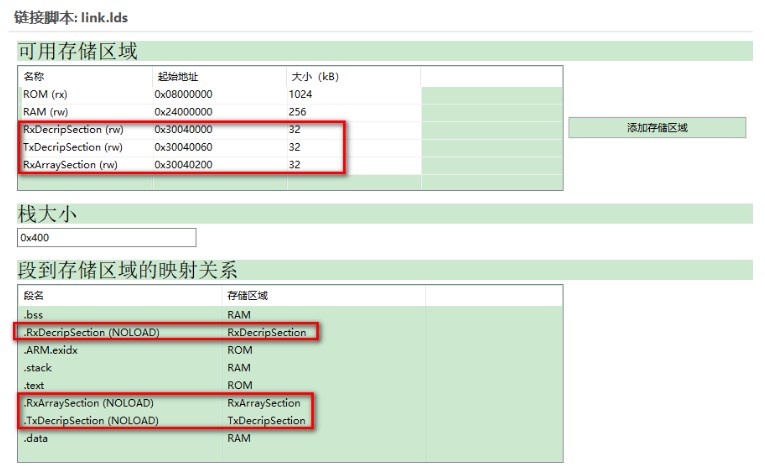
修改link.lds文件
/*
- linker script for STM32H743IITx with GNU ld
/
/ Program Entry, set to mark it as "used" and avoid gc /
MEMORY
{
ROM (rx) : ORIGIN =0x08000000,LENGTH =1024k
RAM (rw) : ORIGIN =0x24000000,LENGTH =512k
RxDecripSection (rw) : ORIGIN =0x30040000,LENGTH =32k
TxDecripSection (rw) : ORIGIN =0x30040060,LENGTH =32k
RxArraySection (rw) : ORIGIN =0x30040200,LENGTH =32k
}
ENTRY(Reset_Handler)
_system_stack_size = 0x400;
SECTIONS
{
.text :
{
. = ALIGN(4);
_stext = .;
KEEP( (.isr_vector)) /* Startup code /
. = ALIGN(4);
(.text) / remaining code /
(.text. ) / remaining code /
(.rodata) / read-only data (constants) /
(.rodata )
(.glue_7)
(.glue_7t)
(.gnu.linkonce.t )
/ section information for finsh shell /
. = ALIGN(4);
__fsymtab_start = .;
KEEP( (FSymTab))
__fsymtab_end = .;
. = ALIGN(4);
__vsymtab_start = .;
KEEP( (VSymTab))
__vsymtab_end = .;
/ section information for utest /
. = ALIGN(4);
__rt_utest_tc_tab_start = .;
KEEP( (UtestTcTab))
__rt_utest_tc_tab_end = .;
/ section information for at server /
. = ALIGN(4);
__rtatcmdtab_start = .;
KEEP( (RtAtCmdTab))
__rtatcmdtab_end = .;
. = ALIGN(4);
/ section information for initial. /
. = ALIGN(4);
__rt_init_start = .;
KEEP( (SORT(.rti_fn*)))
__rt_init_end = .;
. = ALIGN(4);
PROVIDE(ctors_start = .);
KEEP ( (SORT(.init_array. )))
KEEP ((.init_array))
PROVIDE(ctors_end = .);
. = ALIGN(4);
_etext = .;
} > ROM = 0
/ .ARM.exidx is sorted, so has to go in its own output section. /
__exidx_start = .;
.ARM.exidx :
{
(.ARM.exidx .gnu.linkonce.armexidx. )
/* This is used by the startup in order to initialize the .data secion /
_sidata = .;
} > ROM
__exidx_end = .;
/ .data section which is used for initialized data /
.data : AT (_sidata)
{
. = ALIGN(4);
/ This is used by the startup in order to initialize the .data secion /
_sdata = . ;
(.data)
(.data. )
(.gnu.linkonce.d )
PROVIDE(dtors_start = .);
KEEP( (SORT(.dtors. )))
KEEP((.dtors))
PROVIDE(dtors_end = .);
. = ALIGN(4);
/ This is used by the startup in order to initialize the .data secion /
_edata = . ;
} >RAM
.stack :
{
. = ALIGN(4);
_sstack = .;
. = . + _system_stack_size;
. = ALIGN(4);
_estack = .;
} >RAM
__bss_start = .;
.bss :
{
. = ALIGN(4);
/ This is used by the startup in order to initialize the .bss secion */
_sbss = .;
*(.bss)
(.bss. )
(COMMON)
. = ALIGN(4);
/ This is used by the startup in order to initialize the .bss secion */
_ebss = . ;
*(.bss.init)
} > RAM
__bss_end = .;
.RxDecripSection (NOLOAD) : ALIGN(4)
{
. = ALIGN(4);
*(.RxDecripSection)
(.RxDecripSection. )
. = ALIGN(4);
RxDecripSection_free = .;
} > RxDecripSection
.TxDecripSection (NOLOAD) : ALIGN(4)
{
. = ALIGN(4);
*(.TxDecripSection)
(.TxDecripSection. )
. = ALIGN(4);
TxDecripSection_free = .;
} > TxDecripSection
.RxArraySection (NOLOAD) : ALIGN(4)
{
. = ALIGN(4);
(.RxArraySection)
(.RxArraySection. )
. = ALIGN(4);
RxArraySection_free = .;
} > RxArraySection
_end = .;
/ Stabs debugging sections. */
.stab 0 : { *(.stab) }
.stabstr 0 : { *(.stabstr) }
.stab.excl 0 : { *(.stab.excl) }
.stab.exclstr 0 : { *(.stab.exclstr) }
.stab.index 0 : { *(.stab.index) }
.stab.indexstr 0 : { *(.stab.indexstr) }
.comment 0 : { (.comment) }
/ DWARF debug sections.- Symbols in the DWARF debugging sections are relative to the beginning
- of the section so we begin them at 0. /
/ DWARF 1 */
.debug 0 : { *(.debug) }
.line 0 : { (.line) }
/ GNU DWARF 1 extensions */
.debug_srcinfo 0 : { *(.debug_srcinfo) }
.debug_sfnames 0 : { (.debug_sfnames) }
/ DWARF 1.1 and DWARF 2 */
.debug_aranges 0 : { *(.debug_aranges) }
.debug_pubnames 0 : { (.debug_pubnames) }
/ DWARF 2 */
.debug_info 0 : { (.debug_info .gnu.linkonce.wi. ) }
.debug_abbrev 0 : { *(.debug_abbrev) }
.debug_line 0 : { *(.debug_line) }
.debug_frame 0 : { *(.debug_frame) }
.debug_str 0 : { *(.debug_str) }
.debug_loc 0 : { *(.debug_loc) }
.debug_macinfo 0 : { (.debug_macinfo) }
/ SGI/MIPS DWARF 2 extensions */
.debug_weaknames 0 : { *(.debug_weaknames) }
.debug_funcnames 0 : { *(.debug_funcnames) }
.debug_typenames 0 : { *(.debug_typenames) }
.debug_varnames 0 : { *(.debug_varnames) }
}
MPU配置
在board.c文件中添加MPU_Config函数,两个方案的区别在于是否使能catch
(1)方案一
void MPU_Config(void)
{
MPU_Region_InitTypeDef MPU_InitStruct;
/* Disable the MPU /
HAL_MPU_Disable();
/ Configure the MPU attributes as WT for AXI SRAM /
MPU_InitStruct.Enable = MPU_REGION_ENABLE;
MPU_InitStruct.BaseAddress = 0x24000000;
MPU_InitStruct.Size = MPU_REGION_SIZE_512KB;
MPU_InitStruct.AccessPermission = MPU_REGION_FULL_ACCESS;
MPU_InitStruct.IsBufferable = MPU_ACCESS_NOT_BUFFERABLE;
MPU_InitStruct.IsCacheable = MPU_ACCESS_CACHEABLE;
MPU_InitStruct.IsShareable = MPU_ACCESS_NOT_SHAREABLE;
MPU_InitStruct.Number = MPU_REGION_NUMBER0;
MPU_InitStruct.TypeExtField = MPU_TEX_LEVEL0;
MPU_InitStruct.SubRegionDisable = 0X00;
MPU_InitStruct.DisableExec = MPU_INSTRUCTION_ACCESS_ENABLE;
HAL_MPU_ConfigRegion(&MPU_InitStruct);
#ifdef BSP_USING_SDRAM
/ Configure the MPU attributes as WT for SDRAM /
MPU_InitStruct.Enable = MPU_REGION_ENABLE;
MPU_InitStruct.BaseAddress = 0xC0000000;
MPU_InitStruct.Size = MPU_REGION_SIZE_32MB;
MPU_InitStruct.AccessPermission = MPU_REGION_FULL_ACCESS;
MPU_InitStruct.IsBufferable = MPU_ACCESS_NOT_BUFFERABLE;
MPU_InitStruct.IsCacheable = MPU_ACCESS_CACHEABLE;
MPU_InitStruct.IsShareable = MPU_ACCESS_NOT_SHAREABLE;
MPU_InitStruct.Number = MPU_REGION_NUMBER1;
MPU_InitStruct.TypeExtField = MPU_TEX_LEVEL0;
MPU_InitStruct.SubRegionDisable = 0x00;
MPU_InitStruct.DisableExec = MPU_INSTRUCTION_ACCESS_ENABLE;
HAL_MPU_ConfigRegion(&MPU_InitStruct);
#endif
#ifdef BSP_USING_ETH
/ Configure the MPU attributes as Device not cacheable
for ETH DMA descriptors and RX Buffers*/
MPU_InitStruct.Enable = MPU_REGION_ENABLE;
MPU_InitStruct.BaseAddress = 0x30040000;
MPU_InitStruct.Size = MPU_REGION_SIZE_32KB;
MPU_InitStruct.AccessPermission = MPU_REGION_FULL_ACCESS;
MPU_InitStruct.IsBufferable = MPU_ACCESS_NOT_BUFFERABLE;
MPU_InitStruct.IsCacheable = MPU_ACCESS_NOT_CACHEABLE;
MPU_InitStruct.IsShareable = MPU_ACCESS_SHAREABLE;
MPU_InitStruct.Number = MPU_REGION_NUMBER2;
MPU_InitStruct.TypeExtField = MPU_TEX_LEVEL1;
MPU_InitStruct.SubRegionDisable = 0x00;
MPU_InitStruct.DisableExec = MPU_INSTRUCTION_ACCESS_ENABLE;
HAL_MPU_ConfigRegion(&MPU_InitStruct);
#endif
/* Configure the MPU attributes as WT for QSPI /
// MPU_InitStruct.Enable = MPU_REGION_ENABLE;
// MPU_InitStruct.BaseAddress = 0x90000000;
// MPU_InitStruct.Size = MPU_REGION_SIZE_8MB;
// MPU_InitStruct.AccessPermission = MPU_REGION_FULL_ACCESS;
// MPU_InitStruct.IsBufferable = MPU_ACCESS_NOT_BUFFERABLE;
// MPU_InitStruct.IsCacheable = MPU_ACCESS_CACHEABLE;
// MPU_InitStruct.IsShareable = MPU_ACCESS_NOT_SHAREABLE;
// MPU_InitStruct.Number = MPU_REGION_NUMBER3;
// MPU_InitStruct.TypeExtField = MPU_TEX_LEVEL0;
// MPU_InitStruct.SubRegionDisable = 0X00;
// MPU_InitStruct.DisableExec = MPU_INSTRUCTION_ACCESS_ENABLE;
//
// HAL_MPU_ConfigRegion(&MPU_InitStruct);
/ Enable the MPU /
HAL_MPU_Enable(MPU_PRIVILEGED_DEFAULT);
/ Enable CACHE */
SCB_EnableICache();
SCB_EnableDCache();
return RT_EOK;
}
(2)方案二
{
MPU_Region_InitTypeDef MPU_InitStruct = {0};
/* Disables the MPU /
HAL_MPU_Disable();
/ * Initializes and configures the Region and the memory to be protected
/
MPU_InitStruct.Enable = MPU_REGION_ENABLE;
MPU_InitStruct.Number = MPU_REGION_NUMBER0;
MPU_InitStruct.BaseAddress = 0x30040000;
MPU_InitStruct.Size = MPU_REGION_SIZE_256B;
MPU_InitStruct.SubRegionDisable = 0x00;
MPU_InitStruct.TypeExtField = MPU_TEX_LEVEL0;
MPU_InitStruct.AccessPermission = MPU_REGION_FULL_ACCESS;
MPU_InitStruct.DisableExec = MPU_INSTRUCTION_ACCESS_ENABLE;
MPU_InitStruct.IsShareable = MPU_ACCESS_NOT_SHAREABLE;
MPU_InitStruct.IsCacheable = MPU_ACCESS_NOT_CACHEABLE;
MPU_InitStruct.IsBufferable = MPU_ACCESS_BUFFERABLE;
HAL_MPU_ConfigRegion(&MPU_InitStruct);
/ * Initializes and configures the Region and the memory to be protected
/
MPU_InitStruct.Number = MPU_REGION_NUMBER1;
MPU_InitStruct.BaseAddress = 0x30044000;
MPU_InitStruct.Size = MPU_REGION_SIZE_16KB;
MPU_InitStruct.IsCacheable = MPU_ACCESS_CACHEABLE;
MPU_InitStruct.IsBufferable = MPU_ACCESS_NOT_BUFFERABLE;
HAL_MPU_ConfigRegion(&MPU_InitStruct);
/ Enables the MPU */
HAL_MPU_Enable(MPU_PRIVILEGED_DEFAULT);
}
调用MPU配置函数
修改drv_common.c文件的hw_board_init函数
void hw_board_init(char clock_src, int32_t clock_src_freq, int32_t clock_target_freq)
{
extern void rt_hw_systick_init(void);
extern void clk_init(char clk_source, int source_freq, int target_freq);
#ifdef SCB_EnableICache
/ Enable I-Cache--------------------------------------------------------- /
SCB_EnableICache();
#endif
#ifdef SCB_EnableDCache
/* Enable D-Cache---------------------------------------------------------/
SCB_EnableDCache();
#endif
extern void MPU_Config(void);
MPU_Config();
/ HAL_Init() function is called at the beginning of the program /
HAL_Init();
/ enable interrupt /
__set_PRIMASK(0);
/ System clock initialization /
clk_init(clock_src, clock_src_freq, clock_target_freq);
/ disbale interrupt /
__set_PRIMASK(1);
rt_hw_systick_init();
/ Pin driver initialization is open by default /
#ifdef RT_USING_PIN
extern int rt_hw_pin_init(void);
rt_hw_pin_init();
#endif
/ USART driver initialization is open by default */
#ifdef RT_USING_SERIAL
extern int rt_hw_usart_init(void);
rt_hw_usart_init();
#endif
}
-
以太网
+关注
关注
40文章
5415浏览量
171558 -
RCC
+关注
关注
0文章
93浏览量
26928 -
UART接口
+关注
关注
0文章
124浏览量
15286 -
RT-Thread
+关注
关注
31文章
1285浏览量
40065 -
STM32H743
+关注
关注
0文章
24浏览量
1706
发布评论请先 登录
相关推荐
使用STM32H743做以太网,如何检测以太网是否掉线?
STM32H743以太网与高速USB同时工作遇到的疑问求解
STM32H7是否支持usb gadget以太网?
STM32H7以太网不工作怎么解决?
用STM32cube实现STM32H743的USB驱动


 STM32H743以太网驱动调试过程简析


评论