 8月AI实战:工业视觉缺陷检测 --基于tflite的yolov8模型优化和推理
--基于tflite的yolov8模型优化和推理
操作视频见B站连接:aidlux模型优化+工业缺陷检测~~完美用我的华为手机实现缺陷检测的推理bilibiliaidlux模型优化+工业缺陷检测~~完美用我的华为手机实现缺陷检测的推理
1 模型优化
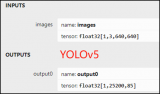
将onnx模型转化为tflite模型
打开网站:http://aimo.aidlux.com/
输入试用账号和密码:账号:AIMOTC001 ,密码:AIMOTC001
通过页面中的提示AI Model Optimizer,依次执行步骤①上传模型②选择目标平台③参数设置④转换结果。
通过上述①-④可将onnx模型转为tflite模型
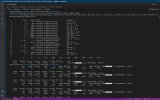
模型转换过程包含如下日志信息
2023-09-07 19:47:05,969 - INFO : Optimization started.
2023-09-07 19:47:05,970 - INFO : [ONNX-SIM] Clean ONNX Model input node.
2023-09-07 19:47:06,733 - INFO : [ONNX2TFLITE] Start converting to TFLITE.
2023-09-07 19:47:28,511 - INFO : Model optimization done.
2 推理的py文件
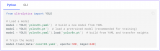
模型采用课程中提供的yolov8_slimneck_SIOU.ONNX,转化完模型路径及名称,如下
# 模型
model_path = "/home/lesson3/yolov8_slimneck_SIOU_tflite/yolov8_slimneck_SIOU_fp32.tflite"
# 测试图片路径
image_path = "/home/lesson3/test"
模型推理过程包含如下步骤:
初始化aidlite类并创建aidlite对象
aidlite = aidlite_gpu.aidlite()
print("ok")
加载模型
value = aidlite.ANNModel(model_path, [640 * 640 * 3 * 4], [8400 * 11 * 4], 4, 0)
print("gpu:", value)
包含遍历每一张图片
for root, dirs, files in os.walk(image_path):
num = 0
for file in files:
file = os.path.join(root, file)
frame = cv2.imread(file)
x_scale = frame.shape[1] / 640
y_scale = frame.shape[0] / 640
将图片转换为模型输入的640*640尺寸
img = cv2.resize(frame, (640, 640))
# img_copy=img.co
img = img / 255.0
img = np.expand_dims(img, axis=0)
img = img.astype(dtype=np.float32)
print(img.shape)
传入模型输入数据
aidlite.setInput_Float32(img)
执行推理
start = time.time()
aidlite.invoke()
end = time.time()
timerValue = 1000 * (end - start)
print("infer time(ms):{0}", timerValue)
获取输出
pred = aidlite.getOutput_Float32(0)
# print(pred.shape)
pred = np.array(pred)
print(pred.shape)
pred = np.reshape(pred, (8400, 11))
print(pred.shape) # shape=(8400,11)
后处理,解析输出
boxes, scores, classes = postProcess(pred, confThresh, NmsThresh)
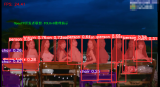
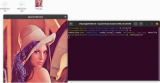
绘制保存图像
ret_img = draw(frame, x_scale, y_scale, boxes, scores, classes)
ret_img = ret_img[:, :, ::-1]
num += 1
image_file_name = "/home/result/res" + str(num) + ".jpg"
8. 保存图片
cv2.imwrite(image_file_name, ret_img)
审核编辑 黄宇
-
AI
+关注
关注
87文章
31845浏览量
270676 -
工业视觉
+关注
关注
0文章
74浏览量
7169
发布评论请先 登录
相关推荐
使用Yolov5 - i.MX8MP进行NPU错误检测是什么原因?
TensorRT 8.6 C++开发环境配置与YOLOv8实例分割推理演示

在AI爱克斯开发板上用OpenVINO™加速YOLOv8分类模型
在AI爱克斯开发板上用OpenVINO™加速YOLOv8目标检测模型

YOLOv8版本升级支持小目标检测与高分辨率图像输入
AI爱克斯开发板上使用OpenVINO加速YOLOv8目标检测模型

在AI爱克斯开发板上用OpenVINO™加速YOLOv8-seg实例分割模型

教你如何用两行代码搞定YOLOv8各种模型推理
在AI爱克斯开发板上用OpenVINO™加速YOLOv8-seg实例分割模型
三种主流模型部署框架YOLOv8推理演示
OpenCV4.8+YOLOv8对象检测C++推理演示
基于YOLOv8的自定义医学图像分割
基于OpenCV DNN实现YOLOv8的模型部署与推理演示


 工商网监
工商网监
评论