使用C++部署tflite模型到飞腾派
前面几章完成了佩奇检测模型的训练和测试,并转换为了 tflite 格式,并分别在 PC 和飞腾派上使用Python和C++完成了简单tflite模型推理的测试。而本章记录下使用 C++ 进行佩奇检测模型推理的过程,本篇分为两个部分。首先是在 PC 端使用 C++ 加载 tflite 模型进行测试,然后再交叉编译到飞腾派上。
参考资料:
- [Real-Time Pose Detection in C++ using Machine Learning with TensorFlow Lite]
- [Tensorflow 1 vs Tensorflow 2 C-API]
工作流程
代码的开发主要是在 minimal 工程的基础上进行。整个代码的工作流程主要是:
- 加载模型
- 修改输入 tensor 的 shape
- 填充输入数据
- 进行推理
- 提取输出数据
基础概念
Inference:推理就是给模型输入新的数据,让模型完成预测的过程
Tensor:张量,在模型中表示一个多维数据的数据结构,在tflite中用结构体 TfLiteTensor 表示
Shape:对应 Tensor 的维度,是 TfLiteTensor 中的 TfLiteIntArray* dims 成员,这里 TfLiteIntArray 中含有维度,和具体每一维的形状
关键步骤
我在实际开发的过程中,主要的步骤有三个:
- 修改模型输入 tensor 的维度:
这里为什么要修改输入维度呢?因为原始的 tensor 维度是[1,-1,-1,3],测试部分代码如下,图像的 -1, -1 表示对应的图片的宽和高是未知的。3表示图像的通道是3,即RGB。
auto a_input = interpreter- >inputs()[0];
auto a_input_batch_size = interpreter- >tensor(a_input)- >dims_signature- >data[0];
auto a_input_height = interpreter- >tensor(a_input)- >dims_signature- >data[1];
auto a_input_width = interpreter- >tensor(a_input)- >dims_signature- >data[2];
auto a_input_channels = interpreter- >tensor(a_input)- >dims_signature- >data[3];
std::cout < < "The input tensor has the following dimensions: ["
           < < a_input_batch_size < < ","
           < < a_input_height < < ","
           < < a_input_width < < ","
           < < a_input_channels < < "]" < < std::endl;
为了明确输入图像的大小,这里设置的是200*200, 所以使用下述代码强制修改输入 tensor 的shape 为 {1,200,200,3} 。
// 强制修改 tensor 的 shape
std::vector< int > peppa_jpg = {1,200,200,3};
interpreter- >ResizeInputTensor(0, peppa_jpg);
这里限定了输入图片的维度后,就方便后面使用数据进行填充测试了。
2. 明确了输入数据后,还有一个关键的步骤是提取输出,提取哪个输出呢?这里首先使用 python 检测模型的输出参数,这里实际执行如下指令以及对应的打印如下:
▸ saved_model_cli show --dir exported_models/efficientdet_d0/saved_model/ --tag_set serve --signature_def serving_default
2023-12-27 11:17:23.958429: I tensorflow/core/util/port.cc:110] oneDNN custom operations are on. You may see slightly different numerical results due to floating-point round-off errors from different computation orders. To turn them off, set the environment variable `TF_ENABLE_ONEDNN_OPTS=0`.
2023-12-27 11:17:23.959999: I tensorflow/tsl/cuda/cudart_stub.cc:28] Could not find cuda drivers on your machine, GPU will not be used.
2023-12-27 11:17:23.990118: I tensorflow/tsl/cuda/cudart_stub.cc:28] Could not find cuda drivers on your machine, GPU will not be used.
2023-12-27 11:17:23.990510: I tensorflow/core/platform/cpu_feature_guard.cc:182] This TensorFlow binary is optimized to use available CPU instructions in performance-critical operations.
To enable the following instructions: AVX2 AVX_VNNI FMA, in other operations, rebuild TensorFlow with the appropriate compiler flags.
2023-12-27 11:17:24.489577: W tensorflow/compiler/tf2tensorrt/utils/py_utils.cc:38] TF-TRT Warning: Could not find TensorRT
2023-12-27 11:17:25.022727: E tensorflow/compiler/xla/stream_executor/cuda/cuda_driver.cc:268] failed call to cuInit: CUDA_ERROR_UNKNOWN: unknown error
2023-12-27 11:17:25.022762: I tensorflow/compiler/xla/stream_executor/cuda/cuda_diagnostics.cc:168] retrieving CUDA diagnostic information for host: fedora
2023-12-27 11:17:25.022765: I tensorflow/compiler/xla/stream_executor/cuda/cuda_diagnostics.cc:175] hostname: fedora
2023-12-27 11:17:25.022836: I tensorflow/compiler/xla/stream_executor/cuda/cuda_diagnostics.cc:199] libcuda reported version is: 535.146.2
2023-12-27 11:17:25.022845: I tensorflow/compiler/xla/stream_executor/cuda/cuda_diagnostics.cc:203] kernel reported version is: 535.146.2
2023-12-27 11:17:25.022847: I tensorflow/compiler/xla/stream_executor/cuda/cuda_diagnostics.cc:309] kernel version seems to match DSO: 535.146.2
The given SavedModel SignatureDef contains the following input(s):
  inputs['input_tensor'] tensor_info:
      dtype: DT_UINT8
      shape: (1, -1, -1, 3)
      name: serving_default_input_tensor:0
The given SavedModel SignatureDef contains the following output(s):
  outputs['detection_anchor_indices'] tensor_info:
      dtype: DT_FLOAT
      shape: (1, 100)
      name: StatefulPartitionedCall:0
  outputs['detection_boxes'] tensor_info:
      dtype: DT_FLOAT
      shape: (1, 100, 4)
      name: StatefulPartitionedCall:1
  outputs['detection_classes'] tensor_info:
      dtype: Dming lingT_FLOAT
      shape: (1, 100)
      name: StatefulPartitionedCall:2
  outputs['detection_multiclass_scores'] tensor_info:
      dtype: DT_FLOAT
      shape: (1, 100, 1)
      name: StatefulPartitionedCall:3
  outputs['detection_scores'] tensor_info:
      dtype: DT_FLOAT
      shape: (1, 100)
      name: StatefulPartitionedCall:4
  outputs['num_detections'] tensor_info:
      dtype: DT_FLOAT
      shape: (1)
      name: StatefulPartitionedCall:5
  outputs['raw_detection_boxes'] tensor_info:
      dtype: DT_FLOAT
      shape: (1, 49104, 4)
      name: StatefulPartitionedCall:6
  outputs['raw_detection_scores'] tensor_info:
      dtype: DT_FLOAT
      shape: (1, 49104, 1)
      name: StatefulPartitionedCall:7
Method name is: tensorflow/serving/predict
使用命令 saved_model_cli 可以更直观地看到模型的输入和输出,因为佩奇检测模型是单个类别,主要是测试位置的信息,即目标佩奇在视场中的相对位置信息,这里我们重点关注两个 tensor。
outputs['detection_scores'] tensor_info:
      dtype: DT_FLOAT
      shape: (1, 100)
      name: StatefulPartitionedCall:4
  outputs['detection_boxes'] tensor_info:
      dtype: DT_FLOAT
      shape: (1, 100, 4)
      name: StatefulPartitionedCall:1
这里在 tflite 中,我们就要通过名字是 StatefulPartitionedCall:4 的 tensor 来获取得推理结果的数据,从 tensor 的 shape 可以看到,这里含有 100 个推理的结果。对应地,通过名字是 StatefulPartitionedCall:1 的 tensor 来获取得对应概率结果的目标框。也可以更加直观的使用类似下述代码进行提取我们关心的输出 tensor。
// 直接找到输出 tensor 指针
  auto detection_scores_tensor = interpreter- >output_tensor_by_signature("detection_scores", "serving_default");
  auto detection_boxes_tensor = interpreter- >output_tensor_by_signature("detection_boxes", "serving_default");
- 提取图片数据填充到输入
这里因为是测试,我首先通过 Python 将图片的 RGB 数据提取出来,然后存储到一个数组中。然后在 minimal 的工程中,直接调用这个数组的数据填充模型的输入。
提取图片的 RGB 数据并存储文件的 Python 脚本如下:
#!/bin/python

import cv2 as cv
import matplotlib.image as mpimg
import matplotlib.pyplot as plt
import sys
import numpy as np

g_color_bits = 4
g_file_name = "gg"
g_file_extend = "xx"
g_file_full_name = g_file_name+'_'+g_file_extend+".cpp"
g_pic_200200_name = '.' + g_file_name+'_.'+g_file_extend

def scale_img(img_name):
	# 读入原图片
	img = cv.imread(img_name)
	# 打印出图片尺寸
	print(img.shape)
	# 将图片高和宽分别赋值给x,y
	#  x, y = img.shape[0:2]
	# 显示原图
	#  cv.imshow('OriginalPicture', img)
	img_200x200 = cv.resize(img, (200, 200))
	#  cv.imshow('img200200', img_200x200)
	print(g_pic_200200_name)
	cv.imwrite(g_pic_200200_name , img_200x200)

def load(img_name):
	global g_color_bits
	global g_file_name
	global g_file_extend
	global g_file_full_name
	global g_pic_200200_name
	g_file_extend = img_name.split('.')[-1]
	g_file_name = img_name.split('/')[-1]
	print(g_file_name.split('.'))
	g_file_name = g_file_name.split('.')[-2]
	g_file_full_name = g_file_name+'_'+g_file_extend+".cpp"
	g_pic_200200_name = '.' + g_file_name + "_200200_." + g_file_extend
	print(img_name + " load succes will change to " + g_file_full_name)
	print(img_name + " load succes will scale to " + g_pic_200200_name)
	scale_img(img_name)
	img = mpimg.imread(g_pic_200200_name)
	if isinstance(img[0,0,0], np.float32):
		img *= 255
	else:
		print(type(img[0,0,0]))
	#  类型转换
	img=np.uint32(img)
	if img.shape[2] == 4:
		g_color_bits = 32
	else:
		g_color_bits = 32
	print("img shape:",  img.shape, g_color_bits);
	return img

def dump_info(img):
	print(img.shape)
	print(type(img.shape[0]))
	print(type(img.shape[1]))
	print(type(img.shape[2]))
	print(type(img[0,0,0]))
	#  print(type(img[500,500,0]))

def show_img(img):
	plt.imshow(img)
	plt.show()

def write_data2file(img):
	global g_file_name
	global g_file_extend
	global g_color_bits
	global g_file_full_name
	ans = np.zeros((img.shape[0], img.shape[1]), dtype = np.uint32)
	output_str="extern "C" { "+ 'n'
	output_str+="unsigned int raw_data[] = {" + 'n'
	# 列
	for i in range(img.shape[1]):
		# 行
		for j in range(img.shape[0]):
			for n in range(4):
				if g_color_bits == 32:
					ans[j, i] = img[j, i, 0] < < 16
					ans[j, i] |= img[j, i, 1] < < 8
					ans[j, i] |= img[j, i, 2]
	#  print(type(img[500, 100, :]), img[500, 100, :])
	#  print('final value:%x' %(ans[500, 100]))
	for j in range(img.shape[0]):
		for i in range(img.shape[1]):
			output_str += hex(ans[j, i]) + ", "
			if (j * img.shape[1] + i) % 16 == 0:
				output_str = output_str[:-1]
				output_str += 'n'
	output_str = output_str[:-2]
	output_str += "};n"
	output_str += "};n"
	global g_file_full_name
	output_file = open(g_file_full_name, "w")
	output_file.write(output_str)
	output_file.close()

#  scale_img(sys.argv[1])
image4convert = load(sys.argv[1])
dump_info(image4convert)

write_data2file(image4convert)
#  show_img(image4convert)
使用图片进行测试:

执行完该脚本后,会得到一个 .cpp 文件,该文件中包含了 RGB 信息的数组。
如:
接下来就是将数组填充到模型的输入 tensor,这部分关键的代码如下:
int insert_raw_data(uint8_t *dst, unsigned int *data)
  {
     int i, j, k, l;

     for (i = 0; i < 200; i++)
       for (j = 0; j < 200; j++)
       {
          *dst++ = *data > > 16 & 0XFF;
          *dst++ = *data > > 8 & 0XFF;
          *dst++ = *data & 0XFF;
          data++;
       }
     return 0;
  }
....
uint8_t * input_tensor = interpreter- >typed_input_tensor< uint8_t >(0);
insert_raw_data(input_tensor, raw_data);
代码解析
工程现在完整的 minimal.cc 文件是:
/* Copyright 2018 The TensorFlow Authors. All Rights Reserved.

Licensed under the Apache License, Version 2.0 (the "License");
you may not use this file except in compliance with the License.
You may obtain a copy of the License at

    http://www.apache.org/licenses/LICENSE-2.0

Unless required by applicable law or agreed to in writing, software
distributed under the License is distributed on an "AS IS" BASIS,
WITHOUT WARRANTIES OR CONDITIONS OF ANY KIND, either express or implied.
See the License for the specific language governing permissions and
limitations under the License.
==============================================================================*/
#include < cstdio >
#include < iostream >
#include < vector >
#include < sys/time.h >

#include "tensorflow/lite/interpreter.h"
#include "tensorflow/lite/kernels/register.h"
#include "tensorflow/lite/model.h"
#include "tensorflow/lite/optional_debug_tools.h"

// This is an example that is minimal to read a model
// from disk and perform inference. There is no data being loaded
// that is up to you to add as a user.
//
// NOTE: Do not add any dependencies to this that cannot be built with
// the minimal makefile. This example must remain trivial to build with
// the minimal build tool.
//
// Usage: minimal < tflite model >

#define TFLITE_MINIMAL_CHECK(x)
  if (!(x)) {
    fprintf(stderr, "Error at %s:%dn", __FILE__, __LINE__);
    exit(1);
  }

int insert_raw_data(uint8_t *dst, unsigned int *data)
{
   int i, j, k, l;

   for (i = 0; i < 200; i++)
     for (j = 0; j < 200; j++)
     {
        *dst++ = *data > > 16 & 0XFF;
        *dst++ = *data > > 8 & 0XFF;
        *dst++ = *data & 0XFF;
        data++;
     }
   return 0;
}

int dump_tflite_tensor(TfLiteTensor *tensor)
{
  std::cout < < "Name:" < < tensor- >name < < std::endl;
  if (tensor- >dims)
  {
      std::cout < < "Shape: [" ;
      for (int i = 0; i < tensor- >dims- >size; i++)
          std::cout < < tensor- >dims- >data[i] < < ",";
      std::cout < < "]" < < std::endl;
  }
  std::cout < < "Type:" < < tensor- >type < < std::endl;

  return 0;
}

extern unsigned int raw_data[];
int main(int argc, char* argv[]) {
  if (argc != 2) {
    fprintf(stderr, "minimal < tflite model >n");
    return 1;
  }
  const char* filename = argv[1];

  // Load model
  // 加载模型
  std::unique_ptr< tflite::FlatBufferModel > model =
      tflite::FlatBufferModel::BuildFromFile(filename);
  TFLITE_MINIMAL_CHECK(model != nullptr);

  // Build the interpreter with the InterpreterBuilder.
  // Note: all Interpreters should be built with the InterpreterBuilder,
  // which allocates memory for the Interpreter and does various set up
  // tasks so that the Interpreter can read the provided model.
  tflite::ops::builtin::BuiltinOpResolver resolver;
  tflite::InterpreterBuilder builder(*model, resolver);
  // builder.SetNumThreads(12);
  // 初始化解释器
  std::unique_ptr< tflite::Interpreter > interpreter;
  builder(&interpreter);
  TFLITE_MINIMAL_CHECK(interpreter != nullptr);

auto a_input = interpreter- >inputs()[0];
auto a_input_batch_size = interpreter- >tensor(a_input)- >dims_signature- >data[0];
auto a_input_height = interpreter- >tensor(a_input)- >dims_signature- >data[1];
auto a_input_width = interpreter- >tensor(a_input)- >dims_signature- >data[2];
auto a_input_channels = interpreter- >tensor(a_input)- >dims_signature- >data[3];

std::cout < < "The input tensor has the following dimensions: ["
          < < a_input_batch_size < < ","
          < < a_input_height < < ","
          < < a_input_width < < ","
          < < a_input_channels < < "]" < < std::endl;

  // 强制修改 tensor 的 shape
  std::vector< int > peppa_jpg = {1,200,200,3};
  interpreter- >ResizeInputTensor(0, peppa_jpg);
  // Allocate tensor buffers.
  // 申请推理需要的内存
  TFLITE_MINIMAL_CHECK(interpreter- >AllocateTensors() == kTfLiteOk);
  printf("=== Pre-invoke Interpreter State ===n");
  // 打印解释器的状态
  // tflite::PrintInterpreterState(interpreter.get());

  // auto keys = interpreter- >signature_keys();
  // for (auto k: keys)
  // {
    // std::cout < < *k < < std::endl;
  // }
  // std::cout < < "---------------------------" < < std::endl;

  // 直接找到输出 tensor 指针
  auto detection_scores_tensor = interpreter- >output_tensor_by_signature("detection_scores", "serving_default");
  auto detection_boxes_tensor = interpreter- >output_tensor_by_signature("detection_boxes", "serving_default");

  // auto abc = interpreter- >signature_outputs("serving_default");
  // std::cout < < abc.size() < < std::endl;
  // for (auto a:abc)
      // std::cout < < a.first < < "and" < < a.second < < std::endl;

  // Fill input buffers
  // TODO(user): Insert code to fill input tensors.
  // Note: The buffer of the input tensor with index `i` of type T can
  // be accessed with `T* input = interpreter- >typed_input_tensor< T >(i);`
  uint8_t * input_tensor = interpreter- >typed_input_tensor< uint8_t >(0);
  insert_raw_data(input_tensor, raw_data);
  // Run inference
  // 执行推理过程
  struct timeval tv;
  if (0 == gettimeofday(&tv, NULL))
  {
    std::cout < < tv.tv_sec * 1000000 + tv.tv_usec < < std::endl;
  }
  TFLITE_MINIMAL_CHECK(interpreter- >Invoke() == kTfLiteOk);
  if (0 == gettimeofday(&tv, NULL))
  {
    std::cout < < tv.tv_sec * 1000000 + tv.tv_usec < < std::endl;
  }
  printf("n=== Post-invoke Interpreter State ===n");
  // tflite::PrintInterpreterState(interpreter.get());

  int i  = 0;
  for ( ; i < 2; i++)
  {
      std::cout < < detection_scores_tensor- >data.f[i] < < '[';
      std::cout < < detection_boxes_tensor- >data.f[i*4] < < ',';
      std::cout < < detection_boxes_tensor- >data.f[i*4 + 1] < < ',';
      std::cout < < detection_boxes_tensor- >data.f[i*4  +2] < < ',';
      std::cout < < detection_boxes_tensor- >data.f[i*4+3] < < ']' < < std::endl;
  }
  // Read output buffers
  // TODO(user): Insert getting data out code.
  // Note: The buffer of the output tensor with index `i` of type T can
  // be accessed with `T* output = interpreter- >typed_output_tensor< T >(i);`
  // T* output = interpreter- >typed_output_tensor< T >(i);

  return 0;
}
测试结果为:
▸ ./minimal model.tflite
2023-12-27 14:19:30.468885: I tensorflow/core/util/port.cc:113] oneDNN custom operations are on. You may see slightly different numerical results due to floating-point round-off errors from different computation orders. To turn them off, set the environment variable `TF_ENABLE_ONEDNN_OPTS=0`.
INFO: Created TensorFlow Lite delegate for select TF ops.
2023-12-27 14:19:30.491445: I tensorflow/core/platform/cpu_feature_guard.cc:210] This TensorFlow binary is optimized to use available CPU instructions in performance-critical operations.
To enable the following instructions: SSE3 SSE4.1 SSE4.2 AVX AVX2 AVX_VNNI FMA, in other operations, rebuild TensorFlow with the appropriate compiler flags.
INFO: TfLiteFlexDelegate delegate: 4 nodes delegated out of 21284 nodes with 2 partitions.

The input tensor has the following dimensions: [1,-1,-1,3]
INFO: Created TensorFlow Lite XNNPACK delegate for CPU.
WARNING: Attempting to use a delegate that only supports static-sized tensors with a graph that has dynamic-sized tensors (tensor#394 is a dynamic-sized tensor).
=== Pre-invoke Interpreter State ===
1703657970521273
1703657971811800

=== Post-invoke Interpreter State ===
0.831981[0.23847,0.269423,0.909584,0.87969]
0.679475[0.114574,0.145309,0.785652,0.755186]
从代码中可以看到,通过在 TFLITE_MINIMAL_CHECK(interpreter->Invoke() == kTfLiteOk); 前后分别添加如下代码打印时间戳:
if (0 == gettimeofday(&tv, NULL))                                                                                                |    main(int argc,char * argv[])
    {                                                                                                                                |~
      std::cout < < tv.tv_sec * 1000000 + tv.tv_usec < < std::endl;                                                                    |~
    }
发现默认的推理耗时:
单位us
1703657970521273
1703657971811800
可以看到推理耗时首次在PC端大概1.3s(这个原因暂时未知,如果有知道的小伙伴希望可以告知一下),之后的推理时间大概在400ms附近,我绘制了接近50次的推理耗时,结果如下图所示:
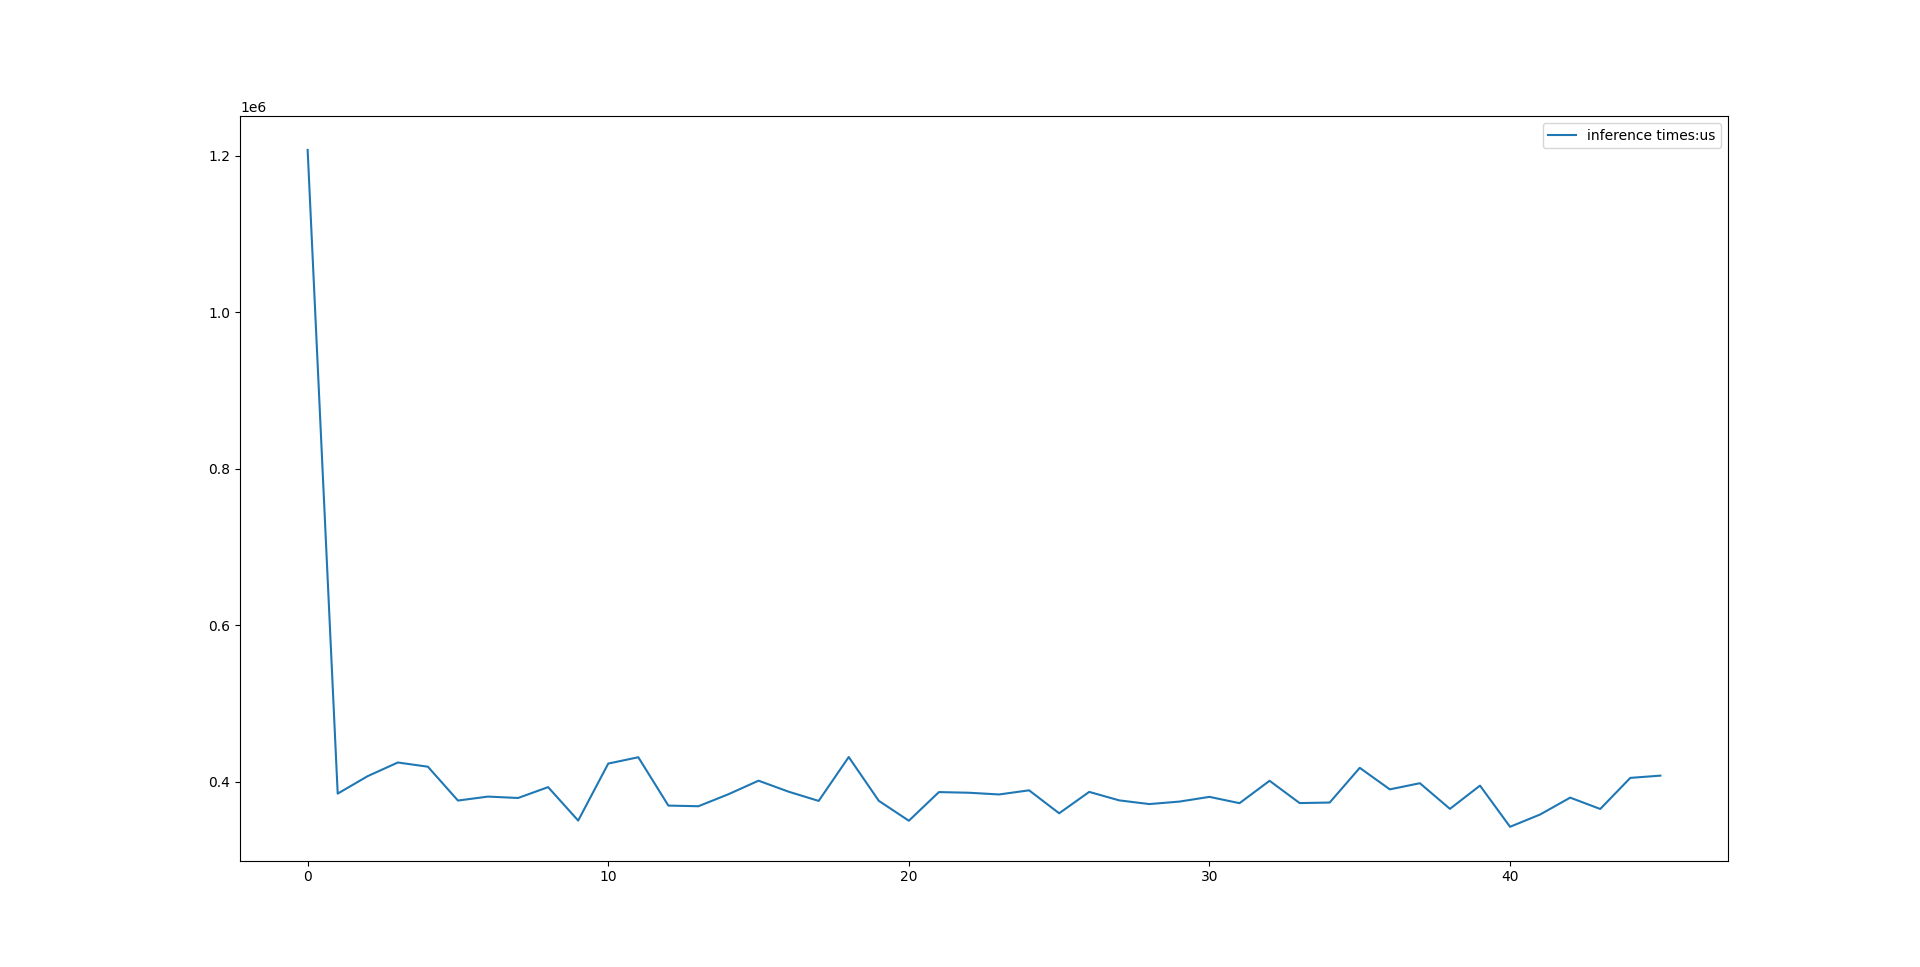
这个和用 Python 的 2s 左右比较,速度提高了接近5倍。
因为,我在 C++ 代码这里只是打印出了前2个概率较高的推理结果,这里截取 Python 端的前 2 个推理的结果对比如下:
'detection_scores': < tf.Tensor: shape=(1, 100), dtype=float32, numpy=
array([[0.8284813 , 0.67629, ....
{'detection_boxes': < tf.Tensor: shape=(1, 100, 4), dtype=float32, numpy=
array([[[0.23848376, 0.26942557, 0.9095545 , 0.8796709 ],
[0.1146237 , 0.14536926, 0.7857162 , 0.7552357 ],
...
附上使用 Python 标注后的图片信息: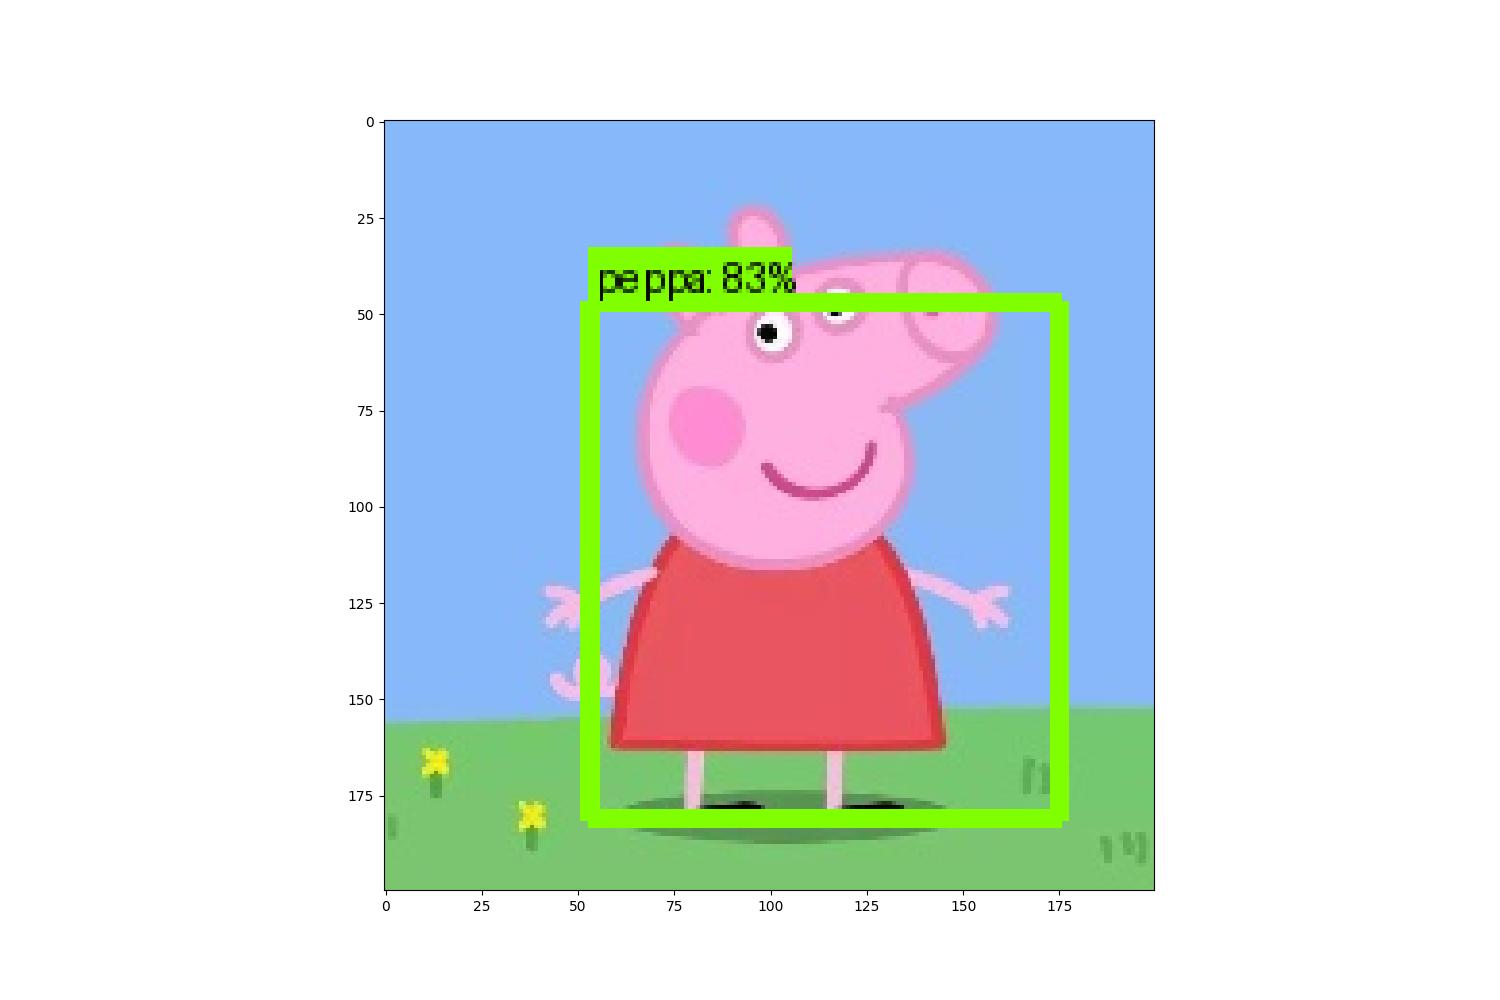
从数据中可以看到结果是完全匹配的,至此就完成了使用 C++ 在 PC 端对 tensorflow Lite 的调用。
到现在为止,完成了 C++ 在 PC 的推理测试,因为我的项目是要跟踪目标的,核心是对采集的图像进行识别,根据识别的目标位置变化驱动转台反向运动,将目标锁定在视场中心,本次试用我重点将工作放在目标识别,检测以及动作预测上,这里我选择了佩奇作为识别的目标,绘制了四张图片,佩奇分别在上,下,左,右位置。我将它们放在一张图上。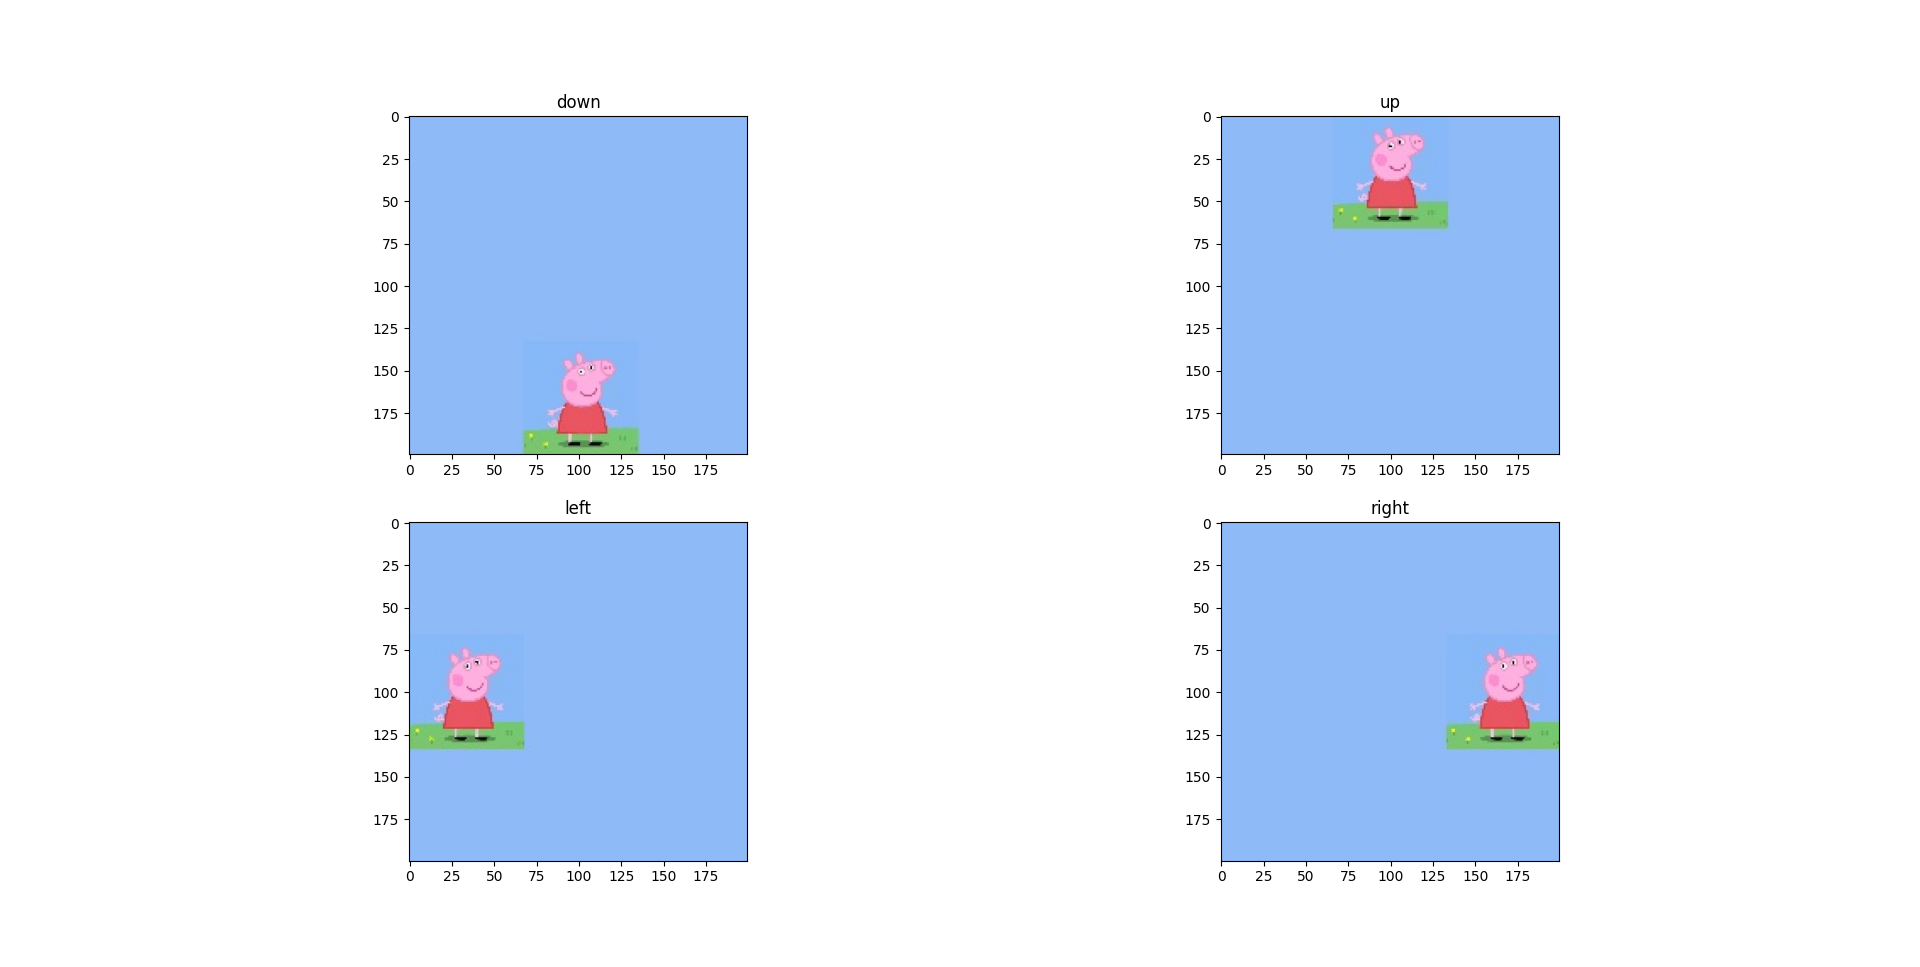
接着就是在 minimal.cc 文件中修改逻辑了。我将这几张佩奇的图片对应的 RGB 信息存储在 4 个数组中。然后定义一个 map 来索引它们。
static jpg_info_t gs_test_peppa_maps[4] = {
    {up_raw_data, "up"},
    {down_raw_data, "down"},
    {left_raw_data, "left"},
    {right_raw_data, "right"},
  };
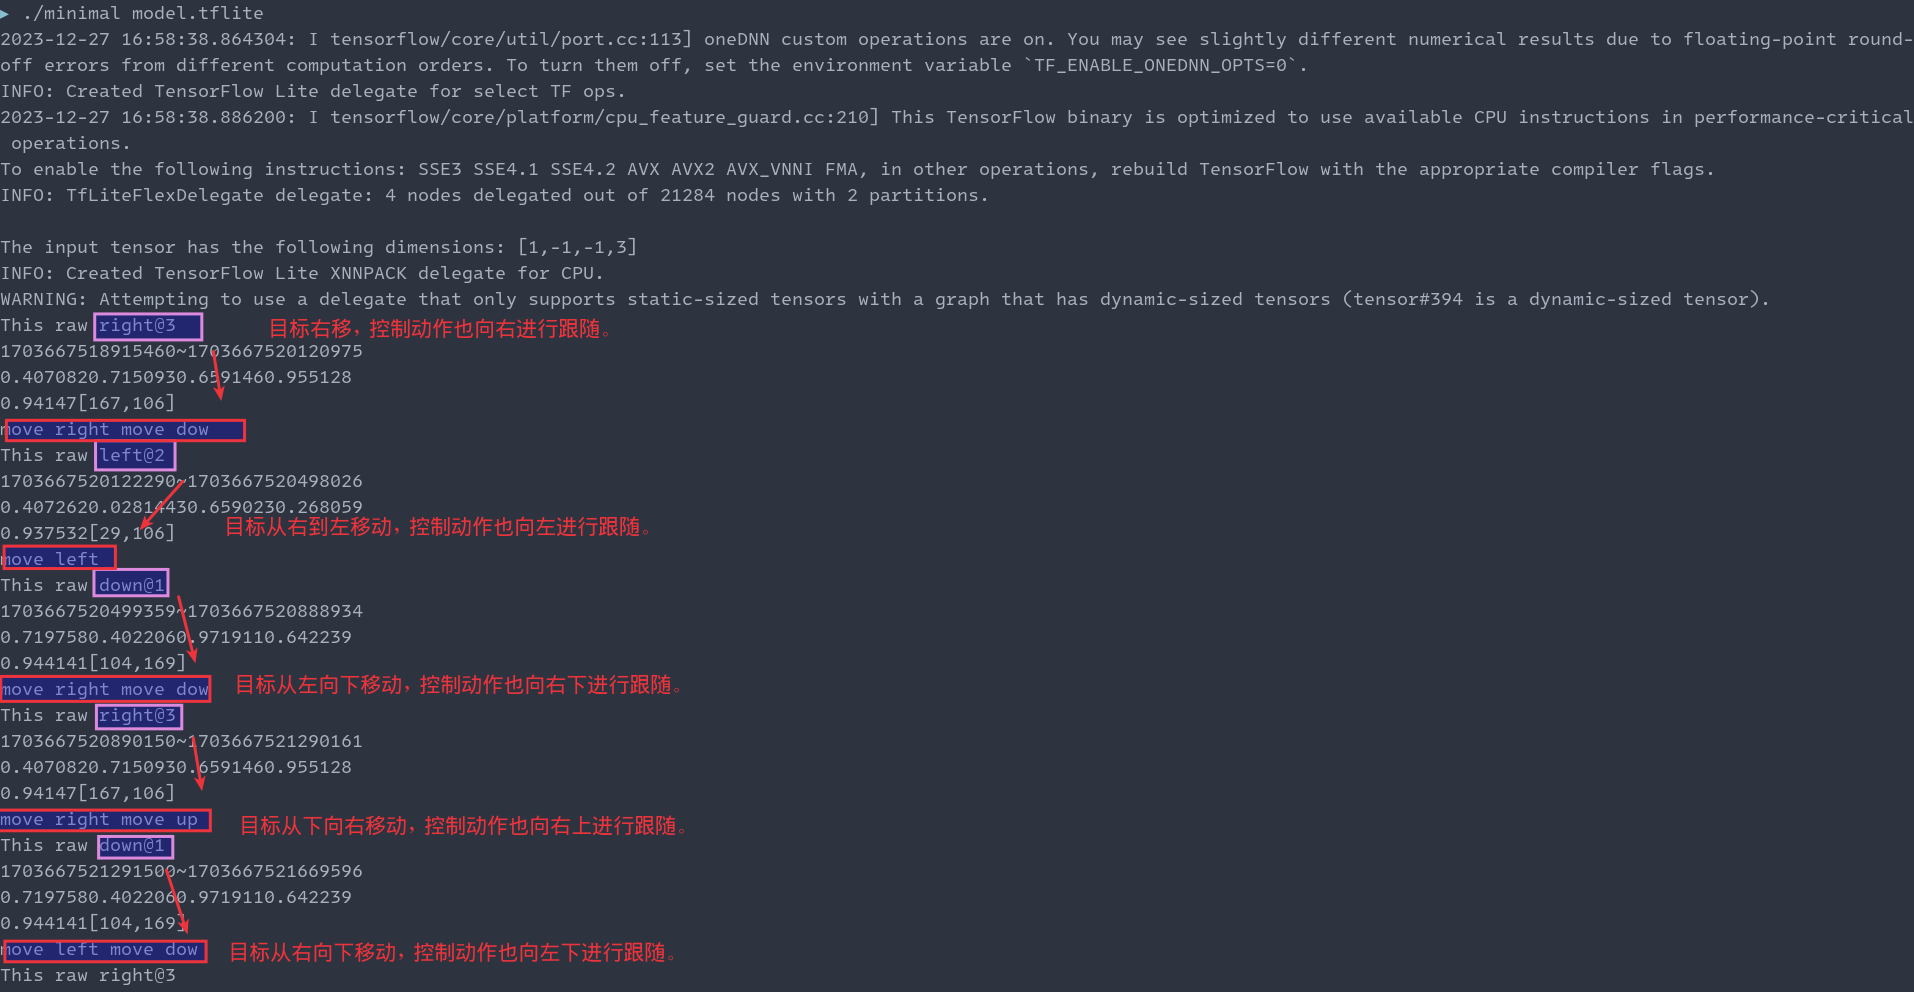
通过在 main 函数 的 while(1) 中使用随机数调用对应的图片模拟目标的移动,然后通过执行模型推理计算目标中心点相对上一次的偏移,接着通过打印输出对应的控制动作反向修正目标的偏移实现目标锁定在视场中心的效果,这部分动作控制的逻辑如下:
int do_with_move_action(int &last_x, int &last_y, int x, int y)
  {
    if (x > last_x)
      std::cout < < "move right ";
    else if (x < last_x)
      std::cout < < "move left ";

    if (y > last_y)
      std::cout < < "move down";
    else if (y < last_y)
      std::cout < < "move up";

    std::cout < < std::endl;

    last_x = x;
    last_y = y;

    return 0;
  };
整个 minimal.cc 文件 修改为如下所示:
/* Copyright 2018 The TensorFlow Authors. All Rights Reserved.

Licensed under the Apache License, Version 2.0 (the "License");
you may not use this file except in compliance with the License.
You may obtain a copy of the License at

    http://www.apache.org/licenses/LICENSE-2.0

Unless required by applicable law or agreed to in writing, software
distributed under the License is distributed on an "AS IS" BASIS,
WITHOUT WARRANTIES OR CONDITIONS OF ANY KIND, either express or implied.
See the License for the specific language governing permissions and
limitations under the License.
==============================================================================*/
#include < cstdio >
#include < iostream >
#include < vector >
#include < sys/time.h >

#include "tensorflow/lite/interpreter.h"
#include "tensorflow/lite/kernels/register.h"
#include "tensorflow/lite/model.h"
#include "tensorflow/lite/optional_debug_tools.h"

// This is an example that is minimal to read a model
// from disk and perform inference. There is no data being loaded
// that is up to you to add as a user.
//
// NOTE: Do not add any dependencies to this that cannot be built with
// the minimal makefile. This example must remain trivial to build with
// the minimal build tool.
//
// Usage: minimal < tflite model >

#define TFLITE_MINIMAL_CHECK(x)
  if (!(x)) {
    fprintf(stderr, "Error at %s:%dn", __FILE__, __LINE__);
    exit(1);
  }

int insert_raw_data(uint8_t *dst, unsigned int *data)
{
   int i, j, k, l;

   for (i = 0; i < 200; i++)
     for (j = 0; j < 200; j++)
     {
        *dst++ = *data > > 16 & 0XFF;
        *dst++ = *data > > 8 & 0XFF;
        *dst++ = *data & 0XFF;
        data++;
     }
   return 0;
}

int dump_tflite_tensor(TfLiteTensor *tensor)
{
  std::cout < < "Name:" < < tensor- >name < < std::endl;
  if (tensor- >dims)
  {
      std::cout < < "Shape: [" ;
      for (int i = 0; i < tensor- >dims- >size; i++)
          std::cout < < tensor- >dims- >data[i] < < ",";
      std::cout < < "]" < < std::endl;
  }
  std::cout < < "Type:" < < tensor- >type < < std::endl;

  return 0;
}

extern unsigned int raw_data[];
extern unsigned int up_raw_data[];
extern unsigned int down_raw_data[];
extern unsigned int left_raw_data[];
extern unsigned int right_raw_data[];

typedef struct jpg_info {
  unsigned int *data;
  char name[8];
} jpg_info_t;

static jpg_info_t gs_test_peppa_maps[4] = {
  {up_raw_data, "up"},
  {down_raw_data, "down"},
  {left_raw_data, "left"},
  {right_raw_data, "right"},
};

int do_with_move_action(int &last_x, int &last_y, int x, int y)
{
  if (x > last_x)
    std::cout < < "move right ";
  else if (x < last_x)
    std::cout < < "move left ";

  if (y > last_y)
    std::cout < < "move down";
  else if (y < last_y)
    std::cout < < "move up";

  std::cout < < std::endl;

  last_x = x;
  last_y = y;

  return 0;
};


int main(int argc, char* argv[]) {
  if (argc != 2) {
    fprintf(stderr, "minimal < tflite model >n");
    return 1;
  }
  const char* filename = argv[1];

  // Load model
  // 加载模型
  std::unique_ptr< tflite::FlatBufferModel > model =
      tflite::FlatBufferModel::BuildFromFile(filename);
  TFLITE_MINIMAL_CHECK(model != nullptr);

  // Build the interpreter with the InterpreterBuilder.
  // Note: all Interpreters should be built with the InterpreterBuilder,
  // which allocates memory for the Interpreter and does various set up
  // tasks so that the Interpreter can read the provided model.
  tflite::ops::builtin::BuiltinOpResolver resolver;
  tflite::InterpreterBuilder builder(*model, resolver);
  builder.SetNumThreads(4);
  // 初始化解释器
  std::unique_ptr< tflite::Interpreter > interpreter;
  builder(&interpreter);
  TFLITE_MINIMAL_CHECK(interpreter != nullptr);

auto a_input = interpreter- >inputs()[0];
auto a_input_batch_size = interpreter- >tensor(a_input)- >dims_signature- >data[0];
auto a_input_height = interpreter- >tensor(a_input)- >dims_signature- >data[1];
auto a_input_width = interpreter- >tensor(a_input)- >dims_signature- >data[2];
auto a_input_channels = interpreter- >tensor(a_input)- >dims_signature- >data[3];

std::cout < < "The input tensor has the following dimensions: ["
          < < a_input_batch_size < < ","
          < < a_input_height < < ","
          < < a_input_width < < ","
          < < a_input_channels < < "]" < < std::endl;

  // 强制修改 tensor 的 shape
  std::vector< int > peppa_jpg = {1,200,200,3};
  interpreter- >ResizeInputTensor(0, peppa_jpg);
  // Allocate tensor buffers.

  // Fill input buffers
  // TODO(user): Insert code to fill input tensors.
  // Note: The buffer of the input tensor with index `i` of type T can
  // be accessed with `T* input = interpreter- >typed_input_tensor< T >(i);`
  uint8_t * input_tensor;
  int map_index;
  int pos_x, pos_y;
  int last_pos_x = 100, last_pos_y = 100;

  while(1)
  {
  // 申请推理需要的内存
  TFLITE_MINIMAL_CHECK(interpreter- >AllocateTensors() == kTfLiteOk);
  // printf("=== Pre-invoke Interpreter State ===n");
  input_tensor = interpreter- >typed_input_tensor< uint8_t >(0);

  // 直接找到输出 tensor 指针
  auto detection_scores_tensor = interpreter- >output_tensor_by_signature("detection_scores", "serving_default");
  auto detection_boxes_tensor = interpreter- >output_tensor_by_signature("detection_boxes", "serving_default");
      map_index = random() % 4;

      std::cout < < "This raw " < < gs_test_peppa_maps[map_index].name < < '@' < < map_index < < std::endl;
      insert_raw_data(input_tensor, gs_test_peppa_maps[map_index].data);
      // Run inference
      // 执行推理过程
      struct timeval tv;
      if (0 == gettimeofday(&tv, NULL))
      {
        std::cout < < tv.tv_sec * 1000000 + tv.tv_usec < < '~';
      }
      TFLITE_MINIMAL_CHECK(interpreter- >Invoke() == kTfLiteOk);
      if (0 == gettimeofday(&tv, NULL))
      {
        std::cout < < tv.tv_sec * 1000000 + tv.tv_usec < < std::endl;
      }
      // printf("n=== Post-invoke Interpreter State ===n");
      // tflite::PrintInterpreterState(interpreter.get());
      std::cout < < detection_boxes_tensor- >data.f[0] < < detection_boxes_tensor- >data.f[1] < <
          detection_boxes_tensor- >data.f[2] < < detection_boxes_tensor- >data.f[3] < < std::endl;

      // 这里注意,推理结果方框的格式是 (y1, x1) 和 (y2, x2)
      pos_y = 100 * (detection_boxes_tensor- >data.f[0] + detection_boxes_tensor- >data.f[2]);
      pos_x = 100 * (detection_boxes_tensor- >data.f[1] + detection_boxes_tensor- >data.f[3]);
          std::cout < < detection_scores_tensor- >data.f[0] < < '[';
          std::cout < < pos_x < < ',';
          std::cout < < pos_y < < ']' < < std::endl;

      do_with_move_action(last_pos_x, last_pos_y, pos_x, pos_y);
      usleep(1000);
      }
  // Read output buffers
  // TODO(user): Insert getting data out code.
  // Note: The buffer of the output tensor with index `i` of type T can
  // be accessed with `T* output = interpreter- >typed_output_tensor< T >(i);`
  // T* output = interpreter- >typed_output_tensor< T >(i);

  return 0;
}
截取测试部分的截图如下所示:
接下来就是重新交叉编译 minimal 工程,然后在飞腾派上测试了。过程和 PC 端差别不大,首先通过 scp 发送到飞腾派,然后查看下依赖:
red@phytiumpi:/tmp$ ldd minimal
        linux-vdso.so.1 (0x0000ffff9cb15000)
        libtensorflowlite_flex.so = > /lib/libtensorflowlite_flex.so (0x0000ffff805e0000)
        librt.so.1 = > /lib/aarch64-linux-gnu/librt.so.1 (0x0000ffff805c0000)
        libdl.so.2 = > /lib/aarch64-linux-gnu/libdl.so.2 (0x0000ffff805a0000)
        libpthread.so.0 = > /lib/aarch64-linux-gnu/libpthread.so.0 (0x0000ffff80580000)
        libm.so.6 = > /lib/aarch64-linux-gnu/libm.so.6 (0x0000ffff804e0000)
        libstdc++.so.6 = > /lib/aarch64-linux-gnu/libstdc++.so.6 (0x0000ffff802b0000)
        libgcc_s.so.1 = > /lib/aarch64-linux-gnu/libgcc_s.so.1 (0x0000ffff80280000)
        libc.so.6 = > /lib/aarch64-linux-gnu/libc.so.6 (0x0000ffff800d0000)
        /lib/ld-linux-aarch64.so.1 (0x0000ffff9cadc000)
接着运行 minimal 进行模型推理。这里只是展示下测试的结果,以及预测的耗时:
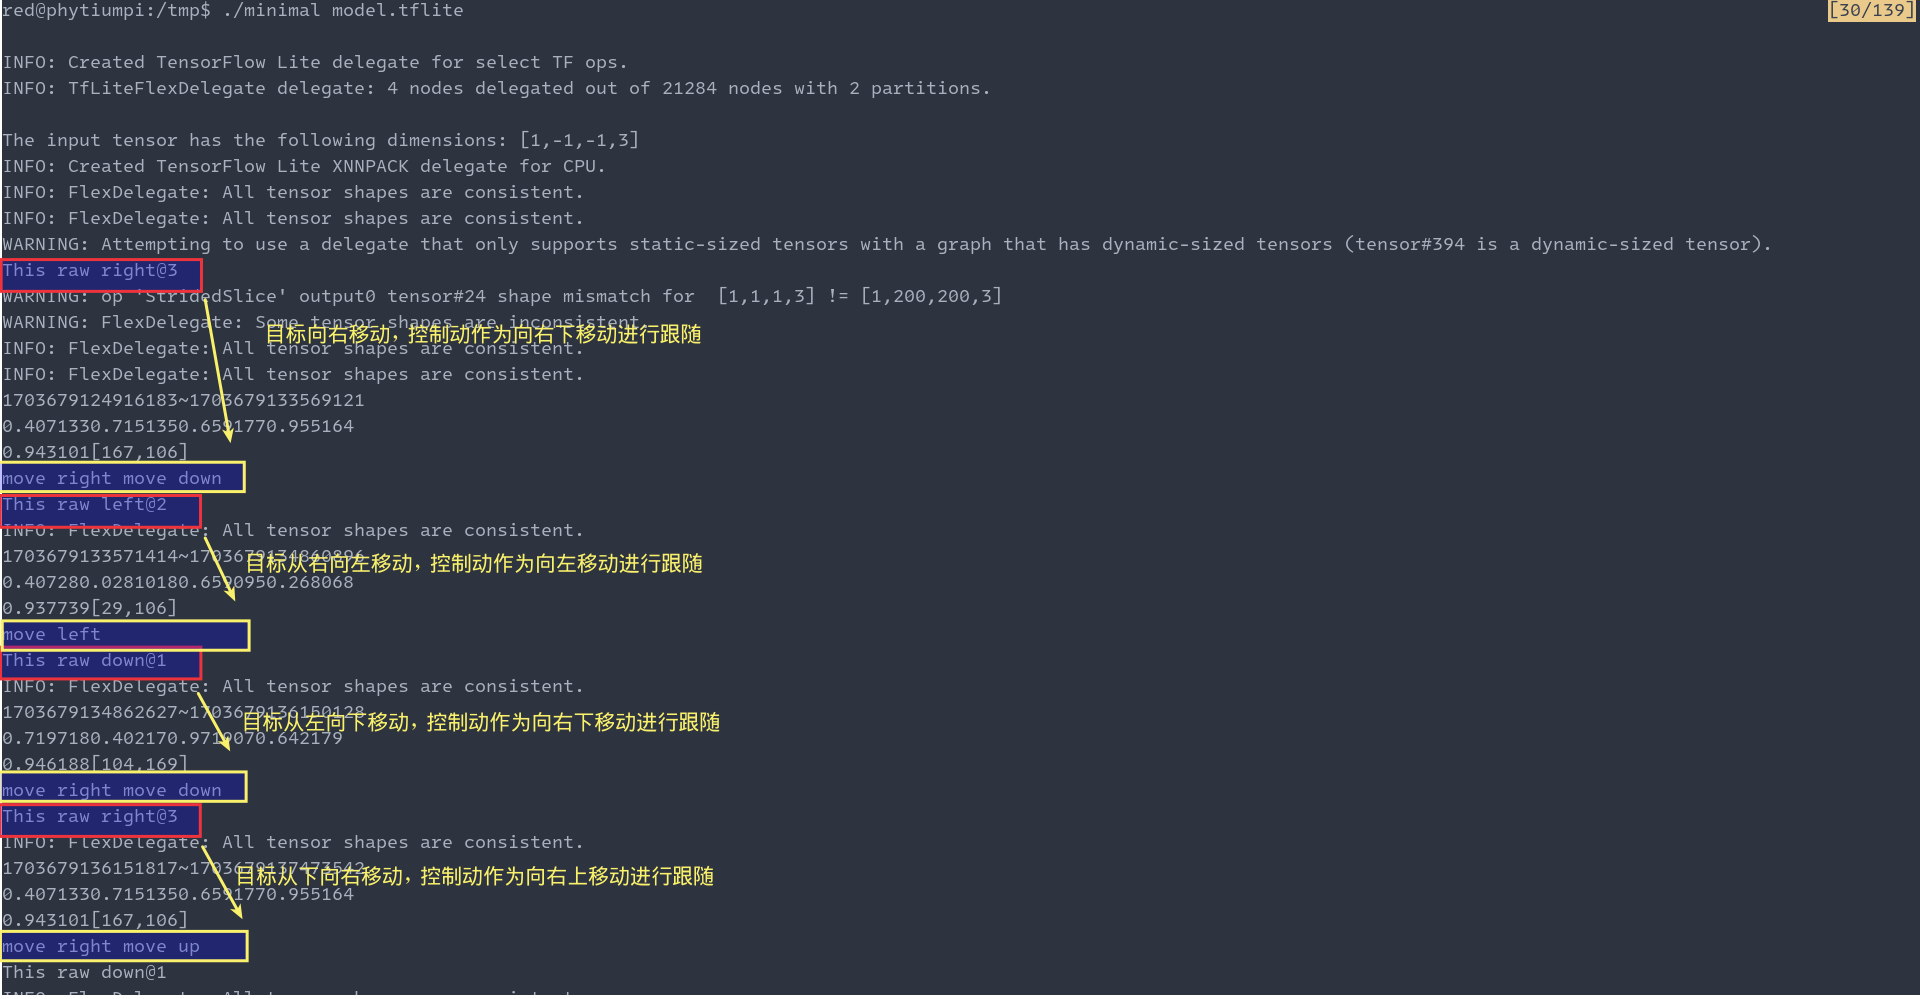
可以从图中看出,有关模型推理的结果部分和在PC端的可以匹配。
下面从打印信息中绘制飞腾派上的推理耗时,结果如下图所示:
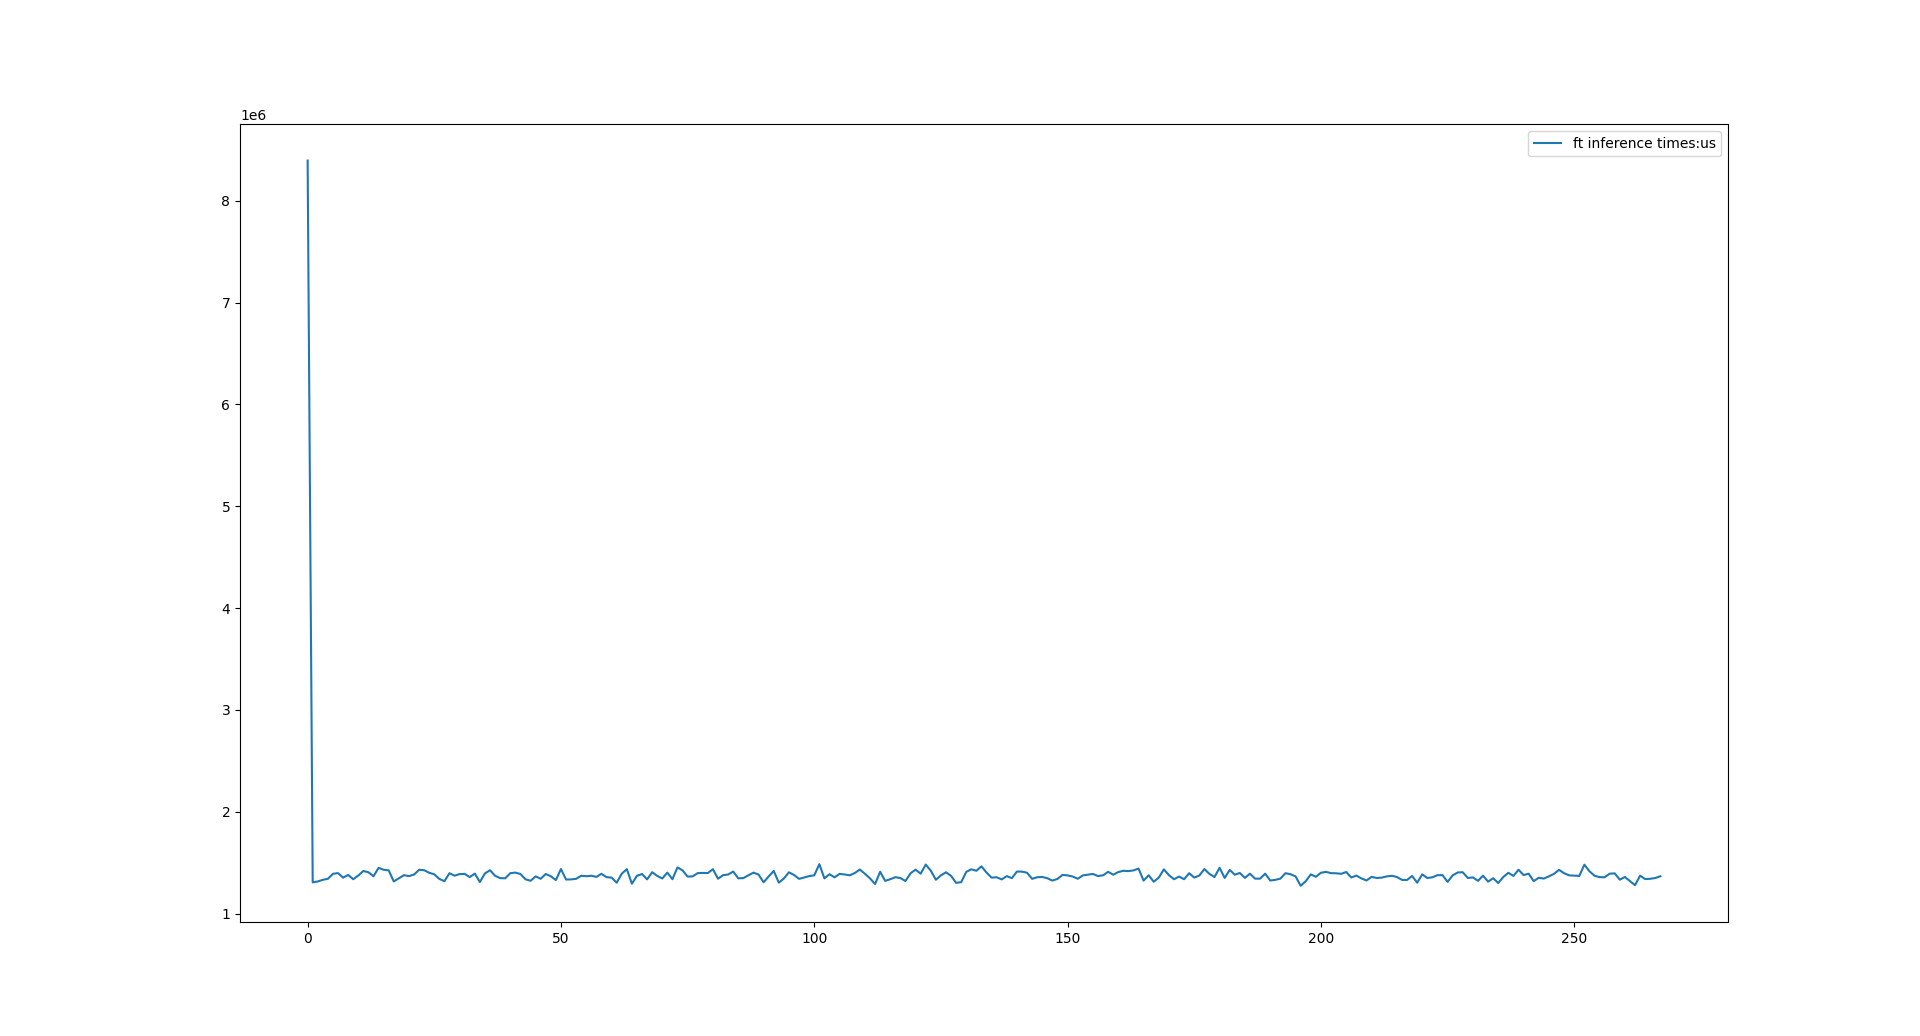
可以看到在飞腾派上首次推理接近8分钟(不知道什么原因),之后趋向稳定,单次推理在1.2s左右。和PC端的 400ms 差别不是特别明显,我使用 btop 看了下,在飞腾派上开了22个线程: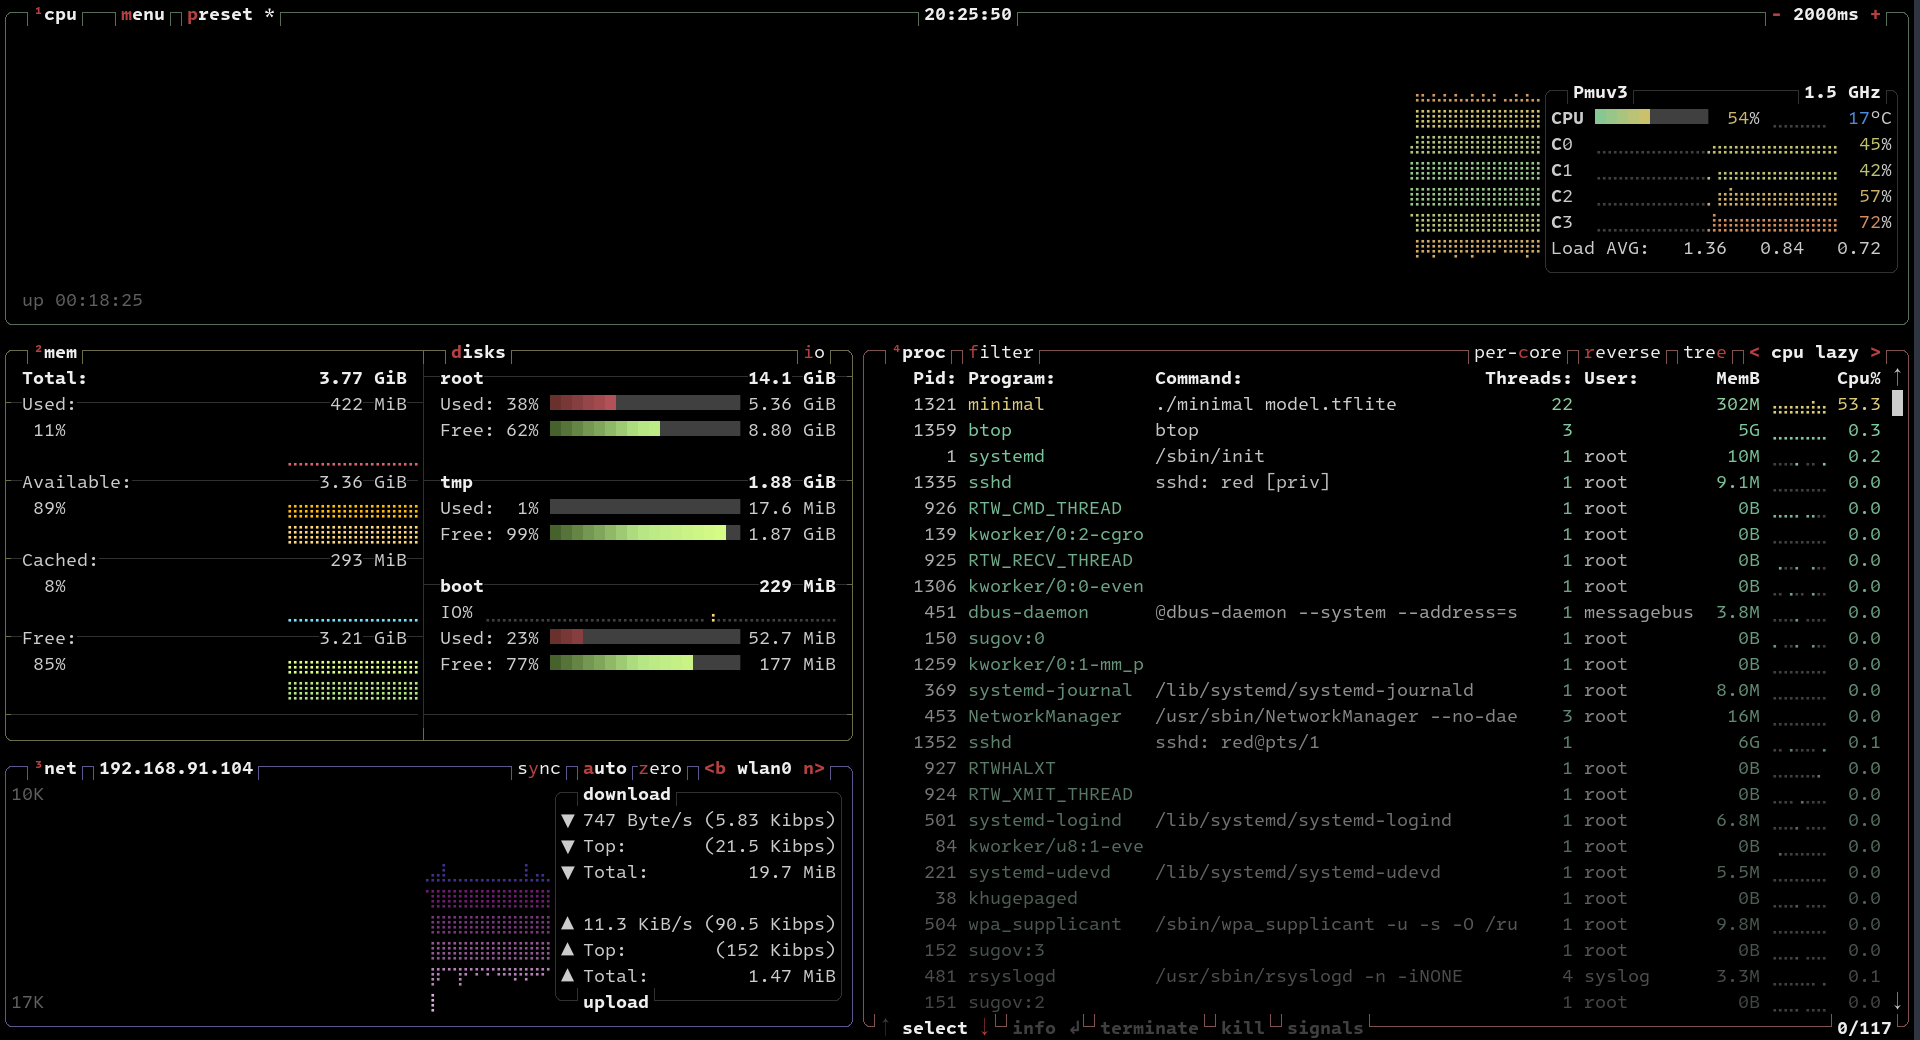
同样的在PC端,使用 btop 看下:
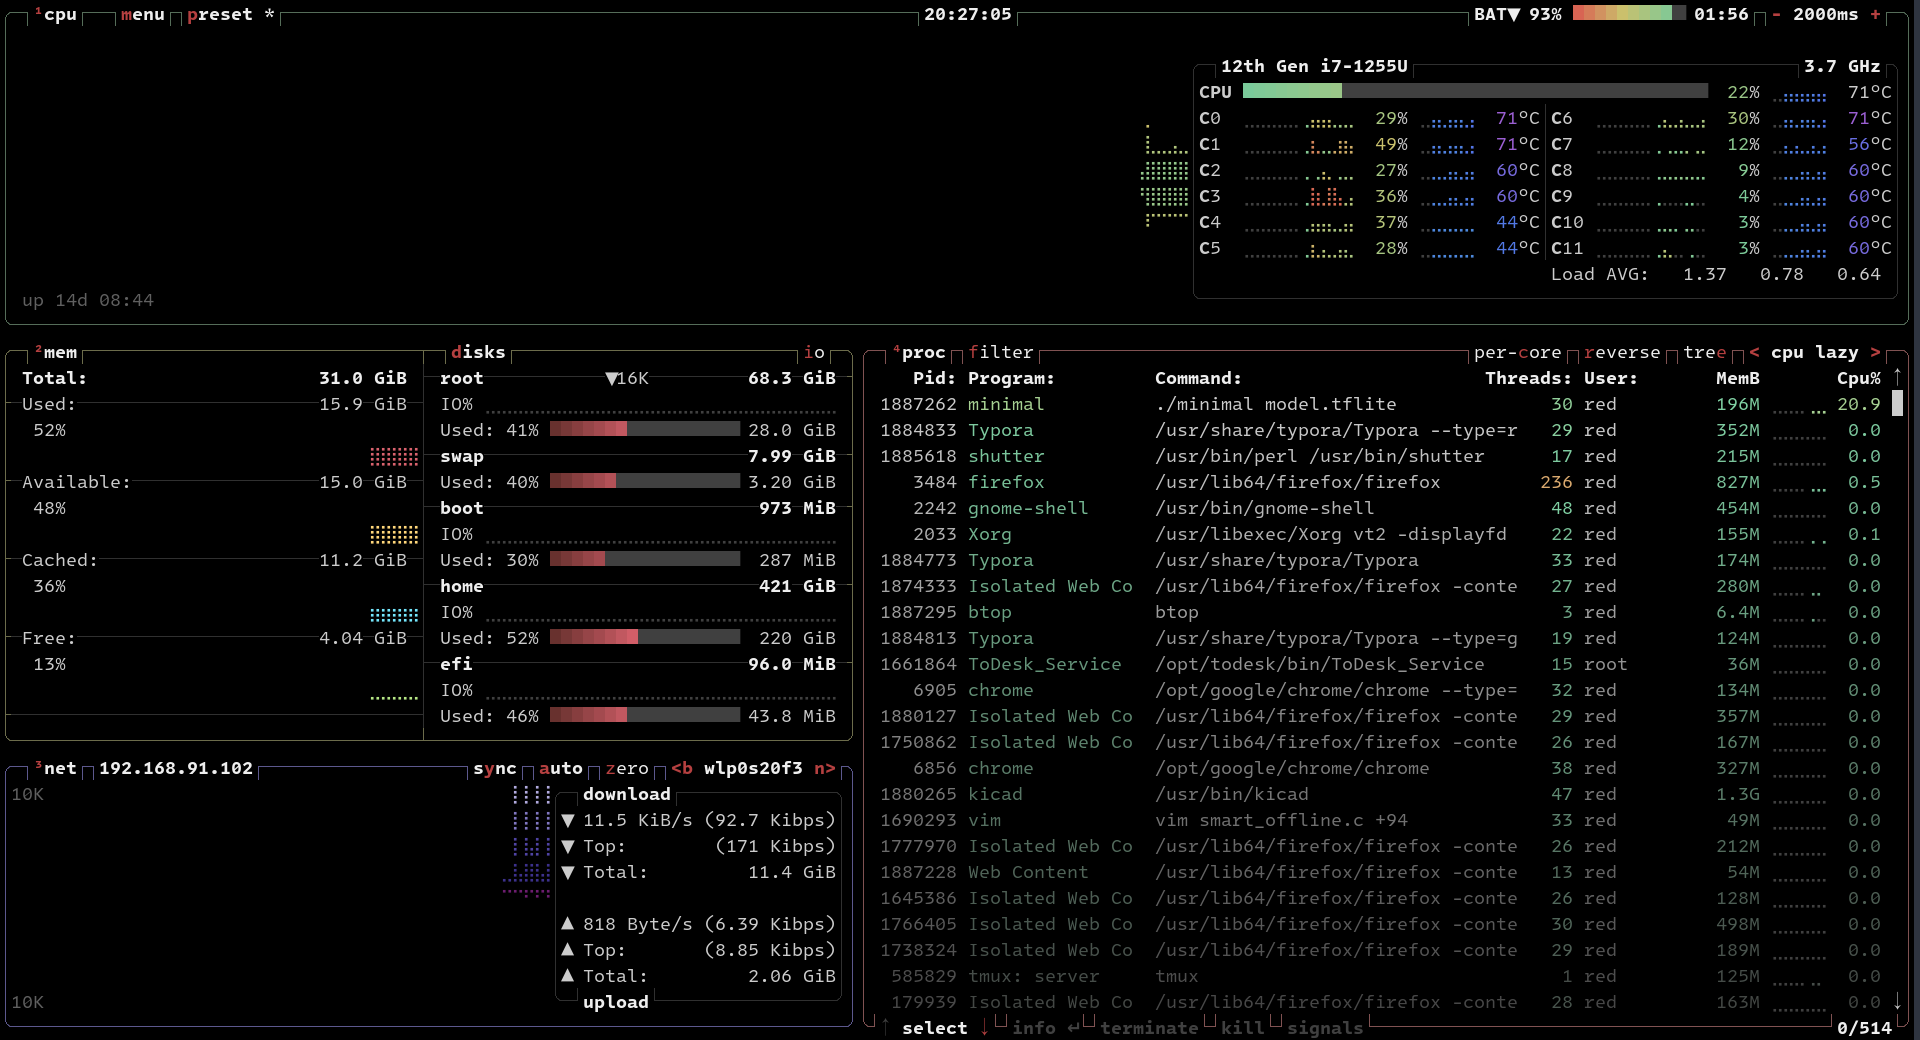
开了30个线程。现在看来飞腾派使用 C++ CPU 推理的速度大概是 1/3 的 PC 性能。
文章写到这里,就暂时完成本次在飞腾派上的试用工作,通过最近这一系列的连载文章,我主要记录了自己如何一步步实现在飞腾派上部署目标识别算法,并提取模型输出进一步完成控制动作的这个过程。
列举这近一个月来的文章汇总:
- 【飞腾派4G版免费试用】第一章:从 Armbian 构建并安装 jammy 到飞腾派
- 【飞腾派4G版免费试用】第二章:在PC端使用 TensorFlow2 训练目标检测模型
- 【飞腾派4G版免费试用】第三章:抓取图像,手动标注并完成自定义目标检测模型训练和测试
- 【飞腾派4G版免费试用】第四章:部署模型到飞腾派的尝试
在临近试用的最后,再次向提供我这次试用机会的电子发烧友,飞腾信息技术有限公司表示感谢。
希望我连载的这些文章可以对想接触体验使用TensorFlow Lite在嵌入式设备上进行机器学习的小伙伴提供一些帮助。
审核编辑 黄宇
-
C++
+关注
关注
22文章
2104浏览量
73478 -
tensorflow
+关注
关注
13文章
328浏览量
60490 -
飞腾派
+关注
关注
2文章
9浏览量
204
发布评论请先 登录
相关推荐
【飞腾派4G版免费试用】第四章:部署模型到飞腾派的尝试
【飞腾派4G版免费试用】2飞腾派openwrt固件烧录
【飞腾派4G版免费试用】飞腾派开发板运行Ubuntu系统
【飞腾派4G版免费试用】飞腾派运行uefi固件,加载通用操作系统
【飞腾派4G版免费试用】来更多的了解飞腾派4G版开发板!
【飞腾派4G版免费试用】飞腾派4G版开发板套装测试及环境搭建



 【飞腾派4G版免费试用】第五章:使用C++部署tflite模型到飞腾派


评论