“天气之子”
功能描述:
开发环境:
IDE:DEV ECO 4.0.600
SDK:4.0.10.15
开发板:DAYU200 4.0.10.16
开发过程
一. 创建项目,调试环境
1.创建项目
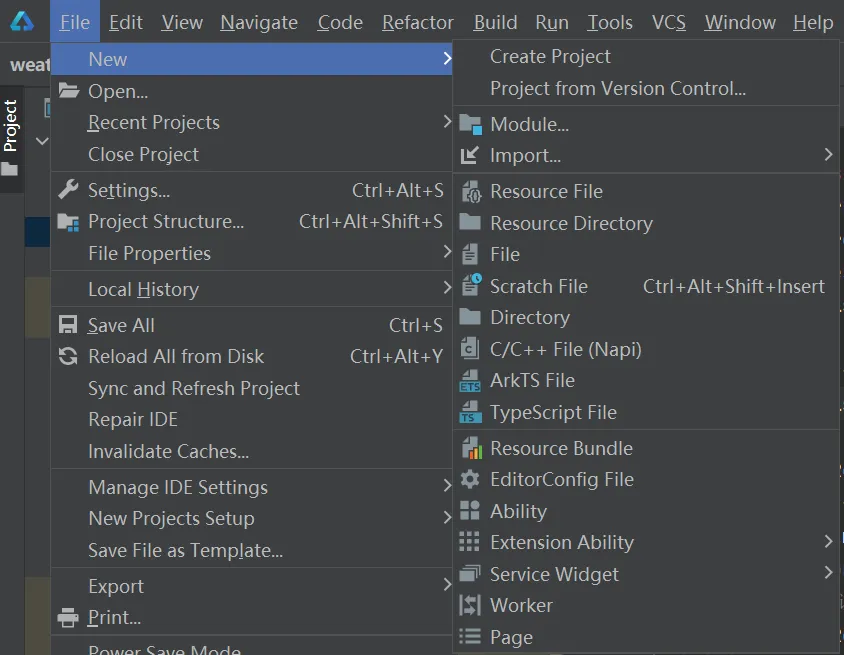
2.选择OpenHarmony、API10
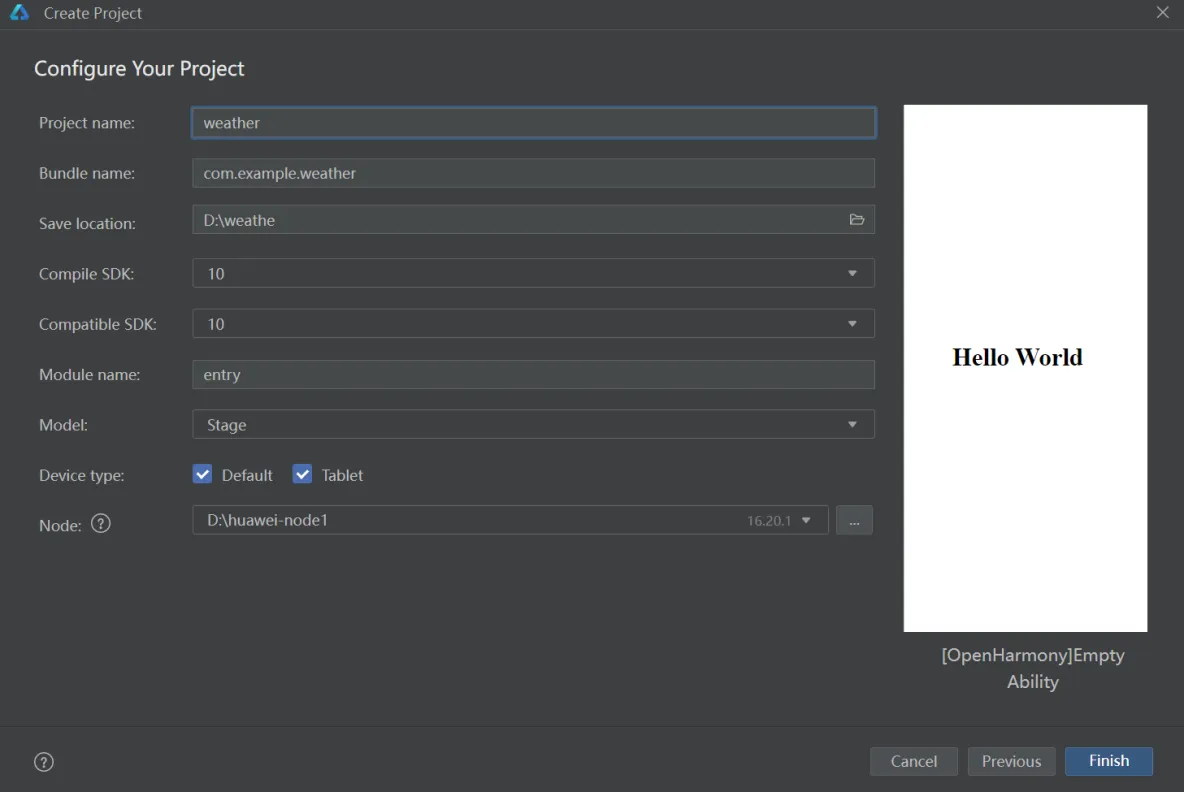
3.连网条件下加载依赖

4.在开发板上签名,运行HelloWorld测试环境
直接运行,然后点击log报错直达签名
在工具栏File/Project Structure/Signing Configs,勾选Automatically generate签名;运行HelloWorld。
二.修改图标和名称
1.设置-应用管理页面
AppScope/app.json5中查看相关配置
2.桌面
src/main/module.json5中查看相关配置
最终效果:


三.添加网络权限
因为需要用到网络数据,所以添加initent权限。
在src/main/module.json5的model中添加配置。
"requestPermissions": [{
      "name": "ohos.permission.INTERNET"
    }],
四.自定义Model
在ets中新建model文件夹,建立ArkTS文件,基于API返回结果结合需要自定义类
API返回结果: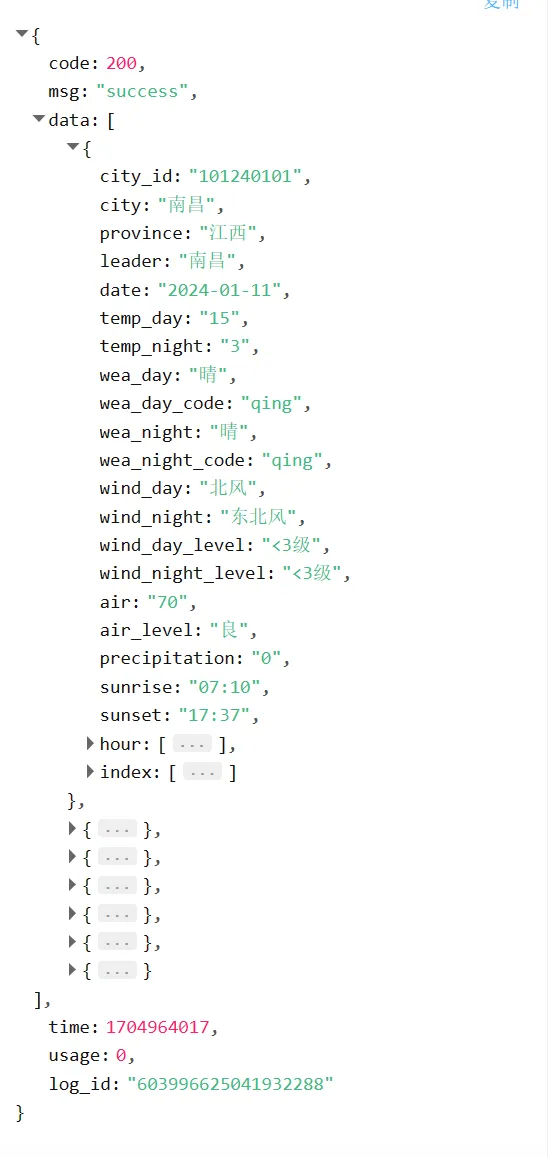
源码如下
export class Item{
  name:string = "紫外线强度指数"
  level:string = "中等"
  // code:string = "uv"
}

export class Result1{//每1天
  city:string = '徐州'
  date:Date = new Date
  temp_day:number = 4
  temp_night:number = -1
  wea_day:string = "晴"
  wea_night:string = '晴'
  wind_day:string = "南风"
  wind_night:string = "南风"
  wind_day_level:string = "< 3级"
  wind_night_level:string = "< 3级"
  air_level:string = "轻度"
  sunrise:string = "07:17"
  sunset:string = "17:19"
  index:Array< Item > = []//建议
}

export class Result0{
  code:number = 200
  msg:string = 'success'
  data:Array< Result1 > = []//7天
}
五.制作index页面、请求网络数据
1.请求网络数据
1.导入http模块
import http from '@ohos.net.http';
import { BusinessError } from '@ohos.base';
2.创建createHttp
let httpRequest = http.createHttp();
3.填写HTTP地址
httpRequest.request(// 填写HTTP请求的URL地址,可以带参数也可以不带参数。URL地址需要开发者自定义。请求的参数可以在extraData中指定
      "https://v2.alapi.cn/api/tianqi/seven",
      {
        method: http.RequestMethod.GET, // 可选,默认为http.RequestMethod.GET
        // // 开发者根据自身业务需要添加header字段
        header: [{
          'Content-Type': 'application/json'
        }],
        // 当使用POST请求时此字段用于传递内容
        extraData: {
          "token": "自己的token",
          "type": "all",
          "format": "json"
        },

      }, (err: BusinessError, data: http.HttpResponse) = > {

    }
    );
4.对网络数据的处理
if (!err) {
        let result:Result0 = JSON.parse(data.result.toString())
        if(result.code == 200){
          this.a = result.data
        }
        else {
          this.message = result.msg
        }
        httpRequest.destroy();
      } else {
        this.message = JSON.stringify(err)
        // console.error('error:' + JSON.stringify(err));
        // 当该请求使用完毕时,调用destroy方法主动销毁
        httpRequest.destroy();
      }
完整代码:
GetData(city:string) {
  // 3.每一个httpRequest对应一个HTTP请求任务,不可复用
  let httpRequest = http.createHttp();
  // 4.
  httpRequest.request(// 填写HTTP请求的URL地址,可以带参数也可以不带参数。URL地址需要开发者自定义。请求的参数可以在extraData中指定
    "https://v2.alapi.cn/api/tianqi/seven",
    {
      method: http.RequestMethod.GET, // 可选,默认为http.RequestMethod.GET
      extraData: {
        "token": "自己的token",
        "city":city,
      },
    },
    (err: BusinessError, data: http.HttpResponse) = > {
      if (!err) {
        let result:Result0 = JSON.parse(data.result.toString())
        if(result.code == 200){
          this.a = result.data
        }
        else {
          this.message = result.msg
        }
        httpRequest.destroy();
      } else {
        this.message = JSON.stringify(err)
        // console.error('error:' + JSON.stringify(err));
        // 当该请求使用完毕时,调用destroy方法主动销毁
        httpRequest.destroy();
      }
    }
  )
}
如果显示2300006错误码,很可能是网络问题
2.制作UI
1.文本输入框
TextInput({
      placeholder:"请输入查询城市名,如:徐州",
    }).onChange((item:string)= >{
      if(item!=null && item!=undefined){
        this.message = item
      }
    }).maxLength(8).type(InputType.Normal)
2.“查询”按钮:点击页面进行跳转到列表页
Button("查询").onClick(()= >{
      this.GetData(this.message)
      //跳转
      if(this.a!=null && this.a!=undefined && this.a.length >0){
        router.pushUrl({
          url:"pages/ListPage",
          params:this.a
        })
      }
      else{
        promptAction.showToast({message:"请重试~"})//数据请求失败
      }
    }).backgroundColor(Color.Transparent).width("50%")
最终界面:
六.制作列表页(跳转到的第二张页面)
先看最终效果: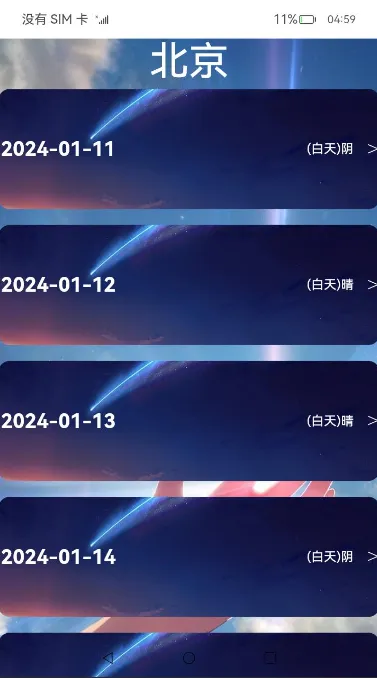
1.自定义组件

被 Component装饰器修饰 ,定义struct,并且用关键字export导出
@Component
export struct ALine{//日期 天气图片 详情跳转
  @State date:Date = new Date
  @State wea:string = '晴'

  build(){
    Row(){
      Text(this.date.toString()).fontSize(25).fontWeight(FontWeight.Bold).margin({right:240}).fontColor(Color.White)

      Text("(白天)"+this.wea).fontColor(Color.White)

      Text("  >").fontWeight(FontWeight.Lighter).fontSize(30).fontColor(Color.White)
    }.width("100%").height("100%")
    .border({color:Color.Transparent}).borderRadius(14).borderWidth(3)
    .backgroundImage($r("app.media.LLBG")).backgroundImagePosition(Alignment.Center)
  }
}
2.页面UI
1.首先接收上一页面传输数据
@State a:Array< Result1 > = router.getParams() as Array< Result1 >
2.主要用到List,Column,Row,Text和自定义组件;利用ForEach循环渲染;每一个自定义组件绑定一个点击事件,可分别跳转到详情页。
源码:
Column({space:5}){
      Text(this.a[0].city).fontSize(50).fontColor(Color.White)

      List({space:20}){
        ForEach(this.a,(item:Result1)= >{
          ListItem(){
            ALine({date:item.date,wea:item.wea_day})
              .onClick(()= >{//
                router.pushUrl({
                  url:"pages/DetailPage",
                  params:item
                })
              })
          }.height("20%").width("100%")
        })
      }.width("100%").height("100%").scrollBar(BarState.Off)
    }.backgroundImage($r("app.media.LPBG")).backgroundImageSize(ImageSize.Cover)
七.制作详情页(点击自定义组件跳转到的第三张页面)
有了前面两张页面的基础,这一张可以较为顺利完成,故不再赘述。
最终效果: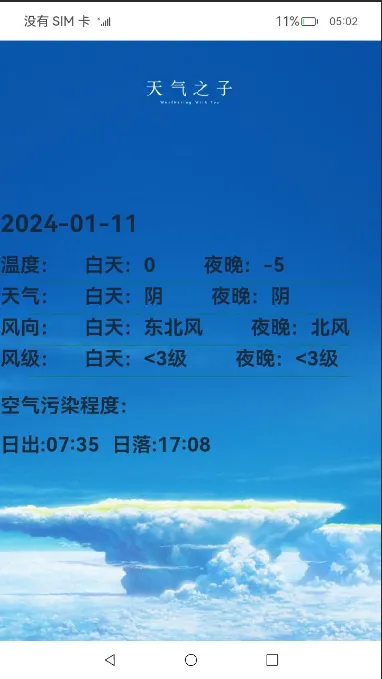
本文主要是对鸿蒙开发中的实战讲解,制作天气应用原生开发。有关更多的实战学习,可以往主页阅读更多;鸿蒙的技术分布内容有如下:

高清完整或者实战文档,可以找我保存


八.总结
此项目主要练习了:
- List,Column,Row,Text,Divider,Image,promptAction等组件及其属性
- 网络数据请求
- 页面跳转及传输数据
- 自定义组件
- 自定义类
- 做自己喜欢的UI
审核编辑 黄宇
-
API
+关注
关注
2文章
1523浏览量
62518 -
OpenHarmony
+关注
关注
25文章
3754浏览量
16744
发布评论请先 登录
相关推荐
OpenHarmony源码编译后烧录镜像教程,RK3566鸿蒙开发板演示

鸿蒙Flutter实战:14-现有Flutter 项目支持鸿蒙 II
OpenHarmony怎么修改DPI密度值?触觉智能RK3566鸿蒙开发板演示

OpenHarmony属性信息怎么修改?触觉智能RK3566鸿蒙开发板来演示

如何在开源鸿蒙OpenHarmony开启SELinux模式?RK3566鸿蒙开发板演示

触觉智能Purple Pi OH鸿蒙开发板成功适配OpenHarmony5.0 Release,开启新征程

鸿蒙Flutter实战:07混合开发
鸿蒙OpenHarmony南向/北向快速开发教程-迅为RK3568开发板
OpenHarmony实战开发-如何实现窗口开发概述
鸿蒙OS南向开发实战:【智能电子牌】


 鸿蒙开发实战-OpenHarmony之天气应用



评论