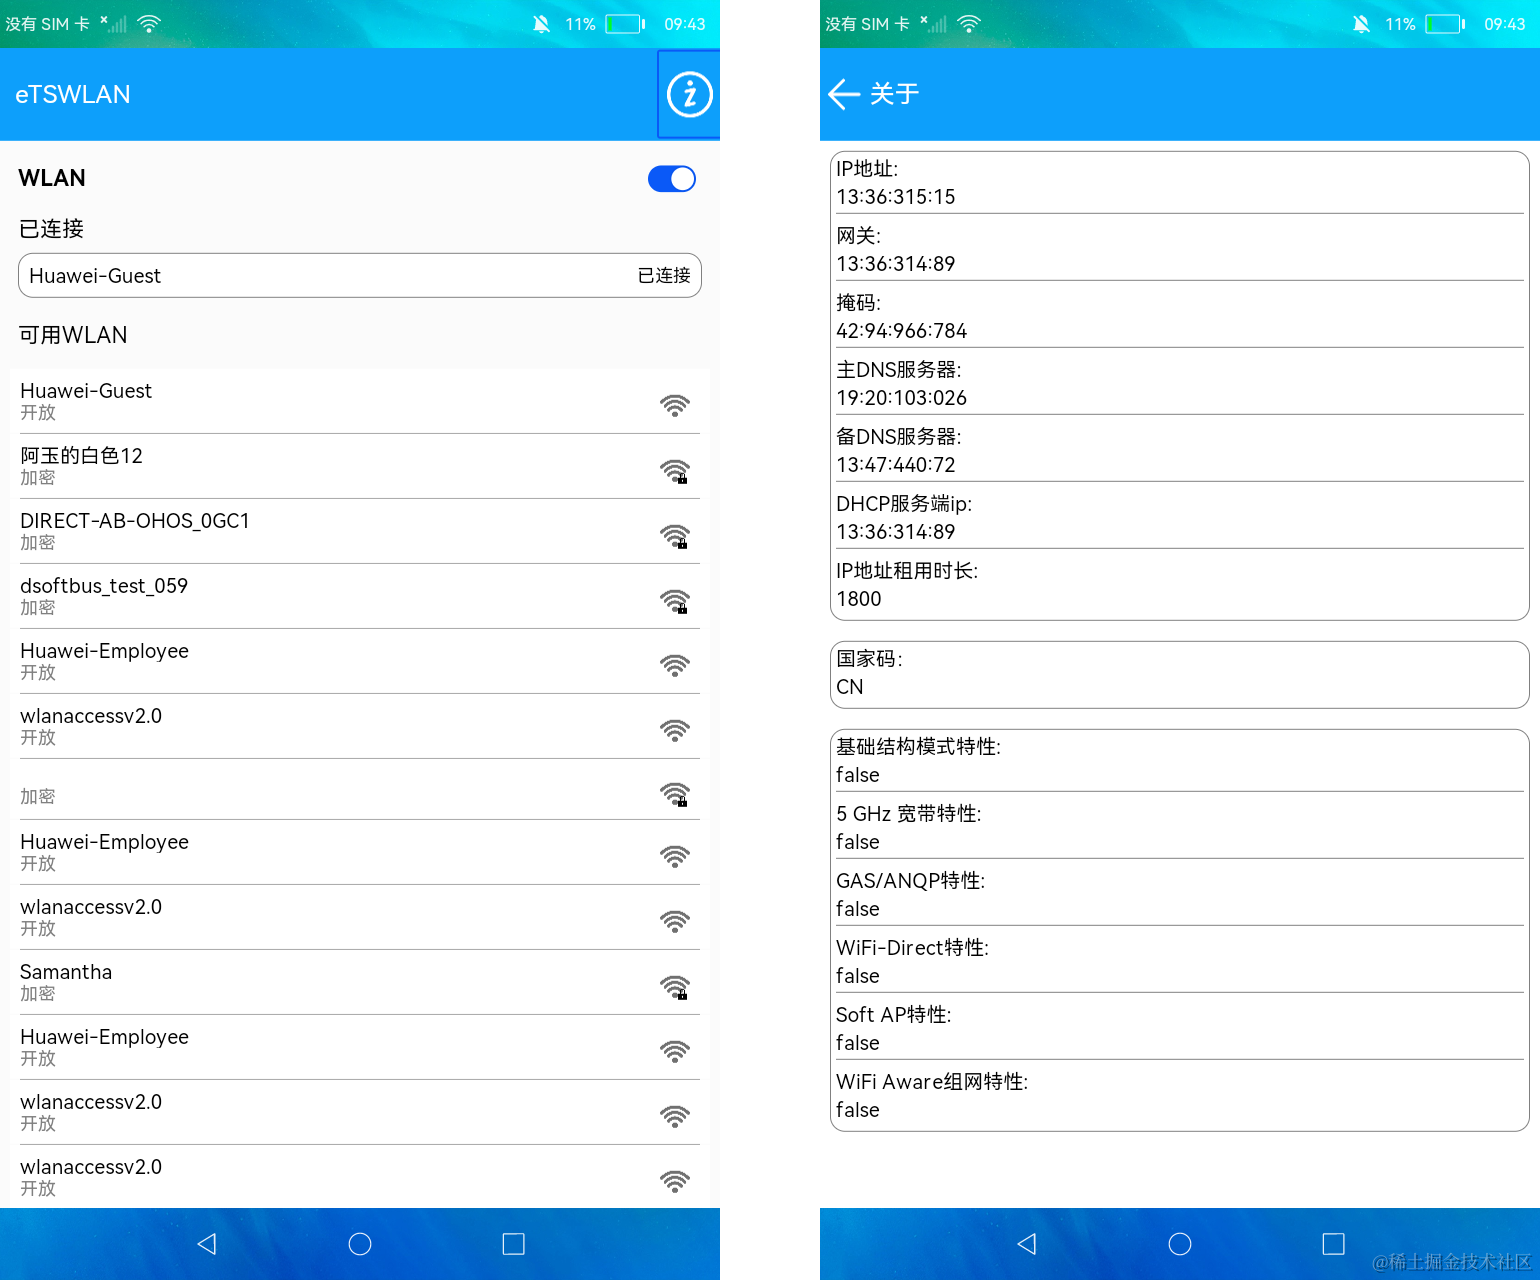
在eTS中WLAN的基本使用,包括禁用和启用WLAN、WLAN扫描和获取扫描结果、WLAN状态监听、WiFi连接状态监听、获取IP信息、获取国家码、判断设备是否支持WLAN相关特性。
样例展示

WLAN(仅对系统应用开放)
介绍
本示例通过[@ohos.wifiManager] 相关API实现wlan激活和关闭、扫描和连接WIFI等功能。
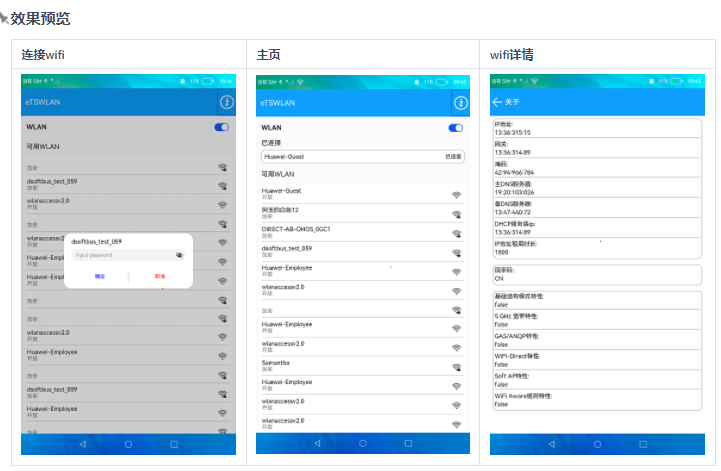
效果预览

使用说明
- 启动应用后会判断WLAN是否激活,如果是激活状态,会扫描并展示可用WiFi列表,同时获取已连接WiFi信息并展示;
- 点击界面的Switch开关可以禁用和激活WLAN,界面会监听WLAN状态扫描可用WiFi列表,也会监听WiFi连接状态展示已连接WiFi;
- 点击可用WLAN列表中的WLAN信息,可以连接WiFi,如果是加密类型,会弹窗输入密码后连接;
- 点击首页右上角的关于图标,进入关于界面,展示获取的IP信息、国家码和支持WLAN相关特性信息。
具体实现
- wlan激活和关闭功能:点击首页的切换按钮,如果是打开,使用wifi.enableWifi()开启wifi;如果是关闭,则使用wifi.disconnect()断开wifi, 然后使用wifi.disableWifi()关闭wifi, 源码参考:[Index.ets] 。
/*

 * Copyright (c) 2022-2023 Huawei Device Co., Ltd.

 * Licensed under the Apache License, Version 2.0 (the "License");

 * you may not use this file except in compliance with the License.

 * You may obtain a copy of the License at

 *

 *     http://www.apache.org/licenses/LICENSE-2.0

 *

 * Unless required by applicable law or agreed to in writing, software

 * distributed under the License is distributed on an "AS IS" BASIS,

 * WITHOUT WARRANTIES OR CONDITIONS OF ANY KIND, either express or implied.

 * See the License for the specific language governing permissions and

 * limitations under the License.

 */


import wifi from '@ohos.wifiManager'

import { AvailableWifi } from '../component/AvailableWifi'

import Logger from '../model/Logger'

import { TitleBar } from '../component/TitleBar'

import { WifiModel, WifiType } from '../model/WifiModel'


const TAG = 'Index'


@Entry

@Component

struct Index {

  private wifiModel: WifiModel = new WifiModel()

  private linkedInfo: wifi.WifiLinkedInfo = null

  @State isLinked: boolean = false

  @State isSwitchOn: boolean = false


  // 扫描wifi

  async scan() {

    // 获取有关Wi-Fi连接的信息,存入linkedInfo

    await this.getLinkedInfo()

    // 不停地扫描wifi

    let result: Array< WifiType > = await this.wifiModel.getScanInfos()

    if (this.isSwitchOn) {

      AppStorage.SetOrCreate('wifiList', result)

      setTimeout(async () = > {

        await this.scan()

      }, 3000)

    }

  }


  // 获取有关Wi-Fi连接的信息,存入linkedInfo

  async getLinkedInfo() {

    try {

      let wifiLinkedInfo = await wifi.getLinkedInfo()

      if (wifiLinkedInfo === null || wifiLinkedInfo.bssid === '') {

        this.isLinked = false

        this.linkedInfo = null

        return

      }

      this.isLinked = true

      this.linkedInfo = wifiLinkedInfo

    } catch (err) {

      Logger.info(`getLinkedInfo failed err is ${JSON.stringify(err)}`)

    }

  }


  // 监听wifi的变化

  addListener() {

    // 连接状态改变时,修改连接信息

    wifi.on('wifiConnectionChange', async state = > {

      Logger.log(TAG, `wifiConnectionChange: ${state}`)

      await this.getLinkedInfo()

    })

    // wifi状态改变时,先清空wifi列表,然后判断是否是开启状态,如果是就扫描

    wifi.on('wifiStateChange', state = > {

      Logger.log(TAG, `wifiStateLisener state: ${state}`)

      AppStorage.SetOrCreate('wifiList', [])

      if (state === 1) { // 1: wifi is enable, 0:wifi is disable

        this.scan()

      }

    })

  }


  aboutToAppear() {

    // 如果wifi是开的,就记录下状态,然后扫描wifi,并获取连接信息

    if (wifi.isWifiActive()) {

      Logger.log(TAG, 'wifi is active')

      this.isSwitchOn = true

      wifi.scan()

      this.scan()

      this.getLinkedInfo()

    }

    // 启动监听

    this.addListener()

  }


  build() {

    Column() {

      TitleBar()

      Row() {

        Text($r('app.string.wlan'))

          .fontSize(22)

          .fontWeight(FontWeight.Bold)

          .height(40)

        Column() {

          Toggle({ type: ToggleType.Switch, isOn: this.isSwitchOn })

            .id('switch')

            .onChange((isOn: boolean) = > {

              Logger.log(`LSQ: wifi swtich is: ${isOn}`)

              AppStorage.SetOrCreate('wifiList', [])

              try {

                // 如果是打开状态,记录状态,打开网络,开始扫描

                if (isOn) {

                  this.isSwitchOn = true

                  wifi.enableWifi()

                  return

                } else {

                  // 记录状态,断开网络禁用网络

                  this.isSwitchOn = false

                  this.isLinked = false

                  wifi.disconnect()

                  wifi.disableWifi()

                }

              } catch (error) {

                Logger.error(TAG, `failed,code:${JSON.stringify(error.code)},message:${JSON.stringify(error.message)}`)

              }

            })

        }

      }

      .width('100%')

      .padding({ left: 16, right: 16 })


      if (this.isLinked && this.isSwitchOn) {

        Column() {

          Text($r('app.string.connected'))

            .fontSize(22)

            .width('100%')

          Row() {

            Text(this.linkedInfo.ssid)

              .fontSize(20)

              .fontColor(Color.Black)

              .layoutWeight(1)

            Text($r('app.string.connected'))

              .fontSize(18)

              .fontColor(Color.Black)

          }

          .width('100%')

          .padding(10)

          .margin({ left: 16, right: 16 })

          .border({ radius: 15, color: Color.Gray, width: 1 })

          .backgroundColor(Color.White)

        }

        .width('100%')

        .padding({ left: 16, right: 16 })

      }

      if (this.isSwitchOn) {

        AvailableWifi({ linkedInfo: this.linkedInfo })

      }

    }

    .width('100%')

    .height('100%')

    .backgroundColor($r('app.color.index_bg'))

  }


  aboutToDisappear() {

    wifi.off('wifiConnectionChange')

    wifi.off('wifiStateChange')

  }

}
- wifi的连接、扫描、获取详细信息等功能封装在WifiModel模块中,源码参考:[WifiModel.ets]。
/*

 * Copyright (c) 2022-2023 Huawei Device Co., Ltd.

 * Licensed under the Apache License, Version 2.0 (the "License");

 * you may not use this file except in compliance with the License.

 * You may obtain a copy of the License at

 *

 *     http://www.apache.org/licenses/LICENSE-2.0

 *

 * Unless required by applicable law or agreed to in writing, software

 * distributed under the License is distributed on an "AS IS" BASIS,

 * WITHOUT WARRANTIES OR CONDITIONS OF ANY KIND, either express or implied.

 * See the License for the specific language governing permissions and

 * limitations under the License.

 */


import prompt from '@ohos.promptAction'

import wifi from '@ohos.wifiManager'

import Logger from '../model/Logger'


const TAG: string = 'WiFiModel'


export type WifiType = {

  ssid: string,

  bssid: string,

  securityType: wifi.WifiSecurityType,

  rssi: number,

  band: number,

  frequency: number,

  timestamp: number

}


export class WifiModel {

  async getScanInfos(): Promise< Array< WifiType >> {

    Logger.log(TAG, 'scanWifi begin')

    let wifiList: Array< WifiType > = []

    let result: Array< wifi.WifiScanInfo > = []

    try {

      result = await wifi.getScanResults()

    } catch (err) {

      Logger.log(TAG, `scan info err: ${JSON.stringify(err)}`)

      return wifiList

    }

    Logger.log(TAG, `scan info call back: ${result.length}`)

    for (var i = 0; i < result.length; ++i) {

      wifiList.push({

        ssid: result[i].ssid,

        bssid: result[i].bssid,

        securityType: result[i].securityType,

        rssi: result[i].rssi,

        band: result[i].band,

        frequency: result[i].frequency,

        timestamp: result[i].timestamp

      })

    }

    return wifiList

  }


  connectNetwork(scanInfo: wifi.WifiScanInfo, psw) {

    prompt.showToast({ message: 'connecting', duration: 5000 })

    Logger.debug(TAG, `connectNetwork bssid=${scanInfo.bssid}`)

    // 这里因为api问题,需要声明为any,已提单

    let deviceConfig: any = {

      ssid: scanInfo.ssid,

      bssid: scanInfo.bssid,

      preSharedKey: psw,

      isHiddenSsid: false,

      securityType: scanInfo.securityType

    }

    try {

      wifi.connectToDevice(deviceConfig)

      Logger.debug(TAG, `connectToDevice success`)

    } catch (err) {

      Logger.debug(TAG, `connectToDevice fail err is ${JSON.stringify(err)}`)

    }

    try {

      wifi.addDeviceConfig(deviceConfig)

    } catch (err) {

      Logger.debug(TAG, `addDeviceConfig fail err is ${JSON.stringify(err)}`)

    }

  }


  resolveIP(ip) {

    let address: string = ip.toString()

    if (address === '0') {

      return '00:00:000:000'

    }

    address.substring(0, 2)

    return `${address.substring(0, 2)}:${address.substring(2, 4)}:${address.substring(4, 7)}:${address.substring(7, 10)}`

  }


  getIpInfo() {

    let ipInfoList = []

    let ipInfo = wifi.getIpInfo()

    Logger.info(`${TAG} getIpInfo=${JSON.stringify(ipInfo)}`)

    ipInfoList.push({ key: $r('app.string.ip_address'), value: this.resolveIP(ipInfo.ipAddress) })

    ipInfoList.push({ key: $r('app.string.gate_way'), value: this.resolveIP(ipInfo.gateway) })

    ipInfoList.push({ key: $r('app.string.net_mask'), value: this.resolveIP(ipInfo.netmask) })

    ipInfoList.push({ key: $r('app.string.primary_dns'), value: this.resolveIP(ipInfo.primaryDns) })

    ipInfoList.push({ key: $r('app.string.second_dns'), value: this.resolveIP(ipInfo.secondDns) })

    ipInfoList.push({ key: $r('app.string.server_ip'), value: this.resolveIP(ipInfo.serverIp) })

    ipInfoList.push({ key: $r('app.string.lease_duration'), value: ipInfo.leaseDuration.toString() })

    return ipInfoList

  }


  getCountryCode() {

    let countryCodeList = []

    let countryCode = wifi.getCountryCode()

    countryCodeList.push({ key: $r('app.string.country_code'), value: countryCode })

    return countryCodeList

  }


  getFeatureSupport() {

    let featureSupportedList = []

    featureSupportedList.push({

      key: $r('app.string.infrastructure_feature'),

      value: wifi.isFeatureSupported(0x0001).toString()

    })

    featureSupportedList.push({ key: $r('app.string.ghz_feature'), value: wifi.isFeatureSupported(0x0002).toString() })

    featureSupportedList.push({

      key: $r('app.string.gas_anqp_feature'),

      value: wifi.isFeatureSupported(0x0004).toString()

    })

    featureSupportedList.push({ key: $r('app.string.wifi_direct'), value: wifi.isFeatureSupported(0x0008).toString() })

    featureSupportedList.push({ key: $r('app.string.soft_ap'), value: wifi.isFeatureSupported(0x0010).toString() })

    featureSupportedList.push({ key: $r('app.string.wifi_aware'), value: wifi.isFeatureSupported(0x0040).toString() })

    return featureSupportedList

  }

}
wifi的连接功能:点击wifi列表中加密的wifi,并在弹窗中输入密码后,会在[AvailableWifi.ets] 中通过WifiModule.connectNetwork()调用wifi.connectToDevice()连接wifi,如图中的 连接wifi 。
/*

 * Copyright (c) 2022-2023 Huawei Device Co., Ltd.

 * Licensed under the Apache License, Version 2.0 (the "License");

 * you may not use this file except in compliance with the License.

 * You may obtain a copy of the License at

 *

 *     http://www.apache.org/licenses/LICENSE-2.0

 *

 * Unless required by applicable law or agreed to in writing, software

 * distributed under the License is distributed on an "AS IS" BASIS,

 * WITHOUT WARRANTIES OR CONDITIONS OF ANY KIND, either express or implied.

 * See the License for the specific language governing permissions and

 * limitations under the License.

 */


import prompt from '@ohos.promptAction'

import Logger from '../model/Logger'

import { PswDialog } from '../component/PswDialog'

import { WifiModel } from '../model/WifiModel'

import { WifiView } from '../component/WifiView'

import WifiDataSource from '../component/BasicDataSource'

import wifi from '@ohos.wifiManager'


const TAG = 'AvailableWiFi'

let self = null


@Component

export struct AvailableWifi {

  private wifiModel = new WifiModel()

  private linkedInfo: wifi.WifiLinkedInfo = null

  @StorageLink('wifiList') @Watch('wifiListRefresh') wifiList: Array< wifi.WifiScanInfo > = []

  @State wifiDataResource: WifiDataSource = new WifiDataSource(this.wifiList)

  @State scanInfo: wifi.WifiScanInfo = undefined

  private pswDialogController: CustomDialogController = new CustomDialogController({

    builder: PswDialog({ scanInfo: $scanInfo, action: this.onAccept }),

    autoCancel: true

  })


  build() {

    List() {

      ListItem() {

        Row() {

          Text($r('app.string.available_wlan'))

            .fontSize(22)

            .layoutWeight(1)

        }

        .id('validWlan')

        .width('100%')

      }


      LazyForEach(this.wifiDataResource, (item, index) = > {

        ListItem() {

          WifiView({ wifi: item })

        }

        .id(`Wifi${index}`)

        .onClick(() = > {

          Logger.info(TAG, 'wifi click')

          this.scanInfo = item

          if (this.linkedInfo !== null && item.ssid === this.linkedInfo.ssid) {

            prompt.showToast({ message: 'this wifi is connected' })

            return

          }

          if (item.securityType === 0 || item.securityType === 1) {

            this.wifiModel.connectNetwork(item, '')

            return

          }

          this.pswDialogController.open()

        })

      }, item = > JSON.stringify(item))

    }

    .width('100%')

    .height('100%')

    .padding({ left: 16, right: 16 })

    .layoutWeight(1)

    .divider({ strokeWidth: 1, color: Color.Gray, startMargin: 10, endMargin: 10 })

    .margin({ top: 10 })

  }


  onAccept(scanInfo, psw) {

    Logger.info(TAG, 'connect wifi')

    self.wifiModel.connectNetwork(scanInfo, psw)

  }


  aboutToAppear() {

    self = this

  }


  wifiListRefresh() {

    this.wifiDataResource['dataArray'] = this.wifiList

    this.wifiDataResource.notifyDataReload()

  }

}
wifi的扫描功能:进入[Index.ets]后就会间歇性的调用wifi.scan()开启扫描,然后通过WifiModel模块中的getScanInfos()调用wifi.getScanResults()来获取扫描的结果,如图中的 主页 。
/*

 * Copyright (c) 2022-2023 Huawei Device Co., Ltd.

 * Licensed under the Apache License, Version 2.0 (the "License");

 * you may not use this file except in compliance with the License.

 * You may obtain a copy of the License at

 *

 *     http://www.apache.org/licenses/LICENSE-2.0

 *

 * Unless required by applicable law or agreed to in writing, software

 * distributed under the License is distributed on an "AS IS" BASIS,

 * WITHOUT WARRANTIES OR CONDITIONS OF ANY KIND, either express or implied.

 * See the License for the specific language governing permissions and

 * limitations under the License.

 */


import wifi from '@ohos.wifiManager'

import { AvailableWifi } from '../component/AvailableWifi'

import Logger from '../model/Logger'

import { TitleBar } from '../component/TitleBar'

import { WifiModel, WifiType } from '../model/WifiModel'


const TAG = 'Index'


@Entry

@Component

struct Index {

  private wifiModel: WifiModel = new WifiModel()

  private linkedInfo: wifi.WifiLinkedInfo = null

  @State isLinked: boolean = false

  @State isSwitchOn: boolean = false


  // 扫描wifi

  async scan() {

    // 获取有关Wi-Fi连接的信息,存入linkedInfo

    await this.getLinkedInfo()

    // 不停地扫描wifi

    let result: Array< WifiType > = await this.wifiModel.getScanInfos()

    if (this.isSwitchOn) {

      AppStorage.SetOrCreate('wifiList', result)

      setTimeout(async () = > {

        await this.scan()

      }, 3000)

    }

  }


  // 获取有关Wi-Fi连接的信息,存入linkedInfo

  async getLinkedInfo() {

    try {

      let wifiLinkedInfo = await wifi.getLinkedInfo()

      if (wifiLinkedInfo === null || wifiLinkedInfo.bssid === '') {

        this.isLinked = false

        this.linkedInfo = null

        return

      }

      this.isLinked = true

      this.linkedInfo = wifiLinkedInfo

    } catch (err) {

      Logger.info(`getLinkedInfo failed err is ${JSON.stringify(err)}`)

    }

  }


  // 监听wifi的变化

  addListener() {

    // 连接状态改变时,修改连接信息

    wifi.on('wifiConnectionChange', async state = > {

      Logger.log(TAG, `wifiConnectionChange: ${state}`)

      await this.getLinkedInfo()

    })

    // wifi状态改变时,先清空wifi列表,然后判断是否是开启状态,如果是就扫描

    wifi.on('wifiStateChange', state = > {

      Logger.log(TAG, `wifiStateLisener state: ${state}`)

      AppStorage.SetOrCreate('wifiList', [])

      if (state === 1) { // 1: wifi is enable, 0:wifi is disable

        this.scan()

      }

    })

  }


  aboutToAppear() {

    // 如果wifi是开的,就记录下状态,然后扫描wifi,并获取连接信息

    if (wifi.isWifiActive()) {

      Logger.log(TAG, 'wifi is active')

      this.isSwitchOn = true

      wifi.scan()

      this.scan()

      this.getLinkedInfo()

    }

    // 启动监听

    this.addListener()

  }


  build() {

    Column() {

      TitleBar()

      Row() {

        Text($r('app.string.wlan'))

          .fontSize(22)

          .fontWeight(FontWeight.Bold)

          .height(40)

        Column() {

          Toggle({ type: ToggleType.Switch, isOn: this.isSwitchOn })

            .id('switch')

            .onChange((isOn: boolean) = > {

              Logger.log(`LSQ: wifi swtich is: ${isOn}`)

              AppStorage.SetOrCreate('wifiList', [])

              try {

                // 如果是打开状态,记录状态,打开网络,开始扫描

                if (isOn) {

                  this.isSwitchOn = true

                  wifi.enableWifi()

                  return

                } else {

                  // 记录状态,断开网络禁用网络

                  this.isSwitchOn = false

                  this.isLinked = false

                  wifi.disconnect()

                  wifi.disableWifi()

                }

              } catch (error) {

                Logger.error(TAG, `failed,code:${JSON.stringify(error.code)},message:${JSON.stringify(error.message)}`)

              }

            })

        }

      }

      .width('100%')

      .padding({ left: 16, right: 16 })


      if (this.isLinked && this.isSwitchOn) {

        Column() {

          Text($r('app.string.connected'))

            .fontSize(22)

            .width('100%')

          Row() {

            Text(this.linkedInfo.ssid)

              .fontSize(20)

              .fontColor(Color.Black)

              .layoutWeight(1)

            Text($r('app.string.connected'))

              .fontSize(18)

              .fontColor(Color.Black)

          }

          .width('100%')

          .padding(10)

          .margin({ left: 16, right: 16 })

          .border({ radius: 15, color: Color.Gray, width: 1 })

          .backgroundColor(Color.White)

        }

        .width('100%')

        .padding({ left: 16, right: 16 })

      }

      if (this.isSwitchOn) {

        AvailableWifi({ linkedInfo: this.linkedInfo })

      }

    }

    .width('100%')

    .height('100%')

    .backgroundColor($r('app.color.index_bg'))

  }


  aboutToDisappear() {

    wifi.off('wifiConnectionChange')

    wifi.off('wifiStateChange')

  }

}
获取wifi的详细信息:在[About.ets]中通过WiFiModel中的getIpInfo()、getCountryCode()、getFeatureSupport()分别调用wifi.getIpInfo()、wifi.getCountryCode()、wifi.isFeatureSupported()来获取对应信息。 如图中的 wifi详情 。
/*

 * Copyright (c) 2022-2023 Huawei Device Co., Ltd.

 * Licensed under the Apache License, Version 2.0 (the "License");

 * you may not use this file except in compliance with the License.

 * You may obtain a copy of the License at

 *

 *     http://www.apache.org/licenses/LICENSE-2.0

 *

 * Unless required by applicable law or agreed to in writing, software

 * distributed under the License is distributed on an "AS IS" BASIS,

 * WITHOUT WARRANTIES OR CONDITIONS OF ANY KIND, either express or implied.

 * See the License for the specific language governing permissions and

 * limitations under the License.

 */


import router from '@ohos.router'

import { WifiModel } from '../model/WifiModel'

import { InfoView } from '../component/InfoView'


@Entry

@Component

struct About {

  private wifiModel: WifiModel = new WifiModel()


  build() {

    Column() {

      Row() {

        Image($r('app.media.ic_back'))

          .size({ width: 50, height: '100%' })

          .objectFit(ImageFit.Contain)

          .onClick(() = > {

            router.back()

          })

          .id('back')


        Text($r('app.string.about'))

          .fontColor(Color.White)

          .fontSize(25)

          .layoutWeight(1)

      }

      .width('100%')

      .height('8%')

      .constraintSize({ minHeight: 50 })

      .backgroundColor($r('app.color.button_color'))


      Scroll() {

        Column() {

          InfoView({ infoList: this.wifiModel.getIpInfo() })

          InfoView({ infoList: this.wifiModel.getCountryCode() })

          InfoView({ infoList: this.wifiModel.getFeatureSupport() })

        }

      }

      .layoutWeight(1)

    }

  }

}
审核编辑 黄宇
-
WLAN
+关注
关注
2文章
658浏览量
73112 -
鸿蒙
+关注
关注
57文章
2356浏览量
42868 -
OpenHarmony
+关注
关注
25文章
3723浏览量
16334
发布评论请先 登录
相关推荐
鸿蒙实战项目开发:【短信服务】
36岁了还有必要转行鸿蒙开发吗?
鸿蒙Flutter实战:07混合开发
鸿蒙Flutter实战:08-如何调试代码
鸿蒙Flutter实战:11-使用 Flutter SDK 3.22.0
鸿蒙Flutter实战:14-现有Flutter 项目支持鸿蒙 II
【专家问答】杨光明:鸿蒙系统研发工程师教你从0开发鸿蒙PCB开发板
【项目实战】基于RISC-V单片机的鸿蒙开发板项目
使用 Taro 开发鸿蒙原生应用 —— 快速上手,鸿蒙应用开发指南


 鸿蒙实战开发:【WLAN使用】


评论