 如何使用ESP32C3驱动SPI NAND flash
最近收到了一片国产工业级SD NAND,可以替代SD卡,容量大,贴片封装,非常适合做飞控"黑匣子"。
不用写驱动程序自带坏块管理的NAND Flash(贴片式TF卡),尺寸小巧,简单易用,兼容性强,稳定可靠,固件可定制,LGA-8封装,标准SDIO接口,兼容SPI/SD接口,兼容各大MCU平台,可替代普通TF卡/SD卡,尺寸6x8mm毫米,内置SLC晶圆擦写寿命10万次,通过1万次随机掉电测试耐高低温,支持工业级温度-40°~+85°,机贴手贴都非常方便,速度级别Class10(读取速度23.5MB/S写入速度12.3MB/S)标准的SD 2.0协议使得用户可以直接移植标准驱动代码,省去了驱动代码编程环节。支持TF卡启动的SOC都可以用SD NAND,厂商提供了STM32参考例程及原厂技术支持,主流容量:128MB/512MB/2GB/4GB/8GB,比TF卡稳定,比eMMC便宜。
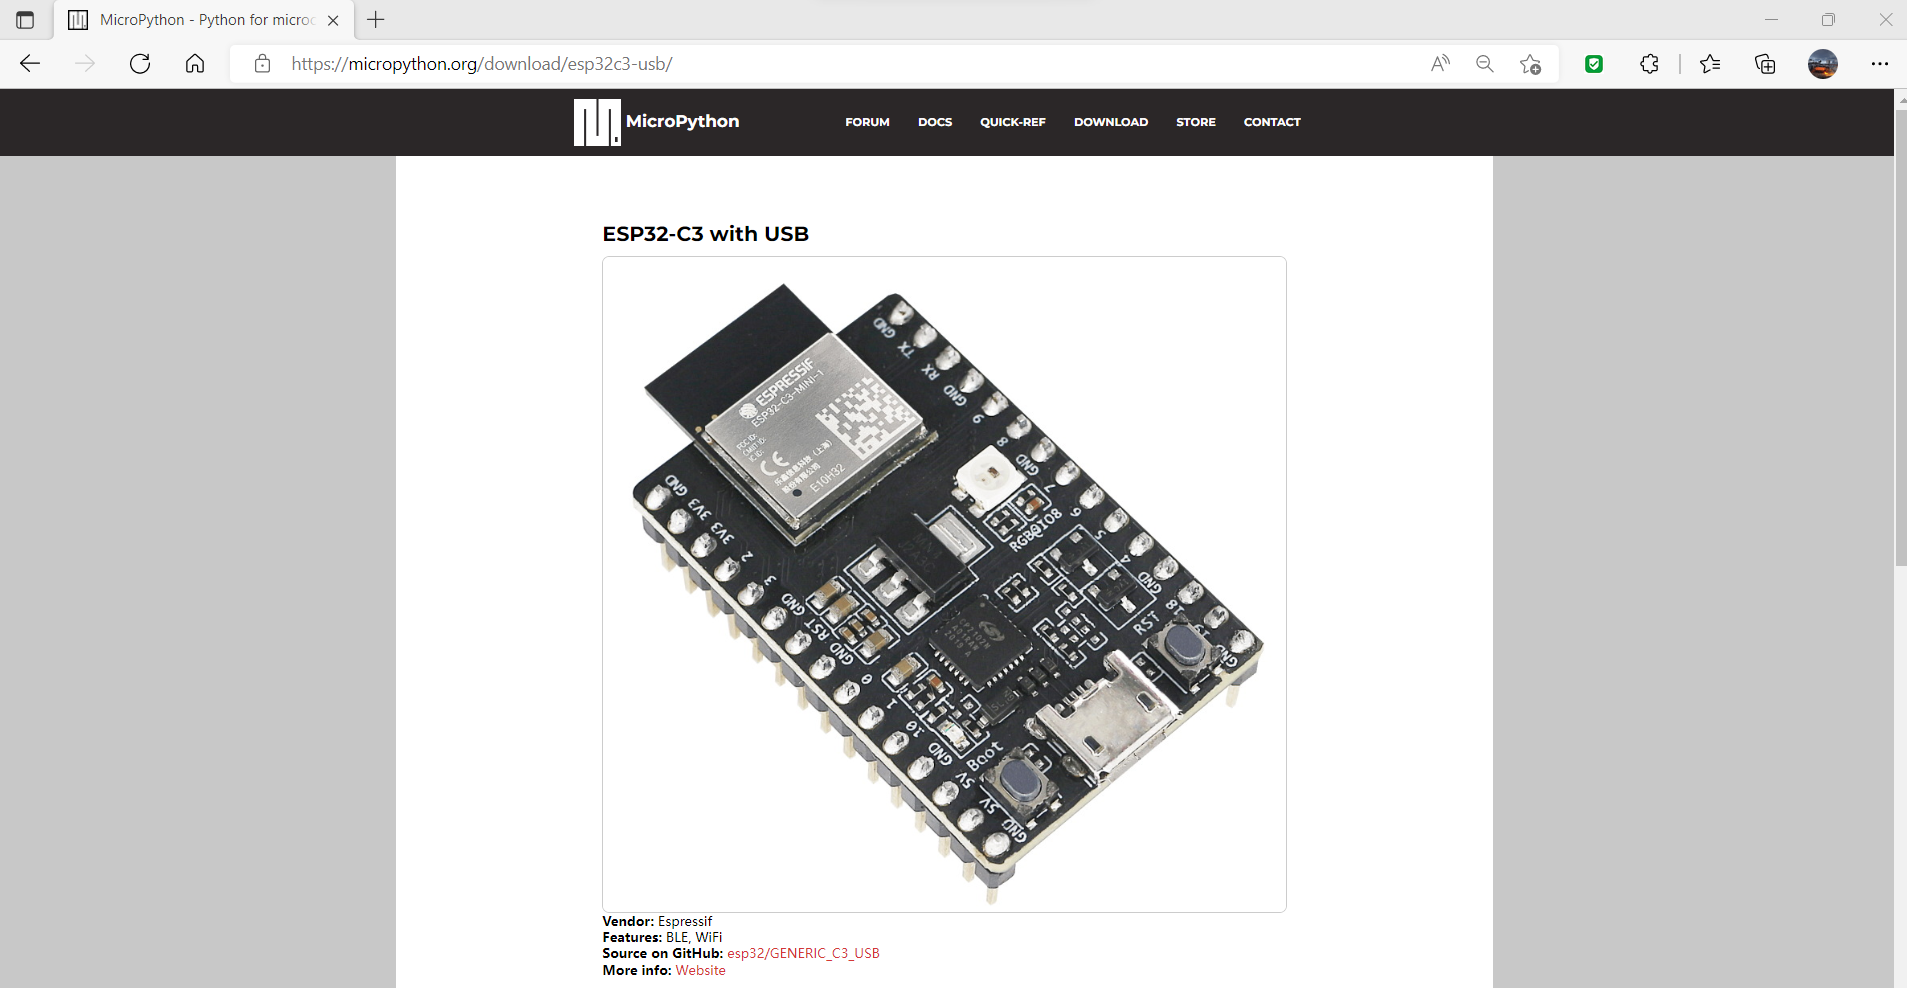
飞控板上ESP32C3的SDIO接口暂时用不了,只能先用SPI接口驱动。
评估板做了个micro SD卡的接口,方便直接插到带卡槽的开发板上进行调试。
ESP32C3的SPI接口是硬件SPI,支持DMA,速度应该还可以,但是我用杜邦线连接的,肯定会影响信号质量,估计时钟很难跑到50MHz了。
接线:
编写测试程序:
/* SD card and FAT filesystem example.
This example uses SPI peripheral to communicate with SD card.
This example code is in the Public Domain (or CC0 licensed, at your option.)
Unless required by applicable law or agreed to in writing, this
software is distributed on an "AS IS" BASIS, WITHOUT WARRANTIES OR
CONDITIONS OF ANY KIND, either express or implied.
*/
#include
#include
#include
#include "esp_vfs_fat.h"
#include "sdmmc_cmd.h"
#define EXAMPLE_MAX_CHAR_SIZE 64
static const char *TAG = "example";
#define MOUNT_POINT "/sdcard"
// Pin assignments can be set in menuconfig, see "SD SPI Example Configuration" menu.
// You can also change the pin assignments here by changing the following 4 lines.
#define PIN_NUM_MISO CONFIG_EXAMPLE_PIN_MISO
#define PIN_NUM_MOSI CONFIG_EXAMPLE_PIN_MOSI
#define PIN_NUM_CLK CONFIG_EXAMPLE_PIN_CLK
#define PIN_NUM_CS CONFIG_EXAMPLE_PIN_CS
static esp_err_t s_example_write_file(const char *path, char *data)
{
ESP_LOGI(TAG, "Opening file %s", path);
FILE *f = fopen(path, "w");
if (f == NULL) {
ESP_LOGE(TAG, "Failed to open file for writing");
return ESP_FAIL;
}
fprintf(f, data);
fclose(f);
ESP_LOGI(TAG, "File written");
return ESP_OK;
}
static esp_err_t s_example_read_file(const char *path)
{
ESP_LOGI(TAG, "Reading file %s", path);
FILE *f = fopen(path, "r");
if (f == NULL) {
ESP_LOGE(TAG, "Failed to open file for reading");
return ESP_FAIL;
}
char line[EXAMPLE_MAX_CHAR_SIZE];
fgets(line, sizeof(line), f);
fclose(f);
// strip newline
char *pos = strchr(line, '\n');
if (pos) {
*pos = '\0';
}
ESP_LOGI(TAG, "Read from file: '%s'", line);
return ESP_OK;
}
void app_main(void)
{
esp_err_t ret;
// Options for mounting the filesystem.
// If format_if_mount_failed is set to true, SD card will be partitioned and
// formatted in case when mounting fails.
esp_vfs_fat_sdmmc_mount_config_t mount_config = {
#ifdef CONFIG_EXAMPLE_FORMAT_IF_MOUNT_FAILED
.format_if_mount_failed = true,
#else
.format_if_mount_failed = false,
#endif // EXAMPLE_FORMAT_IF_MOUNT_FAILED
.max_files = 5,
.allocation_unit_size = 16 * 1024
};
sdmmc_card_t *card;
const char mount_point[] = MOUNT_POINT;
ESP_LOGI(TAG, "Initializing SD card");
// Use settings defined above to initialize SD card and mount FAT filesystem.
// Note: esp_vfs_fat_sdmmc/sdspi_mount is all-in-one convenience functions.
// Please check its source code and implement error recovery when developing
// production applications.
ESP_LOGI(TAG, "Using SPI peripheral");
// By default, SD card frequency is initialized to SDMMC_FREQ_DEFAULT (20MHz)
// For setting a specific frequency, use host.max_freq_khz (range 400kHz - 20MHz for SDSPI)
// Example: for fixed frequency of 10MHz, use host.max_freq_khz = 10000;
sdmmc_host_t host = SDSPI_HOST_DEFAULT();
spi_bus_config_t bus_cfg = {
.mosi_io_num = PIN_NUM_MOSI,
.miso_io_num = PIN_NUM_MISO,
.sclk_io_num = PIN_NUM_CLK,
.quadwp_io_num = -1,
.quadhd_io_num = -1,
.max_transfer_sz = 4000,
};
ret = spi_bus_initialize(host.slot, &bus_cfg, SDSPI_DEFAULT_DMA);
if (ret != ESP_OK) {
ESP_LOGE(TAG, "Failed to initialize bus.");
return;
}
// This initializes the slot without card detect (CD) and write protect (WP) signals.
// Modify slot_config.gpio_cd and slot_config.gpio_wp if your board has these signals.
sdspi_device_config_t slot_config = SDSPI_DEVICE_CONFIG_DEFAULT();
slot_config.gpio_cs = PIN_NUM_CS;
slot_config.host_id = host.slot;
ESP_LOGI(TAG, "Mounting filesystem");
ret = esp_vfs_fat_sdspi_mount(mount_point, &host, &slot_config, &mount_config, &card);
if (ret != ESP_OK) {
if (ret == ESP_FAIL) {
ESP_LOGE(TAG, "Failed to mount filesystem. "
"If you want the card to be formatted, set the CONFIG_EXAMPLE_FORMAT_IF_MOUNT_FAILED menuconfig option.");
} else {
ESP_LOGE(TAG, "Failed to initialize the card (%s). "
"Make sure SD card lines have pull-up resistors in place.", esp_err_to_name(ret));
}
return;
}
ESP_LOGI(TAG, "Filesystem mounted");
// Card has been initialized, print its properties
sdmmc_card_print_info(stdout, card);
// Use POSIX and C standard library functions to work with files.
// First create a file.
const char *file_hello = MOUNT_POINT"/hello.txt";
char data[EXAMPLE_MAX_CHAR_SIZE];
snprintf(data, EXAMPLE_MAX_CHAR_SIZE, "%s %s!\n", "Hello", card->cid.name);
ret = s_example_write_file(file_hello, data);
if (ret != ESP_OK) {
return;
}
const char *file_foo = MOUNT_POINT"/foo.txt";
// Check if destination file exists before renaming
struct stat st;
if (stat(file_foo, &st) == 0) {
// Delete it if it exists
unlink(file_foo);
}
// Rename original file
ESP_LOGI(TAG, "Renaming file %s to %s", file_hello, file_foo);
if (rename(file_hello, file_foo) != 0) {
ESP_LOGE(TAG, "Rename failed");
return;
}
ret = s_example_read_file(file_foo);
if (ret != ESP_OK) {
return;
}
// Format FATFS
ret = esp_vfs_fat_sdcard_format(mount_point, card);
if (ret != ESP_OK) {
ESP_LOGE(TAG, "Failed to format FATFS (%s)", esp_err_to_name(ret));
return;
}
if (stat(file_foo, &st) == 0) {
ESP_LOGI(TAG, "file still exists");
return;
} else {
ESP_LOGI(TAG, "file doesnt exist, format done");
}
const char *file_nihao = MOUNT_POINT"/nihao.txt";
memset(data, 0, EXAMPLE_MAX_CHAR_SIZE);
snprintf(data, EXAMPLE_MAX_CHAR_SIZE, "%s %s!\n", "Nihao", card->cid.name);
ret = s_example_write_file(file_nihao, data);
if (ret != ESP_OK) {
return;
}
//Open file for reading
ret = s_example_read_file(file_nihao);
if (ret != ESP_OK) {
return;
}
// All done, unmount partition and disable SPI peripheral
esp_vfs_fat_sdcard_unmount(mount_point, card);
ESP_LOGI(TAG, "Card unmounted");
//deinitialize the bus after all devices are removed
spi_bus_free(host.slot);
}
这段代码是使用SPI(串行外设接口)与SD卡进行通信。它展示了如何挂载SD卡、写入文件、读取文件、重命名文件、格式化SD卡,最后卸载SD卡。
代码首先包含了必要的头文件,并定义了一些常量,如最大字符大小、SD卡的挂载点和SPI通信的引脚分配。
然后定义了两个辅助函数:s_example_write_file和s_example_read_file。s_example_write_file函数打开一个给定路径的文件,写入数据,然后关闭文件。如果无法打开文件,它会记录一个错误并返回失败状态。s_example_read_file函数打开一个给定路径的文件,从中读取一行,然后关闭文件。如果无法打开文件,它会记录一个错误并返回失败状态。
app_main函数是程序的主入口点。它首先定义了挂载SD卡的配置。然后初始化SPI总线和SD卡插槽。如果初始化失败,它会记录一个错误并返回。
接下来,它试图挂载SD卡。如果挂载失败,它会记录一个错误并返回。如果挂载成功,它会记录一个成功消息并打印SD卡的属性。
程序然后在SD卡上写入一个文件,检查另一个文件是否存在,如果存在则删除它,然后将第一个文件重命名为第二个文件。然后从第二个文件中读取。
程序接着格式化SD卡,并检查第二个文件是否仍然存在。如果存在,它会记录一个消息并返回。如果不存在,它会记录一个成功消息,写入第三个文件,并从第三个文件中读取。
最后,卸载SD卡并禁用SPI外设。
编译:
烧写到ESP32C3后运行,控制台输出:
I (286) app_start: Starting scheduler on CPU0
I (291) main_task: Started on CPU0
I (291) main_task: Calling app_main()
I (291) example: Initializing SD card
I (301) example: Using SPI peripheral
I (301) example: Mounting filesystem
I (311) gpio: GPIO[1]| InputEn: 0| OutputEn: 1| OpenDrain: 0| Pullup: 0| Pulldown: 0| Intr:0
I (321) sdspi_transaction: cmd=52, R1 response: command not supported
I (361) sdspi_transaction: cmd=5, R1 response: command not supported
I (391) example: Filesystem mounted
Name: CS064
Type: SDHC/SDXC
Speed: 20.00 MHz (limit: 20.00 MHz)
Size: 7382MB
CSD: ver=2, sector_size=512, capacity=15118336 read_bl_len=9
SSR: bus_width=1
I (401) example: Opening file /sdcard/hello.txt
I (411) example: File written
I (411) example: Renaming file /sdcard/hello.txt to /sdcard/foo.txt
I (411) example: Reading file /sdcard/foo.txt
I (421) example: Read from file: 'Hello CS064!'
I (421) vfs_fat_sdmmc: Formatting card, allocation unit size=16384
I (2911) example: file doesnt exist, format done
I (2911) example: Opening file /sdcard/nihao.txt
I (2921) example: File written
I (2921) example: Reading file /sdcard/nihao.txt
I (2921) example: Read from file: 'Nihao CS064!'
I (2921) gpio: GPIO[1]| InputEn: 1| OutputEn: 0| OpenDrain: 0| Pullup: 0| Pulldown: 0| Intr:0
I (2931) example: Card unmounted
I (2931) gpio: GPIO[4]| InputEn: 0| OutputEn: 0| OpenDrain: 0| Pullup: 1| Pulldown: 0| Intr:0
I (2941) gpio: GPIO[6]| InputEn: 0| OutputEn: 0| OpenDrain: 0| Pullup: 1| Pulldown: 0| Intr:0
I (2951) gpio: GPIO[5]| InputEn: 0| OutputEn: 0| OpenDrain: 0| Pullup: 1| Pulldown: 0| Intr:0
I (2961) main_task: Returned from app_main()
可以看到输出了存储卡信息:
Name: CS064
Type: SDHC/SDXC
Speed: 20.00 MHz (limit: 20.00 MHz)
Size: 7382MB
CSD: ver=2, sector_size=512, capacity=15118336 read_bl_len=9
SSR: bus_width=1
后面还输出了读写文件相应的信息。
-
FlaSh
+关注
关注
10文章
1632浏览量
147909 -
SPI
+关注
关注
17文章
1706浏览量
91479 -
存储芯片
+关注
关注
11文章
895浏览量
43130 -
ESP32
+关注
关注
18文章
968浏览量
17194
发布评论请先 登录
相关推荐
基于XIAO ESP32C3的智能家居四路控制器设计

ESP32C3串口打印数据
esp32c3项目采用wss_server例程,把wifi断开的话esp32c3会重启,为什么?
idf.py set-target esp32c3无法生效怎么解决?
采用esp-hosted的spi连接的方式连接esp32c3与linux主机,esp32c3收到的包的数据是错的,如何避免?
windowns环境下esp32c3如何解除flash加密?
esp32c3怎样保护flash中的代码不被拷贝?
如何使用ESP32C3驱动SPI NAND flash
windowns环境下esp32c3如何解除flash加密?
使用ESP32C3,用ESP-IDF编译bt_hid_mouse_device例程失败报错如何解决?
esp32c3怎样保护flash中的代码不被拷贝?
【开源资料】使用ESP32C3超简单制作迷你四足机器人
深入剖析esp32c3的系统底层启动
基于nanoESP32-C3开发板用ESP32-c3下试跑Zephyr
【DFRobot Beetle ESP32-C3开发板试用体验】刷写micropython固件


 工商网监
工商网监
评论