1 背景
前段时间学习了一下如何使用pyocd配合APM32F411VCTINY板在命令行下给它进行各种骚操作,在使用一段时间后就想着:pyocd是基于python的,那是不是也可以使用python脚本+pyocd使用起来呢?
完成我们的一些重复的操作的自动化(因为我比较懒),嘿嘿。想到就去做。
2 pyocd 的python api
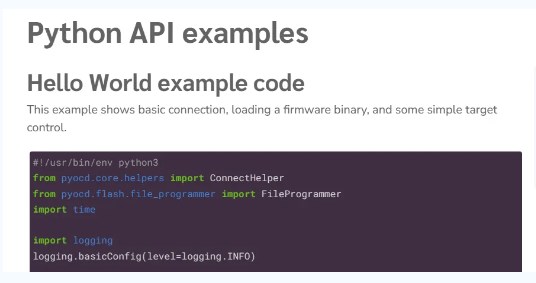
之前有介绍pyocd的时候发现遗漏了pyocd的api没有看,它还给了利用python+pyocd的一些例子(https://pyocd.io/docs/api_examples.html)。
比如下载bin文件的例子。

本文档就对近段时间我学习到的pyocd+python,基于APM32F411TINY板的一些收获。由于我也是初学python,里面的一些不科学的操作,也请大家指出斧正。此致感谢!
2.1 连接
首先是连接的API:
session_with_chosen_probe()
这个api主要是控制我们选择哪个link去连接目标芯片,可以使用link的UID去指定,比如说我这里的link UID是:00350054500000144e5448590258(注:可以在CMD命令行用:pyocd list命令查看)。

那我这里设置指定使用我的 Geehy CMSIS-DAP WinUSB的设置就是:
ConnectHelper.session_with_chosen_probe(unique_id='00350054500000144e5448590258')
2.2 程序控制
让程序停下
target.halt()
让程序继续运行
target.resume()
2.3 数据读取
数据的读取指令可以使用:
target.read32(address)
这个可以读取我们MCU的flash、ram、外设寄存器等内容。
我们也可以使用指令:
target.read_core_register("pc")
读取我们程序的运行到的地方。
2.4 数据写入
数据的写入,我们可以使用:
target.write32(address,data)
这个可以对我们MCU的fram、外设寄存器等可以直接写入内容的地址进行操作。
Q:为什么不能直接对Flash进行直接写入?
A:因为flash的写入其实是flash控制器(解锁、控制、状态等寄存器),去进行的。我们通过swd的指令只能通过操作flash的控制器,从而才能对Flash进行写入。
3 程序设计
我这里设计了两个程序,对学习到的知识进行验证。
3.1 读取PE5/6的状态
这个程序我设想的是,我的APM32F411VCTINY板已经下载了一个LED闪烁的程序,我要知道LED当前的一个状态。这个其实可以类比于一个黑盒子(芯片端),我们在不开盒子的情况下去获取我们想知道的寄存器信息。
程序的基本设计流程:
1. 连接APM32F411VC,
2. 读取GPIOE的ODATA寄存器,用于判断PE5/PE6的高低电平。
3. 输出寄存器内容,PE5/PE6的状态,以及相应的PC的内容。
程序如下:
import time
from pyocd.core.helpers import ConnectHelper
# Replace the following string with your target device serial number
TARGET_DEVICE_SERIAL_NUMBER = '00350054500000144e5448590258'
# APM32F411 GPIOE base address and ODATA offset
GPIOE_BASE = 0x40021000
GPIOE_ODATA_OFFSET = 0x14
# Connect to the target device with the specified serial number
with ConnectHelper.session_with_chosen_probe(unique_id=TARGET_DEVICE_SERIAL_NUMBER) as session:
# Get the target object
board = session.board
target = board.target
# ensure the target device in the running state
target.resume()
# Compute the address of the ODATA register
gpioe_odata_address = GPIOE_BASE + GPIOE_ODATA_OFFSET
# Monitor PE5 and PE6 pin status
# Monitor 10 times
for i in range(10):
target.halt()
odata = target.read32(gpioe_odata_address)
pc = target.read_core_register("pc")
target.resume()
pe5 = (odata >> 5) & 0x1
pe6 = (odata >> 6) & 0x1
# Print the contents of the odata read
print("odata: %s " % bin(odata))
print(f'PE5: {"High" if pe5 else "Low"}, PE6: {"High" if pe6 else "Low"}')
# Read some registers.
print("pc: 0x%X" % pc)
print("")
# Wait 0.5 seconds
time.sleep(0.5)
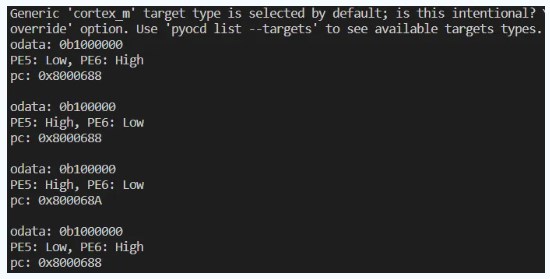
程序运行(vscode)起来得到的结果如下:

发现可以读取回来PE5/PE6的状态,且可以明确知道此时PC的内容。
3.2 解除/上锁APM32F411的读保护
由于我们的程序烧录进APM32F411后一般会对它进行读保护的操作,从而使得我们的程序不会被“有心人”读取**。
通过查阅APM32F411的手册,我们知道对其进行上读保护的操作的流程有:
1. 解锁选项字节编程区域;
2. 对读保护进行操作;
3. 重载选项字节。(PS:重载选项字节会引起复位,此时我们需要重新连接SWD,才能重新读取内容)
下面就根据这个流程对python脚本进行设计。
import time
from pyocd.core.helpers import ConnectHelper
# Replace the following string with your target device serial number
TARGET_DEVICE_SERIAL_NUMBER = '00350054500000144e5448590258'
# APM32F411 Option Bytes related register addresses and key values
FMC_OPTKEY = 0x40023C08
FMC_OPTCTRL = 0x40023C14
OPTCTRL_BYTE1_ADDRESS = FMC_OPTCTRL + 1 # Points to the second byte of OPTCTRL
FMC_OPT_KEY1 = 0x08192A3B
FMC_OPT_KEY2 = 0x4C5D6E7F
OB_RDP_LEVEL_1 = 0x55 # Level 1 read protection
OB_RDP_LEVEL_0 = 0xAA # No read protection
# Connect to the target MCU
with ConnectHelper.session_with_chosen_probe(unique_id=TARGET_DEVICE_SERIAL_NUMBER) as session:
target = session.board.target
# Read the current value of OPTCTRL
optctrl_value = target.read32(FMC_OPTCTRL)
rdp_level = target.read8(OPTCTRL_BYTE1_ADDRESS) # Read the second byte directly
if rdp_level != OB_RDP_LEVEL_0:
print("Target MCU is already read protected")
else:
print("Target MCU is not read protected, proceeding with read protect operation...")
# Unlock Option Bytes programming
if optctrl_value & (1 << 0): # Check the OPTLOCK bit
target.write32(FMC_OPTKEY, FMC_OPT_KEY1)
target.write32(FMC_OPTKEY, FMC_OPT_KEY2)
optctrl_value = target.read32(FMC_OPTCTRL)
print("optctrl_value: 0x%X" % optctrl_value)
# Set the read protection level (only modify the second byte)
target.write8(OPTCTRL_BYTE1_ADDRESS, OB_RDP_LEVEL_1)
# Start the Option Bytes programming
optctrl_value = target.read32(FMC_OPTCTRL)
optctrl_value |= (1 << 1) # Set the OPTSTRT bit
print("optctrl_value: 0x%X" % optctrl_value)
target.write32(FMC_OPTCTRL, optctrl_value)
# Wait for programming to complete and trigger a reset
while True:
optctrl_value = target.read32(FMC_OPTCTRL)
if not (optctrl_value & (1 << 1)): # Wait for the OPTSTRT bit to be cleared
break
# Perform a hardware reset of the target MCU
session.probe.reset()
# Wait 0.5 seconds
time.sleep(0.5)
# Re-establish the connection after the reset
with ConnectHelper.session_with_chosen_probe(unique_id=TARGET_DEVICE_SERIAL_NUMBER) as new_session:
new_target = new_session.board.target
# Verify if read protection has been successfully set
new_optctrl_value = new_target.read32(FMC_OPTCTRL)
new_rdp_level = (new_optctrl_value >> 8) & 0xFF
if new_rdp_level == OB_RDP_LEVEL_1:
print("Read protect operation successful")
else:
print("Read protect operation failed")
脚本运行结果如下:

当然我也给大家准备了解锁的操作的脚本,脚本运行结果如下:

-
python
+关注
关注
56文章
4821浏览量
85611 -
命令行
+关注
关注
0文章
80浏览量
10498 -
脚本
+关注
关注
1文章
395浏览量
15169
原文标题:APM32芯得 EP.34 | 还可以这样玩?APM32F411与pyocd的火花
文章出处:【微信号:geehysemi,微信公众号:Geehy极海半导体】欢迎添加关注!文章转载请注明出处。
发布评论请先 登录
相关推荐


 APM32F411板的python+pyocd命令行操作


评论