 Kubernetes Pod常用管理命令详解
1. k8s-pod常用管理命令
创建Pod:
kubectl apply -f pod.yaml
kubectl run nginx --image=nginx
查看Pod:
kubectl get pods
kubectl describe pod
查看日志:
kubectl logs[-c CONTAINER] kubectl logs [-c CONTAINER] -f
进入容器终端:
kubectl exec[-c CONTAINER] --bash
删除Pod:
kubectl delete
导出pod的yaml配置文件
[root@k8s-master yaml]# kubectl get pods
NAME                     READY   STATUS    RESTARTS   AGE
nginx-6799fc88d8-s5wvx   1/1     Running   1          40h
test-5f655598-5jfrt      1/1     Running   1          20h
test-5f655598-bhhm4      1/1     Running   1          20h
test-5f655598-v5l8f      1/1     Running   1          20h
web-674477549d-flj78     1/1     Running   1          39h
web-674477549d-m7lsj     1/1     Running   1          23h
web-674477549d-stk84     1/1     Running   1          23h
[root@k8s-master yaml]# kubectl get pods web-674477549d-flj78 -o yaml >web-pod.yaml
2. k8s-pod案例
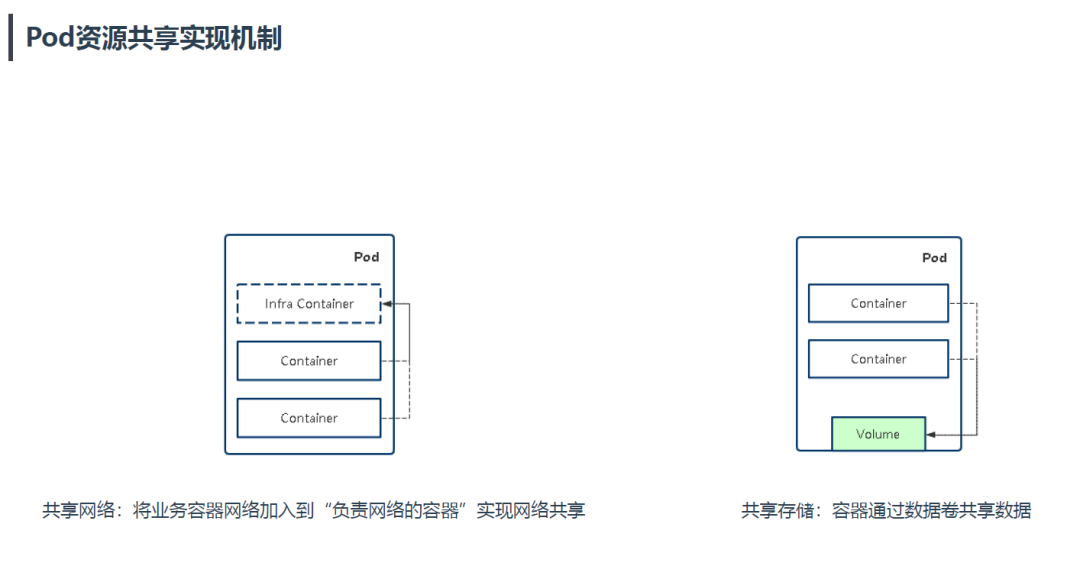
2.1 实现网络共享
2.1.1 导出配置文件,进行编写案例
编写导出的web-pod.yaml文件进行测试
[root@k8s-master yaml]# kubectl get pods
NAME                     READY   STATUS    RESTARTS   AGE
nginx-6799fc88d8-s5wvx   1/1     Running   1          40h
test-5f655598-5jfrt      1/1     Running   1          20h
test-5f655598-bhhm4      1/1     Running   1          20h
test-5f655598-v5l8f      1/1     Running   1          20h
web-674477549d-flj78     1/1     Running   1          39h
web-674477549d-m7lsj     1/1     Running   1          23h
web-674477549d-stk84     1/1     Running   1          23h
[root@k8s-master yaml]# kubectl get pods web-674477549d-flj78 -o yaml >web-pod.yaml
[root@k8s-master yaml]# vim web-pod.yaml
[root@k8s-master yaml]# cat web-pod.yaml
apiVersion: v1
kind: Pod
metadata:
  labels:
    app: pod-test
  name: pod-net-test
  namespace: default
spec:
  containers:
  - image: busybox
    imagePullPolicy: Always
    name: pod-test
    command: ["/bin/sh"]
    args:
      - "-c"
      - "sleep 3000000"

  - image: nginx
    name: web
2.1.2 启动配置文件
[root@k8s-master yaml]# kubectl apply  -f web-pod.yaml
pod/pod-net-test created
2.1.3 监控pod是否启动
[root@k8s-master yaml]# kubectl get pods
NAME                     READY   STATUS              RESTARTS   AGE
nginx-6799fc88d8-s5wvx   1/1     Running             1          41h
pod-net-test             0/2     ContainerCreating   0          19s
test-5f655598-5jfrt      1/1     Running             1          21h
test-5f655598-bhhm4      1/1     Running             1          21h
test-5f655598-v5l8f      1/1     Running             1          21h
web-674477549d-flj78     1/1     Running             1          40h
web-674477549d-m7lsj     1/1     Running             1          23h
web-674477549d-stk84     1/1     Running             1          23h
[root@k8s-master yaml]# kubectl get pods -w
NAME                     READY   STATUS    RESTARTS   AGE
nginx-6799fc88d8-s5wvx   1/1     Running   1          41h
pod-net-test             2/2     Running   0          89s
test-5f655598-5jfrt      1/1     Running   1          21h
test-5f655598-bhhm4      1/1     Running   1          21h
test-5f655598-v5l8f      1/1     Running   1          21h
web-674477549d-flj78     1/1     Running   1          40h
web-674477549d-m7lsj     1/1     Running   1          23h
web-674477549d-stk84     1/1     Running   1          23h
注释:这里注意一下,可以是 “-w ” 持续监听pod状态
2.1.4 进入pod
[root@k8s-master pod]# kubectl exec -it pods/pod-net-test -c pod-test -- /bin/sh
Defaulting container name to pod-test.
Use 'kubectl describe pod/pod-net-test -n default' to see all of the containers in this pod.
/ # ifconfig
eth0      Link encap:Ethernet  HWaddr 5AFA85:C0
          inet addr:10.244.169.139  Bcast:10.244.169.139  Mask:255.255.255.255
          UP BROADCAST RUNNING MULTICAST  MTU:1480  Metric:1
          RX packets:5 errors:0 dropped:0 overruns:0 frame:0
          TX packets:0 errors:0 dropped:0 overruns:0 carrier:0
          collisions:0 txqueuelen:0
          RX bytes:446 (446.0 B)  TX bytes:0 (0.0 B)

lo        Link encap:Local Loopback
          inet addr:127.0.0.1  Mask:255.0.0.0
          UP LOOPBACK RUNNING  MTU:65536  Metric:1
          RX packets:0 errors:0 dropped:0 overruns:0 frame:0
          TX packets:0 errors:0 dropped:0 overruns:0 carrier:0
          collisions:0 txqueuelen:1000
          RX bytes:0 (0.0 B)  TX bytes:0 (0.0 B)

/ # netstat -lntup
Active Internet connections (only servers)
Proto Recv-Q Send-Q Local Address           Foreign Address         State       PID/Program name
tcp        0      0 0.0.0.0:80              0.0.0.0:*               LISTEN      -
tcp        0      0 :::80                   :::*                    LISTEN      -
注释:
exec:进入参数
-it:分配一个伪终端
pod-net-test:为容器名称
-c pod-test:指定容器名称pod-test
-- /bin/sh:为使用的环境变量
2.1.5 我们验证文件是不是nginx
我们进入nginx的容器里面,修改index.html文件进行验证
[root@k8s-master yaml]# kubectl exec -it  pod-net-test  -c web -- /bin/bash
root@pod-net-test:/# cd /usr/share/nginx/html/
root@pod-net-test:/usr/share/nginx/html# ls
50x.html  index.html
root@pod-net-test:/usr/share/nginx/html# echo 'pod-test' >index.html
退出nginx容器,进入busybox进行wget下载,验证文件是否是pod-test
[root@k8s-master yaml]# kubectl exec -it  pod-net-test  -c pod-test -- /bin/sh
/ # netstat -lntup
Active Internet connections (only servers)
Proto Recv-Q Send-Q Local Address           Foreign Address         State       PID/Program name
tcp        0      0 0.0.0.0:80              0.0.0.0:*               LISTEN      -
tcp        0      0 :::80                   :::*                    LISTEN      -
/ # wget http://127.0.0.1:80
Connecting to 127.0.0.1:80 (127.0.0.1:80)
saving to 'index.html'
index.html           100% |************************************************************************************************************************************************|     9  000 ETA
'index.html' saved
/ # cat index.html
pod-test
小结:
我们在nginx启动的时候,没有ip add等相关命令,我们通过修改index.html文件进行验证
注意使用进入命令的时候,一定要使用 “-c ” 参数区分进入那个容器
2.2 实现共享存储
2.2.1 导出配置文件,进行编写案例
进入目录
[root@k8s-master ~]# cd /root/yaml/
[root@k8s-master yaml]# ll
总用量 24
-rw-r--r--  1 root root  389 11月 27 21:22 my-deploy.yaml
-rw-r--r--  1 root root 3722 11月 28 10:48 my-get-deploy.yaml
-rw-r--r--. 1 root root  538 11月 27 17:00 service-test.yaml
-rw-r--r--  1 root root  792 11月 29 08:09 web-disk-pod.yaml
-rw-r--r--  1 root root  302 11月 28 13:39 web-pod.yaml
-rw-r--r--. 1 root root  777 11月 27 16:32 yaml-test.yaml
编写pod-volume-test.yaml配置文件
[root@k8s-master yaml]# vim pod-volume-test.yaml
[root@k8s-master yaml]# cat pod-volume-test.yaml
apiVersion: v1
kind: Pod
metadata:
  labels:
    app: test
  name: pod-volume-test
  namespace: default
spec:
  containers:
  - image: busybox
    imagePullPolicy: Always
    name: test
    command: ["/bin/sh"]
    args:
      - "-c"
      - "sleep 3000000"

    volumeMounts:      #挂载到容器内部的存储卷配置
    - name: log       # 引用pod定义的共享存储卷的名称
      mountPath: /data               #共享路径文件夹


  - image: nginx
    name: web
    volumeMounts:      #挂载到容器内部的存储卷配置
    - name: log       # 引用pod定义的共享存储卷的名称
      mountPath: /data               #共享路径文件夹


  #建立共享存储卷
  volumes:
  - name: log           #共享存储卷名称
    emptyDir: {}
2.2.2 创建共享磁盘
[root@k8s-master yaml]# mkdir -p /data
2.2.3 启动服务
[root@k8s-master yaml]# kubectl apply -f pod-volume-test.yaml
pod/pod-volume-test created
2.2.4 查看服务是否启动
[root@k8s-master yaml]# kubectl get pods
NAME                     READY   STATUS    RESTARTS   AGE
nginx-6799fc88d8-tfgfr   1/1     Running   0          30m
pod-volume-test          2/2     Running   0          2m37s
test-5f655598-j9rth      1/1     Running   0          30m
test-5f655598-kpp8k      1/1     Running   0          30m
test-5f655598-t6mfg      1/1     Running   0          30m
web-674477549d-7gqfr     1/1     Running   0          30m
web-674477549d-cttbc     1/1     Running   0          30m
web-674477549d-rrfqd     1/1     Running   0          30m
2.2.5 验证数据卷是否被共享
进入pod容器,在web容器创建一个index.html,文件内容为 "pod volume test"
[root@k8s-master yaml]# kubectl exec -it pod-volume-test -c web -- /bin/bash
root@pod-volume-test:/# cd /data/
root@pod-volume-test:/data# touch index.html
root@pod-volume-test:/data# echo 'pod volume test ' >index.html
root@pod-volume-test:/data# ls
index.html
进入容器test进行验证,/data目录下面是否有index.html文件,内容是否 “pod volume test”
[root@k8s-master yaml]# kubectl exec -it pod-volume-test -c test -- /bin/sh
/ # cd /data/
/data # ls
index.html
/data # cat index.html
pod volume test
2.2.6 查看日志
查看web日志
[root@k8s-master ~]# kubectl get pods
NAME                     READY   STATUS    RESTARTS   AGE
nginx-6799fc88d8-tfgfr   1/1     Running   0          54m
pod-volume-test          2/2     Running   0          26m
test-5f655598-j9rth      1/1     Running   0          54m
test-5f655598-kpp8k      1/1     Running   0          54m
test-5f655598-t6mfg      1/1     Running   0          54m
web-674477549d-7gqfr     1/1     Running   0          54m
web-674477549d-cttbc     1/1     Running   0          54m
web-674477549d-rrfqd     1/1     Running   0          54m
[root@k8s-master ~]# kubectl logs pod-volume-test -c web -f
/docker-entrypoint.sh: /docker-entrypoint.d/ is not empty, will attempt to perform configuration
/docker-entrypoint.sh: Looking for shell scripts in /docker-entrypoint.d/
/docker-entrypoint.sh: Launching /docker-entrypoint.d/10-listen-on-ipv6-by-default.sh
10-listen-on-ipv6-by-default.sh: Getting the checksum of /etc/nginx/conf.d/default.conf
10-listen-on-ipv6-by-default.sh: Enabled listen on IPv6 in /etc/nginx/conf.d/default.conf
/docker-entrypoint.sh: Launching /docker-entrypoint.d/20-envsubst-on-templates.sh
/docker-entrypoint.sh: Configuration complete; ready for start up
上面开启监听日志,
进入test测试终端,进行访问测试
[root@k8s-master yaml]# kubectl exec -it pod-volume-test -c test -- /bin/sh /data # cd /tmp/ /tmp # wget http://127.0.0.1 Connecting to 127.0.0.1 (127.0.0.1:80) saving to 'index.html' index.html 100% |******************************************************************************************************************************************************************************************************************************| 612 000 ETA 'index.html' saved /tmp # cat index.htmlWelcome to nginx! Welcome to nginx!
If you see this page, the nginx web server is successfully installed and working. Further configuration is required.
For online documentation and support please refer to nginx.org.
Commercial support is available at nginx.com.Thank you for using nginx.
查看监控日志情况
[root@k8s-master ~]# kubectl logs pod-volume-test -c web -f
/docker-entrypoint.sh: /docker-entrypoint.d/ is not empty, will attempt to perform configuration
/docker-entrypoint.sh: Looking for shell scripts in /docker-entrypoint.d/
/docker-entrypoint.sh: Launching /docker-entrypoint.d/10-listen-on-ipv6-by-default.sh
10-listen-on-ipv6-by-default.sh: Getting the checksum of /etc/nginx/conf.d/default.conf
10-listen-on-ipv6-by-default.sh: Enabled listen on IPv6 in /etc/nginx/conf.d/default.conf
/docker-entrypoint.sh: Launching /docker-entrypoint.d/20-envsubst-on-templates.sh
/docker-entrypoint.sh: Configuration complete; ready for start up


127.0.0.1 - - [29/Nov/202051:12 +0000] "GET / HTTP/1.1" 200 612 "-" "Wget" "-"
发现已经有日志了
3. k8s-pod字段详解
# yaml格式的pod定义文件完整内容:
apiVersion: v1#必选,版本号,例如v1
kind: Pod#必选,Pod
metadata:#必选,元数据
name: string#必选,Pod名称
namespace: string#必选,Pod所属的命名空间
labels:#自定义标签
- name: string#自定义标签名字
annotations:#自定义注释列表
- name: string
spec:#必选,Pod中容器的详细定义
containers:#必选,Pod中容器列表
- name: string#必选,容器名称
image: string#必选,容器的镜像名称
imagePullPolicy: [Always | Never | IfNotPresent]#获取镜像的策略 Alawys表示下载镜像 IfnotPresent表示优先使用本地镜像,否则下载镜像,Nerver表示仅使用本地镜像
command: [string]#容器的启动命令列表,如不指定,使用打包时使用的启动命令
args: [string]#容器的启动命令参数列表
workingDir: string#容器的工作目录
volumeMounts:#挂载到容器内部的存储卷配置
- name: string#引用pod定义的共享存储卷的名称,需用volumes[]部分定义的的卷名
mountPath: string#存储卷在容器内mount的绝对路径,应少于512字符
readOnly: boolean#是否为只读模式
ports:#需要暴露的端口库号列表
- name: string#端口号名称
containerPort: int#容器需要监听的端口号
hostPort: int#容器所在主机需要监听的端口号,默认与Container相同
protocol: string#端口协议,支持TCP和UDP,默认TCP
env:#容器运行前需设置的环境变量列表
- name: string#环境变量名称
value: string#环境变量的值
resources:#资源限制和请求的设置
limits:#资源限制的设置
cpu: string#Cpu的限制,单位为core数,将用于docker run --cpu-shares参数
memory: string#内存限制,单位可以为Mib/Gib,将用于docker run --memory参数
requests:#资源请求的设置
cpu: string#Cpu请求,容器启动的初始可用数量
memory: string#内存清楚,容器启动的初始可用数量
livenessProbe:#对Pod内个容器健康检查的设置,当探测无响应几次后将自动重启该容器,检查方法有exec、httpGet和tcpSocket,对一个容器只需设置其中一种方法即可
exec:#对Pod容器内检查方式设置为exec方式
command: [string]#exec方式需要制定的命令或脚本
httpGet:#对Pod内个容器健康检查方法设置为HttpGet,需要制定Path、port
path: string
port: number
host: string
scheme: string
HttpHeaders:
- name: string
value: string
tcpSocket:#对Pod内个容器健康检查方式设置为tcpSocket方式
port: number
initialDelaySeconds: 0#容器启动完成后首次探测的时间,单位为秒
timeoutSeconds: 0#对容器健康检查探测等待响应的超时时间,单位秒,默认1秒
periodSeconds: 0#对容器监控检查的定期探测时间设置,单位秒,默认10秒一次
successThreshold: 0
failureThreshold: 0
securityContext:
privileged:false
restartPolicy: [Always | Never | OnFailure]#Pod的重启策略,Always表示一旦不管以何种方式终止运行,kubelet都将重启,OnFailure表示只有Pod以非0退出码退出才重启,Nerver表示不再重启该Pod
    nodeSelector: obeject#设置NodeSelector表示将该Pod调度到包含这个label的node上,以key:value的格式指定
imagePullSecrets:#Pull镜像时使用的secret名称,以key:secretkey格式指定
- name: string
hostNetwork:false#是否使用主机网络模式,默认为false,如果设置为true,表示使用宿主机网络
volumes:#在该pod上定义共享存储卷列表
- name: string#共享存储卷名称 (volumes类型有很多种)
emptyDir: {}#类型为emtyDir的存储卷,与Pod同生命周期的一个临时目录。为空值
hostPath: string#类型为hostPath的存储卷,表示挂载Pod所在宿主机的目录
path: string#Pod所在宿主机的目录,将被用于同期中mount的目录
secret:#类型为secret的存储卷,挂载集群与定义的secre对象到容器内部
scretname: string
items:
- key: string
path: string
configMap:#类型为configMap的存储卷,挂载预定义的configMap对象到容器内部
name: string
items:
- key: string

path: string
链接:https://www.cnblogs.com/scajy/p/15475993.html
-
文件
+关注
关注
1文章
575浏览量
24989 -
命令
+关注
关注
5文章
711浏览量
22326 -
kubernetes
+关注
关注
0文章
234浏览量
8821
原文标题:"运维必备:Kubernetes Pod 常用管理命令大全与实战技巧"
文章出处:【微信号:magedu-Linux,微信公众号:马哥Linux运维】欢迎添加关注!文章转载请注明出处。
发布评论请先 登录
相关推荐
阿里云容器Kubernetes监控(二) - 使用Grafana展现Pod监控数据
从零开始入门 K8s| 阿里技术专家详解 K8s 核心概念
从零开始入门 K8s| 详解 Pod 及容器设计模式
深入研究Kubernetes调度
Kubernetes组件pod核心原理
Kubernetes Pod多网卡方案MULTUS
Kubernetes集群内服务通信机制介绍
Kubernetes中的Pod简易理解
Kubernetes Pod如何独立工作
Kubernetes Pod如何获取IP地址呢?
配置Kubernetes中Pod使用代理的两种常见方式


 工商网监
工商网监
评论