 基于XIAO ESP32C6的HA空气质量检测仪设计

今天小编给大家带来的是来自MIT的Jason的基于XIAO ESP32C6的HA空气质量检测仪项目,作为一名程序员,Jason经常自己连续几个小时坐在办公桌前,沉浸在一行行代码中。后来意识到周围的空气质量,尤其是二氧化碳水平不断上升。
制作背景
保持健康的工作空间至关重要,但我们需要一个既实用又美观的解决方案。如果有一种紧凑型设备,不仅可以监测空气质量,还可以作为美观的办公桌装饰品,那不是很棒吗?有了这个想法,Jason就开始着手实现它。Zigbee 是一种出色的智能家居低功耗通信协议。
使用 Seeed Studio 的 XIAO ESP32 C6 模块作为主控。它拥有小巧的外形和全面的 Arduino Zigbee 教程为开发者节省了大量开发时间。此外,还增加了 XIAO 扩展板和 Grove VOC 和 eCO2 气体传感器 (SGP30) 以获得准确的读数。
由于不喜欢传统的方形桌面摆件,所以Jason设计了一个小型站立机器人造型。至于细节,对 XIAO 扩展板的引脚排列进行了布线,以便在 XIAO 系列内的不同 MCU 之间轻松切换。这让Jason在组件选择上有了更大的灵活性。在结构件内,我将传感器放在右侧,用打印材料与MCU 隔开,确保最佳性能和时尚的设计。
材料清单
硬件列表
Grove-VOC and CO2 Gas Sensor SGP30
Seeed Studio XIAO ESP32C6Seeed Studio
XIAO Expansion Board
软件列表
Arduino IDE
Autodesk Fusion
Home Assistant
项目演示
1.连接带 OLED 显示屏的设备
在 OLED 屏幕上,我们将显示连接状态,可以轻松查看 Zigbee 与 Home Assistant 的连接是否成功。此外,UI 设计中还会有一些小惊喜!
OLED 显示屏将包含三个内容区域:
启动 Zigbee 连接
连接成功状态
CO2 和 eVOC 数据
我们还可以通过打开 Arduino 串行监视器来监视 XIAO ESP32 C6 的 Zigbee 连接状态和数据输出。
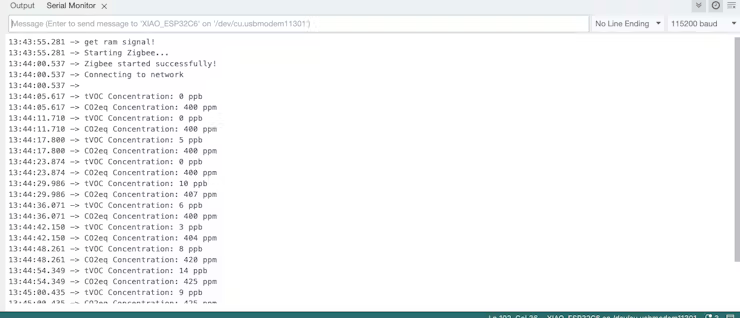
Arduino 串行监视器
2.HomeAssistant 带二氧化碳传感器界面效果截图
将购买的 Home Assistant Connect ZBT-1 插入我的 HA 设置后,我通过 Zigbee Home Automation 添加了我们的 Zigbee 终端设备。随后,在对 XIAO ESP32 C6 进行编程后,设备名称出现在 OLED 显示屏上。
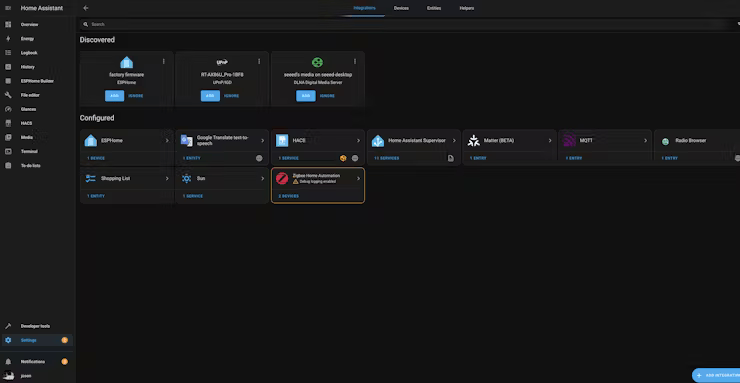
HomeAssistant 查找 Zigbee 集成
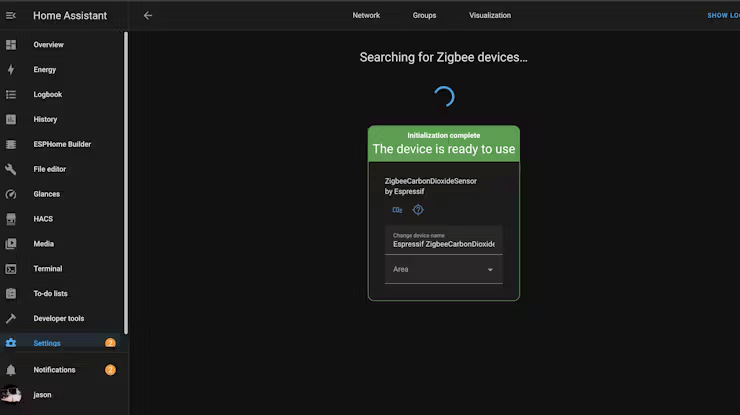
HomeAssistant 连接 Zigbee 设备
访问 Homeassistant 后,我们可以看到显示的数据随时间的变化
成功连接到 HomeAssistant 后,我们在 Zigbee 中找到了我们的设备,它提供了两个主要功能:
实时数据显示
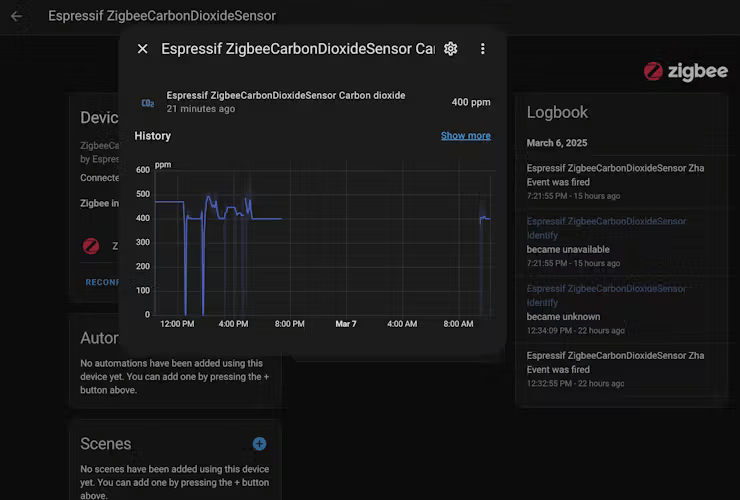
查看历史二氧化碳趋势。值得注意的是,我的设备在此期间并未持续运行。
3.桌面上的最终设置
最后,我们可以看到 OLED 屏幕上显示的传感器数据,以及 Home Assistant 仪表板上的数据。
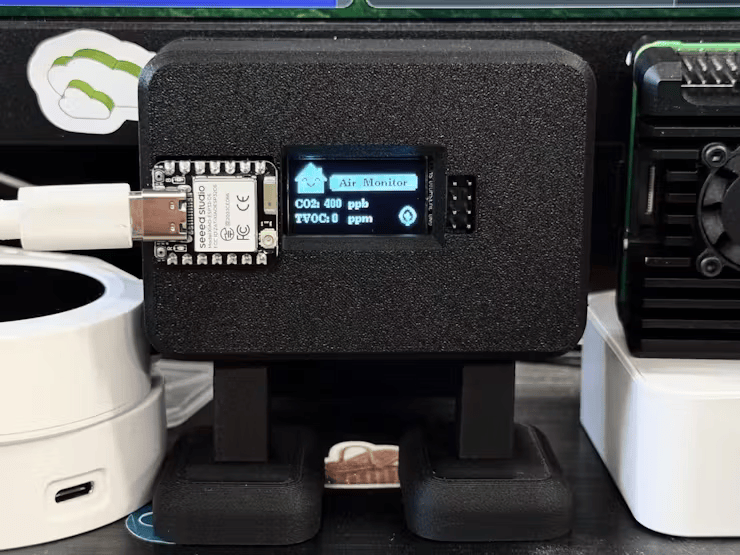
最终展示效果
#ifndef ZIGBEE_MODE_ED #error "Zigbee end device mode is not selected in Tools->Zigbee mode" #endif #include "Zigbee.h" #include "sensirion_common.h" #include "sgp30.h" #include#include U8G2_SSD1306_128X64_NONAME_F_HW_I2C u8g2(U8G2_R0, U8X8_PIN_NONE); uint8_t HugoUI_Animation_EasyOut(float *a, float *a_trg, uint16_t n) { if (*a == *a_trg) return 0; float cz = fabs(*a - *a_trg); if (cz <= 1) *a = *a_trg; else { if (cz < 10) n = n * cz * 0.1f; if (n < 10) n = 10; *a += (*a_trg - *a) / (n * 0.1f); } return 1; } uint8_t HugoUI_Animation_EasyIn(float *a, float *a_trg, uint16_t n) { if (*a == *a_trg) return 0; float cz = fabs(*a - *a_trg); if (cz <= 1) *a = *a_trg; else if (cz > 20) n = n * 3; else if (cz > 15) n = n * 2; else if (cz > 5) n = n * 1; if (*a != *a_trg) *a += (*a_trg - *a) / (n * 0.1f); else return 0; return 1; } void Oled_DrawSlowBitmapResize(int x, int y, const uint8_t *bitmap, int w1, int h1, int w2, int h2) { uint8_t color = u8g2.getDrawColor(); float mw = (float)w2 / w1; float mh = (float)h2 / h1; uint8_t cmw = ceil(mw); uint8_t cmh = ceil(mh); int xi, yi, byteWidth = (w1 + 7) / 8; for (yi = 0; yi < h1; yi++) { for (xi = 0; xi < w1; xi++) { if (*(uint8_t *)(bitmap + yi * byteWidth + xi / 8) & (1 << (xi & 7))) { u8g2.drawBox(x + xi * mw, y + yi * mh, cmw, cmh); } else if (color != 2) { u8g2.setDrawColor(0); u8g2.drawBox(x + xi * mw, y + yi * mh, cmw, cmh); u8g2.setDrawColor(color); } } } } const unsigned char gImage_humidity[] = { 0x00, 0x00, 0x00, 0x00, 0x00, 0x00, 0x00, 0x00, 0x00, 0xC0, 0x03, 0x00, 0x00, 0xF0, 0x07, 0x00, 0x00, 0xF8, 0x1F, 0x00, 0x00, 0x7C, 0x3F, 0x00, 0x00, 0x3E, 0x7C, 0x00, 0x00, 0x1F, 0xF8, 0x00, 0x80, 0x07, 0xF0, 0x01, 0xC0, 0x07, 0xE0, 0x01, 0xC0, 0x03, 0xC0, 0x03, 0xE0, 0x81, 0x81, 0x07, 0xE0, 0xC1, 0x83, 0x07, 0xE0, 0xD0, 0x03, 0x07, 0xF0, 0xF8, 0x03, 0x0F, 0xF0, 0xF8, 0x0B, 0x0F, 0xF0, 0xF0, 0x1F, 0x0F, 0xF0, 0xE0, 0x1F, 0x0F, 0xE0, 0xC0, 0x0F, 0x07, 0xE0, 0xC0, 0x07, 0x07, 0xE0, 0xC1, 0x83, 0x07, 0xC0, 0xC3, 0xC3, 0x03, 0xC0, 0xC7, 0xE3, 0x03, 0x80, 0x8F, 0xF3, 0x01, 0x00, 0xFF, 0xFF, 0x00, 0x00, 0xFE, 0x7F, 0x00, 0x00, 0xF8, 0x1F, 0x00, 0x00, 0xC0, 0x03, 0x00, 0x00, 0xC0, 0x03, 0x00, 0x00, 0xC0, 0x03, 0x00, 0x00, 0x80, 0x01, 0x00, 0x00, 0x00, 0x00, 0x00 }; const unsigned char gImage_homeassistant[] = { 0x00, 0x00, 0x00, 0x00, 0x00, 0x80, 0x01, 0x00, 0x00, 0xC0, 0x03, 0x00, 0x00, 0xE0, 0x07, 0x00, 0x00, 0xF0, 0x0F, 0x00, 0x00, 0xF8, 0x1F, 0x00, 0x00, 0xFC, 0xBF, 0x07, 0x00, 0xFE, 0xFF, 0x07, 0x00, 0xFF, 0xFF, 0x07, 0x80, 0xFF, 0xFF, 0x07, 0xC0, 0xFF, 0xFF, 0x07, 0xE0, 0xFF, 0xFF, 0x07, 0xF0, 0xFF, 0xFF, 0x0F, 0xF8, 0xFF, 0xFF, 0x1F, 0xFC, 0xFF, 0xFF, 0x3F, 0xFE, 0xF8, 0x1F, 0x7F, 0x7F, 0xF7, 0xEF, 0xFE, 0x7F, 0xF7, 0xEF, 0xFE, 0xF8, 0xFF, 0xFF, 0x1F, 0xF8, 0xFF, 0xFF, 0x1F, 0xF8, 0xEF, 0xF7, 0x1F, 0xF8, 0xCF, 0xF3, 0x1F, 0xF8, 0x9F, 0xF9, 0x1F, 0xF8, 0x7F, 0xFE, 0x1F, 0xF8, 0xFF, 0xFF, 0x1F, 0xF8, 0xFF, 0xFF, 0x1F, 0xF8, 0xFF, 0xFF, 0x1F, 0xF8, 0xFF, 0xFF, 0x1F, 0xF8, 0xFF, 0xFF, 0x1F, 0xF8, 0xFF, 0xFF, 0x1F, 0x00, 0x00, 0x00, 0x00, 0x00, 0x00, 0x00, 0x00 }; // 32x32 #define CARBON_DIOXIDE_SENSOR_ENDPOINT_NUMBER 10 uint8_t button = BOOT_PIN; ZigbeeCarbonDioxideSensor zbCarbonDioxideSensor = ZigbeeCarbonDioxideSensor(CARBON_DIOXIDE_SENSOR_ENDPOINT_NUMBER); int16_t err = 0; uint16_t tvoc_ppb, co2_eq_ppm; uint16_t carbon_dioxide_value; static uint32_t timeCounter = 0; static float img_a = 4, img_a_trg = 24; static float img_b = -2, img_b_trg = 24; static float img_c = -10, img_c_trg = 13; static float img_d = 5, img_d_trg = 90; static void carbon_sensor_update(void *arg) { for (;;) { if (!(timeCounter++ % 20)) { err = sgp_measure_iaq_blocking_read(&tvoc_ppb, &co2_eq_ppm); if (err == STATUS_OK) { Serial.printf("tVOC Concentration: %d ppb ", tvoc_ppb); Serial.printf("CO2eq Concentration: %d ppm ", co2_eq_ppm); carbon_dioxide_value = co2_eq_ppm; zbCarbonDioxideSensor.setCarbonDioxide(carbon_dioxide_value); } else { Serial.println("Error reading IAQ values "); } zbCarbonDioxideSensor.report(); delay(6000); } } } void setup() { int16_t err; uint16_t scaled_ethanol_signal, scaled_h2_signal; Serial.begin(115200); u8g2.begin(); // Init RF pinMode(WIFI_ENABLE, OUTPUT); digitalWrite(WIFI_ENABLE, LOW); delay(100); pinMode(WIFI_ANT_CONFIG, OUTPUT); digitalWrite(WIFI_ANT_CONFIG, LOW); // Init button switch pinMode(button, INPUT_PULLUP); // Init SGP30 while (sgp_probe() != STATUS_OK) { Serial.println("SGP failed"); while (1) ; } err = sgp_measure_signals_blocking_read(&scaled_ethanol_signal, &scaled_h2_signal); if (err == STATUS_OK) { Serial.println("get ram signal!"); } else { Serial.println("error reading signals"); } err = sgp_iaq_init(); zbCarbonDioxideSensor.setManufacturerAndModel("Espressif", "ZigbeeCarbonDioxideSensor"); zbCarbonDioxideSensor.setMinMaxValue(0, 1500); Zigbee.addEndpoint(&zbCarbonDioxideSensor); Serial.println("Starting Zigbee..."); u8g2.clearBuffer(); u8g2.setFont(u8g2_font_ncenB08_tr); u8g2.drawStr(0, 30, "Connecting to Zigbee..."); u8g2.sendBuffer(); if (!Zigbee.begin()) { Serial.println("Zigbee failed to start!"); Serial.println("Rebooting..."); ESP.restart(); } else { Serial.println("Zigbee started successfully!"); } Serial.println("Connecting to network"); while (!Zigbee.connected()) { Serial.print("."); delay(100); } u8g2.clearBuffer(); u8g2.drawStr(0, 30, "Successfully connect"); u8g2.drawStr(0, 50, "Zigbee network!"); u8g2.sendBuffer(); Serial.println(); delay(5000); // Start carbon sensor reading task xTaskCreate(carbon_sensor_update, "carbon_sensor_update", 2048, NULL, 10, NULL); zbCarbonDioxideSensor.setReporting(0, 30, 0); } void loop() { u8g2.clearBuffer(); u8g2.setFont(u8g2_font_ncenB08_tr); u8g2.drawXBM(0, 0, 32, 32, gImage_homeassistant); u8g2.drawStr(43, img_b, " Air Monitor"); u8g2.setDrawColor(2); u8g2.drawRBox(36, img_c, img_d, 15, 1); u8g2.setDrawColor(1); u8g2.drawStr(0, 45, "CO2: "); u8g2.setCursor(30, 45); u8g2.print(carbon_dioxide_value); u8g2.drawStr(55, 45, "ppb"); u8g2.drawStr(0, 60, "TVOC: "); u8g2.setCursor(38, 60); u8g2.print(tvoc_ppb); u8g2.drawStr(55, 60, "ppm"); if (img_a == img_a_trg) { if (img_a == 4) { img_a_trg = 24; } else if (img_a == 24) img_a_trg = 4; } HugoUI_Animation_EasyOut(&img_b, &img_b_trg, 100); HugoUI_Animation_EasyIn(&img_a, &img_a_trg, 115); HugoUI_Animation_EasyOut(&img_c, &img_c_trg, 100); HugoUI_Animation_EasyOut(&img_d, &img_d_trg, 100); Oled_DrawSlowBitmapResize(118 - img_a / 2, 50 - img_a / 4, gImage_humidity, 32, 32, img_a, img_a); u8g2.sendBuffer(); if (digitalRead(button) == LOW) { delay(100); int startTime = millis(); while (digitalRead(button) == LOW) { delay(50); if ((millis() - startTime) > 3000) { Serial.println("Resetting Zigbee to factory and rebooting in 1s."); delay(1000); Zigbee.factoryReset(); } } } }
改进计划
得益于 Seeed Studio XIAO 扩展板提供的众多 Grove 接口,Jason计划将其他传感器集成到这个机器人中来收集更多数据。这将可以通过自动化设备来控制其他的智能家居设备,例如当空气太干燥时启动除湿机,或者当二氧化碳水平上升时运行空气循环装置。总而言之,Jason说这个智能二氧化碳监测器项目是一次受益匪浅的创新和学习之旅。通过将技术与设计相结合,他创造了一种不仅可以跟踪空气质量还可以增强工作空间美感的设备。接下来他会逐步利用 Zigbee 连接不同的传感器,打造智能家居生态系统。
-
传感器
+关注
关注
2578文章
55756浏览量
795036 -
mcu
+关注
关注
147文章
19223浏览量
405085 -
机器人
+关注
关注
214文章
31602浏览量
224271 -
空气质量检测仪
+关注
关注
0文章
15浏览量
1366
原文标题:创客项目秀|基于XIAO ESP32C6的HA空气质量检测仪
文章出处:【微信号:ChaiHuoMakerSpace,微信公众号:柴火创客空间】欢迎添加关注!文章转载请注明出处。
发布评论请先 登录
【GoKit申请】空气质量检测仪
Pm2.5空气质量检测的小问题
空气质量测试仪的原理
德尔格压缩空气质量检测仪6种型号的详细介绍
空气质量检测仪的简单介绍
空气质量检测仪的特点介绍
网格化空气质量监测站的特点
空气质量检测仪使用方法是怎样的
空气质量检测仪优势特点介绍
空气质量检测仪原理与应用介绍
ONETEST-100AQL空气质量检测仪工作原理介绍


评论