几天前,Tensorflow刚度过自己的3岁生日,作为当前最受欢迎的机器学习框架,Tensorflow在这个宝座上已经盘踞了近三年。无论是成熟的Keras,还是风头正盛的pytorch,它的地位似乎总是无法被撼动。而就在即将到来的2019年,Tensorflow 2.0将正式入场,给暗流涌动的框架之争再燃一把火。
如果说两代Tensorflow有什么根本不同,那应该就是Tensorflow 2.0更注重使用的低门槛,旨在让每个人都能应用机器学习技术。考虑到它可能会成为机器学习框架的又一个重要里程碑,本文会介绍1.x和2.x版本之间的所有(已知)差异,重点关注它们之间的思维模式变化和利弊关系。
通过阅读这篇文章,熟悉Tensorflow的老用户可以尽早转变思维,适应新版本的变化。而新手也可以直接以Tensorflow 2.0的方式思考,至少目前没有必要急着去学习别的框架。
Tensorflow 2.0:为什么?何时?
Tensorflow 2.0的开发初衷是制作一个更简单易用的Tensorflow。
第一个向公众透露项目具体开发内容的人是Google Brain的工程师Martin Wicke,我们可以在他的公告邮件列表里找到Tensorflow 2.0的蛛丝马迹。在这里,我们对它做一些简单提要:
Tensorflow 2.0的核心功能是动态图机制Eager execution。它允许用户像正常程序一样去编写、调试模型,使TensorFlow更易于学习和应用。
支持更多平台、更多语言,通过标准化API的交换格式和提供准线改善这些组件之间的兼容性。
删除已弃用的API并减少重复的API数,避免给用户造成混淆。
2.0版的设计对公众开放:社区可以和Tensorflow开发人员一起工作,共同探讨新功能。
兼容性和连续性:Tensorflow 2.0会提供Tensorflow 1.x的兼容性模块,也就是它会内置所有Tensorflow 1.x API的模块。
硬盘兼容性:只需修改一些变量名称,Tensorflow 1.x中导出的模型(checkpoints和模型freeze)就能和Tensorflow 2.0兼容。
tf.contrib退出历史舞台。其中有维护价值的模块会被移动到别的地方,剩余的都将被删除。
换言之,如果你在这之前从没接触过Tensorflow,你是幸运的。但是,如果你和我们一样是从0.x版本用起的,那么你就可能得重写所有代码库——虽然官方说会发布转换工具方便老用户,但这种工具肯定有很多bug,需要一定的手动干预。
而且,你也必须开始转变思维模式。这做起来不容易,但真的猛士不就应该喜欢挑战吗?
所以为了应对挑战,我们先来适应第一个巨大差异:移除tf.get_variable,tf.variable_scope,tf.layers,强制转型到基于Keras的方法,也就是用tf.keras。
关于Tensorflow 2.0的发布日期,官方并没有给出明确时间。但根据开发小组成员透露的消息,我们可以确定它的预览版会在今年年底发布,官方正式版可能会在2019年春季发布。
所以留给老用户的时间已经不多了。
Keras(OOP)vs Tensorflow 1.x
在GitHub上,RFC:TensorFlow 2.0中的变量这份意见稿已经被官方接受,它可能是对现有代码库影响最大的RFC,值得参考。
我们都知道,在Tensorflow里,每个变量在计算图中都有一个唯一的名称,我们也已经习惯按照这种模式设计计算图:
哪些操作连接我的变量节点:把计算图定义为连接的多个子图,并用tf.variable_scope在内部定义每个子图,以便定义不同计算图的变量,并在Tensorboard中获得清晰的图形表示。
需要在执行同一步骤时多次使用子图:一定要用tf.variable_scope里的reuse参数,不然Tensorflow会生成一个前缀为_n的新计算图。
定义计算图:定义参数初始化节点(你调用过几次tf.global_variables_initializer()?)。
把计算图加载到Session,运行。
下面,我们就以在Tensorflow中实现简单的GAN为例,更生动地展现上述步骤。
Tensorflow 1.x的GAN
要定义GAN的判别器D,我们一定会用到tf.variable_scope里的reuse参数。因为首先我们会把真实图像输入判别器,之后把生成的假样本再输进去,在且仅在最后计算D的梯度。相反地,生成器G里的参数不会在一次迭代中被用到两次,所以没有担心的必要。
def generator(inputs):
"""generator network.
Args:
inputs: a (None, latent_space_size) tf.float32 tensor
Returns:
G: the generator output node
"""
with tf.variable_scope("generator"):
fc1 = tf.layers.dense(inputs, units=64, activation=tf.nn.elu, name="fc1")
fc2 = tf.layers.dense(fc1, units=64, activation=tf.nn.elu, name="fc2")
G = tf.layers.dense(fc1, units=1, name="G")
return G
def discriminator(inputs, reuse=False):
"""discriminator network
Args:
inputs: a (None, 1) tf.float32 tensor
reuse: python boolean, if we expect to reuse (True) or declare (False) the variables
Returns:
D: the discriminator output node
"""
with tf.variable_scope("discriminator", reuse=reuse):
fc1 = tf.layers.dense(inputs, units=32, activation=tf.nn.elu, name="fc1")
D = tf.layers.dense(fc1, units=1, name="D")
return D
当这两个函数被调用时,Tensorflow会默认在计算图内部定义两个不同的子图,每个子图都有自己的scope(生成器/判别器)。请注意,这个函数返回的是定义好的子图的张量,而不是子图本身。
为了共享D这个子图,我们需要定义两个输入(真实图像/生成样本),并定义训练G和D所需的损失函数。
# Define the real input, a batch of values sampled from the real data
real_input = tf.placeholder(tf.float32, shape=(None,1))
# Define the discriminator network and its parameters
D_real = discriminator(real_input)
# Arbitrary size of the noise prior vector
latent_space_size = 100
# Define the input noise shape and define the generator
input_noise = tf.placeholder(tf.float32, shape=(None,latent_space_size))
G = generator(input_noise)
# now that we have defined the generator output G, we can give it in input to
# D, this call of `discriminator` will not define a new graph, but it will
# **reuse** the variables previously defined
D_fake = discriminator(G, True)
最后要做的是分别定义训练D和G所需的2个损失函数和2个优化器。
D_loss_real = tf.reduce_mean(
tf.nn.sigmoid_cross_entropy_with_logits(logits=D_real, labels=tf.ones_like(D_real))
)
D_loss_fake = tf.reduce_mean(
tf.nn.sigmoid_cross_entropy_with_logits(logits=D_fake, labels=tf.zeros_like(D_fake))
)
# D_loss, when invoked it first does a forward pass using the D_loss_real
# then another forward pass using D_loss_fake, sharing the same D parameters.
D_loss = D_loss_real + D_loss_fake
G_loss = tf.reduce_mean(
tf.nn.sigmoid_cross_entropy_with_logits(logits=D_fake, labels=tf.ones_like(D_fake))
)
定义损失函数不难,对抗训练的一个特点是把真实图像和由G生成的图像输入判别器D,由后者输出评估结果,并把结果馈送给生成器G做参考。这意味着对抗训练其实是分两步走,G和D同在一个计算图内,但在训练D时,我们不希望更新G中的参数;同理,训练G时,我们也不希望更新D里的参数。
因此,由于我们在默认计算图中定义了每个变量,而且它们都是全局变量,我们必须在2个不同的列表中收集正确的变量并正确定义优化器,从而计算梯度,对正确的子图进行更新。
# Gather D and G variables
D_vars = tf.trainable_variables(scope="discriminator")
G_vars = tf.trainable_variables(scope="generator")
# Define the optimizers and the train operations
train_D = tf.train.AdamOptimizer(1e-5).minimize(D_loss, var_list=D_vars)
train_G = tf.train.AdamOptimizer(1e-5).minimize(G_loss, var_list=G_vars)
到这里,我们已经完成了上面提到的“第3步:定义计算图”,最后是定义参数初始化节点:
init_op = tf.global_variables_initializer()
优/缺点
只要正确定义了计算图,且在训练循环内和session内使用,上述GAN就能正常训练了。但是,从软件工程角度看,它有一些值得注意的点:
用tf.variable_scope修改由tf.layers定义的(完整)变量名称:这其实是对不同scope的变量重新用了一次tf.layers.*,导致的结果是定义了新scope下的一组新变量。
布尔标志reuse可以完全改变调用tf.layers.*后的所有行为(定义/reuse)。
每个变量都是全局变量:tf.layers调用tf.get_variable(也就是在tf.layers下面调用)定义的变量可以随处访问。
定义子图很麻烦:你没法通过调用discriminator获得一个新的、完全独立的判别器,这有点违背常理。
子图定义的输出值(调用generator/discriminator)只是它的输出张量,而不是内部所有图的信息(尽管可以回溯输出,但这么做很麻烦)。
定义参数初始化节点很麻烦(不过这个可以用tf.train.MonitoredSession和tf.train.MonitoredTrainingSession规避)。
以上6点都可能是用Tensorflow构建GAN的缺点。
Tensorflow 2.x的GAN
前面提到了,Tensorflow 2.x移除了tf.get_variable,tf.variable_scope,tf.layers,强制转型到了基于Keras的方法。明年,如果我们想用它构建GAN,我们就必须用tf.keras定义生成器G和判别器的:这其实意味着我们凭空多了一个可以用来定义D的共享变量函数。
注:明年tf.layers就没有了,所以你最好从现在就开始适应用tf.keras来定义自己的模型,这是过渡到2.x版本的必要准备。
def generator(input_shape):
"""generator network.
Args:
input_shape: the desired input shape (e.g.: (latent_space_size))
Returns:
G: The generator model
"""
inputs = tf.keras.layers.Input(input_shape)
net = tf.keras.layers.Dense(units=64, activation=tf.nn.elu, name="fc1")(inputs)
net = tf.keras.layers.Dense(units=64, activation=tf.nn.elu, name="fc2")(net)
net = tf.keras.layers.Dense(units=1, name="G")(net)
G = tf.keras.Model(inputs=inputs, outputs=net)
return G
def discriminator(input_shape):
"""discriminator network.
Args:
input_shape: the desired input shape (e.g.: (latent_space_size))
Returns:
D: the discriminator model
"""
inputs = tf.keras.layers.Input(input_shape)
net = tf.keras.layers.Dense(units=32, activation=tf.nn.elu, name="fc1")(inputs)
net = tf.keras.layers.Dense(units=1, name="D")(net)
D = tf.keras.Model(inputs=inputs, outputs=net)
return D
看到和Tensorflow的不同了吗?在这里,generator和discriminator都返回了一个tf.keras.Model,而不仅仅是输出张量。
在Keras里,变量共享可以通过多次调用同样的Keras层或模型来实现,而不用像TensorFlow那样需要考虑变量的scope。所以我们在这里只需定义一个判别器D,然后调用它两次。
# Define the real input, a batch of values sampled from the real data
real_input = tf.placeholder(tf.float32, shape=(None,1))
# Define the discriminator model
D = discriminator(real_input.shape[1:])
# Arbitrary set the shape of the noise prior vector
latent_space_size = 100
# Define the input noise shape and define the generator
input_noise = tf.placeholder(tf.float32, shape=(None,latent_space_size))
G = generator(input_noise.shape[1:])
再重申一遍,这里我们不需要像原来那样定义D_fake,在定义计算图时也不用提前担心变量共享。
之后就是定义G和D的损失函数:
D_real = D(real_input)
D_loss_real = tf.reduce_mean(
tf.nn.sigmoid_cross_entropy_with_logits(logits=D_real, labels=tf.ones_like(D_real))
)
G_z = G(input_noise)
D_fake = D(G_z)
D_loss_fake = tf.reduce_mean(
tf.nn.sigmoid_cross_entropy_with_logits(logits=D_fake, labels=tf.zeros_like(D_fake))
)
D_loss = D_loss_real + D_loss_fake
G_loss = tf.reduce_mean(
tf.nn.sigmoid_cross_entropy_with_logits(logits=D_fake, labels=tf.ones_like(D_fake))
)
最后,我们要做的是定义分别优化D和G的2个优化器。由于用的是tf.keras,所以我们不用手动创建要更新的变量列表,tf.keras.Models的对象本身就是我们要的东西。
# Define the optimizers and the train operations
train_D = tf.train.AdamOptimizer(1e-5).minimize(D_loss, var_list=D.trainable_variables)
train_G = tf.train.AdamOptimizer(1e-5).minimize(G_loss, var_list=G.trainable_variables)
截至目前,因为我们用的还是静态图,所以还要定义变量初始化节点:
init_op = tf.global_variables_initializer()
优/缺点
从tf.layers到过渡tf.keras:Keras里有所有tf.layers的对应操作。
tf.keras.Model帮我们完全省去了变量共享和计算图重新定义的烦恼。
tf.keras.Model不是一个张量,而是一个自带变量的完整模型。
定义变量初始化节点还是很麻烦,但之前也提到了,我们可以用tf.train.MonitoredSession规避。
以上是Tensorflow 1.x和2.x版本的第一个巨大差异,在下文中,我们再来看看第二个差异——Eager模式。
Eager Execution
Eager Execution(动态图机制)是TensorFlow的一个命令式编程环境,它无需构建计算图,可以直接评估你的操作:直接返回具体值,而不是构建完计算图后再返回。它的优点主要有以下几点:
直观的界面。更自然地构建代码和使用Python数据结构,可完成小型模型和小型数据集的快速迭代。
更容易调试。直接调用ops来检查运行模型和测试更改,用标准Python调试工具获取即时错误报告。
更自然的流程控制。直接用Python流程控制而不是用计算图。
简而言之,有了Eager Execution,我们不再需要事先定义计算图,然后再在session里评估它。它允许用python语句控制模型的结构。
这里我们举个典型例子:Eager Execution独有的tf.GradientTape。在计算图模式下,如果我们要计算某个函数的梯度,首先我们得定义一个计算图,从中知道各个节点是怎么连接的,然后从输出回溯到计算图的输入,层层计算并得到最终结果。
但在Eager Execution下,用自动微分计算函数梯度的唯一方法是构建图。我们得先用tf.GradientTape根据可观察元素(如变量)构建操作图,然后再计算梯度。下面是tf.GradientTape文档中的一个原因和示例:
x = tf.constant(3.0)
with tf.GradientTape() as g:
g.watch(x)
y = x * x
dy_dx = g.gradient(y, x) # Will compute to 6.0
此外,用python语句(如if语句和循环语句)进行流程控制区别于静态图的tf.get_variable,tf.variable_scope,tf.layers。
之前官方发布了一个名为Autograph的工具,它的作用是把普通Python代码转换成复杂的计算图代码,也就是允许用户用Python直接编写计算图。但它指的Python事实上并不是真正意义上的Python(比如必须定义一个函数,让它返回一个具有指定Tensorflow数据类型的元素列表),也没法发挥编程语言的强大功能。
就个人而言,我不太喜欢Eager Execution,因为我已经习惯静态图了,而这个新改变有点像是对PyTorch的拙劣模仿。至于其他变化,我会在下面以问答方式做简单介绍。
一问一答
下面是我认为从TensorFlow过渡到TensorFlow 2.0会出现的一些常见问题。
问:如果我的项目要用到tf.contrib怎么办?
你可以用pip安装一个新的Python包,或者把tf.contrib.something重命名为tf.something。
问:如果在Tensorflow 1.x里能正常工作的东西到2.x没法运行了怎么办?
不应该存在这种错误,建议你仔细检查一下代码转换得对不对,阅读GitHub上的错误报告。
问:我的项目在静态图上好好的,一放到Eager Execution上就不行了怎么办?
我也遇到了这个问题,而且目前还不知道具体原因。所以建议先不要用Eager Execution。
问:我发现Tensorflow 2.x里好像没有某个tf.函数怎么办?
这个函数很有可能只被移到别的地方去了。在Tensorflow 1.x中,很多函数会有重复、有别名,Tensorflow 2.x对这些函数做了统一删减整理,也移动了部分函数的位置。你可以在RFC:TensorFlow命名空间里找到将要新增、删除、移动的所有函数。官方即将发布的工具也能帮你适应这个更新。
小结
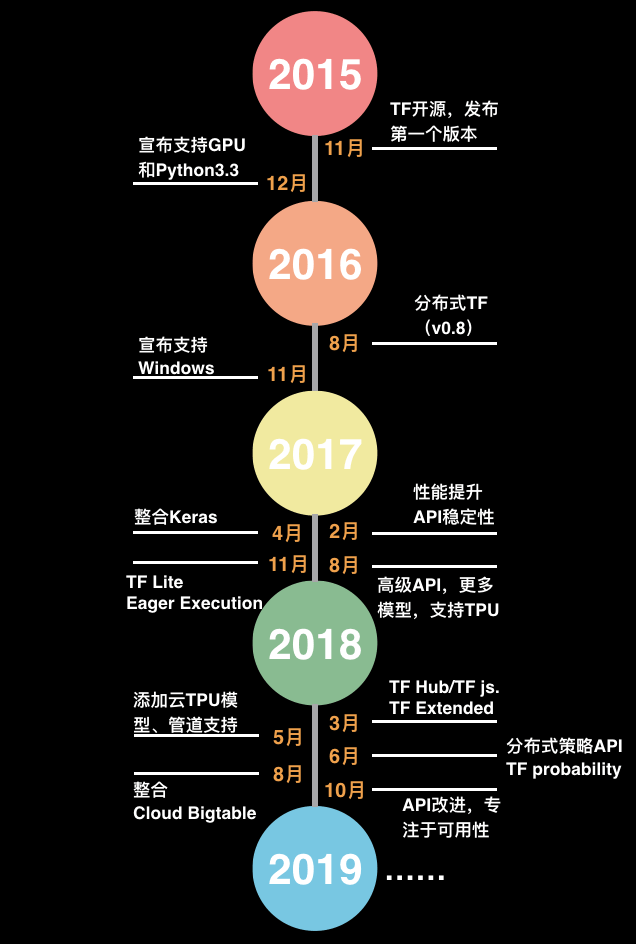
看了这么多,相信读者现在已经对Tensorflow 2.x有了大致了解,也有了心理准备。总的来说,正如大部分产品都要经历更新迭代,我认为Tensorflow 2.x相比Tensorflow 1.x会是有明显改进的一个版本。最后,我们再来看一下Tensorflow的发展时间轴,回忆过去三年来它带给我们的记忆和知识。

-
机器学习
+关注
关注
66文章
8408浏览量
132576 -
tensorflow
+关注
关注
13文章
329浏览量
60528
原文标题:Tensorflow 2.0的这些新设计,你适应好了吗?
文章出处:【微信号:AI_era,微信公众号:新智元】欢迎添加关注!文章转载请注明出处。
发布评论请先 登录
相关推荐
绿源电动车给少年足球烧了一把火
【FireBLE试用体验】之一把钥匙开一把锁
【FireBLE试用体验】之一把钥匙一把锁
深度学习框架TensorFlow&TensorFlow-GPU详解
TensorFlow的特点和基本的操作方式
云计算市场竞争暗流涌动 小鸟云不惧行业变革
L’Oreal发布全球第一把智能发梳,一把要189美元,你会买吗?
华为的一次大胆尝试烧起了一把火,所有手机都借鉴这个功能
TensorFlow的框架结构解析


 Tensorflow 2.0将正式入场,给暗流涌动的框架之争再燃一把火


评论