滤波
滤波是将信号中特定波段频率滤除的操作,是抑制和防止干扰的一项重要措施。滤波分为经典滤波和现代滤波。滤波是将信号中特定波段频率滤除的操作,是抑制和防止干扰的一项重要措施。是根据观察某一随机过程的结果,对另一与之有关的随机过程进行估计的概率理论与方法。
滤波器
电源滤波器是由电容、电感和电阻组成的滤波电路。滤波器可以对电源线中特定频率的频点或该频点以外的频率进行有效滤除,得到一个特定频率的电源信号,或消除一个特定频率后的电源信号。
主要作用
滤波器,顾名思义,是对波进行过滤的器件。“波”是一个非常广泛的物理概念,在电子技术领域,“波”被狭义地局限于特指描述各种物理量的取值随时间起伏变化的过程。该过程通过各类传感器的作用,被转换为电压或电流的时间函数,称之为各种物理量的时间波形,或者称之为信号。因为自变量时间‘是连续取值的,所以称之为连续时间信号,又习惯地称之为模拟信号(Analog Signal)。随着数字式电子计算机(一般简称计算机)技术的产生和飞速发展,为了便于计算机对信号进行处理,产生了在抽样定理指导下将连续时间信号变换成离散时间信号的完整的理论和方法。
也就是说,可以只用原模拟信号在一系列离散时间坐标点上的样本值表达原始信号而不丢失任何信息,波、波形、信号这些概念既然表达的是客观世界中各种物理量的变化,自然就是现代社会赖以生存的各种信息的载体。信息需要传播,靠的就是波形信号的传递。信号在它的产生、转换、传输的每一个环节都可能由于环境和干扰的存在而畸变,甚至是在相当多的情况下,这种畸变还很严重,以致于信号及其所携带的信息被深深地埋在噪声当中了
线性滤波之平滑滤波
传统的滤波方式将滤波分为线性滤波和非线性滤波,这里首先说下线性滤波。
(1)线性滤波的示例3x3的平均滤波器。
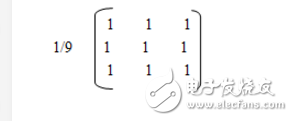
案例如下:
public class ImageJAndroid2Activity extends Activity {
ImageView sourceImage;
ImageView destinationImage;
@Override
public void onCreate(Bundle savedInstanceState) {
super.onCreate(savedInstanceState);
setContentView(R.layout.main);
sourceImage=(ImageView) findViewById(R.id.source);
destinationImage=(ImageView) findViewById(R.id.destination);
}
public void remove(View v){
Bitmap bitmap=BitmapFactory.decodeResource(getResources(),R.drawable.cc);
int width=bitmap.getWidth();
int height=bitmap.getHeight();
int[] pixel=new int[width*height];
int[] outpixel=new int[width*height];
bitmap.getPixels(pixel, 0, width, 0, 0, width, height);
for(int y=0;y《height;y++){
for(int x=0;x《width;x++){
int sumred=0;
int sumgreen=0;
int sumblue=0;
int a=pixel[y*width+x]》》24&0xff;;
for(int i=-1;i《=1;i++){
int newi=y+i;
if(newi《0 ||newi》=height){
newi=y;
}
for(int j=-1;j《=1;j++){
int newj=x+j;
if(newj《0 || newj》=width){
newj=x;
}
int red=pixel[newi*width+newj]》》16&0xff;
int green=pixel[newi*width+newj]》》8&0xff;
int blue=pixel[newi*width+newj]&0xff;
sumred+=red;
sumgreen+=green;
sumblue+=blue;
}
}
int newred=(int)Math.round(sumred/9.0);
int newgreen=(int)Math.round(sumgreen/9.0);
int newblue=(int)Math.round(sumblue/9.0);
outpixel[y*width+x]=a《《24|newred《《16|newgreen《《8|newblue;
}
}
Bitmap newBitmap=Bitmap.createBitmap(width, height,Config.RGB_565);
newBitmap.setPixels(outpixel, 0, width,0,0, width, height);
destinationImage.setImageBitmap(newBitmap);
}
}
效果图:
大家应该看得出来效果吧。
(2)3x3的平滑滤波器

采用这种方式得到的平滑的滤波图像
activity:
public class ImageJAndroid2Activity extends Activity {
ImageView sourceImage;
ImageView destinationImage;
@Override
public void onCreate(Bundle savedInstanceState) {
super.onCreate(savedInstanceState);
setContentView(R.layout.main);
sourceImage=(ImageView) findViewById(R.id.source);
destinationImage=(ImageView) findViewById(R.id.destination);
}
//平滑滤波器
public void remove(View v){
Bitmap bitmap=BitmapFactory.decodeResource(getResources(),R.drawable.cc);
int[][] filter={
{3,5,3},
{5,8,5},
{3,5,3}
};
int width=bitmap.getWidth();
int height=bitmap.getHeight();
int[] pixel=new int[width*height];
int[] outpixel=new int[width*height];
bitmap.getPixels(pixel, 0, width, 0, 0, width, height);
for(int y=0;y《height;y++){
for(int x=0;x《width;x++){
int sumred=0;
int sumgreen=0;
int sumblue=0;
int a=0;
for(int i=-1;i《=1;i++){
int newi=y+i;
if(newi《0||newi》=height){
newi=y;
}
for(int j=-1;j《=1;j++){
int newj=x+j;
if(newj《0||newj》=width){
newj=x;
}
a=pixel[newi*width+newj]》》24&0xff;
int red=pixel[newi*width+newj]》》16&0xff;
int green=pixel[newi*width+newj]》》8&0xff;
int blue=pixel[newi*width+newj]&0xff;
sumred+=filter[i+1][j+1]*red;
sumgreen+=filter[i+1][j+1]*green;
sumblue+=filter[i+1][j+1]*blue;
}
}
outpixel[y*width+x]=a《《24|((int)(sumred/40))《《16|((int)(sumgreen/40))《《8|((int)(sumblue/40));
}
}
Bitmap newBitmap=Bitmap.createBitmap(width, height,Config.RGB_565);
newBitmap.setPixels(outpixel, 0, width, 0, 0, width, height);
destinationImage.setImageBitmap(newBitmap);
}
效果图:
大家会觉得平均滤波与平滑滤波的区别不是蛮大,但是在处理精细图片的时候区别还是蛮蛮明显的。
这里所使用到的是3x3矩阵,因为3x3使用的比较多,除此之外你自己还可以定义任意尺寸的滤波器。例如5x5,,21x21
 电子发烧友App













评论