一、概述
基于子系统去开发驱动程序已经是linux内核中普遍的做法了。前面写过基于I2C子系统的驱动开发。本文介绍另外一种常用总线SPI的开发方法。SPI子系统的开发和I2C有很多的相似性,大家可以对比学习。本主题分为两个部分叙述,第一部分介绍基于SPI子系统开发的理论框架;第二部分以华清远见教学平台FS_S5PC100上的M25P10芯片为例(内核版本2.6.29),编写一个SPI驱动程序
一、概述
基于子系统去开发驱动程序已经是linux内核中普遍的做法了。前面写过基于I2C子系统的驱动开发。本文介绍另外一种常用总线SPI的开发方法。SPI子系统的开发和I2C有很多的相似性,大家可以对比学习。本主题分为两个部分叙述,第一部分介绍基于SPI子系统开发的理论框架;第二部分以华清远见教学平台FS_S5PC100上的M25P10芯片为例(内核版本2.6.29),编写一个SPI驱动程序实例。
二、SPI总线协议简介
介绍驱动开发前,需要先熟悉下SPI通讯协议中的几个关键的地方,后面在编写驱动时,需要考虑相关因素。
SPI总线由MISO(串行数据输入)、MOSI(串行数据输出)、SCK(串行移位时钟)、CS(使能信号)4个信号线组成。如FS_S5PC100上的M25P10芯片接线为:
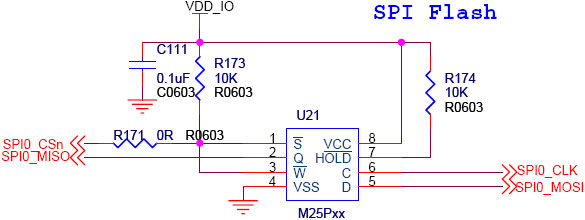
上图中M25P10的D脚为它的数据输入脚,Q为数据输出脚,C为时钟脚。
SPI常用四种数据传输模式,主要差别在于:输出串行同步时钟极性(CPOL)和相位(CPHA)可以进行配置。如果CPOL= 0,串行同步时钟的空闲状态为低电平;如果CPOL= 1,串行同步时钟的空闲状态为高电平。如果CPHA= 0,在串行同步时钟的前沿(上升或下降)数据被采样;如果CPHA = 1,在串行同步时钟的后沿(上升或下降)数据被采样。
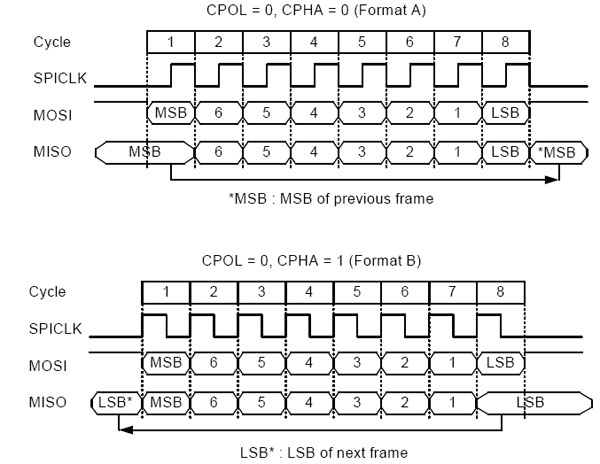

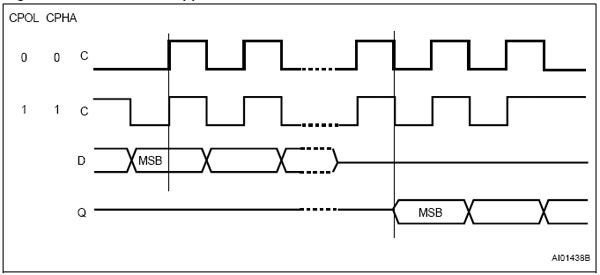
这四种模式中究竟选择哪种模式取决于设备。如M25P10的手册中明确它可以支持的两种模式为:CPOL=0 CPHA=0 和 CPOL=1 CPHA=1
三、linux下SPI驱动开发
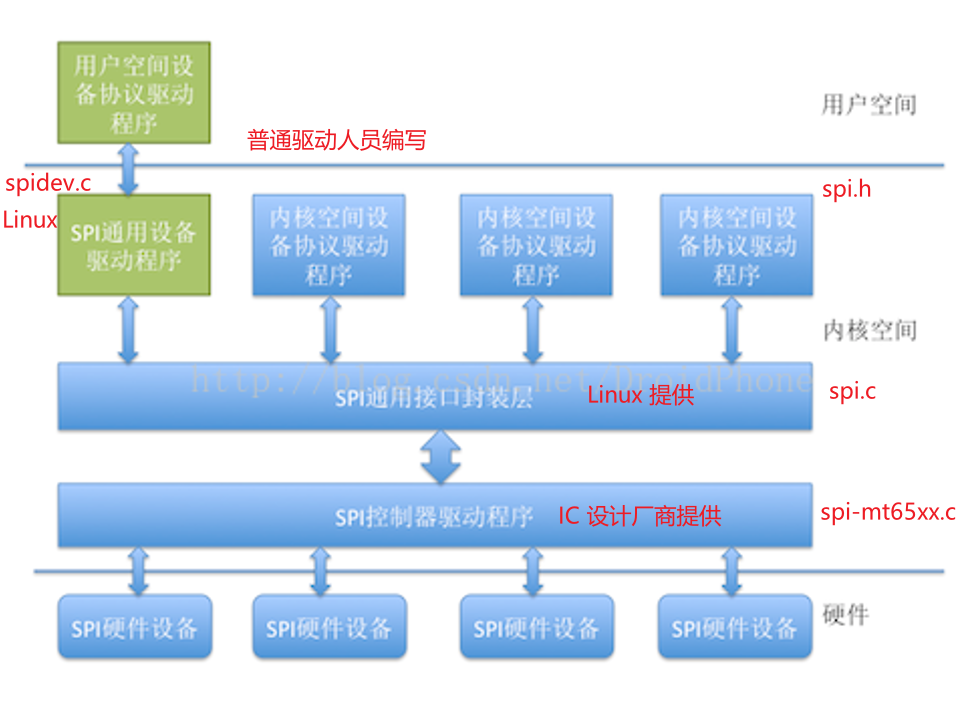
首先明确SPI驱动层次,如下图:

我们以上面的这个图为思路
1、 Platform bus
Platform bus对应的结构是platform_bus_type,这个内核开始就定义好的。我们不需要定义。
2、Platform_device
SPI控制器对应platform_device的定义方式,同样以S5PC100中的SPI控制器为例,参看arch/arm/plat-s5pc1xx/dev-spi.c文件
点击(此处)折叠或打开
struct platform_device s3c_device_spi0 = {
.name = "s3c64xx-spi", //名称,要和Platform_driver匹配
.id = 0, //第0个控制器,S5PC100中有3个控制器
.num_resources = ARRAY_SIZE(s5pc1xx_spi0_resource), //占用资源的种类
.resource = s5pc1xx_spi0_resource, //指向资源结构数组的指针
.dev = {
.dma_mask = &spi_dmamask, //dma寻址范围
.coherent_dma_mask = DMA_BIT_MASK(32), //可以通过关闭cache等措施保证一致性的dma寻址范围
.platform_data = &s5pc1xx_spi0_pdata, //特殊的平台数据,参看后文
},
};
static struct s3c64xx_spi_cntrlr_info s5pc1xx_spi0_pdata = {
.cfg_gpio = s5pc1xx_spi_cfg_gpio, //用于控制器管脚的IO配置
.fifo_lvl_mask = 0x7f,
.rx_lvl_offset = 13,
};
static int s5pc1xx_spi_cfg_gpio(struct platform_device *pdev)
{
switch (pdev->id) {
case 0:
s3c_gpio_cfgpin(S5PC1XX_GPB(0), S5PC1XX_GPB0_SPI_MISO0);
s3c_gpio_cfgpin(S5PC1XX_GPB(1), S5PC1XX_GPB1_SPI_CLK0);
s3c_gpio_cfgpin(S5PC1XX_GPB(2), S5PC1XX_GPB2_SPI_MOSI0);
s3c_gpio_setpull(S5PC1XX_GPB(0), S3C_GPIO_PULL_UP);
s3c_gpio_setpull(S5PC1XX_GPB(1), S3C_GPIO_PULL_UP);
s3c_gpio_setpull(S5PC1XX_GPB(2), S3C_GPIO_PULL_UP);
break;
case 1:
s3c_gpio_cfgpin(S5PC1XX_GPB(4), S5PC1XX_GPB4_SPI_MISO1);
s3c_gpio_cfgpin(S5PC1XX_GPB(5), S5PC1XX_GPB5_SPI_CLK1);
s3c_gpio_cfgpin(S5PC1XX_GPB(6), S5PC1XX_GPB6_SPI_MOSI1);
s3c_gpio_setpull(S5PC1XX_GPB(4), S3C_GPIO_PULL_UP);
s3c_gpio_setpull(S5PC1XX_GPB(5), S3C_GPIO_PULL_UP);
s3c_gpio_setpull(S5PC1XX_GPB(6), S3C_GPIO_PULL_UP);
break;
case 2:
s3c_gpio_cfgpin(S5PC1XX_GPG3(0), S5PC1XX_GPG3_0_SPI_CLK2);
s3c_gpio_cfgpin(S5PC1XX_GPG3(2), S5PC1XX_GPG3_2_SPI_MISO2);
s3c_gpio_cfgpin(S5PC1XX_GPG3(3), S5PC1XX_GPG3_3_SPI_MOSI2);
s3c_gpio_setpull(S5PC1XX_GPG3(0), S3C_GPIO_PULL_UP);
s3c_gpio_setpull(S5PC1XX_GPG3(2), S3C_GPIO_PULL_UP);
s3c_gpio_setpull(S5PC1XX_GPG3(3), S3C_GPIO_PULL_UP);
break;
default:
dev_err(&pdev->dev, "Invalid SPI Controller number!");
return -EINVAL;
}
3、Platform_driver
再看platform_driver,参看drivers/spi/spi_s3c64xx.c文件
点击(此处)折叠或打开
static struct platform_driver s3c64xx_spi_driver = {
.driver = {
.name = "s3c64xx-spi", //名称,和platform_device对应
.owner = THIS_MODULE,
},
.remove = s3c64xx_spi_remove,
.suspend = s3c64xx_spi_suspend,
.resume = s3c64xx_spi_resume,
};
platform_driver_probe(&s3c64xx_spi_driver, s3c64xx_spi_probe);//注册s3c64xx_spi_driver
和平台中注册的platform_device匹配后,调用s3c64xx_spi_probe。然后根据传入的platform_device参数,构建一个用于描述SPI控制器的结构体spi_master,并注册。spi_register_master(master)。后续注册的spi_device需要选定自己的spi_master,并利用spi_master提供的传输功能传输spi数据。
和I2C类似,SPI也有一个描述控制器的对象叫spi_master。其主要成员是主机控制器的序号(系统中可能存在多个SPI主机控制器)、片选数量、SPI模式和时钟设置用到的函数、数据传输用到的函数等。
点击(此处)折叠或打开
struct spi_master {
struct device dev;
s16 bus_num; //表示是SPI主机控制器的编号。由平台代码决定
u16 num_chipselect; //控制器支持的片选数量,即能支持多少个spi设备
int (*setup)(struct spi_device *spi); //针对设备设置SPI的工作时钟及数据传输模式等。在spi_add_device函数中调用。
int (*transfer)(struct spi_device *spi,
struct spi_message *mesg); //实现数据的双向传输,可能会睡眠
void (*cleanup)(struct spi_device *spi); //注销时调用
};
4、Spi bus
Spi总线对应的总线类型为spi_bus_type,在内核的drivers/spi/spi.c中定义
点击(此处)折叠或打开
struct bus_type spi_bus_type = {
.name = "spi",
.dev_attrs = spi_dev_attrs,
.match = spi_match_device,
.uevent = spi_uevent,
.suspend = spi_suspend,
.resume = spi_resume,
};
对应的匹配规则是(高版本中的匹配规则会稍有变化,引入了id_table,可以匹配多个spi设备名称):
点击(此处)折叠或打开
static int spi_match_device(struct device *dev, struct device_driver *drv)
{
const struct spi_device *spi = to_spi_device(dev);
return strcmp(spi->modalias, drv->name) == 0;
}
5、spi_device
下面该讲到spi_device的构建与注册了。spi_device对应的含义是挂接在spi总线上的一个设备,所以描述它的时候应该明确它自身的设备特性、传输要求、及挂接在哪个总线上。
点击(此处)折叠或打开
static struct spi_board_info s3c_spi_devs[] __initdata = {
{
.modalias = "m25p10",
.mode = SPI_MODE_0, //CPOL=0, CPHA=0 此处选择具体数据传输模式
.max_speed_hz = 10000000, //最大的spi时钟频率
/* Connected to SPI-0 as 1st Slave */
.bus_num = 0, //设备连接在spi控制器0上
.chip_select = 0, //片选线号,在S5PC100的控制器驱动中没有使用它作为片选的依据,而是选择了下文controller_data里的方法。
.controller_data = &smdk_spi0_csi[0],
},
};
static struct s3c64xx_spi_csinfo smdk_spi0_csi[] = {
[0] = {
.set_level = smdk_m25p10_cs_set_level,
.fb_delay = 0x3,
},
};
static void smdk_m25p10_cs_set_level(int high) //spi控制器会用这个方法设置cs
{
u32 val;
val = readl(S5PC1XX_GPBDAT);
if (high)
val |= (1<<3);
else
val &= ~(1<<3);
writel(val, S5PC1XX_GPBDAT);
}
spi_register_board_info(s3c_spi_devs, ARRAY_SIZE(s3c_spi_devs));//注册spi_board_info。这个代码会把spi_board_info注册要链表board_list上。
事实上上文提到的spi_master的注册会在spi_register_board_info之后,spi_master注册的过程中会调用scan_boardinfo扫描board_list,找到挂接在它上面的spi设备,然后创建并注册spi_device。
点击(此处)折叠或打开
static void scan_boardinfo(struct spi_master *master)
{
struct boardinfo *bi;
mutex_lock(&board_lock);
list_for_each_entry(bi, &board_list, list) {
struct spi_board_info *chip = bi->board_info;
unsigned n;
for (n = bi->n_board_info; n > 0; n--, chip++) {
if (chip->bus_num != master->bus_num)
continue;
/* NOTE: this relies on spi_new_device to
* issue diagnostics when given bogus inputs
*/
(void) spi_new_device(master, chip); //创建并注册了spi_device
}
}
mutex_unlock(&board_lock);
}
6、spi_driver
本文先以linux内核中的/driver/mtd/devices/m25p80.c驱动为参考。
点击(此处)折叠或打开
static struct spi_driver m25p80_driver = { //spi_driver的构建
.driver = {
.name = "m25p80",
.bus = &spi_bus_type,
.owner = THIS_MODULE,
},
.probe = m25p_probe,
.remove = __devexit_p(m25p_remove),
*/
};
spi_register_driver(&m25p80_driver);//spi driver的注册
在有匹配的spi device时,会调用m25p_probe
static int __devinit m25p_probe(struct spi_device *spi)
{
……
}
根据传入的spi_device参数,可以找到对应的spi_master。接下来就可以利用spi子系统为我们完成数据交互了。可以参看m25p80_read函数。要完成传输,先理解下面几个结构的含义:(这两个结构的定义及详细注释参见include/linux/spi/spi.h)
spi_message:描述一次完整的传输,即cs信号从高->底->高的传输
spi_transfer:多个spi_transfer够成一个spi_message
举例说明:m25p80的读过程如下图

可以分解为两个spi_ transfer一个是写命令,另一个是读数据。具体实现参见m25p80.c中的m25p80_read函数。下面内容摘取之此函数。
点击(此处)折叠或打开
struct spi_transfer t[2]; //定义了两个spi_transfer
struct spi_message m; //定义了两个spi_message
spi_message_init(&m); //初始化其transfers链表
t[0].tx_buf = flash->command;
t[0].len = CMD_SIZE + FAST_READ_DUMMY_BYTE; //定义第一个transfer的写指针和长度
spi_message_add_tail(&t[0], &m); //添加到spi_message
t[1].rx_buf = buf;
t[1].len = len; //定义第二个transfer的读指针和长度
spi_message_add_tail(&t[1], &m); //添加到spi_message
flash->command[0] = OPCODE_READ;
flash->command[1] = from >> 16;
flash->command[2] = from >> 8;
flash->command[3] = from; //初始化前面写buf的内容
spi_sync(flash->spi, &m); //调用spi_master发送spi_message
// spi_sync为同步方式发送,还可以用spi_async异步方式,那样的话,需要设置回调完成函数。
另外你也可以选择一些封装好的更容易使用的函数,这些函数可以在include/linux/spi/spi.h文件中找到,如:
extern int spi_write_then_read(struct spi_device *spi,
const u8 *txbuf, unsigned n_tx,
u8 *rxbuf, unsigned n_rx);
这篇博文就到这了,下篇给出一个针对m25p10完整的驱动程序。
Linux下spi驱动开发之m25p10驱动测试
目标:在华清远见的FS_S5PC100平台上编写一个简单的spi驱动模块,在probe阶段实现对m25p10的ID号探测、flash擦除、flash状态读取、flash写入、flash读取等操作。代码已经经过测试,运行于2.6.35内核。理解下面代码需要参照m25p10的芯片手册。其实下面的代码和处理器没有太大关系,这也是spi子系统的分层特点。
点击(此处)折叠或打开
#include
#include
#include
#include
#include
#include
#include
#include
#include
#define FLASH_PAGE_SIZE 256
/* Flash Operating Commands */
#define CMD_READ_ID 0x9f
#define CMD_WRITE_ENABLE 0x06
#define CMD_BULK_ERASE 0xc7
#define CMD_READ_BYTES 0x03
#define CMD_PAGE_PROGRAM 0x02
#define CMD_RDSR 0x05
/* Status Register bits. */
#define SR_WIP 1 /* Write in progress */
#define SR_WEL 2 /* Write enable latch */
/* ID Numbers */
#define MANUFACTURER_ID 0x20
#define DEVICE_ID 0x1120
/* Define max times to check status register before we give up. */
#define MAX_READY_WAIT_COUNT 100000
#define CMD_SZ 4
struct m25p10a {
struct spi_device *spi;
struct mutex lock;
char erase_opcode;
char cmd[ CMD_SZ ];
};
/*
* Internal Helper functions
*/
/*
* Read the status register, returning its value in the location
* Return the status register value.
* Returns negative if error occurred.
*/
static int read_sr(struct m25p10a *flash)
{
ssize_t retval;
u8 code = CMD_RDSR;
u8 val;
retval = spi_write_then_read(flash->spi, &code, 1, &val, 1);
if (retval < 0) {
dev_err(&flash->spi->dev, "error %d reading SR\n", (int) retval);
return retval;
}
return val;
}
/*
* Service routine to read status register until ready, or timeout occurs.
* Returns non-zero if error.
*/
static int wait_till_ready(struct m25p10a *flash)
{
int count;
int sr;
/* one chip guarantees max 5 msec wait here after page writes,
* but potentially three seconds (!) after page erase.
*/
for (count = 0; count < MAX_READY_WAIT_COUNT; count++) {
if ((sr = read_sr(flash)) < 0)
break;
else if (!(sr & SR_WIP))
return 0;
/* REVISIT sometimes sleeping would be best */
}
printk( "in (%s): count = %d\n", count );
return 1;
}
/*
* Set write enable latch with Write Enable command.
* Returns negative if error occurred.
*/
static inline int write_enable( struct m25p10a *flash )
{
flash->cmd[0] = CMD_WRITE_ENABLE;
return spi_write( flash->spi, flash->cmd, 1 );
}
/*
* Erase the whole flash memory
*
* Returns 0 if successful, non-zero otherwise.
*/
static int erase_chip( struct m25p10a *flash )
{
/* Wait until finished previous write command. */
if (wait_till_ready(flash))
return -1;
/* Send write enable, then erase commands. */
write_enable( flash );
flash->cmd[0] = CMD_BULK_ERASE;
return spi_write( flash->spi, flash->cmd, 1 );
}
/*
* Read an address range from the flash chip. The address range
* may be any size provided it is within the physical boundaries.
*/
static int m25p10a_read( struct m25p10a *flash, loff_t from, size_t len, char *buf )
{
int r_count = 0, i;
flash->cmd[0] = CMD_READ_BYTES;
flash->cmd[1] = from >> 16;
flash->cmd[2] = from >> 8;
flash->cmd[3] = from;
#if 1
struct spi_transfer st[2];
struct spi_message msg;
spi_message_init( &msg );
memset( st, 0, sizeof(st) );
flash->cmd[0] = CMD_READ_BYTES;
flash->cmd[1] = from >> 16;
flash->cmd[2] = from >> 8;
flash->cmd[3] = from;
st[ 0 ].tx_buf = flash->cmd;
st[ 0 ].len = CMD_SZ;
spi_message_add_tail( &st[0], &msg );
st[ 1 ].rx_buf = buf;
st[ 1 ].len = len;
spi_message_add_tail( &st[1], &msg );
mutex_lock( &flash->lock );
/* Wait until finished previous write command. */
if (wait_till_ready(flash)) {
mutex_unlock( &flash->lock );
return -1;
}
spi_sync( flash->spi, &msg );
r_count = msg.actual_length - CMD_SZ;
printk( "in (%s): read %d bytes\n", __func__, r_count );
for( i = 0; i < r_count; i++ ) {
printk( "0x%02x\n", buf[ i ] );
}
mutex_unlock( &flash->lock );
#endif
return 0;
}
/*
* Write an address range to the flash chip. Data must be written in
* FLASH_PAGE_SIZE chunks. The address range may be any size provided
* it is within the physical boundaries.
*/
static int m25p10a_write( struct m25p10a *flash, loff_t to, size_t len, const char *buf )
{
int w_count = 0, i, page_offset;
struct spi_transfer st[2];
struct spi_message msg;
#if 1
if (wait_till_ready(flash)) { //读状态,等待ready
mutex_unlock( &flash->lock );
return -1;
}
#endif
write_enable( flash ); //写使能
spi_message_init( &msg );
memset( st, 0, sizeof(st) );
flash->cmd[0] = CMD_PAGE_PROGRAM;
flash->cmd[1] = to >> 16;
flash->cmd[2] = to >> 8;
flash->cmd[3] = to;
st[ 0 ].tx_buf = flash->cmd;
st[ 0 ].len = CMD_SZ;
spi_message_add_tail( &st[0], &msg );
st[ 1 ].tx_buf = buf;
st[ 1 ].len = len;
spi_message_add_tail( &st[1], &msg );
mutex_lock( &flash->lock );
/* get offset address inside a page */
page_offset = to % FLASH_PAGE_SIZE;
/* do all the bytes fit onto one page? */
if( page_offset + len <= FLASH_PAGE_SIZE ) { // yes
st[ 1 ].len = len;
printk("%d, cmd = %d\n", st[ 1 ].len, *(char *)st[0].tx_buf);
//while(1)
{
spi_sync( flash->spi, &msg );
}
w_count = msg.actual_length - CMD_SZ;
}
else { // no
}
printk( "in (%s): write %d bytes to flash in total\n", __func__, w_count );
mutex_unlock( &flash->lock );
return 0;
}
static int check_id( struct m25p10a *flash )
{
char buf[10] = {0};
flash->cmd[0] = CMD_READ_ID;
spi_write_then_read( flash->spi, flash->cmd, 1, buf, 3 );
printk( "Manufacture ID: 0x%x\n", buf[0] );
printk( "Device ID: 0x%x\n", buf[1] | buf[2] << 8 );
return buf[2] << 16 | buf[1] << 8 | buf[0];
}
static int m25p10a_probe(struct spi_device *spi)
{
int ret = 0;
struct m25p10a *flash;
char buf[ 256 ];
printk( "%s was called\n", __func__ );
flash = kzalloc( sizeof(struct m25p10a), GFP_KERNEL );
if( !flash ) {
return -ENOMEM;
}
flash->spi = spi;
mutex_init( &flash->lock );
/* save flash as driver's private data */
spi_set_drvdata( spi, flash );
check_id( flash ); //读取ID
#if 1
ret = erase_chip( flash ); //擦除
if( ret < 0 ) {
printk( "erase the entirely chip failed\n" );
}
printk( "erase the whole chip done\n" );
memset( buf, 0x7, 256 );
m25p10a_write( flash, 0, 20, buf); //0地址写入20个7
memset( buf, 0, 256 );
m25p10a_read( flash, 0, 25, buf ); //0地址读出25个数
#endif
return 0;
}
static int m25p10a_remove(struct spi_device *spi)
{
return 0;
}
static struct spi_driver m25p10a_driver = {
.probe = m25p10a_probe,
.remove = m25p10a_remove,
.driver = {
.name = "m25p10a",
},
};
static int __init m25p10a_init(void)
{
return spi_register_driver(&m25p10a_driver);
}
static void __exit m25p10a_exit(void)
{
spi_unregister_driver(&m25p10a_driver);
}
module_init(m25p10a_init);
module_exit(m25p10a_exit);
MODULE_DESCRIPTION("m25p10a driver for FS_S5PC100");
MODULE_LICENSE("GPL");
例。
二、SPI总线协议简介
介绍驱动开发前,需要先熟悉下SPI通讯协议中的几个关键的地方,后面在编写驱动时,需要考虑相关因素。
SPI总线由MISO(串行数据输入)、MOSI(串行数据输出)、SCK(串行移位时钟)、CS(使能信号)4个信号线组成。如FS_S5PC100上的M25P10芯片接线为:

上图中M25P10的D脚为它的数据输入脚,Q为数据输出脚,C为时钟脚。
SPI常用四种数据传输模式,主要差别在于:输出串行同步时钟极性(CPOL)和相位(CPHA)可以进行配置。如果CPOL= 0,串行同步时钟的空闲状态为低电平;如果CPOL= 1,串行同步时钟的空闲状态为高电平。如果CPHA= 0,在串行同步时钟的前沿(上升或下降)数据被采样;如果CPHA = 1,在串行同步时钟的后沿(上升或下降)数据被采样。


这四种模式中究竟选择哪种模式取决于设备。如M25P10的手册中明确它可以支持的两种模式为:CPOL=0 CPHA=0 和 CPOL=1 CPHA=1

三、linux下SPI驱动开发
首先明确SPI驱动层次,如下图:

我们以上面的这个图为思路
1、 Platform bus
Platform bus对应的结构是platform_bus_type,这个内核开始就定义好的。我们不需要定义。
2、Platform_device
SPI控制器对应platform_device的定义方式,同样以S5PC100中的SPI控制器为例,参看arch/arm/plat-s5pc1xx/dev-spi.c文件
点击(此处)折叠或打开
struct platform_device s3c_device_spi0 = {
.name = "s3c64xx-spi", //名称,要和Platform_driver匹配
.id = 0, //第0个控制器,S5PC100中有3个控制器
.num_resources = ARRAY_SIZE(s5pc1xx_spi0_resource), //占用资源的种类
.resource = s5pc1xx_spi0_resource, //指向资源结构数组的指针
.dev = {
.dma_mask = &spi_dmamask, //dma寻址范围
.coherent_dma_mask = DMA_BIT_MASK(32), //可以通过关闭cache等措施保证一致性的dma寻址范围
.platform_data = &s5pc1xx_spi0_pdata, //特殊的平台数据,参看后文
},
};
static struct s3c64xx_spi_cntrlr_info s5pc1xx_spi0_pdata = {
.cfg_gpio = s5pc1xx_spi_cfg_gpio, //用于控制器管脚的IO配置
.fifo_lvl_mask = 0x7f,
.rx_lvl_offset = 13,
};
static int s5pc1xx_spi_cfg_gpio(struct platform_device *pdev)
{
switch (pdev->id) {
case 0:
s3c_gpio_cfgpin(S5PC1XX_GPB(0), S5PC1XX_GPB0_SPI_MISO0);
s3c_gpio_cfgpin(S5PC1XX_GPB(1), S5PC1XX_GPB1_SPI_CLK0);
s3c_gpio_cfgpin(S5PC1XX_GPB(2), S5PC1XX_GPB2_SPI_MOSI0);
s3c_gpio_setpull(S5PC1XX_GPB(0), S3C_GPIO_PULL_UP);
s3c_gpio_setpull(S5PC1XX_GPB(1), S3C_GPIO_PULL_UP);
s3c_gpio_setpull(S5PC1XX_GPB(2), S3C_GPIO_PULL_UP);
break;
case 1:
s3c_gpio_cfgpin(S5PC1XX_GPB(4), S5PC1XX_GPB4_SPI_MISO1);
s3c_gpio_cfgpin(S5PC1XX_GPB(5), S5PC1XX_GPB5_SPI_CLK1);
s3c_gpio_cfgpin(S5PC1XX_GPB(6), S5PC1XX_GPB6_SPI_MOSI1);
s3c_gpio_setpull(S5PC1XX_GPB(4), S3C_GPIO_PULL_UP);
s3c_gpio_setpull(S5PC1XX_GPB(5), S3C_GPIO_PULL_UP);
s3c_gpio_setpull(S5PC1XX_GPB(6), S3C_GPIO_PULL_UP);
break;
case 2:
s3c_gpio_cfgpin(S5PC1XX_GPG3(0), S5PC1XX_GPG3_0_SPI_CLK2);
s3c_gpio_cfgpin(S5PC1XX_GPG3(2), S5PC1XX_GPG3_2_SPI_MISO2);
s3c_gpio_cfgpin(S5PC1XX_GPG3(3), S5PC1XX_GPG3_3_SPI_MOSI2);
s3c_gpio_setpull(S5PC1XX_GPG3(0), S3C_GPIO_PULL_UP);
s3c_gpio_setpull(S5PC1XX_GPG3(2), S3C_GPIO_PULL_UP);
s3c_gpio_setpull(S5PC1XX_GPG3(3), S3C_GPIO_PULL_UP);
break;
default:
dev_err(&pdev->dev, "Invalid SPI Controller number!");
return -EINVAL;
}
3、Platform_driver
再看platform_driver,参看drivers/spi/spi_s3c64xx.c文件
点击(此处)折叠或打开
static struct platform_driver s3c64xx_spi_driver = {
.driver = {
.name = "s3c64xx-spi", //名称,和platform_device对应
.owner = THIS_MODULE,
},
.remove = s3c64xx_spi_remove,
.suspend = s3c64xx_spi_suspend,
.resume = s3c64xx_spi_resume,
};
platform_driver_probe(&s3c64xx_spi_driver, s3c64xx_spi_probe);//注册s3c64xx_spi_driver
和平台中注册的platform_device匹配后,调用s3c64xx_spi_probe。然后根据传入的platform_device参数,构建一个用于描述SPI控制器的结构体spi_master,并注册。spi_register_master(master)。后续注册的spi_device需要选定自己的spi_master,并利用spi_master提供的传输功能传输spi数据。
和I2C类似,SPI也有一个描述控制器的对象叫spi_master。其主要成员是主机控制器的序号(系统中可能存在多个SPI主机控制器)、片选数量、SPI模式和时钟设置用到的函数、数据传输用到的函数等。
点击(此处)折叠或打开
struct spi_master {
struct device dev;
s16 bus_num; //表示是SPI主机控制器的编号。由平台代码决定
u16 num_chipselect; //控制器支持的片选数量,即能支持多少个spi设备
int (*setup)(struct spi_device *spi); //针对设备设置SPI的工作时钟及数据传输模式等。在spi_add_device函数中调用。
int (*transfer)(struct spi_device *spi,
struct spi_message *mesg); //实现数据的双向传输,可能会睡眠
void (*cleanup)(struct spi_device *spi); //注销时调用
};
4、Spi bus
Spi总线对应的总线类型为spi_bus_type,在内核的drivers/spi/spi.c中定义
点击(此处)折叠或打开
struct bus_type spi_bus_type = {
.name = "spi",
.dev_attrs = spi_dev_attrs,
.match = spi_match_device,
.uevent = spi_uevent,
.suspend = spi_suspend,
.resume = spi_resume,
};
对应的匹配规则是(高版本中的匹配规则会稍有变化,引入了id_table,可以匹配多个spi设备名称):
点击(此处)折叠或打开
static int spi_match_device(struct device *dev, struct device_driver *drv)
{
const struct spi_device *spi = to_spi_device(dev);
return strcmp(spi->modalias, drv->name) == 0;
}
5、spi_device
下面该讲到spi_device的构建与注册了。spi_device对应的含义是挂接在spi总线上的一个设备,所以描述它的时候应该明确它自身的设备特性、传输要求、及挂接在哪个总线上。
点击(此处)折叠或打开
static struct spi_board_info s3c_spi_devs[] __initdata = {
{
.modalias = "m25p10",
.mode = SPI_MODE_0, //CPOL=0, CPHA=0 此处选择具体数据传输模式
.max_speed_hz = 10000000, //最大的spi时钟频率
/* Connected to SPI-0 as 1st Slave */
.bus_num = 0, //设备连接在spi控制器0上
.chip_select = 0, //片选线号,在S5PC100的控制器驱动中没有使用它作为片选的依据,而是选择了下文controller_data里的方法。
.controller_data = &smdk_spi0_csi[0],
},
};
static struct s3c64xx_spi_csinfo smdk_spi0_csi[] = {
[0] = {
.set_level = smdk_m25p10_cs_set_level,
.fb_delay = 0x3,
},
};
static void smdk_m25p10_cs_set_level(int high) //spi控制器会用这个方法设置cs
{
u32 val;
val = readl(S5PC1XX_GPBDAT);
if (high)
val |= (1<<3);
else
val &= ~(1<<3);
writel(val, S5PC1XX_GPBDAT);
}
spi_register_board_info(s3c_spi_devs, ARRAY_SIZE(s3c_spi_devs));//注册spi_board_info。这个代码会把spi_board_info注册要链表board_list上。
事实上上文提到的spi_master的注册会在spi_register_board_info之后,spi_master注册的过程中会调用scan_boardinfo扫描board_list,找到挂接在它上面的spi设备,然后创建并注册spi_device。
点击(此处)折叠或打开
static void scan_boardinfo(struct spi_master *master)
{
struct boardinfo *bi;
mutex_lock(&board_lock);
list_for_each_entry(bi, &board_list, list) {
struct spi_board_info *chip = bi->board_info;
unsigned n;
for (n = bi->n_board_info; n > 0; n--, chip++) {
if (chip->bus_num != master->bus_num)
continue;
/* NOTE: this relies on spi_new_device to
* issue diagnostics when given bogus inputs
*/
(void) spi_new_device(master, chip); //创建并注册了spi_device
}
}
mutex_unlock(&board_lock);
}
6、spi_driver
本文先以linux内核中的/driver/mtd/devices/m25p80.c驱动为参考。
点击(此处)折叠或打开
static struct spi_driver m25p80_driver = { //spi_driver的构建
.driver = {
.name = "m25p80",
.bus = &spi_bus_type,
.owner = THIS_MODULE,
},
.probe = m25p_probe,
.remove = __devexit_p(m25p_remove),
*/
};
spi_register_driver(&m25p80_driver);//spi driver的注册
在有匹配的spi device时,会调用m25p_probe
static int __devinit m25p_probe(struct spi_device *spi)
{
……
}
根据传入的spi_device参数,可以找到对应的spi_master。接下来就可以利用spi子系统为我们完成数据交互了。可以参看m25p80_read函数。要完成传输,先理解下面几个结构的含义:(这两个结构的定义及详细注释参见include/linux/spi/spi.h)
spi_message:描述一次完整的传输,即cs信号从高->底->高的传输
spi_transfer:多个spi_transfer够成一个spi_message
举例说明:m25p80的读过程如下图

可以分解为两个spi_ transfer一个是写命令,另一个是读数据。具体实现参见m25p80.c中的m25p80_read函数。下面内容摘取之此函数。
点击(此处)折叠或打开
struct spi_transfer t[2]; //定义了两个spi_transfer
struct spi_message m; //定义了两个spi_message
spi_message_init(&m); //初始化其transfers链表
t[0].tx_buf = flash->command;
t[0].len = CMD_SIZE + FAST_READ_DUMMY_BYTE; //定义第一个transfer的写指针和长度
spi_message_add_tail(&t[0], &m); //添加到spi_message
t[1].rx_buf = buf;
t[1].len = len; //定义第二个transfer的读指针和长度
spi_message_add_tail(&t[1], &m); //添加到spi_message
flash->command[0] = OPCODE_READ;
flash->command[1] = from >> 16;
flash->command[2] = from >> 8;
flash->command[3] = from; //初始化前面写buf的内容
spi_sync(flash->spi, &m); //调用spi_master发送spi_message
// spi_sync为同步方式发送,还可以用spi_async异步方式,那样的话,需要设置回调完成函数。
另外你也可以选择一些封装好的更容易使用的函数,这些函数可以在include/linux/spi/spi.h文件中找到,如:
extern int spi_write_then_read(struct spi_device *spi,
const u8 *txbuf, unsigned n_tx,
u8 *rxbuf, unsigned n_rx);
这篇博文就到这了,下篇给出一个针对m25p10完整的驱动程序。
Linux下spi驱动开发之m25p10驱动测试
目标:在华清远见的FS_S5PC100平台上编写一个简单的spi驱动模块,在probe阶段实现对m25p10的ID号探测、flash擦除、flash状态读取、flash写入、flash读取等操作。代码已经经过测试,运行于2.6.35内核。理解下面代码需要参照m25p10的芯片手册。其实下面的代码和处理器没有太大关系,这也是spi子系统的分层特点。
点击(此处)折叠或打开
#include
#include
#include
#include
#include
#include
#include
#include
#include
#define FLASH_PAGE_SIZE 256
/* Flash Operating Commands */
#define CMD_READ_ID 0x9f
#define CMD_WRITE_ENABLE 0x06
#define CMD_BULK_ERASE 0xc7
#define CMD_READ_BYTES 0x03
#define CMD_PAGE_PROGRAM 0x02
#define CMD_RDSR 0x05
/* Status Register bits. */
#define SR_WIP 1 /* Write in progress */
#define SR_WEL 2 /* Write enable latch */
/* ID Numbers */
#define MANUFACTURER_ID 0x20
#define DEVICE_ID 0x1120
/* Define max times to check status register before we give up. */
#define MAX_READY_WAIT_COUNT 100000
#define CMD_SZ 4
struct m25p10a {
struct spi_device *spi;
struct mutex lock;
char erase_opcode;
char cmd[ CMD_SZ ];
};
/*
* Internal Helper functions
*/
/*
* Read the status register, returning its value in the location
* Return the status register value.
* Returns negative if error occurred.
*/
static int read_sr(struct m25p10a *flash)
{
ssize_t retval;
u8 code = CMD_RDSR;
u8 val;
retval = spi_write_then_read(flash->spi, &code, 1, &val, 1);
if (retval < 0) {
dev_err(&flash->spi->dev, "error %d reading SR\n", (int) retval);
return retval;
}
return val;
}
/*
* Service routine to read status register until ready, or timeout occurs.
* Returns non-zero if error.
*/
static int wait_till_ready(struct m25p10a *flash)
{
int count;
int sr;
/* one chip guarantees max 5 msec wait here after page writes,
* but potentially three seconds (!) after page erase.
*/
for (count = 0; count < MAX_READY_WAIT_COUNT; count++) {
if ((sr = read_sr(flash)) < 0)
break;
else if (!(sr & SR_WIP))
return 0;
/* REVISIT sometimes sleeping would be best */
}
printk( "in (%s): count = %d\n", count );
return 1;
}
/*
* Set write enable latch with Write Enable command.
* Returns negative if error occurred.
*/
static inline int write_enable( struct m25p10a *flash )
{
flash->cmd[0] = CMD_WRITE_ENABLE;
return spi_write( flash->spi, flash->cmd, 1 );
}
/*
* Erase the whole flash memory
*
* Returns 0 if successful, non-zero otherwise.
*/
static int erase_chip( struct m25p10a *flash )
{
/* Wait until finished previous write command. */
if (wait_till_ready(flash))
return -1;
/* Send write enable, then erase commands. */
write_enable( flash );
flash->cmd[0] = CMD_BULK_ERASE;
return spi_write( flash->spi, flash->cmd, 1 );
}
/*
* Read an address range from the flash chip. The address range
* may be any size provided it is within the physical boundaries.
*/
static int m25p10a_read( struct m25p10a *flash, loff_t from, size_t len, char *buf )
{
int r_count = 0, i;
flash->cmd[0] = CMD_READ_BYTES;
flash->cmd[1] = from >> 16;
flash->cmd[2] = from >> 8;
flash->cmd[3] = from;
#if 1
struct spi_transfer st[2];
struct spi_message msg;
spi_message_init( &msg );
memset( st, 0, sizeof(st) );
flash->cmd[0] = CMD_READ_BYTES;
flash->cmd[1] = from >> 16;
flash->cmd[2] = from >> 8;
flash->cmd[3] = from;
st[ 0 ].tx_buf = flash->cmd;
st[ 0 ].len = CMD_SZ;
spi_message_add_tail( &st[0], &msg );
st[ 1 ].rx_buf = buf;
st[ 1 ].len = len;
spi_message_add_tail( &st[1], &msg );
mutex_lock( &flash->lock );
/* Wait until finished previous write command. */
if (wait_till_ready(flash)) {
mutex_unlock( &flash->lock );
return -1;
}
spi_sync( flash->spi, &msg );
r_count = msg.actual_length - CMD_SZ;
printk( "in (%s): read %d bytes\n", __func__, r_count );
for( i = 0; i < r_count; i++ ) {
printk( "0x%02x\n", buf[ i ] );
}
mutex_unlock( &flash->lock );
#endif
return 0;
}
/*
* Write an address range to the flash chip. Data must be written in
* FLASH_PAGE_SIZE chunks. The address range may be any size provided
* it is within the physical boundaries.
*/
static int m25p10a_write( struct m25p10a *flash, loff_t to, size_t len, const char *buf )
{
int w_count = 0, i, page_offset;
struct spi_transfer st[2];
struct spi_message msg;
#if 1
if (wait_till_ready(flash)) { //读状态,等待ready
mutex_unlock( &flash->lock );
return -1;
}
#endif
write_enable( flash ); //写使能
spi_message_init( &msg );
memset( st, 0, sizeof(st) );
flash->cmd[0] = CMD_PAGE_PROGRAM;
flash->cmd[1] = to >> 16;
flash->cmd[2] = to >> 8;
flash->cmd[3] = to;
st[ 0 ].tx_buf = flash->cmd;
st[ 0 ].len = CMD_SZ;
spi_message_add_tail( &st[0], &msg );
st[ 1 ].tx_buf = buf;
st[ 1 ].len = len;
spi_message_add_tail( &st[1], &msg );
mutex_lock( &flash->lock );
/* get offset address inside a page */
page_offset = to % FLASH_PAGE_SIZE;
/* do all the bytes fit onto one page? */
if( page_offset + len <= FLASH_PAGE_SIZE ) { // yes
st[ 1 ].len = len;
printk("%d, cmd = %d\n", st[ 1 ].len, *(char *)st[0].tx_buf);
//while(1)
{
spi_sync( flash->spi, &msg );
}
w_count = msg.actual_length - CMD_SZ;
}
else { // no
}
printk( "in (%s): write %d bytes to flash in total\n", __func__, w_count );
mutex_unlock( &flash->lock );
return 0;
}
static int check_id( struct m25p10a *flash )
{
char buf[10] = {0};
flash->cmd[0] = CMD_READ_ID;
spi_write_then_read( flash->spi, flash->cmd, 1, buf, 3 );
printk( "Manufacture ID: 0x%x\n", buf[0] );
printk( "Device ID: 0x%x\n", buf[1] | buf[2] << 8 );
return buf[2] << 16 | buf[1] << 8 | buf[0];
}
static int m25p10a_probe(struct spi_device *spi)
{
int ret = 0;
struct m25p10a *flash;
char buf[ 256 ];
printk( "%s was called\n", __func__ );
flash = kzalloc( sizeof(struct m25p10a), GFP_KERNEL );
if( !flash ) {
return -ENOMEM;
}
flash->spi = spi;
mutex_init( &flash->lock );
/* save flash as driver's private data */
spi_set_drvdata( spi, flash );
check_id( flash ); //读取ID
#if 1
ret = erase_chip( flash ); //擦除
if( ret < 0 ) {
printk( "erase the entirely chip failed\n" );
}
printk( "erase the whole chip done\n" );
memset( buf, 0x7, 256 );
m25p10a_write( flash, 0, 20, buf); //0地址写入20个7
memset( buf, 0, 256 );
m25p10a_read( flash, 0, 25, buf ); //0地址读出25个数
#endif
return 0;
}
static int m25p10a_remove(struct spi_device *spi)
{
return 0;
}
static struct spi_driver m25p10a_driver = {
.probe = m25p10a_probe,
.remove = m25p10a_remove,
.driver = {
.name = "m25p10a",
},
};
static int __init m25p10a_init(void)
{
return spi_register_driver(&m25p10a_driver);
}
static void __exit m25p10a_exit(void)
{
spi_unregister_driver(&m25p10a_driver);
}
module_init(m25p10a_init);
module_exit(m25p10a_exit);
MODULE_DESCRIPTION("m25p10a driver for FS_S5PC100");
MODULE_LICENSE("GPL");
 电子发烧友App









评论