01第一节 知识点
我们通过定时器0的讲解来实现多个定时器的定时功能。
(1)Timer0 模块具有以下特征:
• 可通过软件选择,作为8 位或16 位定时器/ 计数器
• 可读写的寄存器
• 专用的8 位软件可编程预分频器
• 可选的时钟源(内部或外部)
• 外部时钟的边沿选择
• 溢出中断
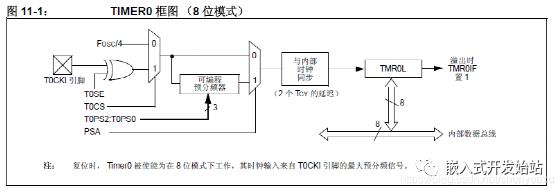
(2)TImer0工作原理
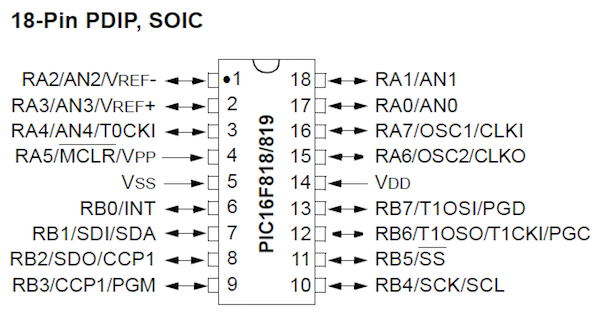
Timer0 既可用作定时器亦可用作计数器;具体的模式由TOCS 位(T0CON<5>)选择。在定时器模式下(T0CS = 0),除非选择了不同的预分频值,否则,默认情况下在每个时钟周期该模块的计时都会递增(见第11.3 节“预分频器”)。如果写入TMR0 寄存器,那么在随后的两个指令周期内,计时将不再递增。用户可通过将校正后的值写入TMR0 寄存器来解决上述问题。通过将T0CS 位置1 选择计数器模式。在计数器模式下, Timer0 可在RA4/T0CKI 引脚信号的每个上升沿或下降沿递增。触发递增的边沿由Timer0 时钟源边沿选择位T0SE (T0CON<4>)决定。清零此位选择上升沿递增。下面讨论外部时钟输入的限制条件。可以使用外部时钟源来驱动Timer0。但是必须确保外部时钟与内部时(TOSC)相位同步。在同步之后,定时器/ 计数器仍需要一定的延时才会引发递增操作。
(3) 中断
当TMR0 寄存器发生溢出时(8 位模式下,从FFh 到00h ;或16 位模式下,从FFFFh 到0000h),将产生TMR0 中断。这种溢出会将标志位TMR0IF 置1。可以通过清零TMR0IE 位(INTCON<5>)来屏蔽此中断。在重新允许该中断前,必须在中断服务程序中用软件清
零TMR0IF 位。由于Timer0 在休眠模式下是关闭的,所以TMR0 中断无法将处理器从休眠状态唤醒。
(4) 定时器的时钟选择内部FOSC/4;
定时器的初值为0的话,8位模式, 一次中断的时间为(1/(FOSC/4)256; 如果定时1s 中断的计数值为n=1/((1/(FOSC/4)256);
eg: FOSC=40MHz 1s定时n=39063
02第二节 软件设计
我们新建一个关于定时器的头文件和一个源文件
(1) timer_config.h
/*
* File:   timer_config.h
* Author:  Greg
* Comments: 定时器的配置和初始化程序
* Revision history: version 1.1
*/


// This is a guard condition so that contents of this file are not included
// more than once.
#ifndef _TIMER_CONFIG_H_
#define           _TIMER_CONFIG_H_


#include // include processor files - each processor file is guarded.
extern unsigned int timer0num=0;
extern unsigned int timer1num=0;
extern unsigned int timer2num=0;
void timer0_config_init(void);
void tiner1_config_init(void);
void timer2_config_init(void);
void timer3_config_init(void);
#endif           /* _TIMER_CONFIG_H_ */
(2)timer_config.c
#include "timer_config.h"
void timer0_config_init(void)
{   //没有预分频,可以预分频
    TMR0ON=1; // enable timer0
    T08BIT=1; // 8bit model
    T0CS=0; //clock is selected by internal clko
    PSA=1; // 未经分频器
    // 中断timer0 使能
    TMR0IE=0; // timer0 允许中断
    TMR0IF=0; // 中断标志位清零
    TMR0L=0;  // 初值为0
}
void tiner1_config_init(void)
{   //没有预分频,可以预分频
    T1CONbits.RD16=1;// 16位操作
    T1RUN=0;// 时钟由时钟源产生
    T1OSCEN=0;
    TMR1CS=0;// 内部时钟 Fosc/4
    TMR1ON=1;// timer1 使能
    TMR1IE=0;// timer1 允许中断
    TMR1IF=0;
    TMR1=0;  //timer1 初值

}
void timer2_config_init(void)
{
    T2CONbits.TMR2ON=1;// timer2使能
    T2CONbits.T2CKPS=0b00; //预分频值为1
    T2CONbits.T2OUTPS=0b0000; //timer2输出后分频为1
    TMR2=0; //timer2 初值W为0;
    PR2=0xFF;// tiner2 周期寄存器的值设置为256;TMR2的值和PR2的值相等时是TMR2IF为1;
    TMR2IE=0;// timer2允许中断
    TMR2IF=0;
}


void timer3_config_init(void)
{
    T3CONbits.RD16=1;// 16位操作
    T3CONbits.T3CKPS=0b00;// 预分频
    T3CONbits.T3SYNC=1;// 不与外部时钟同步
    T3CONbits.TMR3CS=0;// 内部时钟
    T3CONbits.TMR3ON=1;//  timer3使能
    TMR3=0;  //timer3 初值
    TMR3IE=1;// timer3允许中断
    TMR3IF=0;
}
再新建两个关于中断的头文件和源文件
(3)inrt_config.h
// This is a guard condition so that contents of this file are not included
// more than once.
#ifndef _INRT_CONFIG_H_
#define           _INRT_CONFIG_H_


#include // include processor files - each processor file is guarded.
#include "usart_dr.h"
void interrupt_config_init(void);
// 高级优先级中断服务子程序 声明
void interrupt high_priority inrt_isr_high(void);
//低级中断服务子程序 声明
void interrupt low_priority inrt_isr_low(void);


#endif           /* _INRT_CONFIG_H_ */
(4)inrt_config.c
#include"timer_config.h"
#include "inrt_config.h"
void interrupt_config_init(void)
{
    INTCONbits.GIE=1;//允许全局中断
    INTCONbits.PEIE=1;// 允许外设中断
    RCONbits.IPEN=1;  // 中断优先级使能位
    RCIE=1;  //USART中断使能
    RCIP=1; // USART中断优先级高
    RCIF=0;
    TMR0IP=1;// timer0 设置为高级优先中断
    TMR1IP=1; //timer1 设置为高级优先级中断
    TMR2IP=1; //timer2 设置为高级优先级中断
    TMR3IP=1; //timer3 设置为高级优先级中断
}
// 高级优先级中断服务子程序
void interrupt high_priority inrt_isr_high(void)
{    //usart 服务
    if(RCIF&&RCIE)
    {
        RCIF=0; // 必须先清楚RC中断标志位
        usart_send_byte(RCREG);
    }
    //timer 0 服务
    if(TMR0IE&&TMR0IF)
    {
        TMR0IF=0;
        timer0num++;
            if(timer0num==39063)
            {
                usart_send_string("timer0 is count for 1s!rtn");
                timer0num=0;
            }
    }
    //timer 1 服务
    if(TMR1IE&&TMR1IF)
    {   // 在这里定时器的初值在初始化设置为0,因此不需要再赋初值
        TMR1IF=0;
        timer1num++;
        if(timer1num==305) //16bits
        {
            usart_send_string("timer1 is count for 2s!rtn");
            timer1num=0;
        }
    }
    if(TMR2IE&&TMR2IF)
    {   // 在这里定时器的初值在初始化设置为0,因此不需要再赋初值
        TMR2IF=0;
        timer2num++;
        if(timer2num==39063)
        {
            usart_send_string("timer2 is count for 1s!rtn");
            timer2num=0;
        }
    }
    //timer3 服务
    if(TMR3IE&&TMR3IF)
    {   // 在这里定时器的初值在初始化设置为0,因此不需要再赋初值
        TMR3IF=0;
        timer1num++;
        if(timer1num==458)//3s 16bits
        {
            usart_send_string("timer3 is count for 3s!rtn");
            timer1num=0;
        }
    }
}
// 低级中断服务程序由此处书写
void interrupt low_priority inrt_isr_low(void)
{
   ;
}
现在具体的定时器和中断的配置已经完成了,我们在主函数中使用:
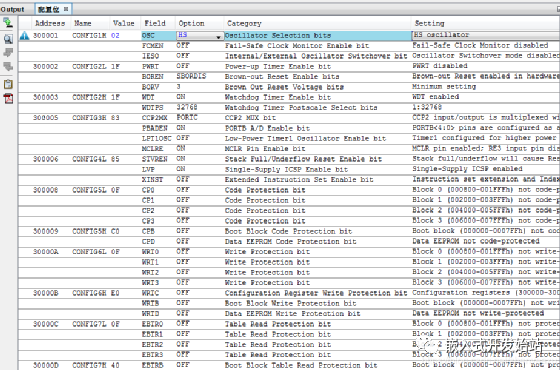
注意:我们配置字没有修改,默认前期教程的。
#include "usart_dr.h"
#include "inrt_config.h"
#include "timer_config.h"
//#include"plib/adc.h"
//#include "delays.h"
int main(void)
{
    usart_port_dir_init();
    usart_Config_init();
    interrupt_config_init();
    timer0_config_init();
    tiner1_config_init();
    timer2_config_init();
    timer3_config_init();
    usart_send_string("I love you!");

    while(1)
    {

    }
     return 0;

}
下载到开发板中测试吧,我已经测试过没有问题。
 电子发烧友App






评论